Everybot Edge User Manual
Hide thumbs
Also See for Edge:
- Quick start manual (24 pages) ,
- Quick manual (2 pages) ,
- Quick manual (2 pages)
Advertisement
Table of Contents
- 1 Table of Contents
- 2 Safety Information
- 3 Parts Name & Product Component
- 4 Charging Status and Indication
- 5 Installing Water Supply Mop Kit
- 6 Water Supply Mop Kit & Mop Maintenance
- 7 Cleaning Operation & Remote Control
- 8 Cleaning Modes
- 9 Handy Cleaning Mode & Product
- 10 LED Indications
- 11 Troubleshooting
- 12 Product Specifications
- 13 Product Warranty
- Download this manual
Ver 1.0 Copyright © 2019 Everybot Inc. All rights reserved
EDGE
User Manual
Please carefully read this manual before
operate the machine. This manual includes
Warranty card so please keep it well a er reviewing.
This machine is only allowed for home use.
Please do not use for industrial or commercial
purpose. Please fully charge the battery before of
first operation. EVERYBOT Inc. assumes no
responsibility for technical or editorial errors or
omissions contained herein, nor for any incidental or
consequential damages and failures of appliance
caused by not following the precautions and
instructions.
Contents
Maintenance
2
4
6
7
8
9
10
11
12
13
14
15
Advertisement
Table of Contents

Subscribe to Our Youtube Channel
Related Manuals for Everybot Edge


Summary of Contents for Everybot Edge
-
Page 1: Table Of Contents
Ver 1.0 Copyright © 2019 Everybot Inc. All rights reserved EDGE User Manual Contents Please carefully read this manual before Safety Information operate the machine. This manual includes Parts Name & Product Component Warranty card so please keep it well a er reviewing. -
Page 2: Safety Information
This contents below are important notifications that contain for using the machine correctly and preventing unpredictable damage or danger for users. EVERYBOT Inc. assumes no responsibility for technical or editorial errors or omissions contained herein, nor for any incidental or consequential damages and failures of appliance caused by not following the precautions and instructions. - Page 3 Cautions ■ Before using the robot cleaner, remove objects. (fragile objects, valuables, pet litter, cables, long strings, etc.) from the floor. ■ Do not soak the robot cleaner in water or spray oil on it. ■ Do not kick the robot cleaner or apply strong impact. ■...
-
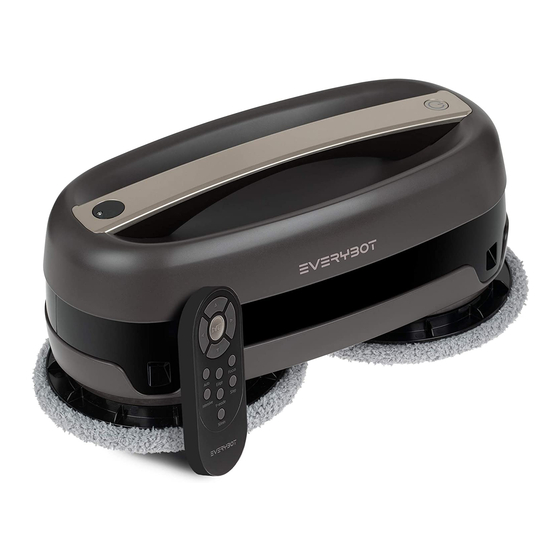
Page 4: Parts Name & Product Component
Parts Name & Product Component Components Main Unit Water Supply Mop Kit Mother Yarn Mop Microfiber Mop ( Grey Color ) ( Green Color ) Remote Control Power Adaptor Silicon Brush ( with Battery ) Mother yarn mop (Grey color) Microfiber yarn (Green color) It is included with mother yarn which It is a mop with richer and longer... - Page 5 Main Unit Front Illumination sensor/Remote control receiver Handle Operation button/ LED lamp Obstacle detection sensor Cli detection sensor Main Unit Bottom Main Unit Rear Power jack Mop guide kit Mop guide kit set screw Water Supply Mop Kit Water Supply Mop Kit Bottom Mop Velcro Rubber cap...
-
Page 6: Charging Status And Indication
Charging Status & Indication Do not use unauthorized adaptors. It may cause serious damage for the product. Cautions How to Charge Connect the power adaptor to the charging port on the back of main unit. Battery Level Indication Battery level can be checked through LED lamp. Yellow Low battery Blinking... -
Page 7: Installing Water Supply Mop Kit
Installing Water Supply Mop Kit · Please turn o the main power when you install or detach water supply mop kits. · Please tightly squeeze out water the mother yarn mops before attaching, Cautions otherwise the cleaning speed may slower down. How to Install Water Supply Mop Kit Wet mops throughly in water Attach the mop pads to fit the... -
Page 8: Water Supply Mop Kit & Mop Maintenance
Water Supply Mop Kit & Mop Maintenance Washing Mops You can use included silicon brush for easier mop washing. Wet mops enough. Use a natural detergent Squeeze out water and for washing mops. dry them under the sun light. Maintaining Water Supply Mop Kits Separate the mop from the water tank Open the rubber cap to dry out inside of mop kit a er finished operating. -
Page 9: Cleaning Operation & Remote Control
Start the auto cleaning or When the main unit stops, the unit can stop the cleaning mode. be controlled with direction buttons. Edge Cleaning Auto Cleaning Focuses to clean corners and E ectively cleans the whole area edges of floor. -
Page 10: Cleaning Modes
Cleaning Modes Select a cleaning mode you want by using the remote control. Note Auto Cleaning Edge Cleaning Focus Cleaning As a basic cleaning mode, Focuses to clean corners and Intensively cleans the surrounding cleans the entire space e ciently edges of floor... -
Page 11: Handy Cleaning Mode & Product
Handy Cleaning Mode & Product Maintenance · User can clean manually by holding the handle of the main unit. Note · This mode is good to clean desks, tables, glass floors, and glass windows. How to Use Handy Cleaning Mode Li up the machine with handle and Handy cleaning starts with the mop guide press Operation button twice shortly. -
Page 12: Led Indications
LED Indications Description of LED Lamp When Using · Blue Change mops, and fill water in the water supply Blinking mop kit and start the cleaning again. Blue · Recharge the battery. Yellow * If the battery is low while cleaning a dark place, the unit Yellow moves out to a bright place and stops its operating ·... -
Page 13: Troubleshooting
Troubleshooting The power is not turned on. · Check if the battery is discharged. · Recharge the battery fully and start the main unit again. The main unit does not charge. · Check if the power adaptor complies with the specifications. ·... -
Page 14: Product Specifications
Product Specifications Main Unit 165mm 136mm 327mm Product Name Electric Floor Sweeper (Floor Mopping Robot Cleaner) Model Name Power Consumption 27 Wh Edge Size Weight W327 x D165 x H136 mm 1.6 kg Power Battery Li-ion 11.1VDC, 2150mA AC100-240V, 50/60Hz... -
Page 15: Product Warranty
The Warranty Service we provide to our consumers is based on the customer compensation regulation. If you request warranty service, Everybot will provied the sevice. The company will notify the customer of whether he or she will be compensated and the details of the...
Need help?
Do you have a question about the Edge and is the answer not in the manual?
Questions and answers
Reset everybot three spin