
Related Manuals for Climax FF3000


Summary of Contents for Climax FF3000
- Page 1 FF3000 FLANGE FACER OPERATING MANUAL MACHINE SERIAL RANGE: 11017900- ORIGINAL INSTRUCTIONS P/N 35426 May 2019 Revision 3...
- Page 3 CLIMAX. CLIMAX hereby grants permission to download a single copy of this manual and of any revision hereto onto an electronic storage medium to be viewed and to...
- Page 4 CLIMAX GLOBAL LOCATIONS Page B FF3000 Operating Manual...
- Page 5 CLIMAX warrants that all parts are free from defects in materials and workmanship, and that all labor has been performed properly. This warranty is available to the customer purchasing parts or labor for a period of 90 days after delivery of the part or repaired machine or 180 days on used machines and components.
- Page 6 CE DOCUMENTATION Page D FF3000 Operating Manual...
-
Page 7: Table Of Contents
Table of Contents Contents CE ..............................1 Safety Guidelines ........................... 2 Machine Specific Safety ......................... 3 Labeling Guidelines ........................4 Risk assessment and hazard mitigation ..................5 Risk assessment checklist ......................6 Machine Lock-Out ........................7 Introduction ............................ 8 About this manual ........................9 Check the machine when you receive it .................. - Page 8 This page is intentionally left blank Page F FF3000 Operating Manual...
- Page 9 Recommended air pressure: 90 psi (DO NOT EXCEED 120 psi) 89 dB(A) – Hearing protection required Noise level: Sound Power Level: 88.8 dB(A) (Pneumatic) Operator Sound Pressure Level: 86.0 dB(A) (Pneumatic) Bystander Sound Pressure Level: 83.4 dB(A) (Pneumatic) P/N 59035 Labels on the Machine P/N 34734 Weight = Approx.
-
Page 10: Safety Guidelines
The primary challenge for most on-site maintenance is that repairs are often done under difficult conditions. CLIMAX leads the way in promoting the safe use of portable machine tools. Safety is a joint effort. As the operator of this machine, you are expected to do your part by scrutinizing the job site and closely following the operating procedures outlined in this manual, your own company rules, and local regulations. -
Page 11: Machine Specific Safety
Most of the machine components are heavy and must be the machine or parts are damaged, have the machine repaired moved or lifted with approved rigging and practices. CLIMAX before use. accepts no responsibility for the selection of lifting equipment. -
Page 12: Labeling Guidelines
IMPORTANT Provides critical information for the completion of a task. There is no associated hazard to people or the machine. Provides important information regarding the machine. Page 4 FF3000 Operating Manual... -
Page 13: Risk Assessment And Hazard Mitigation
Risk assessment and hazard mitigation Machine Tools are specifically designed to perform precise material-removal operations. Stationary Machine Tools include lathes and milling machines and are typically found in a machine shop. They are mounted in a fixed location during operation and are considered to be a complete, self- contained machine. -
Page 14: Risk Assessment Checklist
I checked that all affected personnel understand the danger zone and are clear of it. I evaluated and mitigated any other potential risks specific to my work area. Page 6 FF3000 Operating Manual... -
Page 15: Machine Lock-Out
Machine Lock-Out Air shutoff in the operating position (UP) To lockout the machine, Push down on the lockout and insert locks into the openings at the bottom of the air shutoff on the air intake side of the pneumatic conditioning unit. Recommended air pressure: 90 psi (DO NOT EXCEED 120 psi) P/N 35426, Rev. -
Page 16: Introduction
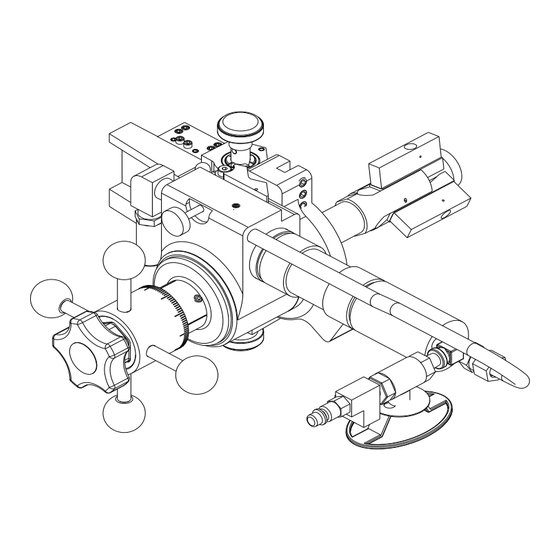
Introduction The Model FF3000 is a right-angled machining tool designed for facing flanges from 1.85 to 12.0 inches diameter (47 to 304.80 mm). Also, for beveling, squaring, counter boring, and cutting welding prep configurations on tube and pipe. An internal, expanding clamping chuck grips inside diameters from 1.50 to 6.75 inches (38.10 to 171.45 mm) with interchangeable jaw sets. -
Page 17: About This Manual
Working machinery can cause serious injury. Understand all instructions before operating this machine. This manual describes how to use your Model FF3000 flange facing/pipe beveling machine. All parts meet CLIMAX’s strict quality standards. For maximum safety and performance, read the entire instruction manual before operating the machine. -
Page 18: Precision Instruments
In cases where precision machining and alignment is required, these additional items may be useful: Dial/digital slide calipers ID spring and/or dial calipers Precision level Micrometers Dial indicator Page 10 FF3000 Operating Manual... -
Page 19: Machine Setup
Machine Setup WARNING Avoid bodily injury from working machinery. Turn off and disconnect the air supply hose before machine setup. Assemble and install tool head Make sure the ramps in the clamping chuck are fully retracted before sliding a tool head over them. Install a tool head (beveling or facing), with the arrow-side facing away from the main body. -
Page 20: Selecting And Setting Tool Bits
3. With each bit in position, tighten the setscrews securely. When a land is required on the work piece, use a facing bit in combination with the beveling bit. The FF3000 beveling head can plunge cut, but does not feed in a radial direction. -
Page 21: Mount The Machine In The Work Piece
Mount the machine in the work piece 1. Turn the draw rod star-shaped knob counterclockwise, drawing the clamp blades back inward. CAUTION To prevent damaging the clamp blades when cutting, be sure the machine is mounted far enough inside the work piece to clear the cutters. -
Page 22: Power Connection
3. Make sure the ball valve is turned off. The ball valve is closed when the handle is perpendicular with the air line. 4. Connect the air supply line from the pneumatic conditioning unit to the machine using quick disconnect fittings. Page 14 FF3000 Operating Manual... -
Page 23: Starting And Stopping The Machine
Starting and stopping the machine The FF3000 has a .79 hp air motor and a ball valve. Adjust the motor speed by opening or closing the ball valve. Air line connections should be made with nonrestrictive air line fittings. Starting the machine... -
Page 24: Operation
3. Position the facing head cutting depth using the feed handle. Lightly tighten the three setscrews under the feed handle to stabilize the mandrel, reducing the chance of chatter. Tightening these screws locks the facing head axial positioning. Page 16 FF3000 Operating Manual... -
Page 25: Facing Feed Direction
Facing feed direction The facing head feeds automatically in either direction. It uses a set of internal one-way clutches to drive a pinion feed shaft along d i r the rack. After pushing the feed shaft in on one side or the other, t i o the machine will feed in the direction of the arrow engraved on the side of the head. -
Page 26: Beveling
5. Change chuck blades if required. CAUTION To prevent damaging the clamp blades when cutting, be sure the machine is mounted far enough inside the work piece to clear the cutters. Page 18 FF3000 Operating Manual... - Page 27 Feed rate Tighten Push and turn for Loosen final tightening Draw rod knob 6. Install the machine in the pipe/tube end and turn the draw rod knob clockwise to spread the clamp blades inside the bore. 7. To center and secure the machine in the tube/pipe, gently work the tool back and forth while tightening the draw rod knob (clockwise).
-
Page 28: Disassembly
2. Back off the tool head so the tool bits clear the work piece by 1/4" to 1/2". 3. Loosen the draw rod knob by turning it counterclockwise and gently rock the tool to loosen the clamping chuck. Remove the machine from the work piece. Page 20 FF3000 Operating Manual... -
Page 29: Maintenance
Excessive gear wear can be evident as backlash at the tool head. Call CLIMAX for recommended action. Air motor and pneumatic conditioning unit To sustain the life of the air motor: ... - Page 30 It is important that the chuck clamping mechanism and components remain free from dirt and corrosion. Do not drop, hit, or otherwise abuse your FF3000 flange facing/pipe-beveling machine. Do not use dull tool bits or force-feed into the work piece. If...
-
Page 31: Troubleshooting
Troubleshooting The FF3000 has few field serviceable parts. Contact the factory for any repairs or adjustments beyond those listed here. Symptom Probable cause Remedy Be sure pressure is 90 psi Air supply limited or (620 kPa), Check for crimped blocked... -
Page 32: Exploded View Drawings And Parts Lists
Exploded View Drawings and Parts Lists FF3000 BALLOON NO PART DESCRIPTION 36833 BASE UNIT FF3000 35428 ASSY CHUCK HEAD FF3000 35702 SET BLADES 1.89-2.35 ID 35703 SET BLADES 2.30-2.76 ID 35704 SET BLADES 2.71-3.17 ID 35705 SET BLADES 3.12-3.58 ID 35706 SET BLADES 3.53-3.99 ID... - Page 33 P/N 35426, Rev. 3 Page 25...
- Page 34 35686 ASSY MAIN BODY FF3000 BALLOON No PART DESCRIPTION 13530 RING SNAP 5/8 ID 34979 SLEEVE .315 HEX X .63 OD 34965 MANDREL FF3000 35650 BUSHING OILITE 1-1/4 ID X 1-1/2 OD X 1.0 34702 SPINDLE MAIN DRIVE FF3000 34986...
- Page 35 P/N 35426, Rev. 3 Page 27...
- Page 36 35687 ASSY DRIVE PNEUMATIC FF3000 BALLOON No PART DESCRIPTION 35383 MOTOR AIR .79 HP 465 RPM FREE 232 RPM MAX 35692 FTG ELBOW 1/2 NPTM X 1/2 NPTF ST 90 DEG BRASS 35693 MUFFLER AIR 1/2 NPTM MINI-EXHAUST 35881 TUBE AIR COOL FF3000...
- Page 37 35428 ASSY CHUCK HEAD FF3000 BALLOON No PART DESCRIPTION 34969 CHUCK FF3000 34971 RAMP CHUCK REGULAR 36723 CAP CHUCK REGULAR 36681 SCREW 3/16 DIA X 3/8 SHLDCS LP HEAD 36046 PIN ROLL 3/32 DIA X 3/16 36722 BOLT CHUCK FF3000 P/N 35426, Rev.
- Page 38 Page 30 FF3000 Operating Manual...
- Page 39 34980 ASSY HEAD BEVELING 1.25-6.63 DIA BALLOON No PART DESCRIPTION 35557 HEAD BEVELING 1.25-7.00 DIA 35368 SCREW M10 X 1.5 X 12 SSSCP 11027 PIN DOWEL 3/8 DIA X 1 NOT SHOWN 35541 SET STARTER FORM TOOLS ASSY HEAD BEVELING 1.25 - 7.00 DIA - 34980 P/N 35426, Rev.
- Page 40 This page is intentionally left blank Page 32 FF3000 Operating Manual...
Need help?
Do you have a question about the FF3000 and is the answer not in the manual?
Questions and answers