
Subscribe to Our Youtube Channel
Related Manuals for Pentair Pool Products IntelliFlo Pump Demo Kiosk


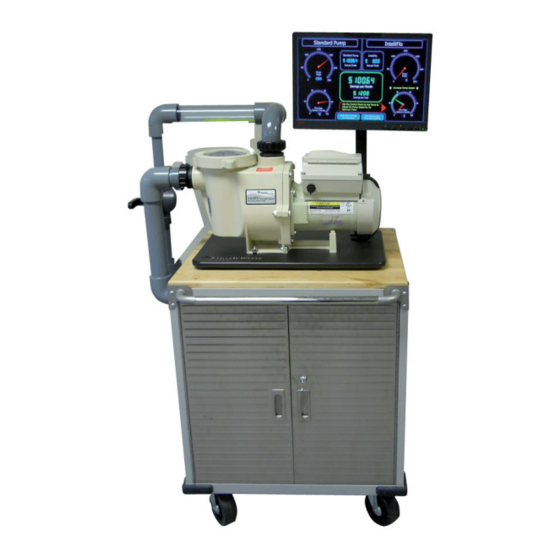
Summary of Contents for Pentair Pool Products IntelliFlo Pump Demo Kiosk
- Page 1 IntelliFlo Pump Demo Kiosk ® Operation and Set Up Instructions Pre-Installed Live Pump Demo...
- Page 2 ® Technical Support for IntelliFlo Operation Demo Kiosk Technical Support If you have questions about Pentair Water Pool and Spa For questions about the demo kiosk set up or for (“Pentair”) IntelliFlo pump operation, please use the following ® additional copies of this manual, please use the follow- contact information: ing contact information: Sanford, North Carolina (8 A.M.
-
Page 3: Table Of Contents
Table of Contents Important Warning and Safety Instructions LCD Monitor Shipping Contents ..........Connecting Laptop Computer Quick Reference Guide: Connection Diagram Setting up Wireless Mouse Cabinet Set Up ............ Pressure Tube Set (Optional) Front Handle Installation Finished Demo Unit Start Up and Operation ........Base Cabinet and Pump Module Assembly Connecting Pump to Power Supply Water Fill and Priming... -
Page 4: Quick Reference Guide: Connection Diagram
Quick Reference Guide: Connection Diagram Suction IntelliFlo Pump Demo Kiosk Operation and Set-Up Instructions ®... -
Page 5: Cabinet Set Up
Cabinet Set Up Base Cabinet and Pump Module Assembly Unpack the cabinet and place close to the designated final location. Be sure to leave room for the front door to open and close for normal service access. The following items come installed in the cabinet: • Cabinet cooling fan • DAQ-202 “BLACK BOX”... -
Page 6: Installing The Piping
Installing the Piping Installing Gray PVC Piping (Outside Cabinet) Suction Section 1. Before installing, find the gray gasket and install into the pipe flange. 2. Place the lower end of the Pipe into Hole #1. 3. Connect to the front threaded union adapter of the pump. TIP: Be sure flanges of union and... -
Page 7: White Pvc Suction And Discharge
Installing White PVC Piping (Inside Cabinet) Discharge Foot Section 1. Install the lower end through the corresponding 2” Diameter opening in the top water tub by feeding the leg down through the top lid openings. 2. Install the large white diffuser onto the bottom end of the pipe. Suction Foot Section 1. -
Page 8: Installing Electronics Equipment
Installing the Electronics Equipment Suction IntelliFlo Pump Demo Kiosk Operation and Set-Up Instructions ®... -
Page 9: 120V/240V A/C Transformer
120V/240V A/C Step-Up Transformer The kiosk transformer should be the only equipment connected to the outside of the kiosk. It should connect to a 20 amp circuit. 1. Be sure the voltage “tap-plug” selector to the 110V on the back of the transformer voltage is in the 110V position. 2. -
Page 10: Lcd Monitor
LCD Monitor 1. Connect the monitor power cord and video cable, as shown in the picture below. 2. Use the (2) supplied Velcro straps to route the wires along the monitor stand and down into the top of the cabinet. 3. -
Page 11: Pressure Tube Set (Optional)
Pressure Tube Set (Included with optional Pressure Sensor Unit) 1. Install the tube ends into the corresponding marked connections (orange flanged adapters) on the pressure sensor box, as shown below. 2. Route the pressure tube quick disconnect ends through the opening in the cabinet divider wall and up through the pump board. -
Page 12: Start Up And Operation
Start Up and Operation Water Fill and Priming DO NOT ADD ADDITIONAL WATER AFTER THE INITIAL START-UP. Water in pipes could drain downward and cause an overflow into the water tub and cabinet. 1. Be sure the Flow Valve on discharge piping is OPEN (lever 90°... -
Page 13: Purging Pressure Sensing Hoses
Purging the Pressure Sensing Hoses (If pressure sensor box is installed) 1. Disconnect the high pressure (RED) tube to vent air out of line (use lower pump speed while bleeding the line). 2. Disconnect the low pressure (BLUE) tube, allowing air to flow though tube until dry (about 15 seconds). Computer Program Operation The computer shipped with this Kiosk Demo Unit has pre-installed software. -
Page 14: Using The Computer Program
Using the Program, Continued 3. Click on the Cost Comparison Calculator tab to view operating cost scenarios. The screen will show the energy savings for a Standard vs. IntelliFlo Variable Speed pump using the default values. 4. To input your savings scenario, click “Click Here to Change Pool Description” and follow the on-screen instructions to customize your data. - Page 15 5. The screen will show the energy savings for a Standard vs. IntelliFlo Variable Speed pump. Adjust the IntelliFlo pump speed until the flow rate needle is in the green “Optimum Pump Speed” zone - indicating an ideal flow rate for a 12 hour turn on the selected pool size.
-
Page 16: Troubleshooting
Troubleshooting Pump Operation Diffusers on feet, inside water bucket, must rest fl at in tub to prevent stress on unions and possible leakage. • When pump is running at very high speeds, water may splash excessively, especially during priming (to purge air •...
Need help?
Do you have a question about the IntelliFlo Pump Demo Kiosk and is the answer not in the manual?
Questions and answers