Advertisement
Advertisement

Subscribe to Our Youtube Channel
Summary of Contents for Ssl 2+
- Page 1 SSL 2+ User Guide SSL 2+...
- Page 2 ® registered trademarks of Solid State Logic. ® ® SSL 2+™ is a trademark of Solid State Logic. All other product names and trademarks are the property of their respective owners and are hereby acknowledged. Pro Tools is a registered trademark of Avid ®...
-
Page 3: Introduction To Ssl
We know you’re probably keen to get up-and-running, so this User Guide is set out to be as informative and useful as possible. It should provide you with a solid reference for how to get the best out of your SSL 2+. If you get stuck, don’t worry, the support section of our website is full of useful resources to get you going again. -
Page 4: Table Of Contents
System Requirements Registering Your SSL 2+ What is the SSL Production Pack? Quick-Start / Installation Can't Hear Anything? Selecting SSL 2+ As Your DAW's Audio Device Pro Tools | First Setup Ableton Live Lite Setup Front Panel Controls Input Channels... - Page 5 Contents Audio Performance Specifications Digital Audio Physical Troubleshooting & FAQs Important Safety Notices SSL 2+ User Guide...
-
Page 6: Overview
SSL 2 vs SSL 2+ Which one is right for you, the SSL 2 or the SSL 2+? The table below will help you to compare and contrast the differences between SSL 2 and SSL 2+. Both have 2 input channels for recording and balanced monitor outputs for connecting to your speakers. The SSL 2+ gives you 'that little bit more', with an additonal professional high-powered headphone output, complete with independent level control, making it perfect for when you are recording with another person. -
Page 7: Get-Started
USB Power LED Please use one of the provided USB cables ('C' to 'C' or 'C' to 'A') to connect the SSL 2+ to your computer. The connector on the rear of SSL 2+ is a 'C' type. The type of USB port you have available on your computer will determine which of the two included cables you should use. -
Page 8: Registering Your Ssl 2
Get-Started Registering Your SSL 2+ Registering your SSL USB audio interface will grant you access to an array of exclusive software from us and other industry-leading software companies - we call this incredible bundle the 'SSL Production Pack' . To register your product, head to and follow the on-screen instructions. -
Page 9: Quick-Start / Installation
Get-Started Quick-Start / Installation 1. Connect your SSL USB audio interface to your computer using one of the included USB cables. 2. Go to ‘System Preferences’ then ‘Sound’ and select 2. Download and install the SSL USB ASIO/WDM audio 'SSL 2+’ as the input and output device (drivers are not driver for your SSL 2+. -
Page 10: Can't Hear Anything
MONITOR MIX control. In the left-most position, you will hear only the inputs you have connected. In the right-most position you will hear the USB playback from your media player/DAW. In your DAW, ensure that ‘SSL 2+’ is selected as your audio device in the audio preferences or playback engine settings. Don't know how? Please see the next page... -
Page 11: Selecting Ssl 2+ As Your Daw's Audio Device
If you have followed the Quick-Start / Installation section then you are ready to open up your favourite DAW and start creating. Included in the SSL Production Pack are copies of Pro Tools | First and Ableton Live Lite DAWs but you can of course use any DAW that supports Core Audio on Mac or ASIO/WDM on Windows. -
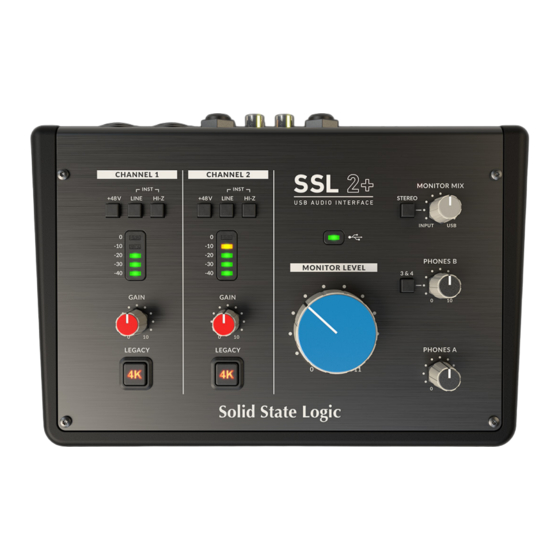
Page 12: Front Panel Controls
This enhancement effect is created completely in the analogue domain and is inspired by the kind of extra character the legendary SSL 4000-series console (often referred to as '4K') could add to a recording. -
Page 13: Monitoring Section
1-2) out of the PHONES B headphone output. This can be useful when you are recording another person and they want a different headphone mix whilst they record. See the How-To / Application Examples section for more information on using this feature. SSL 2+ User Guide... -
Page 14: Rear Panel Connections
These outputs carry signals from USB streams 3&4. There is no physical level control for these outputs so any level control needs to be done inside the computer. These outputs can be useful when connecting to a DJ mixer. See the Connecting SSL 2+ Up To A DJ Mixer section for more information. -
Page 15: How-To / Application Examples
The RCA outputs are not shown to be connected to anything in this example, please see Connecting SSL 2+ to a DJ Mixer for more information on using the RCA outputs. -
Page 16: Connecting Your Monitors And Headphones
How-To / Application Examples Connecting Your Monitors and Headphones The diagram below shows where to connect your monitors and headphones up to your SSL 2+. It also shows the interaction of the front panel controls with the various output connections on the rear. -
Page 17: Connecting Ssl 2+ To A Dj Mixer
Connecting SSL 2+ To A DJ Mixer The diagram below shows how to connect your SSL 2+ to a DJ mixer, making use of the 4 RCA outputs on the rear panel. In this case, you would be using DJ software on your computer that would allow separate stereo tracks to be played out of Outputs 1-2 and 3-4, that can be mixed together on the DJ mixer. -
Page 18: Selecting Your Input And Setting Levels
+48V switch. LINE and HI-Z should remain unpressed. You'll notice the top red LEDs blink whilst phantom power is applied. The audio will be muted for a few seconds. Once phantom power has been engaged, proceed with steps 2 and 3 like before. SSL 2+ User Guide... -
Page 19: Keyboards And Other Line-Level Sources
When recording an electric guitar or bass, engaging the HI-Z switch alongside the LINE switch changes the impedance of the input stage to better suit these types of sources. Specifically, it will help retain the high frequency detail. SSL 2+ User Guide... -
Page 20: Monitoring Your Inputs
2 respectively), then pressing the STEREO switch will allow you to monitor the keyboard in true stereo, with CHANNEL 1 being sent to the left side and CHANNEL 2 being sent to the right side. SSL 2+ User Guide... -
Page 21: Setting Up Your Daw To Record
Pro Tools | First session but the same steps will apply to any DAW. Please consult your DAW's User Guide for it's operations. If you have not already done so, please ensure that SSL 2+ is the selected Audio Device in your DAW's audio setup. -
Page 22: Hearing Double
DAW with as little latency as possible. For instance, you want to plug an electric guitar directly into your SSL 2+, put it through a guitar amp simulator plug-in (like Native Instruments' Guitar Rig Player) and then monitor that 'affected' sound whilst you record, instead of just listening to the 'dry' input signal with the Monitor Mix. -
Page 23: Sample Rate
SSL USB Control Panel will be installed onto your computer. This Control Panel will report details such as what Sample Rate and Buffer Size your SSL 2+ is running at. Please note that both Sample Rate and Buffer size will be taken control of by your DAW when it is opened. -
Page 24: Using Phones B
Using PHONES B Creating A Separate Mix in Pro Tools | First One of the great things about SSL 2+ is that it has 2 headphone outputs, with indepedent level controls for PHONES A and PHONES B. By default, PHONES B is a duplicate of whatever is being listened to on PHONES A, ideal for when you and the perfromer want to listen to the same mix. -
Page 25: Using Phones B 3&4 Switch To Cue Up Tracks In Ableton Lite Live
Step 2 - 'Cue Out' set to 3/4 Step 5 - Switch between Cue and Main Mix Step 4 - Click this button to cue track Step 3 - Click this button so that it changes from 'Solo' to 'Cue' SSL 2+ User Guide... -
Page 26: Specifications
Monitor Outputs (Balanced) Frequency Response ± 0.05 dB Dynamic Range (A-Weighted) 112 dB THD+N (@ 1kHz) < 0.0012% @ -8 dBFS, < 0.002 % @ -1 dBFS Maximum Output Level +12.5 dBu Output Impedance 1 Ω SSL 2+ User Guide... -
Page 27: Digital Audio
Outputs 3 & 4 Level Control None Monitor Mix Input - USB Blend Via front panel Monitor Mix - Stereo Input Via front panel Headphones Level Control Via front panel Headphones B 3&4 Source Selection Via front panel SSL 2+ User Guide... -
Page 28: Troubleshooting & Faqs
234mm x 157mm x 70mm (including knob heights) Weight 900g Box Dimensions 265mm x 198 x 104mm Boxed Weight 1.20kg Troubleshooting & FAQs Frequently Asked Questions and additonal support contacts can be found on the Solid State Logic Website at: www.solidstatelogic.com/support SSL 2+ User Guide... -
Page 29: Important Safety Notices
EU Compliance SSL 2 and SSL 2+ Audio Interfaces are CE compliant. Note that any cables supplied with SSL equipment may be fitted with ferrite rings at each end. This is to comply with the current regulations and these ferrites should not be removed. - Page 30 Evaluation of apparatus based on temperate climate conditions only. There may be some potential safety hazard if the apparatus is operated in tropical climate conditions. __________________________________________________________________________________________________________________ Environmental Temperature: Operating: +1 to 40ºC Storage: -20 to 50ºC SSL 2+ User Guide...
- Page 31 SSL 2+...
Need help?
Do you have a question about the 2+ and is the answer not in the manual?
Questions and answers