Table of Contents
Advertisement
Quick Links
Advertisement
Table of Contents

Related Manuals for Logiblocs Super Inventor's


Summary of Contents for Logiblocs Super Inventor's
- Page 1 I N V E N T O R ’ S M A N U A L...
-
Page 3: Table Of Contents
3. Light Feedback 4. Sound Feedback 5. The Memory Circuit 6. Two System Feedback Combining Systems 37-39 1. Light and Sound Together 2. The Randomizer 3. Card Reader What the Logiblocs Do 40-44 Battery Installation Safety Advice and Useful Tips... -
Page 4: Contents
CONTENTS BUTTON (x 2) LIGHT SWITCH SOUND BLOC PULSE STRAIGHT (x 4) CROSS (x 4) CORNER (x 2) Y-BLOC FLYER SEQUENCER BATTERY BOX... - Page 5 BLEEP (x 2) RED LIGHT YELLOW LIGHT GREEN LIGHT Maximum current rating 1A FLIP/FLOP DELAY (Long) DELAY (2-way) BATTERY CONNECTOR (9V DC 6F22 or 6LR61) Pressure Mat Cards (x 2), Wires (Red, Yellow and Blue), Jack Plug, Light Bulb (1.5V) and Holder, Pouch, Filter Paper and Stickers.
-
Page 6: Introduction
Logiblocs in this kit with your other kits to increase their power and flexibility. If you join the Logiclub you will be able to get loads more ideas of things to make and do with your Logiblocs. You may try to win a prize by entering your own ideas in the regular competitions. -
Page 7: Understanding Logiblocs
Logi Green Power: These energy suppliers give life to Logibloc inventions. All Logiblocs work with each other so with a few Extrablocs you can build on to your inventions to make them even more powerful using your Logimagination. -
Page 8: Let's Get Started
LET’S GET STARTED The first thing to do is to get to know the Logiblocs and make sure that they are working OK. You will need four 1.5V AA size batteries. BATTERY Step 1 Open the BATTERY BOX and put the batteries in. - Page 9 Step 4 Now place the Logitester on a flat STRAIGHT surface and add on the rest of the STRAIGHT and CROSS blocks as Y-BLOCK well as the Y-BLOC as shown. Press the BUTTON and check that all the green lights come on. These blue blocs take messages from place to place.
- Page 10 Step 6 Still working with the Logitester, replace the LIGHT SWITCH with the IN and plug in the Jack Plug leaving the wires loose. JACK-PLUG Hold the wires, one in each hand and touch the metal ends of the wires together. Again, the BLEEP will start bleeping.
- Page 11 Step 8 This time, replace the BLEEP with the OUT block and hear it click. You could use this as a metronome to keep your music in time! We can use the OUT block to switch other things, such as light bulbs and motors, on and off.
- Page 12 Step 10 Now add on the rest of the red blocks as shown. You can stand this up on its side. See how far away you can see the lights. RED LIGHT YELLOW LIGHT GREEN LIGHT SOUND BLOC FLIP/FLOP Step 11 Now let’s check out the SOUND BLOC and the FLIP/FLOP.
- Page 13 LIGHT SWITCH. Can you see the difference between the way the AND and the OR blocks work? You have successfully completed the test procedure. Well done! Now it is time to get the Logiblocs to work and have some fun!
-
Page 14: Lights & Shadows
LIGHT DETECTOR Now let's see how easy the LIGHT SWITCH is to use. Fix the Logiblocs together as shown. Walk around in the evening and see when the green light is on and when the red light is on. If you need to be quiet just take off the BLEEP and put it in your pocket. -
Page 15: The Electronic Eye
LIGHTS AND SHADOWS THE ELECTRONIC EYE We can trigger the Logiblocs by shining light into the LIGHT SWITCH. Many systems use light to switch machines on or off. A light sensor is often used to open doors. Some systems are controlled by invisible light like the remote control on your TV. -
Page 16: Light Breaker Alarm
Alarm. When the light beam is broken by walking through the beam, the BLEEP will sound for about 10 seconds. Don’t forget to disconnect the BATTERY BOX when you are not using the Logiblocs to make the batteries last as long as possible ! -
Page 17: Protect Your Treasure
Make sure there is enough light shining down onto the LIGHT SWITCH to make the light on the Logiblocs come on. Now cover over the LIGHT SWITCH with a loose block or your treasure. The two BLEEPS will stop sounding. -
Page 18: Let's Get Connected
This is exactly what the Logiblocs IN block can do. We don't bother with switches but do the same thing by simply touching the two Jack Plug wires together to complete the circuit. -
Page 19: Door Alarm
LET’S GET CONNECTED As you have seen we can use light and sound to trigger the Logiblocs. This section shows you how to make systems which are triggered by the Jack Plug and IN block. DOOR ALARM You will need a strip of aluminium foil and some sticky tape. -
Page 20: Drawer Guard
Jack Plug wires so completing the circuit and setting the alarm off. Hide the Logiblocs at the back or beside the drawer where there is usually a bit of space. METAL DETECTOR... -
Page 21: Security Mat
Jack Plug. Tap the sandwich you have made. When the two pieces of foil touch, the circuit is completed and the Logiblocs should be triggered. If the aluminium sheets in the sandwich are touching too easily then add another spacer or two. -
Page 22: Lie Detector
LIE DETECTOR We can use the Logiblocs to make a Lie Detector. This uses the effect that when people do not tell the truth they usually sweat which increases the electrical conductivity of their hands. Step 1 Make two hand sized aluminium... -
Page 23: Deep Space
DEEP SPACE! No Logibloc session would be complete without building a few intriguing Space vehicles. We have shown just a few ideas to get you started. LOGIFIGHTER Use a 9V battery (6F22 or 6LR61) to power these next two spaceships. Hold the battery in place using tape. -
Page 25: Mother Ship
MOTHER SHIP Support the Mother Ship in three places using the BATTERY BOX and the two CORNER blocs. -
Page 26: Landing Craft
LANDING CRAFT Fasten the BATTERY BOX on to the craft as shown so that the bleeping starts when the Landing Craft comes into land and the BUTTONS are pressed down. Bring your Landing Craft into land onto the Landing Pad provided in the box! LAND SPEEDER... -
Page 27: Control Ship
CONTROL SHIP Now use your Logimagination to design and build your own spacecraft! -
Page 28: Sounds & Silence
SOUNDS & SILENCE It is amazing how much noise there is in the world. Air-conditioning, motor cars, aeroplanes and not to mention people, animals and the wind rustling in the trees. Sound is carried through the air as a pressure wave. The bigger the pressure difference the greater the noise level. -
Page 29: Voice Detector
SOUND GUARD Put the Logiblocs together as shown and hide them beside a door or inside a cupboard. Put the BLEEP as far away from the SOUND BLOC as possible to prevent feedback. -
Page 30: Feedback & Automation
- but it does this at great speed which is why they appear to be so clever! - a bit like Logiblocs do today! Breakthroughs in electronics have reduced the size and weight of computers dramatically. -
Page 31: Flashing Circuit
FEED-BACK & AUTOMATION FLASHING CIRCUIT Put together the Logiblocs as shown. As soon as you join the last Logibloc together to make the complete circle, the lights will begin to flash! To understand what is happening you need to think what is happening to the signal as it travels around the circle. -
Page 32: Logibuzzer
LOGIBUZZER We can use another type of feedback loop to make a Logibuzzer. Put the blocks together as shown. Connect the Jack Plug wires to the terminals of the OUT block. Plug the Jack Plug into the IN. If there is enough light shining onto the LIGHT SWITCH the blocks will buzz. -
Page 33: Sound Feedback
SOUND FEEDBACK This time plug the SOUND BLOC onto the end of the FLYER so you can move it around. When you press the BUTTON it clicks and this will usually trigger the SOUND BLOC which then sends a signal to the BLEEP. -
Page 34: The Memory Circuit
THE MEMORY CIRCUIT Another very useful example of "feed-back" is the Memory Circuit. Put the Logiblocs together as shown. As soon as you press the top BUTTON the signal will go right around the circle and feed-back into the OR block. -
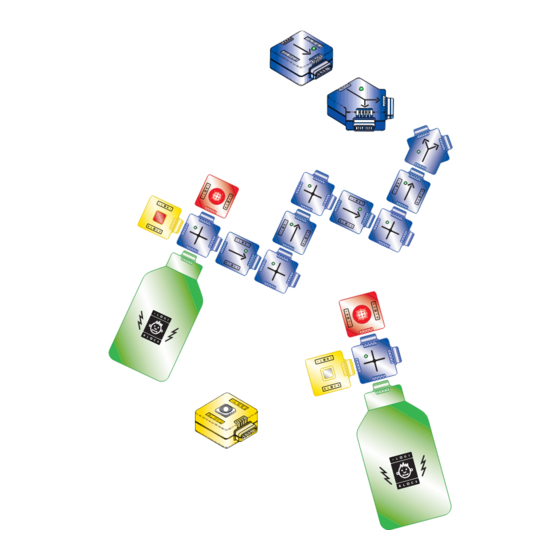
Page 35: Two System Feedback
TWO SYSTEM FEEDBACK Now we will make two completely separate systems and let them talk to each other! Step 1 Put SYSTEM 1 together as shown. Cover over the LIGHT SWITCH and check that the FLIP/FLOP swaps the two BLEEPS and that the OUT block clicks. - Page 36 Step 4 To help you understand what is going on, place a card first to break the light beam link and then, by placing the card in the "U", the sound link. You may be able to do this with your hand also. Experiment with changing the distance between the systems and the color of the LIGHT.
-
Page 37: Combining Systems
Elevators may also work out what is the most efficient way to stop at several floors where the call button has been pressed. The logical Logiblocs AND, OR, NOT, DELAY and the FLIP/FLOP (the orange ones) can all be used to combine messages in different ways. But... -
Page 38: The Randomizer
THE RANDOMIZER In this project we are mixing two signals using the AND block. So only when both signals arrive at the same time will the AND block send the signal on to the SEQUENCER. The two signals are coming from the steady flashing unit and the PULSE block. -
Page 39: Card Reader
Move the card just one space back again so that it triggers the next position. Then the GREEN LED will come on. You are now clear for entry! Change round your Logiblocs and design different arrangements and see if your friends can work out how to decode them! -
Page 40: What The Logiblocs Do
BATTERY CONNECTOR (9V DC 6F22 or 6LR61) This lets you use a 9V Battery Pack to power the Logiblocs. Use it like the BATTERY BOX but not in the same circuit and at the same time. STRAIGHT This is the basic Logibloc piece that just gets you from place to place. - Page 41 WHAT ELSE THE LOGIBLOCS DO Y-BLOCK This splits off signals in two directions and triggers any block connected to it. The light lights up when ever it receives a message and passes it on immediately. FLYER The FLYER lets you jump...
- Page 42 AND MORE ! SOUND BLOC This contains a sound sensor which triggers the other blocks if it hears the slightest sound. Great for making booby-traps! Plug in the Jack-Plug. When the two wires of the Jack Plug are touched together the IN block triggers any other block that it is connected to.
- Page 43 DELAY (Long) Logiblocs have several different types of delay. A delay waits for a bit before sending the message on. This one stays on for about 8 seconds once it has been triggered.
- Page 44 This has one input and seven outputs. When it receives a signal it passes it on to the next output immediately. Any Logiblocs plugged in will be triggered when it is their turn and they will light up or beep.
-
Page 45: Battery Installation
ADD BATTERIES SCREW (underneath) JOIN OTHER LOGIBLOCS HERE FUSE REPLACEMENT As an added safety feature there is a 1A fuse contained in the BATTERY BOX and the BATTERY CONNECTOR (LBT/F2). If in the unlikely event this gets broken you will need to obtain a replacement BATTERY BOX or BATTERY CONNECTOR. -
Page 46: Safety Advice And Useful Tips
If you want to save the batteries, disconnect the BATTERY BOX when you finish a Logibloc session. When using the BATTERY CONNECTOR (LBT/F2) just unplug it from the other Logiblocs – there is no need to remove the battery from its tight connector. Do not attempt to open up the Logiblocs.
Need help?
Do you have a question about the Super Inventor's and is the answer not in the manual?
Questions and answers