Table of Contents
Advertisement
Quick Links
Advertisement
Table of Contents

Related Manuals for Logiblocs Electric City


Summary of Contents for Logiblocs Electric City
- Page 1 I N V E N T O R ’ S M A N U A L...
- Page 2 LOOKING AFTER YOUR LOGIBLOCS It’s a good idea to keep your Logiblocs in the box. There is plenty of space underneath the plastic holder to store your models and any Logibloc Extrablocs you may have.
- Page 3 Logi Green Power: These energy suppliers give life to Logibloc inventions. All Logiblocs work with each other so with a few Extrablocs you can build on to your inventions to make them even more powerful using your Logimagination.
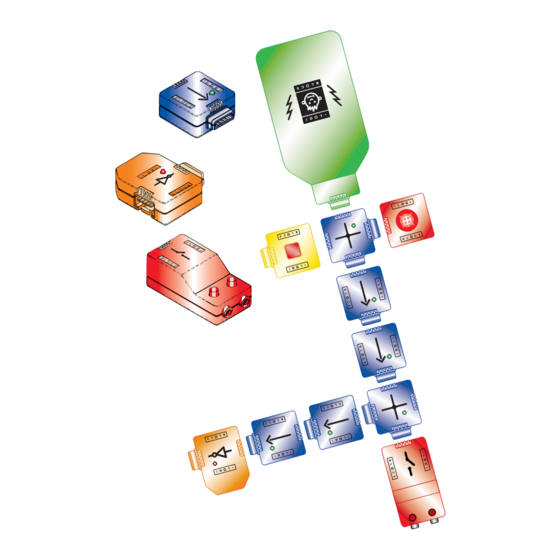
- Page 4 CONTENTS Please check that you have all the parts in the Electric City Kit as follows: BATTERY BOX BUTTON LIGHT SWITCH BLEEP Maximum current rating 1A STRAIGHT (x 4) CROSS (x 2) FLYER Jack Plug, Wires (Red,Yellow & Blue) Bulb (1.5V) & Socket, Stickers...
-
Page 5: Let's Get Started
LET’S GET STARTED The first thing to do is to get to know the Logiblocs and make sure that they are working OK. You will need four 1.5V AA (LR6) size batteries. BATTERY Step 1 Open the BATTERY BOX and put the batteries in. - Page 6 Step 4 Put the Logiblocs together as shown. STRAIGHT The NOT will be on showing how it always does the opposite to the other Logiblocs ! Now press the BUTTON and see what happens. The NOT should go off and all the other lights will come on.
- Page 7 Finally, just add the FLYER, AND, and OR Logiblocs, press the BUTTON and check that all the lights work. You have successfully completed the test procedure. Well done ! Now it is time to get the Logiblocs to work and have some fun !
-
Page 8: Door Alarm
As you have seen, using the IN and joining the two wires from the Jack Plug together, you can trigger the Logiblocs into action. We will now use this sys- tem to make the Door Alarm, a Security Mat and the Water Bleeper. - Page 9 Step 3 Fix the Logiblocs together as shown. This circuit is called the Memory Circuit because it captures the signal from the IN however short it is. Press the BUTTON to re-set the system. Hide the Logibloc system you have made. Remember, if...
- Page 10 When your door alarm is working really well it could be time to add to the system. The Logiblocs can also turn on other things such as motors and lights using the OUT. Add the OUT on to your system and check that it clicks when you open the door.
- Page 11 Plug. Tap the sandwich you have made. When the two pieces of foil touch, the circuit is completed and the Logiblocs should be triggered. If the aluminium foil sheets in the sandwich are touching too easily then add another spacer or two.
- Page 12 Jack Plug wires so com- pleting the circuit and setting the alarm off. Hide the Logiblocs at the back or beside the drawer where there is usually a bit of space. CHECK FOR METAL! We can use the two metal ends of the Jack Plug Wires to test for metal.
- Page 13 Jack Plug. Step 3 Place the Logiblocs on the edge of a basin but be careful not to get them wet ! Fill up the basin to half full. Hold the two aluminium foil sheets one in each hand but do not let them touch and slowly lower them in to the water.
- Page 14 Ask each other questions and then join your free hands together. You will find that the Logiblocs can be triggered through you both! This is because your bodies also can conduct electricity.
-
Page 15: Light Detector
Logiblocs. We will now use it to make a Light Detector unit and the Light Breaker Alarm. Also we’ll show you how to play the Treasure Hunt... - Page 16 Step 1 To make sure that we catch the intruder, we need to use the Memory Circuit again, although in a slightly different way. Plug the Logiblocs together as shown and stand them up on the BATTERY BOX. Step 2...
- Page 17 This is called feedback. Try replacing the LIGHT SWITCH with the IN and connect the jack plug wires directly to the terminals of the OUT. Remember to disconnect the BATTERY BOX when you are not using the Logiblocs to save the batteries !
-
Page 18: Treasure Hunt
LIGHT SWITCH and make sure that the flashlight will trigger the Logiblocs when it is shone directly at the hidden LIGHT SWITCH. Take it in turns to hide the Logiblocs in ever more clever places. Hide the Logiblocs in secret places and see the hidden treasure revealed with the... -
Page 19: Battery Box
WHAT THE LOGIBLOCS DO BATTERY BOX (6V output. 4 x 1.5V AA LR6) This brings the power from the batteries to make the Logiblocs work. Plug it in to a CROSS or wherever there is a space. CROSS This acts as a cross-roads for all Logiblocs and lets you turn corners. - Page 20 WHAT ELSE THE LOGIBLOCS DO This does the opposite of what you expect. When it gets a message it doesn’t send it on and if it has no message it sends one of its own ! Plug in the Jack Plug. When the two...
-
Page 21: Light Switch
The AND stops signals getting through unless both the inputs are on. The OR lets either of the two signals it receives go through. FLYER The FLYER lets you jump over the other Logiblocs or just get from place to place quickly. -
Page 22: Battery Installation
ADD BATTERIES SCREW (underneath) JOIN OTHER LOGIBLOCS HERE FUSE REPLACEMENT As an added safety feature there is a 1A fuse contained in the BATTERY BOX. If in the unlikely event this gets broken you will need to obtain a replacement BATTERY BOX. Please send the old one back to us, enclosing... - Page 23 SAFETY ADVICE AND USEFUL TIPS BETTER TO BE SAFE THAN SORRY ! Before you use the Logiblocs, be sure to read and understand this section on safety. If used correctly, the Logiblocs are absolutely safe. The Logiblocs operate at low voltage only. Never connect any wires to mains electrical outlets.
- Page 24 Logiblocs Limited PO Box 375 St Albans Herts AL1 3GA England www.logiblocs.com Logiblocs is a registered trademark of Logiblocs Ltd. Copyright 2000 VERSION #171299...
Need help?
Do you have a question about the Electric City and is the answer not in the manual?
Questions and answers