Advertisement
Available languages
Available languages
Table of Contents
Instructions: PolyPRO 3
WARNING!
Installation is best done with two people.
Never install on a windy day or when your
5th wheel roof is slippery. Please take care
whenever you are on a ladder or the roof.
CAUTION
Installation and removal is safer and easier
when done by two people. Please consult
your RV owners manual.
Tools Needed:
• Scissors
• Matches or lighter (optional)
• Screwdriver (usually Phillips head) for
roof antennas
Installation
1. Cover or tape any sharp edges on your 5th
wheel that could wear against your cover. Be
sure to lower any roof antennas.
2. Unroll the cover next to your 5th wheel
with the Classic logo on your cover at the
front of your 5th wheel and facing the
outside. Unzip the side and rear panels.
3. On larger 5th wheels it's easiest to install
your cover from the roof. Carefully climb up
on the roof pulling the cover front with you.
Lower the front of your cover down over the
front of your 5th wheel then carefully move
toward the back pulling the cover and letting
it fall down the sides of your 5th wheel.
Climb down the rear ladder and locate the
ladder cap. (The cap helps keep the top
of the ladder from stressing the cover). Fit
it over the ladder top and attach it to the
rungs with the hook and loop straps. Now
pull the back end of the cover down the
back of the 5th wheel.
4. Zip all the panels closed on your cover
and then pull the elasticized corners down
over both bumpers of your 5th wheel.
5. Locate the hook and loop straps on the
upper part of the flaps that fold in under
the nose of your 5th wheel. Adjust them
to fit your cover to the exact length of the
nose of your 5th wheel.
6. Once the length of the nose of the cover
75263 75363 75463 75563 75663 75763
12cR55_12859
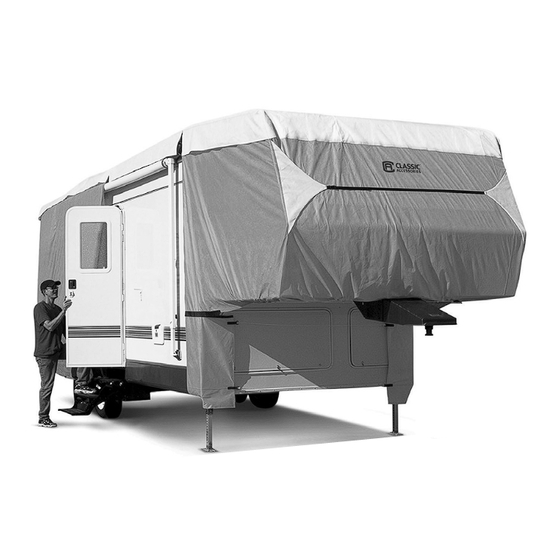
Extra Tall Models: 75863, 75963, 75063
5th Wheel Cover
™
is correctly adjusted,
locate one of the
supplied ropes and the
D-rings sewn in along the
flaps that fold in under
the nose of your 5th
wheel. Tighten the rope
and tie it off onto the
D-rings located opposite
each other. Repeat with
the lower D-ring.
7. Tie an end of the
supplied rope onto one
of the D-rings along
the bottom hem. Put a small rock in the
provided toss bag, close the top and tie
the free end of the rope to the bag D-ring.
Now toss the bag and rope under your 5th
wheel to the D-ring on the opposite side.
Take the rope off the bag and, allowing
enough to make a knot, cut it off and tie it
to the D-ring. Repeat with the other D-rings.
To keep the rope ends from fraying you
can carefully melt the ends with a match or
lighter.
8. Adjust the strap length on the white
tension panels across the front and back to
fit your 5th wheel. Don't over tighten—the
straps should be snug, not drum tight.
To attach the straps into the side-release
buckles just insert the clip into the buckle.
To release the buckle press the buttons
on both sides and pull the clip out of the
buckle.
Use and Storage
Your cover can be unzipped for access to
the passenger side and rear. The panels
can be rolled up and held in place with the
hook and loop straps toward the top of each
panel.
A handy storage bag is provided. To fit it
in the bag fold your cover and roll the cover
tightly rather than stuffing it. Never store
a wet cover in the storage bag or confined
area as the cover can be damaged by
mildew.
Care
Spot clean with water, a mild soap and a
sponge. Don't use abrasive cleaners or
brushes.
CLASSIC ACCESSORIES, INC.
KENT, WA USA 98032 ©2012
c l a s s i c a c c e s s o r i e s . c o m
do not
line dry
use soap
do not iron
water
resistant
do not
pack wet
Advertisement
Table of Contents

Related Manuals for Classic Accessories PolyPRO 3


Summary of Contents for Classic Accessories PolyPRO 3
-
Page 1: Tools Needed
Instructions: PolyPRO 3 5th Wheel Cover ™ is correctly adjusted, WARNING! locate one of the Installation is best done with two people. supplied ropes and the Never install on a windy day or when your D-rings sewn in along the 5th wheel roof is slippery. Please take care flaps that fold in under whenever you are on a ladder or the roof. the nose of your 5th wheel. Tighten the rope CAUTION... - Page 2 Mode d’emploi: Housse pour caravane à sellette PolyPRO 3 ™ 6. Une fois que la longueur AVERTISSEMENT! de la housse du nez a Il est recommandé que deux personnes été correctement réglée, localisez une des cordes effectuent l'installation. Ne jamais installer fournies et les anneaux en D la housse par grand vent ou si le toit de la cousus le long des rabats qui caravane à sellette est glissant ou mouillé. se replient sous le nez de la caravane à sellette. Serrez la Faites preuve de prudence lorsque vous corde et faites un noeud afin êtes sur une échelle ou sur le toit.
- Page 3 Instrucciones: Cubierta para caravana de quinta rueda PolyPRO 3 ™ 6. Después que la longitud de ¡ADVERTENCIA! la parte frontal de la cubierta Es conveniente que dos personas realicen la esté ajustada correctamente, encuentre una de las cuerdas instalación. Nunca instale la cubierta en un suministradas y los anillos día de mucho viento ni cuando el techo de la D cosidos en las solapas caravana de quinta rueda esté resbaladizo. que se doblan debajo de la parte frontal de la caravana Tenga cuidado al subirse a una escalera o al de quinta rueda. Apriete la techo.
Need help?
Do you have a question about the PolyPRO 3 and is the answer not in the manual?
Questions and answers