Table of Contents
Advertisement
Available languages
Available languages
Quick Links
Advertisement
Table of Contents

Related Manuals for Linea 2000 Domo DO918WK


Summary of Contents for Linea 2000 Domo DO918WK
- Page 1 DO918WK Handleiding Wijnkoeler Mode d’emploi Cave à vin Gebrauchsanleitung Weinkühlschrank Instruction booklet Wine cooler Manual de instrucciones Refrigerador de vinos Istruzioni per l’uso Cantinette Vino Návod k použití Vinotéka Návod na použitie Vinotéka PRODUCT OF...
- Page 2 Lees aandachtig alle instructies - bewaar deze handleiding voor latere raadpleging. Lisez attentivement les instructions - gardez le mode d’emploi pour utilisation ultérieur. Lesen Sie genau die Anweisungen - bewahren Sie die Gebrauchsanleitung für spätere heranziehung. Read all instructions carefully - save this instruction manual for future reference. Lea detenidamente todas las instrucciones - Conserve este manual para futura referencia.
-
Page 3: Garantie
GARANTIE Geachte klant, Al onze producten ondergaan steeds een strenge kwaliteitscontrole, alvorens ze aan je worden aangeboden. Mocht je desondanks toch nog problemen hebben met jouw toestel, dan betreuren wij dit ten zeerste. In dat geval verzoeken wij je contact op te nemen met onze klantendienst. Onze medewerkers zullen je met plezier verder helpen. - Page 4 · Dit toestel mag gebruikt worden door kinderen vanaf 16 jaar en personen met een fysieke of sensoriële beperking of mensen met een beperkte mentale capaciteit of gebrek aan ervaring of kennis, op voorwaarde dat deze personen toezicht krijgen of instructies hebben gekregen over het gebruik van het toestel op een veilige manier en dat ze ook de gevaren kennen bij het gebruik van het toestel.
- Page 5 ONDERDELEN Scharnier Houten leggers Bediening Schakelaar Voetjes Deur INSTALLATIE Verwijder alle verpakkingsmaterialen en eventuele promotionele stickers. Vooraleer het toestel aan te sluiten op het elektriciteitsnet, laat het ongeveer 8 uur gewoon rechtop staan. Dit verkleint het risico op een slechte werking van het koelingsysteem ten gevolge van het transport.
-
Page 6: Omkeren Van De Deur
GEBRUIK OMKEREN VAN DE DEUR Zorg ervoor dat het toestel leeg is en niet aangesloten op het elektriciteitsnet. Verwijder het afdekplaatje (1) en scharnierpin (2) aan de bovenzijde van de deur. Verwijder de schroeven (3), het plaatje van de schakelaar (4) , de deurstopper (5) en de scharnierpin (6) aan de onderzijde van de deur. - Page 7 BEDIENING A. Onderste zone B. Bovenste zone Knop voor verhogen temperatuur Knop voor verlagen temperatuur Display Knop voor aan/uit verlichting Knop voor aan/uit toestel · De gewenste temperatuur kan ingesteld worden met de knoppen voor verhogen en verlagen temperatuur (1+2). Door op deze knoppen te duwen verandert de temperatuur telkens met 1°C. ·...
-
Page 8: Reiniging En Onderhoud
VERPLAATSEN · Verwijder alle flessen uit de wijnkoeler. · Plak alle losse onderdelen met plakband vast in de wijnkoeler of haal ze eruit. · Zet de voetjes onderaan het toestel op de laagste stand om beschadiging te voorkomen. · Plak de deur dicht met plakband. ·... -
Page 9: Consignes De Sécurité
GARANTIE Cher client, Tous nos produits sont soumis à des contrôles qualité stricts avant d’être proposés à la vente. Si vous deviez toutefois rencontrer un problème avec votre appareil, nous le déplorons vivement. Dans ce cas, nous vous invitons à prendre contact avec notre service à la clientèle. Nos collaboratrices se feront un plaisir de vous aider ! +32 14 21 71 91 info@linea2000.be... - Page 10 à son utilisation. Les enfants ne peuvent pas jouer avec cet appareil. L’entretien et le nettoyage de l’appareil ne peuvent pas être effectués par des enfants, sauf s’ils sont âgés de plus de 16 ans et sous la surveillance d’un adulte. ·...
-
Page 11: Installation
PARTIES Charnière Étagères en bois Panneau de commande Interrupteur Pieds Porte INSTALLATION Enlevez tous les matériaux d’emballage et éventuelles étiquettes adhésives promotionnelles. Avant de brancher l’appareil, laissez-le en position debout pendant environ 8 heures. Ceci atténue le risque d’un mauvais fonctionnement du système de réfrigération suite au transport. Nettoyez l’intérieur avec de l’eau tiède et un chiffon doux. -
Page 12: Inversion Du Sens D'ouverture Des Portes
UTILISATION INVERSION DU SENS D’OUVERTURE DES PORTES Veillez à ce que l’appareil soit vide et non raccordé au réseau électrique. Retirez la plaque de recouvrement (1) et l’axe de charnière (2) en dessus de la porte. Retirez les vis (3), la plaque de l’interrupteur (4), la butée de porte (5) et l’axe de charnière (6) en dessous de la porte. -
Page 13: Panneau De Commande
PANNEAU DE COMMANDE A: partie supérieure B: partie inférieure Bouton pour augmenter la température Bouton pour diminuer la température Ecran Bouton marche/ arrêt pour l’éclairage Bouton marche/ arrêt pour l’appareil · Vous pouvez régler la température souhaitée en utilisant les boutons pour augmenter ou diminuer la température. -
Page 14: Nettoyage Et Entretien
DÉPLACER · Enlevez toutes les bouteilles de la cave à vin. · Fixez toutes les parties mobiles de la cave à vin avec du ruban adhésif. · Placez les pieds situés sous l’appareil dans leur position le plus basse, pour éviter de les endommager. ·... - Page 15 GARANTIE Sehr geehrter Kunde, Sämtliche unserer Produkte unterliegen einer strengen Qualitätskontrolle, bevor Sie Ihnen angeboten werden. Sollten dennoch Probleme mit Ihrem Gerät auftreten, bedauern wir dies zutiefst. Wir möchten Sie in diesem Fall bitten, unseren Kundenservice zu kontaktieren. Unsere Mitarbeiter helfen Ihnen gern weiter! +32 14 21 71 91 info@linea2000.be Montag –...
- Page 16 · Diese Gerät darf von Kindern ab 16 Jahren und Menschen mit körperlichen oder sensorischen Behinderungen oder Menschen mit eingeschränkten geistigen Fähigkeiten oder mangelnder Erfahrung bzw. Sachkenntnis unter der Bedingung verwendet werden, dass diese Personen beaufsichtigt werden oder sie eine Anleitung zur sicheren Verwendung des Geräts erhalten haben und sich der Gefahren bei der Verwendung des Geräts bewusst sind.
- Page 17 TEILE Scharnier Holzregale Bedienfeld Schalter Füße Tür AUFSTELLEN Alle Verpackungsmaterial und mögliche Werbeaufkleber entfernen. Lassen Sie das Gerät vor dem Anschluss an die Stromversorgung etwa 8 Stunden lang einfach aufrecht stehen. Dadurch wird das Risiko verringert, dass das Kühlsystem infolge des Transports nicht richtig funktioniert.
- Page 18 GEBRAUCH TÜRANSCHLAG ÄNDERN Sorgen Sie dafür, dass das Gerät leer und nicht an das Stromnetz angeschlossenen ist. Entfernen Sie die Abdeckung (1) und den Scharnierbolzen (2) an der Oberseite der Tür. Entfernen Sie die Schrauben (3), die Platte des Schalters (4) , den Türstopper (5) und den Scharnierbolzen (6) an der Unterseite der Tür.
- Page 19 BEDIENFELD A: obere Zone B: untere Zone Taste zur Erhöhung der Temperatur Taste zur Senkung der Temperatur Display Taste An/Aus Beleuchtung Taste An/Aus Gerät · Die gewünschte Temperatur kann mit den Tasten zur Erhöhung und Senkung der Temperatur (1+2) eingestellt werden. Durch Drücken dieser Tasten ändert sich die Temperatur um jeweils 1 °C. ·...
-
Page 20: Reinigung Und Wartung
STANDORT ÄNDERN · Entfernen Sie alle Flaschen aus dem Weinkühlschrank. · Befestigen Sie alle beweglichen Teile im Weinkühlschrank mit Klebeband. · Stellen Sie die Füße auf der Unterseite des Geräts auf die geringste Länge ein, um Beschädigungen zu verhindern. · Kleben Sie die Tür mit Klebeband zu. -
Page 21: Warranty
WARRANTY Dear client , All of our products are always submitted to a strict quality control before they are sold to you. Should you nevertheless experience problems with your device, we sincerely regret this. In that case, we kindly request you to contact our customer service. Our staff will gladly assist you. - Page 22 supervision or instruction concerning use of the appliance in a safe way and understand the hazards involved. Children shall not play with the appliance. Cleaning and user maintenance shall not be made by children unless they are older than 16 and supervised. ·...
-
Page 23: Reversing The Door
INSTALLATION Remove all packaging materials and any promotional stickers. Before connecting the appliance to the power net, leave it standing upright for about 8 hours. This reduces the risk of any malfunctioning of the cooling system due to transportation. Clean the inside of the wine cooler with lukewarm water and a soft cloth. Place the appliance on a firm, steady surface, that is strong enough to carry a filled wine cooler. -
Page 24: Control Panel
Turn the door over. Replace the cover plate (1) and the hinge pin (2) on top of the door, on the opposite side. Replace the screws (3) and the plate of the switch (4) at the bottom of the door. Replace the door stop (5) and the hinge pin (6) at the bottom of the door, on the opposite side. -
Page 25: Moving The Appliance
needs to be minimum 1°C hotter than the lower part. The maximum temperature difference between both zones is 7°C. This implicates it is possible that, when setting the temperature of a zone, the temperature of the other zone will be adjusted automatically. ·... -
Page 26: Environmental Guidelines
ENVIRONMENTAL GUIDELINES This symbol on the product or on its packaging indicates that this product may not be treated as household waste. Instead it must be brought to the applicable collection point for recycling of electrical and electronic equipment. By ensuring this product is disposed of correctly, you will help prevent potential negative consequences for the environment and human health, which could otherwise be caused by inappropriate waste handling of this product. -
Page 27: Instrucciones De Seguridad
GARANTIA Este aparato tiene un periodo de garantía de 2 años a partir de la fecha de compra. Durante el periodo de garantía, el distribuidor será completamente responsable de los defectos directamente asignables a errores del material y fabricación. Cuando se detecten este tipo de errores, y siempre que se estime necesario, el aparato se sustituirá... -
Page 28: Instalación
limpiarlo. Ponga todos los botones en posición desconectado (“off”) y desconecte el enchufe de la toma de corriente. Nunca tire del cable para desenchufarlo. · No encienda nunca el aparato cerca de una estufa de gas o eléctrica, ni en un lugar donde pueda entrar en contacto con un horno eléctrico o con otro aparato caliente. - Page 29 el consumo de energía. Las temperaturas extremas también pueden hacer que el refrigerador no funcione correctamente. Asegúrese que haya suficiente ventilación alrededor del refrigerador y deje al menos 5 cm de espacio entre el mismo y cualquier otro objeto. No deje el cordón expuesto o colgando para evitar posibles accidentes. Fije la asa a la puerta con los tornillos suministrados.
-
Page 30: Panel De Control
TEMPERATURA Asegúrese de que la temperatura esté entre 10°C y 26°C. Si la temperatura es superior o inferior, el rendimiento del refrigerador puede quedar afectado. La temperatura puede variar dependiendo de si las botellas están en la parte superior, media, o inferior, o si la luz interior está... -
Page 31: Limpieza Y Mantenimiento
· La temperatura seleccionada aparecerá a la pantalla. · Puede encender o apagar la iluminación interior apretando el botón de encendido/apagado de la iluminación interior (4). · Puede activar o desactivar el aparato apretando el botón de encendido/ apagado del aparato (5). Si desactiva el aparato con este botón, seguirá... - Page 32 DIRECTRICES MEDIOAMBIENTALES El símbolo en el producto o en el embalaje indica que este producto no puede ser tratado como residuo doméstico. Se debe llevar a un lugar en el que se reciclan equipos eléctricos y electrónicos. Si se asegura de que este producto se desecha correctamente, usted ayudará...
-
Page 33: Garanzia
GARANZIA La garanzia dell’apparecchio è valida per 2 anni a partire dalla data di acquisto. Durante il periodo di validità della garanzia, il distributore si assume la piena responsabilità dei difetti dei materiali o di quelli di fabbricazione. In caso di presenza di tali difetti, se necessario, si procederà alla sostituzione o alla riparazione dell’apparecchio. - Page 34 · Non posizionare mai l’apparecchio sopra o vicino a un fornello a gas o un fornello elettrico o in luoghi in cui possa venire a contatto con apparecchiature calde. · Non utilizzare l’apparecchio all’aperto. · Utilizzare l’apparecchio solo per lo scopo previsto. ·...
- Page 35 Assicurarsi che vi sia ventilazione sufficiente attorno all’apparecchio. Lasciare quindi almeno 5 cm di spazio tra l’apparecchio e altri oggetti. Per evitare incidenti, il cavo non deve essere scoperto o penzolare. IMPUGNATURA Fissare la maniglia allo sportello con le viti fornite. Assicurarsi che le viti siano sulla parte inferiore dell’impugnatura.
- Page 36 TEMPERATURA Assicurarsi che la temperatura ambiente sia tra 10 °C e 26 °C. Se la temperatura è superiore o inferiore, le prestazioni dell’apparecchio potrebbero essere ridotte. La temperatura potrebbe variare leggermente a seconda che le bottiglie siano posizionate sul ripiano superiore, mediano o inferiore o se la luce interna è...
-
Page 37: Pulizia E Manutenzione
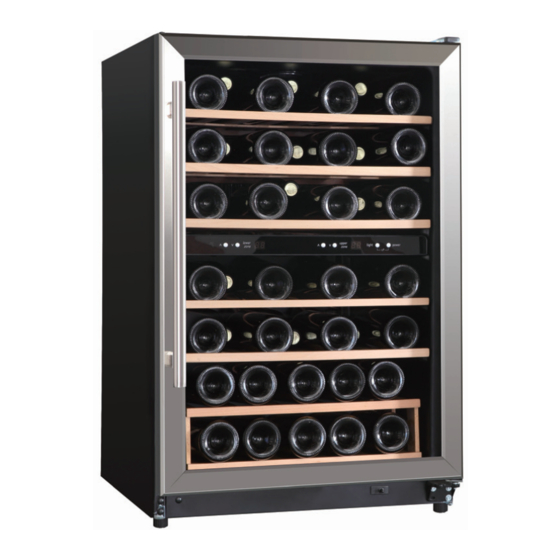
· La temperatura può essere espressa in Celsius o in Fahrenheit. Per modificare l’unità di misura, è necessario tenere premuto il tasto di accensione o di spegnimento dell’illuminazione per 2 secondi. BOTTIGLIE La cantinetta frigo può contenere fino a 45 bottiglie. Questa quantità è stata calcolata su bottiglie di dimensioni standard e posizionate come in figura. - Page 38 MISURE AMBIENTALI Il simbolo sul prodotto o sulla confezione indica che esso non deve essere trattato come rifiuto domestico. Deve, al contrario, essere conferito al punto di raccolta predisposto per il riciclo delle apparecchiature elettriche ed elettroniche. Facendo in modo che questo prodotto venga smaltito correttamente aiuterete a prevenire potenziali conseguenze negative per l’ambiente e la salute dell’uomo, che potrebbero essere causate da uno smaltimento non corretto.
-
Page 39: Bezpečnostní Pokyny
ZÁRUKA Pro záruku začínající dnem prodeje spotřebiče platí na území ČR tyto podmínky: 1. trvání záruky: 2 roky 2. poskytování záruky: a) záruční opravu provedeme podle našeho zvážení opravou nebo výměnou vadných dílů, jestliže tyto závady vznikly prokazatelně vadou materiálu nebo chybou při výrobě b) záruční... - Page 40 · Před použití zkontrolujte zda parametry el. sítě odpovídají požadovaným parametrů na informativním štítku přístroje. Zástrčka přívodního kabelu smí být zapojena pouze do zásuvky s uzemněním a všemi standardními parametry dle místní sítě. · Nenechávejte viset kabel přístroje přes hranu stolu a vyvarujte se toho, aby přišel do styku s horkými plochami.
- Page 41 MONTÁŽ Odlepte všechny ochranné a reklamní polepy Před zapojením do el. sítě nechte vinotéku ve vzpřímené poloze, alespoň 8 hodiny. To obecně snižuje riziko poruchy jakéhokoli chladící systému. Vnitřek vinotéky očistěte vlažnou vodou a jemným hadříkem. Vinotéku postavte na stabilní, rovné a suché místo. Místo (police) musí mít dostatečnou nosnost pro případ že vinotéka bude zcela naplněná...
- Page 42 Otočte dveře. Přemístěte krycí desku a závěsný kolík z horní část dveří na opačnou spodní stranu. Přemístěte šrouby, destičku ke spínači, dverovú zarážku a závěsný kolík ze spodní části na opačnou horní stranu. TEPLOTA Vinotéka musí být v místnosti. Ujistěte se, že je okolní teplota v místnosti mezi 10 – 26 °C. Pokud je teplota místnosti vyšší...
-
Page 43: Čištění A Údržba
· Nastavená teplota je zobrazena na displeji. · Tlačítkem zapnutí/vypnutí světla je možné zapnout/vypnout světlo uvniř přístroje. (4) · Přístroj zapněte stiskem tlačítka zapnutí/vypnutí přístroje. (5) I když je přístroj vypnut tímto tlačítkem, stále je napájen elektrickou energií. · Teplota může být nastavena ve stupních Celsia nebo Fahrenheita. K nastavení stupnice zmáčkněte současně... - Page 44 OHLED NA ŽÍVOTNÍ PROSTŘEDÍ Symbol na přístroji či na jeho obalu znamená, že s tímto výrobkem není možno nakládat jako s běžným domovním odpadem, nýbrž musí být odevzdán na místech určených ke sběru a likvidaci elektrických a elektronických zařízení. Dodržením tohoto doporučení chráníte životní prostředí...
-
Page 45: Bezpečnostné Pokyny
ZÁRUKA Pre záruku začínajúcich dňom predaja spotrebiča platí na území SR tieto podmienky: 1. trvania záruky: 2 roky 2. poskytovanie záruky: a) záručnú opravu vykonáme podľa nášho zvážení opravou alebo výmenou chybných dielov, ak tieto závady vznikli preukázateľne chybou materiálu alebo chybou pri výrobe b) záručná... - Page 46 informatívnym štítku prístroja. Zástrčka prívodného kábla môže byť zapojená len do zásuvky s uzemnením a všetkými štandardnými parametrami podľa miestnej siete. · Nenechávajte visieť kábel prístroja cez hranu stola a vyvarujte sa toho, aby prišiel do styku s horúcimi plochami. ·...
- Page 47 MONTÁŽ Odlepte všetky ochranné a reklamné polepy Pred zapojením do el. siete nechajte vinotéku vo vzpriamenej polohe, aspoň 8 hodiny. To všeobecne znižuje riziko poruchy akéhokoľvek chladiaci systém. Vnútro vinotéky očistite vlažnou vodou a jemnou handričkou. Vinotéku postavte na stabilný, rovné a suché miesto. Miesto (police) musí mať dostatočnú nosnosť pre prípad že vinotéka bude úplne naplnená...
- Page 48 Otočte dvere. Premiestnite kryciu dosku a závesný kolík z hornej časť dverí na opačnú spodnú stranu. Premiestnite skrutky, doštičku ku spínaču, dverovú zarážku a závesný kolík zo spodnej časti na opačnú hornú stranu. TEPLOTA Vinotéka musí byť v miestnosti. Uistite sa, že je okolitá teplota v miestnosti medzi 10 - 26 ° C. Ak je teplota miestnosti vyššia alebo nižšia, môže byť...
-
Page 49: Čistenie A Údržba
nastavení teploty jednej časti sa teplota druhej časti nastaví automaticky. · Nastavená teplota je zobrazená na displeji. · Tlačidlom zapnutia / vypnutia svetla je možné zapnúť / vypnúť svetlo uvniř prístroja (4). · Prístroj zapnite stlačením tlačidla zapnutia / vypnutia prístroja (5). Aj keď je prístroj vypnutý týmto tlačidlom, stále je napájaný... - Page 50 OHĽAD NA ŽIVOTNÉ PROSTREDIE Symbol na prístroji alebo na jeho obale znamená, že s týmto výrobkom nie je možné nakladať ako s domovým odpadom, ale musí byť odovzdaný na miestach určených na zber a likvidáciu elektrických a elektronických zariadení. Dodržaním tohto odporúčania chránite životné prostredie a zdravie spoluobčanov.
- Page 51 www.domo-elektro.be DO918WK...
- Page 52 über: webshop.domo-elektro.be or scan here: oder hier scannen: of scan hier: ou scannez ici: LINEA 2000 bvba - Dompel 9 - 2200 Herentals - Belgium - Tel: +32 14 21 71 91 - Fax: +32 14 21 54 63...
Need help?
Do you have a question about the Domo DO918WK and is the answer not in the manual?
Questions and answers