Z GRILLS Feed Life ZPG-700E Owner's Manual
Wood pellet grill
Hide thumbs
Also See for Feed Life ZPG-700E:
- User manual ,
- Owner's manual (21 pages) ,
- Manual (29 pages)

Related Manuals for Z GRILLS Feed Life ZPG-700E


Summary of Contents for Z GRILLS Feed Life ZPG-700E
- Page 1 Z Grills ZPG-700E Wood Pellet Grill Owner Manual www.zgrills.com.au support@zgrills.com.au...
- Page 2 IMPORTANT SAFETY INFORMATION DANGER! • FLAMMABLE LIQUIDS: Never use or store flammable liquids near the grill, or use flammable liquids to light the grill. • OUTDOOR USE ONLY: Do not operate the grill indoors or in enclosed spaces as carbon-monoxide poisoning may occur. DANGER! •...
-
Page 3: Table Of Contents
11. Initial Startup Instructions 12. New Grill Burn In 13. Normal Operation 14. Manual Operation 15. Technical Specifications 16. Troubleshooting 17. Grill Repair Instructions 18. Limited Product Warranty © Z Grills Australia Pty Ltd - 2019 www.zgrills.com.au ZG06.01.01 V5 06-2019... -
Page 4: Operating Guidelines
1. Operating Guidelines • For convenient and safe assembly, use at least two people to assemble the grill. • DO NOT use the grill in any enclosed area, it is for outdoor use only. • DO NOT use your grill outside on rainy days, it must not get wet. •... -
Page 5: Quick Reference Guide
2. Quick Reference Guide INITIAL STARTUP PROCEDURE • The Initial Startup Procedure must be completed before first use and each time after the grill runs out of wood pellets. NEW GRILL BURN IN • It is important to complete a 45 minute HIGH temperature BURN IN before cooking any food on a new Z Grill. -
Page 6: Food Minimum Cooked Temperatures
3. Food Minimum Temperature Chart • When cooking meat and fish use food probes to monitor the internal temperature. • Minimum temperatures must be reached to kill bacteria to ensure the meat is safe to eat, but can also indicate how well cooked it is. •... -
Page 7: Cleaning The Grill
4. Cleaning the Grill Clean the Grill after each use, as accumulation of grease, ash and soot can increase the risk of a grease fire and result in inefficient operation. Grease Tray, Drain & Bucket • Remove foil from the Grease Tray and wipe off any surface grease. •... -
Page 8: Controller Operation
5. Controller Operation The Controller monitors the Temperature Sensor inside the Grill and turns on/off the Auger Motor and sets the Fire-pot Fan speed. It can take some time for temperatures to stabilise at the desired setting. Avoid frequently adjusting the temperature or openly the lid. -
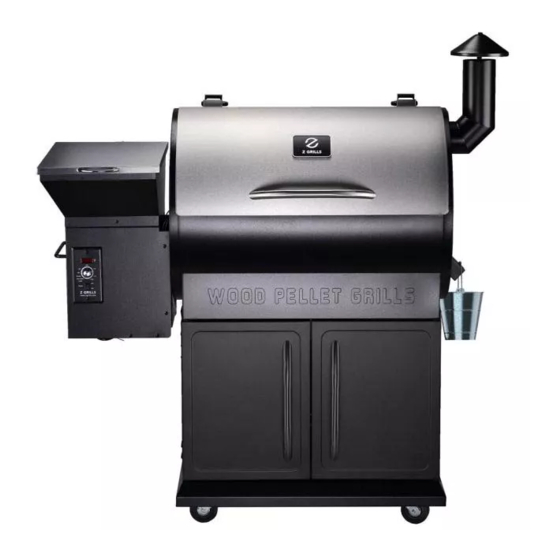
Page 9: Main Grill Components
7. Main Grill Components Hopper Bottom Assembly Chimney Stack Hopper Feed Chute Chimney Gasket Grill Lid Grease Bucket Grill Lid Handle Grill Base Fire Pot Heat Baffle Grill Temperature Sensor Grease Tray Thermal Insulating Sheet Main Grilling Rack Grill Drum Small Grilling Rack Chimney Cap... -
Page 10: Unpacking & Assembly Instructions
8. Unpacking & Assembly Instructions The boxes and some of the components are heavy. 2 people are required to safely complete the assembly process. Unpacking • Use the packing cardboard as a base to place painted metal components to avoid scratching. - Page 11 STEP 1 - WHEELS STEP 4 - FRONT BRACE STEP 2 - SIDE PANELS STEP 5 - HOPPER ASSEMBLY STEP 3 - REAR PANEL TIP: Cover the opening of the hopper with a piece of cardboard to prevent the kep nuts accidentally falling into the Auger.
- Page 12 STEP 6 - DRUM & BASE ASSEMBLY TIPS: 1. Lock the rear wheels so the Base doesn’t move around. 2. Use two people to lift the Drum up onto the base. 3. Align the Base holes with the threaded holes in the Drum. 4.
- Page 13 STEP 8 - HOPPER LID HANDLE STEP 9 - GRILL LID HANDLE TIP: Cover the opening of the hopper with a piece of cardboard to prevent the kep nuts accidentally falling into the Auger. STEP 11 - CHIMNEY STEP 10 - DOOR HANDLES Left &...
- Page 14 STEP 13 - HEAT BAFFLE TIPS: 1. Gently tap the Heat Baffle in and out of the slots. Using force will make it more difficult to remove. 2. Only remove the Heat Baffle once the grill has completely cooled down. REMOVE INSERT STEP 14 - GREASE TRAY...
-
Page 15: Wiring Diagram
9. Wiring Diagram Electrical Wire Colours Component TERMINAL BLOCK | GREY, GREY TEMPERATURE SENSOR RED, WHITE | RED, RED AUGER MOTOR & COOLING FAN (25 WATT) ORANGE, WHITE | ORANGE, ORANGE FIRE POT FAN (25 WATT) PURPLE, WHITE | GREY, GREY IGNITION ROD (200 WATT) BLACK, WHITE | BROWN, BLUE, GREEN/YELLOW... -
Page 16: Initial Startup Instructions
11. Initial Startup Instructions Follow the initial startup process before first use and each time after the grill runs out of wood pellets. 1. Remove Grill Racks, Grease Tray and Heat Baffle from the Grill. 2. Open the Pellet Hopper Lid and check to ensure there are no foreign objects in the Hopper or Auger. -
Page 17: Normal Operation
13. Normal Operation Startup Procedure 1. Open the Grill Lid 2. With the Controller Dial on Shut Down Cycle, switch the power ON 3. Turn the Dial to SMOKE position 4. Once you see smoke and hear the “roaring” sound of the fire close the Grill Lid 5. -
Page 18: Manual Operation
14. Manual Operation If there is a problem with the operation of the Ignition Rod, indicated by an inability for the Grill to ignite the pellets, please order a replacement one by contacting the Z Grills Australia team at www.zgrills.com.au... -
Page 19: Troubleshooting
Auger motor or control board. No smoke or fire Contact Z Grills Australia customer support for replacement parts. With the Grease Tray and Heat Baffle removed, turn the Dial to SMOKE setting so pellets are fed into the Fire-pot. Watch for signs of smoke. - Page 20 Problem Reason Investigation/Solution If the temperature setting is switched directly from SMOKE to a high temperature, the fire pot can sometimes become too full, ErH High Temperature resulting in a high temperature error. FIRE POT TOO FULL OF Error on Controller Turn the grill OFF, then back ON, open the lid and set to SMOKE, PELLETS Display...
-
Page 21: Grill Repair Instructions
✓ Wire snips or scissors 30-40 min ZG-AMOTOR ✓ Pliers * This is standard type of fuse widely available from electrical suppliers and retailers. Questions? • Send a support request on our website. (BEST OPTION) • Contact Z Grills Australia customer support at support@zgrills.com.au... -
Page 22: Limited Product Warranty
Please refer to the section Grill Repair Instructions, for more information. Manufacturer’s Limited Warranty Policy Z Grills Australia Pty Ltd (Z Grills) provides a 3 years parts warranty from the date of purchase by the original owner. This warranty applies to defects in all materials and workmanship. - Page 23 Enjoy your Cooking!
Need help?
Do you have a question about the Feed Life ZPG-700E and is the answer not in the manual?
Questions and answers