Advertisement
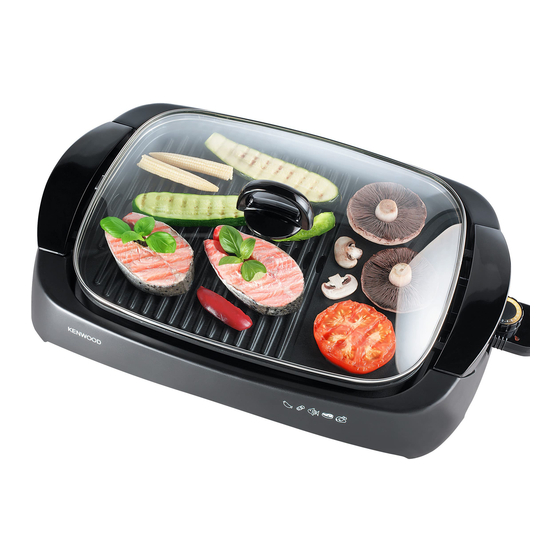
Know Your Kenwood Health Grill
Your new Kenwood Health Grill will enable you to cook a range of
healthy and flavoursome foods including meat, fish, poultry and
vegetables. During cooking the fat drains away from the food and
collects in the drip tray thus reducing the fat content of the food.
IMPORTANT SAFEGUARDS
When using electrical appliances basic safety precautions should
always be followed including the following:-
1. Read all instructions.
2. Do not touch hot surfaces, use the handles.
3. Do not immerse the power supply connector in water or other
liquids and do not allow it to become wet.
4. This appliance is for domestic use only.
5. The appliance is not intended for use by young children or infirm
persons without supervision.
6. Young children should be supervised to ensure that they do not
play with the appliance.
7. Do not leave the appliance unattended when in use.
8. Never use a damaged appliance. Get it checked or repaired: see
9. The use of accessories not recommended by the appliance
manufacturer may cause injury.
10. Take care when removing the temperature control - the probe may
be hot.
11. Do not let the power supply cord hang over the edge of the table or
worktop or touch hot surfaces. (This also applies to an extension
lead if used)
12. Do not use the appliance for other than its intended use.
13. Do not use the Health Grill outdoors.
14. Do not place any part of this appliance on or near a naked flame or
hot plate or in a heated oven.
15. Always attach the power supply connector to the appliance first,
then plug into the power supply. To disconnect, switch off, remove
plug from the power supply first and then the power supply
connector from the appliance.
16. The connector must be removed before the appliance is cleaned and
the appliance inlet must be dried before the appliance is used again.
17. Unplug the appliance from the power supply when not in use.
18. If this appliance is used with an extension lead, ensure that it is
suitable for the rating of the Health Grill and that the extension lead
is reliably earthed, If unsure check with a qualified electrician.
19. The supply cord should be regularly examined for signs of damage
and the appliance must not be used if the cord is damaged.
20. With some foods large quantities of smoke are emitted - ensure
there is adequate ventilation.
21. The appliance must be connected to a socket-outlet having an
earthing contact.
22. WARNING: Charcoal or similar combustible fuels must not be used
with this appliance.
23. Only the appropriate connector must be used with this appliance.
SAVE THESE INSTRUCTIONS
Key
1. Handles
5. Base
2. Glass lid
6. Detachable power supply
3. Non stick grill plate
connector
4. Drip tray
7. Temperature control
Connecting to Power
Before switching on make sure that the voltage of your electricity supply is the
same as that indicated on the rating plate.
IMPORTANT (UK ONLY): The wires in the mains lead are coloured in
accordance with the following code:
GREEN and YELLOW
BLUE
BROWN
NOTE:
This appliance complies with European Economic Community Directive
89/336/EEC.
Operation
For packing purposes the handle is not fitted to the lid. To fit the
handle:-
1. Undo the screw.
2. Place handle centrally over the hole in the top of the lid.
3. Invert the lid and handle and fix together by means of the screw
assembly. DO NOT OVERTIGHTEN.
Prior to using this appliance for the first time, wash the grill plate, base,
lid and drip tray in accordance with the instructions given under the
Cleaning section. Dry thoroughly and then lightly brush the surface of
the grill plate with cooking oil.
Place the drip tray into the base, then place the grill plate onto the drip
tray. Never use the grill plate directly on the work surface, always use
with the drip tray and base.
Insert the power supply connector into the grill plate, then connect to
the power supply and switch on. Turn the temperature control to the
desired setting: the higher the number the hotter the temperature. When
the Health Grill reaches this temperature, the light will go out and
cooking can commence. (During cooking, the light will go on and off
indicating that the selected temperature is being maintained).
This appliance should only be used on a heat resistant and easy to
wipe clean surface.
Cooking Guide
The following temperature settings and times are a guide only and will
vary according to individual preferences and the size/thickness of the
food being cooked. With use you will become familiar with the time and
setting needed to cook the food to your own requirements. Some
thicker items of food in particular pork and chicken, which should be
thoroughly cooked, may benefit from being pre-cooked in an oven or
microwave before being placed on the grill.
The Health Grill has two cooking areas. The flat plate is most suitable
for cooking fried eggs, tomatoes, mushrooms whereas the grills are
suitable for cooking meat such as beefburgers, chops and steaks.
Food
Whole fish
Fish steaks
Prawns
Chicken - Drumstick
Boneless chicken breast
Steak
Chops
Sausages
Bacon
EARTH
NEUTRAL
Burgers Frozen 55g
LIVE
Burgers
Kebabs
Temperature
Approximate
Setting
12
15-20 minutes
12
15 minutes
12
6-10 minutes
12
35-40 minutes
12
25-30 minutes
MAX
3-5 minutes (rare)
15-20 minutes (well done)
12
30-35 minutes
14
20-25 minutes
10
6 minutes
14
10-12 minutes
Fresh 175g
14
10 minutes
14
10-15 minutes
Time
Advertisement
Table of Contents

Related Manuals for Kenwood HG230


Summary of Contents for Kenwood HG230
- Page 1 Know Your Kenwood Health Grill Operation Your new Kenwood Health Grill will enable you to cook a range of 1. Handles 5. Base For packing purposes the handle is not fitted to the lid. To fit the healthy and flavoursome foods including meat, fish, poultry and 2.
- Page 2 If the supply cord of this appliance is damaged, it must, for safety best used on the Health Grill. It is best to avoid cooking tough cuts reasons be replaced by Kenwood or an authorised Kenwood repairer. of meat. Best results are obtained by cooking foods of a uniform thickness.
Need help?
Do you have a question about the HG230 and is the answer not in the manual?
Questions and answers