Baby Jogger city GO base Instructions Manual
Hide thumbs
Also See for city GO base:
- Manual (92 pages) ,
- Instruction manual (75 pages) ,
- Instructions manual (48 pages)
Table of Contents
Advertisement
Available languages
Available languages
Advertisement
Chapters
Table of Contents

Related Manuals for Baby Jogger city GO base


Summary of Contents for Baby Jogger city GO base
- Page 1 base PD349317B KEEP INSTRUCTIONS FOR FUTURE USE Do not install or use this child restraint base until you read and understand the instructions in this manual. FAILURE TO PROPERLY USE THIS CHILD RESTRAINT BASE INCREASES THE RISK OF SERIOUS INJURY OR DEATH IN A SUDDEN STOP OR CRASH. babyjogger.com...
-
Page 2: Table Of Contents
TABLE OF CONTENTS Registration ............................3 Warnings ............................. 5 LATCH System ..........................7 Vehicle Installation Safety ....................8 Features ..............................11 Adjusting the Recline ......................12 Base Installation • LATCH ............................13 • Lap/Shoulder Belt ......................16 • Lap Belt Only ........................19 Attaching & Removing Car Seat................22 LATCH and Instruction Storage ................23 Care and Maintenance .....................23 Warranty ............................24... -
Page 3: Registration
Zip Code Email Address DO NOT USE 7 YEARS AFTER THE MANUFACTURE DATE Baby Jogger, LLC Child restraints could be recalled for safety reasons. You must register this restraint to be reached in a recall. Send your name, address, email address if available and the restraint’ s model number and... - Page 4 ATV’ s or any other non-certified vehicles. IF YOU NEED ASSISTANCE OR HAVE ANY QUESTIONS If you have any questions regarding installation of your seat, please contact consumer care: Baby Jogger, LLC 4110 Premier Drive High Point, NC 27265 1-800-241-1848 www.babyjogger.com...
-
Page 5: Warnings
WARNING DO NOT place rear-facing child seat on front seat with an active airbag. DEATH OR SERIOUS INJURY can occur. The back seat is the safest place for children 12 and under. • Only place this child restraint base in a rear-facing direction on a forward facing vehicle seat when using it in a vehicle. - Page 6 • Secure this child restraint base with the vehicle’ s child restraint anchorage system (LATCH) if available or with a vehicle belt, never both. • Never leave child restraint base unsecured in your vehicle. An unsecured base can be thrown around and may injure occupants in a sharp turn, sudden stop, or crash.
-
Page 7: Latch System
LATCH SYSTEM LATCH stands for Lower Anchors and Tethers for CHildren. The LATCH system can make installation easier without using the vehicle’ s seat belts. LATCH is a way to secure your child restraint to your vehicle by using the LATCH connectors on your child restraint base. - Page 8 VEHICLE SEAT LOCATIONS WARNING! • Failure to place the child restraint base in the correct seating positions increases the risk of serious injury or death. • DO NOT place rear-facing child restraint base on front seat with airbag. DEATH or SERIOUS INJURY can occur.
- Page 9 UNSAFE VEHICLE SEAT BELTS WARNING! The following types of vehicle seat belts are NOT compatible with this base. If any of the belt types listed are in the chosen seating position, choose another seating position within in the vehicle. Lap or Shoulder Motorized Shoulder Belt Mounted on Belt with Lap Belt...
- Page 10 SAFE VEHICLE SEAT BELTS The following vehicle belt systems are SAFE to use for base installation. 1 Lap Belt with Locking Latch Plate - The vehicle belt is tightened by pulling on the free end of the strap until the belt is tight. 2 Lap Belt with Automatic Locking Retractor (ALR)- The automatic locking retractor does not allow the lap belt to get longer once it...
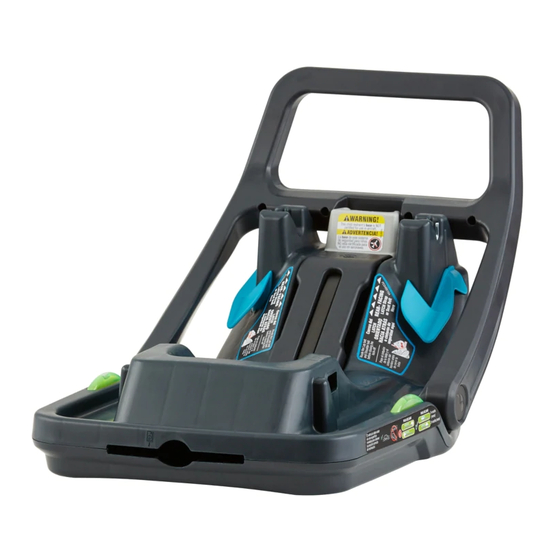
- Page 11 Level Indicators LATCH Adjuster 2 Belt Lock-Off LATCH Release Button 3 LATCH Strap LATCH Connector 4 LATCH & Vehicle Belt Path Recline Foot 5 LATCH Storage Compartment...
-
Page 12: Adjusting The Recline
ADJUSTING THE RECLINE 1 The base has 6 recline positions for the foot. 2 To raise the foot, twist the knob to the left until it clicks into place. Recline base until the bubble rests completely within the blue line. 3 Reverse steps to lower the foot. -
Page 13: Base Installation
BASE INSTALLATION - LATCH Before installing base, make sure vehicle is on level ground. Place base on an approved LATCH vehicle seating location. 1 Remove LATCH strap from LATCH storage compartment. 2 Extend the strap to the longest length by pushing in on the gray button and pulling on the strap. - Page 14 BASE INSTALLATION - LATCH 3 Press the LATCH connectors onto the adjacent vehicle anchors until a click is heard. Pull the LATCH connector to verify a secure lock. 4 Check the level indicator on the base. The bubble must be completely within the zone of your childs weight.
- Page 15 BASE INSTALLATION - LATCH 7 Place child restraint into the base. Push down on the front of the child restraint and handle, you will hear a click. Test to make sure it is attached by pulling up on the front corners of the child restraint.
-
Page 16: Lap/Shoulder Belt
BASE INSTALLATION - LAP/SHOULDER BELT Before installing base, make sure vehicle is on level ground. Place base on an approved vehicle seat location. 1 Open the lock off. 2 Ensure the vehicle seat belt is not twisted and route the vehicle belt through the first belt path opening then under the belt lock-off and down through the second belt guide. - Page 17 BASE INSTALLATION - LAP/SHOULDER BELT 4 While pressing the base down into the seat, pull on the vehicle belt to tighten. 5 Close the lock-off over the lap belt until it clicks into place. 6 Test For Tightness. Grab the sides of the base where the seat belt is and push and pull the base from side to side and front to back.
- Page 18 BASE INSTALLATION - LAP/SHOULDER BELT 7 Place child restraint into the base. Push down on the front of the child restraint and handle, you will hear a click. Test to make sure it is attached by pulling up on the front corners of the child restraint. 8 Check the level indicator.
- Page 19 BASE INSTALLATION - LAP BELT Before installing base, make sure vehicle is on level ground. Place base on an approved vehicle seat location. 1 Open the lock off. 2 Route the vehicle seat belt through the rear-facing belt path (marked with labels) and buckle.
- Page 20 BASE INSTALLATION - LAP BELT 4 While pressing the base down into the seat, pull on the vehicle belt to tighten. 5 Close the lock-off over the lap belt and lock it. 6 Test For Tightness. Grab the sides of the base where the seat belt is and push and pull the base from side to side and front to back.
- Page 21 BASE INSTALLATION - LAP BELT 7 Place child restraint into the base. Push down on the front of the child restraint and handle, you will hear a click. Test to make sure it is attached by pulling up on the front corners of the child restraint. CLICK 8 Check the level indicator.
-
Page 22: Attaching & Removing Car Seat
ATTACHING & REMOVING THE CAR SEAT 1 Attach the carrier into the base until you hear a click. Lift up on the handle of the carrier to make sure that it is securely attached in the base. 2 To remove the seat from the base, pull up the release handle located on the rear of the car seat. -
Page 23: Latch And Instruction Storage
LATCH AND INSTRUCTION STORAGE 1 Press the LATCH connectors into the LATCH storage compartments until a click is heard. 2 Store instruction manual on the under side of the base in the specified grooves in the base. car seat & base Do not install or use this child restraint until you read and understand the instructions in this manual. -
Page 24: Warranty
Attorney General. Note: When contacting Baby Jogger regarding your product, please have the serial number and manufacturing date ready. It can be found on the underside of the car seat and inside of the base. - Page 25 NOTES:...
- Page 26 NOTES:...
- Page 27 NOTES:...
- Page 28 Baby Jogger, LLC 6655 Peachtree-Dunwoody Rd. NE, Atlanta, GA 30328 1.800.241.1848 • www.babyjogger.com...
- Page 29 base PD349317B GUARDE ESTAS INSTRUCCIONES PARA USO FUTURO No instale ni use esta base del sistema de seguridad para niños hasta que haya leído y entendido las instrucciones en este manual. NO USAR DEBIDAMENTE ESTA BASE DEL SISTEMA DE SEGURIDAD PARA NIÑOS AUMENTA EL RIESGO DE LESIONES SERIAS O LA MUERTE EN UN ACCIDENTE O AL DETENERSE REPENTINAMENTE.
- Page 30 TABLE OF CONTENTS Registro ..............................3 Advertencias ........................... 5 Sistema LATCH ..........................7 Seguridad de la instalación en el vehículo ............8 Características ..........................11 Ajustar la reclinación ......................12 Instalación de la base • LATCH ............................13 • Cinturón para la falda y el hombro .............16 •...
- Page 31 Zip Code Email Address DO NOT USE 7 YEARS AFTER THE MANUFACTURE DATE Baby Jogger, LLC Los sistemas de seguridad para niños pueden ser retirados del mercado por razones de seguridad. Debe registrar este sistema de seguridad para que lo podamos contactar en dicho caso. Envíe su nombre, dirección, dirección electrónica si está...
- Page 32 SI NECESITA ASISTENCIA O TIENE ALGUNA PREGUNTA Si tiene alguna pregunta sobre la instalación de su asiento, por favor comuníquese con atención al consumidor: Baby Jogger, LLC 4110 Premier Drive High Point, NC 27265 1-800-241-1848 www.babyjogger.com Para obtener información sobre los sistemas de seguridad para...
-
Page 33: Advertencias
ADVERTENCIA NO ponga el asiento para niños orientado hacia atrás en un asiento delantero con bolsa de aire activa. Puede ocurrir la MUERTE o LESIÓN SERIA. El asiento de atrás es el lugar más seguro para niños de 12 años o menores. •... - Page 34 este producto. • Asegure esta base del sistema de seguridad para niños con el sistema de anclaje del vehículo para sistemas de seguridad para niños (LATCH) si está disponible o con un cinturón de seguridad del vehículo, nunca ambos. • Nunca deje la base del sistema de seguridad para niños sin sujetar en su vehículo.
-
Page 35: Sistema Latch
SISTEMA LATCH LATCH quiere decir anclaje inferior y superior para niños (Lower Anchors and Tethers for CHildren). El sistema LATCH puede hacer que la instalación sea más fácil sin usar los cinturones de seguridad del vehículo. El LATCH es una manera de sujetar el sistema de seguridad para niños a su vehículo usando los conectores del LATCH en la base de su sistema de seguridad para niños. - Page 36 UBICACIONES DEL ASIENTO DEL VEHÍCULO ¡ADVERTENCIA! • No poner la base del sistema de seguridad para niños en la posición correcta del asiento aumenta el riesgo de lesiones serias o la muerte. • NO ponga la base del sistema de seguridad para niños orientada hacia atrás en un asiento delantero con bolsa de aire.
- Page 37 CINTURONES DE SEGURIDAD DEL VEHÍCULO INSEGUROS ¡ADVERTENCIA! Los siguientes tipos de cinturones de seguridad del vehículo NO son compatibles con este asiento para niños. Si alguno de los tipos de cinturón listados están en la posición del asiento elegida, elija otra posición del asiento dentro del vehículo.
- Page 38 CINTURONES DE SEGURIDAD DEL VEHÍCULO SEGUROS Los siguientes sistemas del cinturón del vehículo son SEGUROS para usar en la instalación de la base. 1 Cinturón para la falda con placa de unión con traba – El cinturón del vehículo se tensiona tirando del extremo libre de la correa hasta que el cinturón esté...
- Page 39 Indicadores del nivel Ajustador del LATCH 2 Traba del cinturón Botón de liberación del LATCH 3 Correa del LATCH Conector del LATCH 4 Vía del LATCH y cinturón del vehículo 9 Pie de reclinación 5 Compartimiento de almacenamiento del LATCH...
-
Page 40: Ajustar La Reclinación
AJUSTAR LA RECLINACIÓN 1 La base tiene 6 posiciones de reclinación para el pie. 2 Para levantar el pie, gire la perilla hacia la izquierda hasta que se trabe en su lugar. Recline la base hasta que la burbuja esté completamente dentro de la línea azul. -
Page 41: Instalación De La Base
INSTALACIÓN DE LA BASE - LATCH Antes de instalar la base, asegúrese de que el vehículo esté en un piso nivelado. Ponga la base en un lugar aprobado del asiento del vehículo con LATCH. 1 Saque la correa del LATCH del compartimento de almacenamiento del LATCH. - Page 42 INSTALACIÓN DE LA BASE - LATCH 3 Oprima los conectores del LATCH sobre los anclajes adyacentes del vehículo hasta que se escuche un sonido. Tire el conector del LATCH para verificar una traba segura. 4 Verifique el indicador del nivel en la base. La burbuja debe estar completamente 4-20 lb (2-9 kg) dentro de la zona que corresponde con...
- Page 43 INSTALACIÓN DE LA BASE - LATCH 7 Ponga el sistema de seguridad para niños en la base. Empuje hacia abajo en el frente del sistema de seguridad para niños y la manija, escuchará un clic. Pruebe para asegurarse de que esté...
- Page 44 INSTALACIÓN DE LA BASE – CINTURÓN PARA LA FALDA/HOMBRO Antes de instalar la base, asegúrese de que el vehículo esté en un piso nivelado. Ponga la base en una ubicación aprobada en el asiento del vehículo. 1 Abra la traba. 2 Asegúrese de que el cinturón de seguridad del vehículo no esté...
- Page 45 INSTALACIÓN DE LA BASE – CINTURÓN PARA LA FALDA/HOMBRO MBRO 4 Mientras oprime la base hacia abajo al asiento, tire el cinturón del vehículo para tensionarlo. 5 Cierre la traba sobre el cinturón para la falda hasta que se trabe en su lugar. 6 Pruebe la tensión.
- Page 46 INSTALACIÓN DE LA BASE – CINTURÓN PARA LA FALDA/HOMBRO 7 Ponga el sistema de seguridad para niños en la base. Empuje hacia abajo en la parte delantera del sistema de seguridad para niños y la manija, escuchará un clic. Pruebe para asegurarse de que esté...
- Page 47 MBRO INSTALACIÓN DE LA BASE – CINTURÓN PARA LA FALDA Antes de instalar la base, asegúrese de que el vehículo esté en un piso nivelado. Ponga la base en un lugar aprobado para el asiento del vehículo. 1 Abra la traba. 2 Pase el cinturón de seguridad del vehículo por la vía del cinturón orientada hacia atrás (marcada con etiquetas) y...
- Page 48 INSTALACIÓN DE LA BASE – CINTURÓN PARA LA FALDA 4 Mientras oprime la base hacia abajo al asiento, tire el cinturón del vehículo para tensionarlo. 5 Cierre la traba sobre el cinturón para la falda y trábela. 6 Pruebe la tensión. Agarre los costados del base donde se encuentra la correa del LATCH y deslice el asiento de un lado a otro y de atrás hacia delante.
- Page 49 INSTALACIÓN DE LA BASE – CINTURÓN PARA LA FALDA 7 Ponga el sistema de seguridad para niños en la base. Empuje hacia abajo en la parte delantera del sistema de seguridad para niños y la manija, escuchará clic. Pruebe para ¡CLIC! asegurarse de que esté...
-
Page 50: Sujetar Y Sacar El Asiento De Automóvil
SUJETAR Y SACAR EL ASIENTO DE AUTOMÓVIL 1 Sujete el transportador a la base hasta que escuche un sonido. Levante agarrando la manija del transportador para asegurarse de que esté apretadamente sujetado a la base. 2 Para sacar el asiento de la base, tire hacia arriba la manija de liberación que se encuentra atrás del asiento de automóvil. -
Page 51: Almacenamiento Del Latch E Instrucciones
ALMACENAMIENTO DEL LATCH E INSTRUCCIONES 1 Oprima los conectores LATCH en los compartimientos de almacenamiento del LATCH hasta que se escuche un sonido. 2 Guarde el manual de instrucciones en la parte inferior de la base en las ranuras especificadas de la base. car seat &... -
Page 52: Garantía
Fiscal General de su estado. Nota: Cuando se comunica con Baby Jogger sobre su producto, por favor tenga a mano el número de serie y la fecha de fabricación. Se pueden encontrar en la parte de abajo del asiento de automóvil y en el interior de... - Page 53 NOTAS:...
- Page 54 NOTAS:...
- Page 55 NOTAS:...
- Page 56 Baby Jogger, LLC 6655 Peachtree-Dunwoody Rd. NE, Atlanta, GA 30328 1.800.241.1848 • www.babyjogger.com...
Need help?
Do you have a question about the city GO base and is the answer not in the manual?
Questions and answers