Table of Contents
Advertisement
Quick Links
Advertisement
Table of Contents

Related Manuals for Bartscher K 300/60L


Summary of Contents for Bartscher K 300/60L
- Page 1 K 300/60L 300747 Original-Gebrauchsanleitung V2/0419...
-
Page 2: Table Of Contents
5.4.1 Functions of buttons / indicators / LED indicators ........42 5.4.2 Settings ....................... 44 5.4.3 Vacuum packaging ..................45 6. Cleaning ........................49 7. Possible Malfunctions ..................... 50 8. Waste disposal ......................52 Bartscher GmbH phone: +49 5258 971-0 Franz-Kleine-Str. 28 fax: +49 5258 971-120 33154 Salzkotten... -
Page 3: Safety
Read this instruction manual before using and keep them available at all times! This instruction manual contains information about the installation, operation and maintenance of the device and should be consulted as an important source of information and reference guide. Awareness of the safety instructions and instructions for use in this manual will ensure the safe and correct use of the device. -
Page 4: Safety Instructions
WARNING of hand injury! This symbol highlights dangerous situations which could lead to serious hand injury. CAUTION! This symbol highlights dangerous situations which could lead to light injuries, or damage, malfunction, and/or destruction of the device. NOTE! This symbol highlights recommendations and information aimed for effective and trouble-free device operation. - Page 5 Prevent access of children to the package materials like plastic bags and foamed polystyrene elements. Suffocation hazard! Only a qualified technician and using original spare parts and accessories should carry out repairs and maintenance of the device. Do not attempt to repair the device yourself. ...
- Page 6 Check the power cord regularly for damage. Do not use the device if the power cord is damaged. If this cable is damaged, it must be replaced by customer service or a qualified electrician in order to avoid dangers. ...
-
Page 7: Use As Intended
WARNING! Burn hazard! In order to avoid this risk, please observe the following safety instructions. During the operation and shortly after, the sealing strip and sealing bar are hot. Do not touch these parts of the device. Operate the device only using the designated handles and control elements. -
Page 8: General Information
2. General information 2.1 Liability and Warrantees All the information and instructions in this manual take into account standard safety regulations, current levels of technical engineering as well as the expertise and experience we have developed over the years. The instruction manual was translated with all due care and attention. However, we do not accept liability for any translation errors. -
Page 9: Transport, Packaging And Storage
3. Transport, packaging and storage 3.1 Delivery check Please check the delivery upon completeness and transport damage immediately after receipt. In case of visible damage do not accept or accept the delivery with reservation only. Note the extent of damage on the carrier’s bill of delivery. Trigger off the complaint. Hidden damages should be reclaimed immediately after notice, as claims for damages can only be asserted within the effective period for complaints. -
Page 10: Technical Data
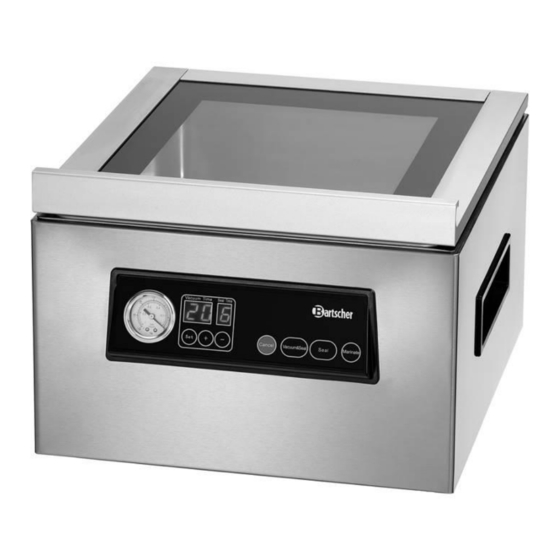
4. Technical data 4.1 Overview of parts Lid handle Sealing strip Control panel Lid hinges (2x) Body ON/OFF switch Carrying handle Power cable Seal Vacuum chamber Sealing bar Clamp bar for vacuuming bags - 35 -... -
Page 11: Technical Specification
4.2 Technical specification Description Vacuum packaging machine K 300/60L 300747 Code- No.: Body: stainless steel, plastic Material: Lid: glass, stainless steel Silver, black Colour: Functions: - combined vacuuming and sealing - manual sealing - marinating Vacuum control: Time controlled ... -
Page 12: Accessories
4.3 Accessories (not included in the delivery!) Vacuum Bags K1,2L Capacity: 1,2 litres Dimensions: 160 x 250 mm Code-No. 300311 Vacuum Bags K2,5L Capacity: 2.5 litres Dimensions: 200 x 300 mm Code-No. 300312 5. Installation and operation 5.1 Installation and connection Positioning ... -
Page 13: The Benefits Of Vacuum Packing
Connection DANGER! Electric shock hazard! The device can cause injuries due to improper installation! Before installation and connecting the local power grid specification should be compared with that of the device (see rating plate). Connect the device only in case of compliance! ... -
Page 14: Guidelines For Vacuum Packaging
more space is freed up in the freezer; foodstuffs are protected from drying out and oxidation; in this manner it is possible to marinate quickly and thoroughly (20 minutes in the vacuum is enough); in this manner it is also possible to repack meat products, sausages, and cheeses which were previously vacuum packed (the flavour is retained);... - Page 15 8. Fruits and vegetables, such as apples, bananas, potatoes, and root vegetables should be peeled prior to vacuum packing, as this will prolong their shelf lives. 9. Some vegetables, such as broccoli, cauliflower, and white cabbage emit gases when vacuum packed. For this reason it is necessary to blanch and freeze them. 10.
- Page 16 Vacuum packing for the refrigerator The meals may be prepared earlier in appropriate portions and stored as vacuum packed in the refrigerator, and then heat as required. Vacuum packing for the food storage The vacuum packing may also be advantageous in case of foodstuffs which may be stored in the room temperature (coffee, flour, flour products, sugar, etc.).
-
Page 17: Operation
5.4 Operation Before the first use Before the first use always thoroughly clean the device and its surfaces which will come into contact with food (vacuum bags, lid, etc.), according to the instructions included in Section 6 “Cleaning“. 5.4.1 Functions of buttons / indicators / LED indicators A. - Page 18 D. “Vacuum Time“ indicator (vacuum packaging time) This indicator displays: progress of the vacuum packaging process the set time of vacuum packaging E. “Seal Time“ indicator (sealing time) This indicator displays: progress of the sealing process the set time of sealing F.
-
Page 19: Settings
5.4.2 Settings 1. Vacuum packaging time In order to properly set the vacuum packaging time depending on the type of food products and vacuum bag size (increase or decrease), press the “SET“ button (F) and then “+“ (G) or “-“ (H) buttons. Please, take into account the recommended vacuum packaging times presented in the table below. -
Page 20: Vacuum Packaging
2. Sealing time In order to properly set the sealing time, based on the thickness and the material from which the vacuum bag is made, ambient temperature and types of food products (increase or decrease), press the “SET“ (F) button and then “+“ (G) or “-“ (H) buttons. Please, take into account the recommended sealing times presented in the table below. - Page 21 Big vacuum bags which are not fully filled require longer vacuum packaging time; smaller bags may be vacuum packed faster. If necessary increase the vacuum packaging time, to make a more tightly sealed bag. To ensure better results of food marinating, repeat the vacuum packaging process 2 or 3 times.
- Page 22 Press the “Seal” button (C) on the control panel. The sealing starts. The set sealing time is shown on the “Seal Time”(E) indicator and it is counted down until the end of the process. Note: in order to stop the sealing process earlier press the Cancel (J) button. ...
- Page 23 Start the automatic vacuum packaging process (vacuum packaging and sealing) Close the lid of the device. Note: Make sure that no air is escaping through the lid. When starting the device always keep the lid tightly shut for a few seconds. ...
-
Page 24: Cleaning
Vacuum marinating 1. Open the lid of the device and fill the vacuum bag with food products to be marinated. Place the vacuum bag with on open end on the sealing strip in the vacuum chamber. 2. Close the lid of the device and press the ON/OFF switch to “I” position to start the device. -
Page 25: Possible Malfunctions
Interior of the device o If any food or liquid residues gather on the sealing strip or the sealing bar, remove them with a paper towel. o Wipe the vacuum chamber with a soft moistened cloth. Storing the device o If the device is not used for a long time, clean it according to the above description and store in a dry, clean place, protected against cold, sun and, children. - Page 26 Problem Possible cause and solution The device does not produce Check the seal of the lid for damages or contamination. vacuum in the Clean the seal or replace it with a new seal. vacuum chamber The sealing may be incomplete due to folds, crumbs, fat, or moisture.
-
Page 27: Waste Disposal
Electric devices should be used and disposed of properly to prevent the impact on the environment. Disconnect the device from the power supply and remove the power cord from the device. Bartscher GmbH phone: +49 5258 971-0 Franz-Kleine-Str. 28 fax: +49 5258 971-120...
Need help?
Do you have a question about the K 300/60L and is the answer not in the manual?
Questions and answers