Table of Contents
Advertisement
Available languages
Available languages
TG 500A/(AL) / TG 500B/C
TG 501A/(AL)
a
guide d'installation - p. 2
Détecteur avertisseur de fumée à pile
Détecteur avertisseur de fumée 230 V
e
Montageanleitung - S. 14
Rauchwarnmelder, Batterie 9 V
Rauchwarnmelder, 10 Jahre, 9 V DC, weiß
Rauchwarnmelder, 230 V AC, weiß
Rauchwarnmelder, 10 Jahre, 230 V AC weiß
Installation guide- p. 26
z
Battery-operated smoke detector
Smoke detector 230 V
Installatiehandleiding - p. 38
i
Rookdetector op batterijvoeding
Rookdetector 230 V
y
manuale di installazione - p. 50
Rilevatore di fumo a batteria
Rilevatore di fumo 230 V
r
manual de instalación - p. 62
Rilevatore di fumo a batteria
Rilevatore di fumo 230 V
6LE001247C Ind. A
Advertisement
Chapters
Table of Contents

Subscribe to Our Youtube Channel
Related Manuals for hager TG 500A


Summary of Contents for hager TG 500A
- Page 1 TG 500A/(AL) / TG 500B/C TG 501A/(AL) guide d’installation - p. 2 Détecteur avertisseur de fumée à pile Détecteur avertisseur de fumée 230 V Montageanleitung - S. 14 Rauchwarnmelder, Batterie 9 V Rauchwarnmelder, 10 Jahre, 9 V DC, weiß Rauchwarnmelder, 230 V AC, weiß...
-
Page 2: Table Of Contents
Sommaire TG 500A (blanc) TG 500B (argent) Présentation ........2 - Principe de fonctionnement .... 2 - Descriptif.......... 3 TG 501A (blanc) Alimentation ........4 Présentation Pose du détecteur ......4 - Choix de l’emplacement ....4 Principe de fonctionnement - Fixation .......... -
Page 3: Descriptif
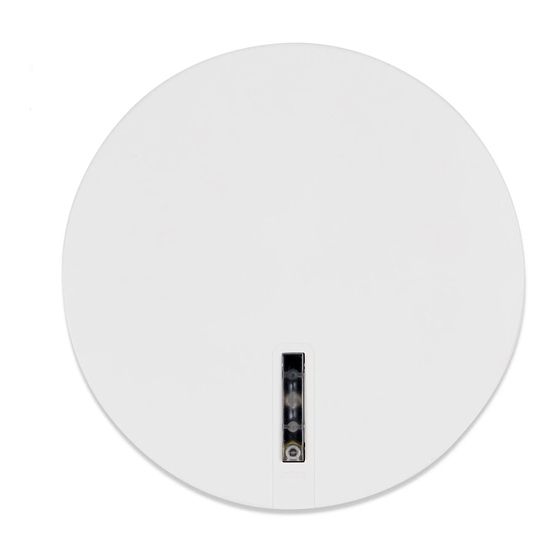
Descriptif Repère d’alignement de la touche test Connecteur de pile Touche test Bornier de connexion Voyant vert (présence tension TG501A) Voyant rouge (fonctionnement et alarme) Voyant blanc (éclairage en cas de détection de fumée) -
Page 4: Alimentation
Alimentation TG 500A / TG 500B TG 501A Connecter la pile en respectant le sens de Connecter la pile en respectant le sens de branchement. Le voyant rouge de signalisation branchement et raccorder le produit au secteur 230 V clignote pendant 15 s puis ensuite 1 fois toutes ~ sur les bornes L/N . -
Page 5: Fixation
Fixation Fixation sur boîte d’encastrement Pour des boîtes de diamètre 60 mm, utiliser les trous de fi xations repérés 60. Pour des boîtes de diamètre 85 mm, utiliser les trous de fi xations repérés 85. Fixer le socle à l’aide de vis appropriées. Fixation en saillie (Fig. -
Page 6: Pose De Plusieurs Détecteurs En Réseau
... -
Page 7: Test Du Détecteur
Test du détecteur La sonnerie est atténuée lors d’un test manuel Test de détection du détecteur de fumée néanmoins, il est conseillé de Pulvériser à travers les fentes prévenir au préalable le voisinage et de prendre les à environs 10 cm de la tête de précautions nécessaires pour éviter les risques de détection avec une bombe test troubles auditifs. -
Page 8: Inhibition Volontaire Du Détecteur
10 s. Signalisation des anomalies Anomalie d’alimentation : Détecteur à l’origine de l’anomalie A l’apparition de l’anomalie TG 500A/TG 500B TG 501A d’alimentation, le détecteur continue à fonctionner 1 clignotement parfaitement pendant 30 jours. -
Page 9: Anomalie De Tête Encrassée
Anomalie de tête de détection encrassée : Détecteur à l’origine de l’anomalie TG 500A/TG 500B TG 501A 8 clignotements toutes les 8 sec. 8 bips rapides toutes les 58 sec. Si la signalisation sonore de l’anomalie de tête de détection encrassée apparaît à... -
Page 10: Changement De L'alimentation
Changement de l’alimentation Il est impératif de A. Si l’ouverture optionnelle du détecteur n’est pas remplacer la verrouillée : pile fournie par une - Dégager le détecteur de son socle en le tournant pile alcaline dans le sens inverse des aiguilles d’une montre du même type jusqu’au clic de déverrouillage. -
Page 11: Fiche D'utilisation
Se préparer Résumé des réactions et des signalisations de votre détecteur à l’incendie Fonctionnement normal • Prévoyez un itinéraire d’évacuation. Tous vos détecteurs • Préparez un plan d’évacuation pour 1 clignotement toutes les 10 sec. toutes les pièces. Détection de fumée •... - Page 12 Il est possible de désactiver le détecteur pour une durée Détecteur à l’origine de l’anomalie de 15 min. : • en prévention d’activités TG 500A/TG 500B TG 501A pouvant générer de la 1 clignotement fumée (balayage d’une toutes les 5 sec.
-
Page 13: Spécifi Cations Techniques
La déclaration de performance • Alimentation : du TG500A/B est disponible en téléchargement sur le site internet local - TG 500A / TG 500B : de la marque hager. - pile alcaline 9 V type 6LR61 ; durée de vie 4 ans environ - pile Lithium 9 V type U9VL-J-P ;... -
Page 14: Beschreibung Des Gerätes
Inhaltsverzeichnis TG 500A (weiß) / TG 500(AL) (weiß) TG 500B (silber) / TG 500C (braun) Beschreibung des Gerätes ... 14 - Funktionsprinzipien ....... 14 TG 501A (weiß) / TG 501(AL) (weiß) - Beschreibung ........ 15 Stromversorgung ......16 Montage des Beschreibung des Gerätes... -
Page 15: Beschreibung
Beschreibung Montageplatte Markierung zum Ausrichten der Orientierungsleuchte Gehäuse Batterieclip Anschluss- Benutzertaste (zentral betätigen) sockel LED grün (Betriebsanzeige 230 V TG501A) LED rot (Normalbetrieb, Brandalarm, Störung) LED weiß (Raumausleuchtung im Alarmfall) -
Page 16: Stromversorgung
Stromversorgung TG 500A / TG 500(AL) / TG 500B TG 501A / TG 501(AL) TG 500C Batterie anschließen; Polung beachten und Melder Batterie anschließen; Polung beachten. an 230 V Netz gemäß Anschlussplan an (L/ N) Die rote Rauchmeldeleuchte blinkt 15 Sekunden lang anschliessen. -
Page 17: Montage
Montage Montage auf Unterputzdose Für Unterputzdosen, Durchmesser 60 mm, sind die Befestigungslöcher mit der Pos.-Nr. 60 zu verwenden. Für Unterputzdosen, Durchmesser 85 mm, sind die Befestigungslöcher mit der Pos.-Nr. 85 zu verwenden. Sockel mit Hilfe geeigneter Schrauben anbringen. Aufputzmontage (Abb. A) - Montageplatte am geplanten Einbauort anhalten und Befestigungslöcher mit Bleistift anzeichnen (Abbildung, Pos. - Page 18 ...
-
Page 19: Rauchwarnmelder
Rauchwarnmelder testen Beim manuellen Test des Rauchwarnmelders Rauchmeldefunktions-Test: ertönt ein gedämpfter Signalton; dennoch empfi ehlt Die Öffnungsschlitze des es sich, die Nachbarschaft vorab zu benachrichtigen Detektionskopfes etwa 1 bis und die gebotenen Vorkehrungen gegen 2 Sekunden aus mindestens Gehörschädigungen zu ergreifen. 10 cm Entfernung mit Testspray besprühen. -
Page 20: Gewollte Unterdrückung
Zustandsmeldeleuchte blinkt wieder alle 10 Sekunden. Meldung von Fehlern Fehler in der Stromversorgung: Fehlerverursachender Rauchwarnmelder Ab dem Auftreten des Strom- versorgungsfehlers ist die TG 500A/TG 500(AL)/ Funktion des Rauchwarnmelders TG 501A/TG 501(AL) TG 500B/ TG 500C noch für min. 30 Tage 1x Blinken alle gewährleistet. -
Page 21: Warnung "Melderkopf Verschmutzt
Warnung “Melderkopf verschmutzt”: Fehlerverursachender Rauchwarnmelder TG 500A/TG 500(AL)/ TG 501A/TG 501(AL) TG 500B/ TG 500C 8-maliges Blinken alle 8 Sekunden (rote LED) 8 kurz aufeinanderfolgende Signaltöne alle 58 Sek. Tritt die akustische Fehlermeldung “Melderkopf verschmutzt” zum ungewünschten Zeitpunkt auf, lässt sie sich maximal 7 Tage lang um 8 Stunden verschieben; hierzu ist die Benutzertaste bis zum Ertönen des ersten Signaltons zu drücken. -
Page 22: Batterie Auswechseln
... -
Page 23: Merkblatt
Verhalten Meldefunktionen Ihres Rauchwarnmelders im Brandfall Normalbetrieb Ruhe bewahren Alle Rauchwarnmelder 1x kurzes Blinken alle 10 Sek. 1. Brand melden Feuerwehr verständigen Rauchmeldung WER meldet ? Alarmauslösender Weitere im Netzverbund Rauchwarnmelder verdrahtete Melder WAS brennt ? WO brennt es ? blinkt schnell Aufl... -
Page 24: Gewollte Unterdrückung Des Rauchwarnmelders
Meldung von Fehlern Unterdrückung des Fehler in der Stromversorgung / Batterie Rauchwarnmelders Der Rauchwarnmelder Fehlerverursachender Rauchwarnmelder lässt sich für 15 Minuten TG 500A/TG 500(AL)/ deaktivieren: TG 501A/TG 501(AL) TG 500B/ TG 500C • vorbeugend bei rauch- 1mal blinken alle staubverursachenden 5 Sekunden (rote LED) Tätigkeiten (Fegen... -
Page 25: Technische Spezifi Kationen
• Einsatzbereich: innen EN 14604 (2005). • Stromversorgung: Die Leistungserklärung des Produktes • - TG 500A / TG 500B / TG 500C: TG500A/(AL)/B/C kann auf der - 9 V Block Alkaline (Typ: 6LR61); Internetseite der Firma hager des Lebensdauer ca. 4 Jahre. -
Page 26: Presentation
Contents TG 500A (white) TG 500B (silver) Presentation ........26 - Operation principle ......26 - Description ........27 TG 501A (white) Power supply ........28 Installation of the detector ... 28 Presentation - Selection of the installation location .......... 28 Operation principle - Fixing .......... -
Page 27: Description
Description Alignment position in the key test Battery- operated connector Test Key connector block Green signal lamp (sector presence 230 V TG501A) Red signal lamp (state of the detector) White indicator lamp (An emergency light is turned on in the event of smoke detection) -
Page 28: Power Supply
Alimentation TG 500A / TG 500B TG 501A Connect the battery, making sure that the Connect the battery, making sure that the battery connections are correct. The red direction of battery connections are correct and indicator lamp fl ickers for 15 sec, then once... -
Page 29: Fixing
Fixing Fixing with fl ush-mounting box For boxes of 60 mm diameter: use holes marked 60 For boxes of 85 mm diameter: use holes marked 85. Fix the base using suitable screws. Projecting mounting (Fig A) - Place the base in the desired location, then mark the position of the 2 fi xing holes using a pencil (ref. -
Page 30: Installing Several Detectors In A Network
... -
Page 31: Testing The Detector
Testing the detector Although the alarm level is reduced Detection test: during a manual test of a smoke detector, Using the smoke generator, it is advisable to inform neighbours prior spray smoke through the slots to running the test and to use all suitable about 10 cm away from the hearing protective devices. -
Page 32: Manual Disabling Of The Detector
fl ickering every 10 s. Indication of faults Power supply fault: Detector at the source of the fault indication After the power supply fault TG 500A/TG 500B TG 501A has occurred, the detector will operate normally for a 30-day the unit fl ickers once period. -
Page 33: Indication Of Detection Head Clogging
Indication of detection head clogging: Detector at the source of the fault indication TG 500A/TG 500B TG 501A the unit fl ickers 8 times over an 8-sec period the unit beeps fast 8 times over a 58-sec period If the sound indication of the clogged detection head state is activated at an inappropriate... -
Page 34: Battery Replacement
The warranty is withdrawn if: - after inspection by hager quality control dept the device is found to have been installed in a manner which is contrary to IEE wiring regulations and accepted practice within the industry at the time of installation. -
Page 35: User Sheet
Getting ready Summary of reactions and signals of the detector for fi re emergency Normal operation • Prepare an evacuation route. All your détectors • Draw up an emergency plan for all rooms. 1 fl ash every 10 sec. • In case of fi re, exit Smoke detection the room by crawling on the fl... - Page 36 15 min. Detector at the source of the fault indication period: • Prior to activities likely to TG 500A/TG 500B TG 501A produce smoke (sweeping the unit fl ickers once of a dusty room, of a every 5 sec.
-
Page 37: Technical Characteristics
• Use: interior The declaration of performance of the • Power supply: product TG500A/B can be downloaded on hager commercial internet site of the • - TG 500A / TG 500B: concerned country. - 9 V alkaline battery (Type: 6LR61);... -
Page 38: Introductie
Inhoudsopgave TG500A TG501A Introductie ........38 - Werking van het product ....38 - Tekening ........39 TG501AL Voeding ........... 40 Montage van de rookmelder ..40 Introductie - Keuze van de montageplaats ..40 - Bevestiging ........41 Werking van het product - Doorkoppelen van melders ... -
Page 39: Tekening
Tekening Richtpunt voor de drukknop Batterij- connector Drukknop Aansluitblok Groene LED (aanwezigheid 230 V netspanning) Rode LED voor alarm en functie status Witte LED oriëntatie verlichting... -
Page 40: Voeding
Voeding TG500A, TG501A, TG501AL TG501A, TG501AL Sluit de batterij aan. Let op de polariteit. Sluit de bruine fase draad aan op de L klem, de blauwe nul draad Het rode verklikkerlampje knippert op de N klem en de oranje signaaldraad (doorkoppeling) op de snel gedurende 15 seconden en klem met het “puls”... -
Page 41: Bevestiging
Bevestiging Bevestiging op inbouwdoos Bevestig de sokkel met behulp van gepaste schroeven op de inbouwdoos. De sokkel bevat gaten met een hartafstand van 60 en 85 mm. Opbouwmontage (Fig. A) - Plaats de sokkel op de voorziene plaats en markeer met een potlood de stand van de 2 bevestigingsgaten (60 of 85 mm). -
Page 42: Doorkoppelen Van Melders
... -
Page 43: Test Van De Detector
Test van de melder Het is verstandig om voor het testen van de Detectietest: rookmelder de mensen in de omgeving te Voer eerst een handmatige test waarschuwen. Houd een armlengte afstand tussen uit met de testknop. oren en rookmelder om beschadiging van het gehoor Na de handmatige test wordt te voorkomen. -
Page 44: Alarmsignaal Stoppen
Melder tijdelijk uitschakelen. Alarmsignaal stoppen U kunt de melder tijdelijk 15 minuten uitschakelen om te voor- Gedurende deze komen dat bij schoonmaakwerkzaamheden het alarm af gaat 15 minuten zal de melder door stof of damp. Om de melder tijdelijk uit te schakelen drukt geen alarm geven. -
Page 45: Geluidssignaal Vanwege Vuil En Stof In De Melder
Geluidssignaal vanwege vuil en stof in de melder: Detector die de storing weergeeft TG500A TG5001A/TG501AL knippert 8 keer om de 8 sec. 8 snelle pieptonen om de 58 sec. De melder geeft een geluidssignaal (8 korte piepen per minuut) als er te veel stof in de detector aanwezig is. -
Page 46: Vervangen Van De Batterijen
... -
Page 47: Eindgebruikersinformatie
Wat te doen bij brand • Blijf kalm. Red mensen in acuut gevaar en alarmeer overige bewoners. • Vlucht volgens uw eigen vluchtplan naar een veilige plaats. Sluit hierbij deuren achter u, blijf laag bij de grond en gebruik nóóit de lift. •... - Page 48 Bewust uitschakelen Signaleren van storingen van de melder Batterijstoring U kunt de melder tijdelijk 15 minuten uitschakelen om Detector die de storing weergeeft te voorkomen dat bij schoon- maakwerkzaamheden het alarm TG500A TG5001A/TG501AL af gaat door stof of damp. Om knippert 1 keer de melder tijdelijk uit te scha- om de 5 sec.
-
Page 49: Technische Kenmerken
50 m De verklaring van de prestaties van het • Gebruik: binnenmontage product TG500A kan worden gedownload • Voeding: op hager commerciële internetsite van het betrokken land. TG500A: - alkalinebatterij 9 V (type: 6LR61); levensduur ongeveer 4 jaar De rookmelder TG501A en TG501AL in - lithiumbatterij 9 V (type: U9VL-J-P);... -
Page 50: Presentazione Del Prodotto
Sommario TG 500A (bianco) TG 500B (argento) Presentazione del prodotto ..50 - Principi di funzionamento....50 - Descrizione ........51 TG 501A (bianco) Alimentazione ......... 52 Posa del rilevatore ......52 Presentazione del prodotto - Scelta dell’ubicazione ....52 - Fissaggio ........ -
Page 51: Descrizione
Descrizione Posizione di allineamento del pulsante test Connettore batteria Morsettiera Pulsante test di connessione Spia verde (presenza alimentazione 230 V TG501A) Spia rossa (stato del rivelatore) Spia bianca (segnalazione d'emergenza accesa in caso di rilevazione di fumo) -
Page 52: Alimentazione
Alimentazione TG 500A / TG 500B TG 501A Collegare la batteria rispettando le polarità. Collegare la batteria rispettando le polarità e La spia rossa lampeggia per 15 secondi collegare i morsetti L/N alla rete a 230V. La spia e poi di nuovo 1 volta ogni 10 secondi: rossa lampeggia per 15 secondi e poi di nuovo segno del corretto funzionamento del rilevatore. -
Page 53: Fissaggio
Fissaggio Fissaggio su scatola ad incastro Per scatole ad incastro di diametro 60 mm, utilizzare i fori di fi ssaggio identifi cati 60. Per scatole ad incastro di diametro 85 mm, utilizzare i fori di fi ssaggio identifi cati 85. Fissare lo zoccolo mediante viti appropriate. -
Page 54: Posa Di Vari Rilevatori In Rete
... -
Page 55: Test Del Rilevatore
Test del rilevatore La suoneria è attenuata durante un test Test di rilevazione: manuale del rilevatore di fumo, tuttavia si consiglia Nebulizzate attraverso le di avvertire il vicinato e prendere le precauzioni aperture a circa 10 cm necessarie per evitare i rischi di disturbi auditivi. di distanza dalla testa di rilevazione, utilizzando una bomboletta test,... -
Page 56: Inibizione Volontaria Del Rilevatore
10 secondi. Segnalazione delle anomalie Anomalia d’alimentazione: Rilevatore all’origine dell’anomalia All’apparizione dell’anomalia TG 500A/TG 500B TG 501A d’alimentazione, il rilevatore continua a funzionare 1 lampeggio perfettamente per 30 giorni. -
Page 57: Anomalia Di Testa Di Rilevazione Intasata
Anomalia di testa di rilevazione intasata: Rilevatore all’origine dell’anomalia TG 500A/TG 500B TG 501A 8 lampeggi ogni 8 secondi 8 bip rapidi ogni 58 secondi Se la segnalazione sonora dell’anomalia di testa di rilevazione intasata appare in un momento inopportuno, è possibile rinviarla di 8 ore su una durata massima di 7 giorni premendo il tasto test fi... -
Page 58: Cambio Dell'alimentazione
Cambio della batteria Tassativo : A. Se l’apertura del rilevatore non è bloccata. sostituire la batteria - Rimuovere il rilevatore dal suo zoccolo ruotando fornita con una in senso antiorario fi no al clic d’apertura. batteria alcalina di - Sostituire la batteria usata. tipo identico - Bloccare il rilevatore sul suo zoccolo. -
Page 59: Scheda Uso
Prepararsi Riassunto delle reazioni e delle segnalazioni del vostro rivelatore all’incendio Funzionamento normale • Prevedete un itinerario d’evacuazione. Ogni rilevatore • Preparate un piano d’evacuazione per 1 lampeggio ogni 10 secondi tutti i locali. • Al suolo il fumo è Rilevazione di fumo meno concentrato: Rilevatore... - Page 60 Anomalia d’alimentazione È possibile disattivare de il rilevatore per una durata di Rilevatore all’origine dell’anomalia 15 minuti: • prima di intraprendere TG 500A/TG 500B TG 501A attività eventualmente 1 lampeggio generatrici di fumo (pulizia ogni 5 secondi d’una stanza polverosa, disintasamento d’un...
-
Page 61: Specifi Che Tecniche
• Alimentazione: prodotto TG500A/B può essere scaricata sul sito Internet commerciale hager del • - TG 500A / TG 500B: paese considerato. - batteria alcalina 9 V (Tipo: 6LR61); autonomia 4 anni circa - batteria lithium 9 V (Typo: U9VL-J-P);... -
Page 62: Presentación Del Producto
Sumario TG 500A (blanco) TG 500B (dinero) Presentación del producto ... 62 - Principio de funcionamiento ..62 - Descripción........63 TG 501A (blanco) Alimentación........64 Instalación del detector ....64 Presentación del producto - Elección del emplazamiento ..64 - Instalación ........ -
Page 63: Descripción
Descripción Señal de alineación de la tecla test Conector de la pila Pulsador Terminal de prueba de conexión Indicador verde (Indicador de tensión de alimentación 230 V TG501A) Testigo rojo (indicador del estado del detector Testigo blanco (encendido de un piloto luminoso de emergencia en caso de detección de humo) -
Page 64: Alimentación
Alimentazione TG 500A / TG 500B TG 501A Colocar la pila cuidando de respetar la polaridad Colocar la pila cuidando de respetar la polaridad de la de la conexión. El testigo rojo indicador parpadea conexión y conectar el producto a la alimentación de durante 15 seg. -
Page 65: Instalación
Instalación Fijación en una caja de empotrar Para las cajas de empotrar de 60 mm de diámetro utilice los agujeros de fi jación N° 60. Para las cajas de empotrar de 85 mm de diámetro utilice los agujeros de fi jación N° 85. Fije la base con los tornillos apropiados. -
Page 66: Instalación De Varios Detectores En Red
... -
Page 67: Prueba Del Detector
Prueba del detector La sirena puede ser atenuada durante la prueba Prueba de detección: manual del detector, sin embargo se aconseja informar Con spray de prueba, realizar con tiempo a los vecinos y tomar las precauciones una pulverización a través necesarias para evitar todo riesgo de lesión auditiva. -
Page 68: Desactivación Voluntaria Del Detector
10 seg. Indicación de anomalías Anomalía de la alimentación: Detector en que se produce la anomalía En caso de anomalía de la ali- TG 500A/TG 500B TG 501A mentación el detector seguirá funcionando perfectamente el testigo parpadea durante 30 días. Se aconseja cada 5 seg. -
Page 69: Notifi Cación Del Cabezal De Detección Sucia
Notifi cación del cabezal de detección sucia: Detector en que se produce la anomalía TG 500A/TG 500B TG 501A 8 parpadeos cada 8 seg. 8 tonos rápidos cada 58 seg. Si la notifi cación sonora de esta anomalía se produce en un momento inoportuno, es posible posponerla 8 horas dentro de los próximos 7 días. -
Page 70: Cambio De Pila
... -
Page 71: Guía De Utilización
Es posible desactivar voluntariamente el detector Detector donde se produce la anomalía por un período de 15 min. Esta función puede ser útil TG 500A/TG 500B TG 501A en los casos siguientes: • si se realizan actividades el testigo parpadea cada 5 seg. - Page 72 Actuación en Resumen de las operaciones y caso de incendio notifi caciones de su detector • Tener previsto Funcionamiento normal un itinerario Todos los detectores de evacuación. • Tener previsto un plan parpadea una vez cada 10 seg. de evacuación desde todas las estancias.
-
Page 73: Especifi Caciones Técnicas
La declaración de rendimiento del - pila alcalina de 9 V (Tipo: 6LR61); producto TG501A puede ser descargado autonomía 10 años en sitio web comercial hager del país en • Indicaciones: cuestión. - del estado del detector, - de los disparos de la alarma, - de las anomalías: testigo rojo... - Page 76 Hager SAS 132 Boulevard d’Europe BP 78 F-67212 OBERNAI CEDEX Tél. +333 88 49 50 50 www.hager.com Hager 07.18 6LE001247A Ind. C...
Need help?
Do you have a question about the TG 500A and is the answer not in the manual?
Questions and answers