Advertisement
Advertisement
Table of Contents

Related Manuals for Adler ADCHARGER 15


Summary of Contents for Adler ADCHARGER 15
-
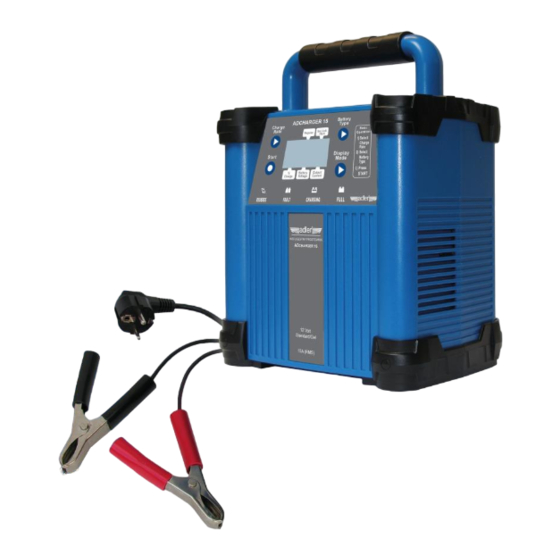
Page 2: Special Features
Features – Charges with 12 V, 10/6/2 A DC (15/9/3 A RMS) – Self-identifying multi-stage characteristic charging curve Soft Start tests the battery condition. Severely discharged batteries need the soft start step. The charging starts with a reduced current until the voltage reaches 10V. Bulk is the main step, where most of the charge is returned (60-80%). - Page 3 environment the unit lowers the output voltage and at a freezing condition, the unit adjusts a higher output voltage. Voltage Compensation: ecause of some voltage drop in the cables, the actual voltage at the clamps of the battery can be lower than the charger output voltage.
-
Page 4: Important Safety Instructions
IMPORTANT SAFETY INSTRUCTIONS Gases When the NORMAL/LEAD ACID battery is being charged you may notice bubbling in the fluid caused by the release of gas. As the gas is flammable, no naked lights should be used around the battery. The charging process must be performed in a well ventilated area. Because of the risk of explosive gas, connect and disconnect the battery leads only when the mains supply is disconnected. - Page 5 Be sure to position the charger power cord to prevent it from being stepped on, tripped over, or damaged. Never pull out the plug by the cord when unplugging the charger. Pulling on the cord may cause damage to the cord or the plug. If the supply cord is damaged, it must be replaced by the manufacturer, its service agent or similarly qualified persons.
- Page 6 4. It is important to ensure that both DC Clamps are in a good contact with their respective terminal poles. Control Panel 1. Charge Rate Button sets the charge rate to one of the following: 2A DC Slow - Intended for charging small batteries such as those commonly used in garden tractors, snow mobiles and motorcycles.
- Page 7 Battery Selection Button sets the type of battery to be charged to one of the following: – All type of “gel cell” & “SLA” type battery. GEL CELL / SLA Regular – All type of “lead acid” battery, sealed or non-seal. 3.
-
Page 8: Led Indicators
The battery charger is now in the stand-by mode with the default choice of Battery - “Gel Cell / SLA” Current – “2A DC Slow” If the Start Charging Button is now pressed, the charger will immediately go into the 2A DC, Gel Cell battery charging mode. For alternative selection, please follow the following steps: Step1 –... -
Page 9: Charging Time
COMPLETION OF CHARGING When the battery “Full Charge” LED goes on, this mean the battery is fully charged. The battery charger will now go into the maintenance mode. If the AC plug is pulled off from the mains supply, the battery charger will turn off. -
Page 10: Troubleshooting
TROUBLESHOOTING Some minor problems often can be solved by the user. Please read this chart for possible solutions to common problems. PROBLEM POSSIBLE CAUSE SOLUTION The battery is The charger is not Press MODE DISPLAY connected and the in the charging button until the battery % charger is on, but mode. -
Page 11: Maintenance And Care
MAINTENANCE AND CARE Clean the clamps each time you are finished charging. Wipe off any battery fluid that may have come in contact with the clamps to prevent corrosion. Coil the input and output cords neatly when storing the charger. This will help prevent accidental damage to the cords and charger.
Need help?
Do you have a question about the ADCHARGER 15 and is the answer not in the manual?
Questions and answers