Advertisement
you press "
" or "
" button and if its indicator light is not on either, then you
can shake the receiver or let your dog move to activate it. (If you shake the
receiver, you'll hear a rattling noise caused by the built-in vibration sensor which
indicates that it is in working status).
Step 5 Fit the collar-receiver
3A
3B
Important : The proper fit and placement of the collar-receiver is essential for
effective training. To assure a proper fit, please follow these steps:
1. Have your pet standing comfortably. (3A)
2. Centre the Contact Points underneath your pet's neck, touching the skin. (3B)
3. The Collar should fit snugly, yet loose enough to allow one finger to fit between
the strap and your pet's neck. (3C)
4. Allow your pet to wear the collar for several minutes then recheck the fit. Check
the fit again as your pet becomes more comfortable with the Collar. If your
pet's neck is less than 12" around, you will need to thread the part of the collar
which includes the antenna through the buckle. It will be a tight fit.
LIMITED 90 DAYS WARRANTY
Petrainer warrants this product to be free of defects in parts, materials and
workmanship for a period of 90 days, from date of purchase.
Should any repairs or servicing under this warranty be required, contact Customer
Service by phone or email for instructions on how to pack and ship the product to
Petrainer.
Petrainer CUSTOMER SERVICE
Telephone: 1-866-877-7949
Email: service@ipets-mall.com
Hours: Weekdays 9:00 AM- 5:00 PM EST
This warranty gives you specific legal rights and you may also have other rights
which vary from state to state.
4
3C
PET916N Training Collar System
Key Definition
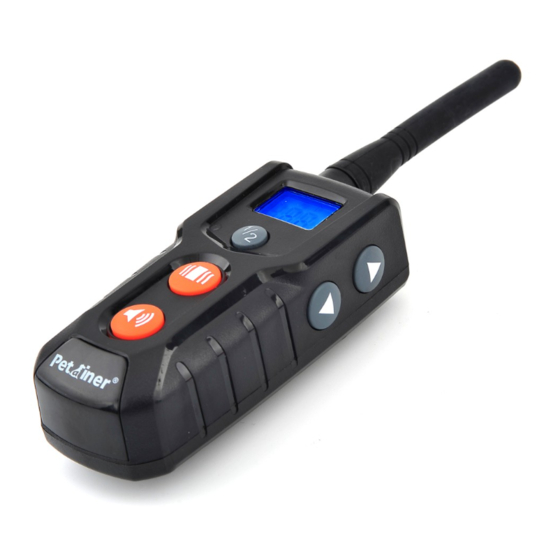
Remote Transmitter:
1. Antenna
2. LCD Screen
3. Channel button
4. LED Indicator
5. Up/down button
6.Vibration button
7.Beep button
8.Charging hole
Collar receiver:
channel 1
channel 2
low battery indicator
1-10 level
vibration mode
beep mode
1
Advertisement
Table of Contents

Related Manuals for Petainer PET916N


Summary of Contents for Petainer PET916N
- Page 1 (If you shake the receiver, you'll hear a rattling noise caused by the built-in vibration sensor which indicates that it is in working status). PET916N Training Collar System Step 5 Fit the collar-receiver Key Definition Remote Transmitter: 1.
-
Page 2: Operating Guide
Step 3 Sync transmitter with collar-receiver: Plastic Probes: Deliver vibration. ON/OFF/Encode Button: Turn on/off the collar-receiver; hold it for a few seconds 1. Turn on the remote transmitter by pressing any button on the transmitter. to encode the receiver. 2. Select channel 1 or 2 by pressing the ½ button. Rubber Cover: After completion of charging, please put the cover in place to 3.
Need help?
Do you have a question about the PET916N and is the answer not in the manual?
Questions and answers