Table of Contents
Advertisement
Advertisement
Table of Contents

Related Manuals for Pulsar CAL. VD53


Summary of Contents for Pulsar CAL. VD53
- Page 1 CAL. VD53 & VD54 CHRONOGRAPH CALIBER OF THREE HANDS WITH THREE EYES (MINUTES, 1/1 SECOND CHRONOGRAPH, 24-HOUR INDICATOR) TIME/CALENDAR l Hour, minute and second hands l Date displayed in numerals (VD53 only) STOPWATCH l Measures up to 60 minutes in one second increments...
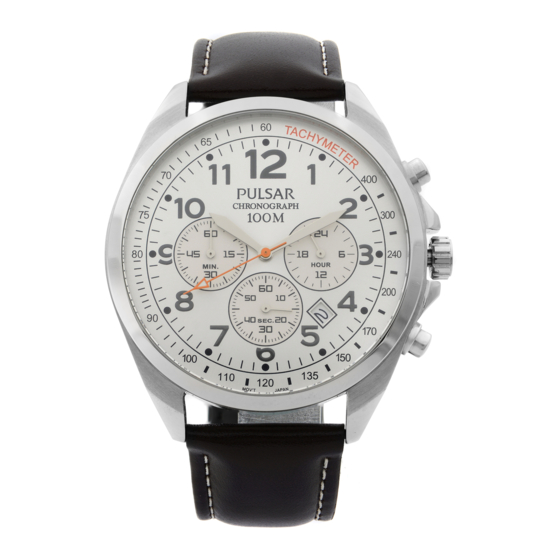
- Page 2 DISPLAY AND CROWN/BUTTONS Minute hand Hour hand STOPWATCH CROWN minute hand a b c HOUR. Second hand 24 - hour hand STOPWATCH second hand Date (VD53 only) b: First click c: Second click a: Normal position...
- Page 3 SCREW DOWN CROWN [for models with screw down crown] Unlocking the crown 1 Turn Crown counterclockwise until you no longer feel the threads turning. 2 Crown can be pulled out. Locking the crown 1 Push Crown back in to normal position. 2 Turn Crown clockwise while pressing it lightly until tight.
- Page 4 ADJUSTING THE STOPWATCH HAND POSITION Before setting the time, be sure to check that the STOPWATCH hands are in the “0” position when the STOPWATCH is reset (for resetting the STOPWATCH, see "STOPWATCH"). * If either of the STOPWATCH hands is not at the "0" position, reset them , following the procedure below: Pull out to second click.
-
Page 5: Time Setting
TIME SETTING Before setting the time, check that the stopwatch measurement is stopped. Second Minute hand hand HOUR. Hour hand CROWN Date (VD53 only) 1 Pull out to first click, and turn clockwise until the previous day’s date appears(VD53 only). 2 Pull out to second click when the second hand is at the 12 o’clock position. - Page 6 STOPWATCH l The stopwatch can measure up to 60 minutes in one second increments. l The measured time is indicated by the STOPWATCH hands that move inde- pendently of the center and 24-hour hands. l Before using the stopwatch, be sure to check that the crown is set at the nor- mal position and that the STOPWATCH hands are reset to the “0”...
- Page 7 Standard measurement RESET START STOP Accumulated elapsed time measurement STOP RESTART STOP RESET START Split time measurement START SPLIT SPLIT RELEASE STOP RESET...
-
Page 8: Notes On Operating The Watch
NOTES ON OPERATING THE WATCH TIME SETTING Do not press any button when the crown is at the second click position, as this will move the STOPWATCH hands. When the time is set, the 24-hour hand move correspondingly with the hour and minute hands. -
Page 9: Battery Change
STOPWATCH Restart and stop of the stopwatch can be repeated by pressing button A. Measurement and release of split time can be repeated by pressing button B. BATTERY CHANGE Battery life : Approx. 2 years Battery : SEIKO SR920SW Years l If the stopwatch is used for more than 2 hours a day, the battery life may be less than the specified period. -
Page 10: Battery Life Indicator
We recommend that you contact an AUTHORIZED PULSAR DEALER for battery replacement. l After the battery is replaced with a new one, adjust the stopwatch hand position and set the time/calendar. l Battery life indicator When the battery nears its end, the second hand moves at two-second intervals instead of normal one-second intervals. -
Page 11: Necessary Procedure After Battery Change
l Necessary procedure after battery change After the battery is replaced with a new one, or in case any of the hands should STOPWATCH move improperly, follow the procedure below to reset the hands to “0” position. CROWN Pull out to second click. Press and hold simultaneously for 2 seconds or longer. - Page 12 WARNING Do not remove the battery from the watch. If it is necessary to take out the battery, keep it out of the reach of children. If a child swallows it, consult a doctor immediately. Never short-circuit, tamper with or heat the battery, and never ex- pose it to fire.
-
Page 13: To Preserve The Quality Of Your Watch
3 bar, such as acci- ing a bath, shallow diving, but not for scuba diving. dental contact with splashes of water or rain, but it We recommend that you wear a PULSAR Diver’s is not designed for swimming or diving. watch for scuba diving. - Page 14 * Before using the water resistance 5, 10, 15 or 20 bar watch in water, be sure the crown is pushed in completely. Do not operate the crown when the watch is wet or in water. If used in sea water, rinse the watch in fresh water and dry it completely.
-
Page 15: Periodic Check
CARE OF CASE AND BRACELET MAGNETISM Your watch will be ad- To prevent possible rusting of versely affected by strong the case and bracelet caused magnetism. Keep it away by dust, moisture and perspi- from close contact with ration, wipe them periodically magnetic objects.
Need help?
Do you have a question about the CAL. VD53 and is the answer not in the manual?
Questions and answers