Table of Contents
Advertisement
Available languages
Available languages
Non-Programmable Thermostats
PRS3110 Single Stage Heat / Cool
PRS3210 Up to 2 Heat / 1 Cool
1 Specifications
2 Installation
3 Setting User Options
Warning
Attention
Read all instructions before proceeding.
This thermostat requires 24 Volt AC Power or two (2) properly installed
"AA" Alkaline batteries for proper operation. When connecting 24 Volt
AC Power the batteries may be installed as a backup.
installation and all components of the system shall conform to
Class II Circuits per NEC code.
For use only as described in this manual. Any other use will void warranty.
1 Specifications
This thermostat is compatible with:
• Single stage heat / cool conventional and heat pump systems
• Conventional systems up to 2 heat / 1 cool (PRS3210 only)
• Single compressor heat pump systems with an auxiliary heat stage (PRS3210)
• 250 – 750 millivolt heat only systems
Electrical and control specifications:
• Electrical Rating: 24 Volt AC
• 1 amp maximum load per terminal
• AC Power: 18 – 30 Volts AC
• DC Power: 3.0 Volt DC (2 "AA" Alkaline Batteries Included)
• Control Range: 45° – 90° F (7° – 32° C)
• Temperature Accuracy: +/- 1° F (+/- .5° C)
Terminations
• PRS3110 – Rc, Rh, O, B, Y1, W1, G, C
• PRS3210 – Rc, Rh, O, B, Y1, E/W1, G, W2, C
Conventional and Heat Pump
Conventional and Heat Pump
Model number is located on back of thermostat
4 Operating Your Thermostat
5 Additional Operation Features
6 Thermostat Maintenance
Turn off power to the heating or cooling
equipment before installation.
For installation by experienced service
technicians only.
User
Manual
Thermostat
PRS3110-100-02
Advertisement
Table of Contents

Related Manuals for Prostat PRS3110


Summary of Contents for Prostat PRS3110
- Page 1 • Control Range: 45° – 90° F (7° – 32° C) • Temperature Accuracy: +/- 1° F (+/- .5° C) Terminations • PRS3110 – Rc, Rh, O, B, Y1, W1, G, C • PRS3210 – Rc, Rh, O, B, Y1, E/W1, G, W2, C PRS3110-100-02...
-
Page 2: Installation
Avoid installation in locations where the thermostat can be affected by drafts, dead air spots, hot or cold air ducts, sunlight, appliances, concealed pipes, chimneys and outside walls. Install your new PROSTAT thermostat in 5 basic steps: 1 Install the Sub-Base 2 Provide Power... -
Page 3: Connect Your Wires
Provide Power • For 24 Volt AC power, you must connect the common side of the trans- former to the C terminal on the thermostat sub-base. • For primary or back-up power, insert the 2 supplied “AA” type alkaline batteries into the battery compartment located in the rear housing of the thermostat. - Page 4 Heat Pump Systems Typical Wiring Configurations NOTE: The “Installer Switch” option will be configured in the next step. 1 HEAT / 1 COOL - No Auxiliary Heat Set Installer Switch to HP 24 Volt AC Power Connected to Rh with supplied Jumper Wire O or B Changeover Valve [note 2] Compressor Relay Fan Relay...
-
Page 5: Attach Thermostat To Sub-Base
Attach Thermostat to Sub-Base 1. Line up the thermostat body with the sub-base. 2. Carefully push the thermostat body against the sub-base until it snaps into place. 3. Insert quick reference card into slot on top of thermostat. 3 Setting User Options Advanced User Options User options allow you to customize some of your thermostats features. -
Page 6: Operating Your Thermostat
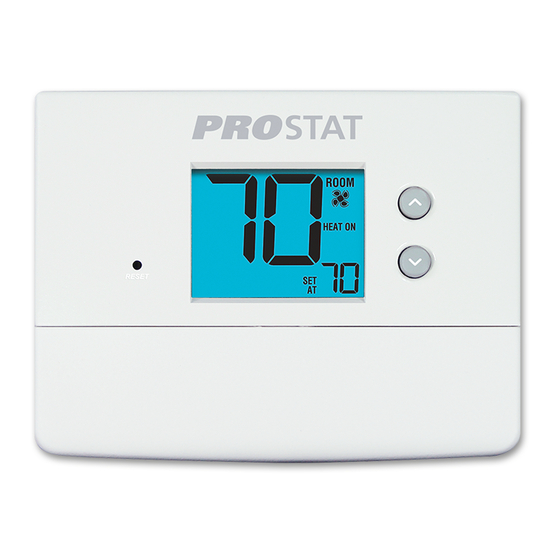
4 Operating Your Thermostat Setting the System Control Mode The System Control has several modes of operation that can be selected by moving the SYSTEM switch to the appropriate position. COOL Only your cooling system will operate Heating and cooling systems are off. HEAT Only your heating system will operate. -
Page 7: Additional Operation Features
PROPARTS agrees to repair or replace at its option any PROSTAT thermostat under warranty provided it is returned postage prepaid to our warranty facility in a padded carton within the warranty period, with proof of the original date of purchase and a brief description of the malfunction. -
Page 8: Especificaciones
• Amplitud de control: 7º – 32º C (45 ° – 90 °F) • Precisión de la temperatura: +/- 0,5° C (+/- 1° F) Terminaciones: • PRS3110 – Rc, Rh, O, B, Y1, W1, G, C PRS3110-100-02 • PRS3210 – Rc, Rh, O, B, Y1, E/W1, G, W2, C... -
Page 9: Instalación
Evite la instalación en lugares donde el termostato pueda ser afectado por corrientes de aire, aire estancado, ductos de aire frío o caliente, luz solar, electrodomésticos, tuberías ocultas, chimeneas y paredes exteriores. Instale su nuevo termostato PROSTAT en 5 pasos básicos: 1 Instale la sub-base 2 Suministre energía 3 Conecte los cables 4 Configure los interruptores de instalación... - Page 10 Conecte los cables Sistemas convencionales Configuraciones típicas de cableado NOTA: La opción “Interruptor de instalación” se configurará en el siguiente paso. Calefacción solamente o milivoltaje Configurar el interruptor de instalación en CONV Rh Conexión de la energía W Relé de calefacción (aparece como W1/E en el modelo PRS3210) Relé...
- Page 11 Sistemas de bomba de calor Configuraciones típicas de cableado NOTA: La opción “Interruptor de instalación” se configurará en el siguiente paso. 1 etapa de calefacción / 1 etapa de aire acondicionado – Sin calefacción auxiliar Configure el interruptor de instalación en HP Energía a 24 voltios de CA Conectado a Rh con el cable para puente suministrado O or B Válvula de conversión [nota 2]...
- Page 12 Fije el termostato a la sub-base 1. Alinee el cuerpo del termostato con la sub-base. 2. Empuje cuidadosamente el cuerpo del termostato contra la sub-base hasta que encaje en su sitio. 3. Introduzca la tarjeta de consulta rápida en la ranura de la parte superior del termostato.
-
Page 13: Ajuste De La Temperatura
4 Funcionamiento de su termostato Configuración del modo de control del sistema El control del sistema cuenta con varios modos de funcionamiento que pueden seleccionarse al mover el interruptor del sistema a la posición apropiada. COOL (aire acondicionado) Sólo funcionará el sistema de aire acondicionado. - Page 14 PROSTAT. Esta garantía limitada es aplicable desde la fecha de compra original por un técnico profesional.
Need help?
Do you have a question about the PRS3110 and is the answer not in the manual?
Questions and answers