
Related Manuals for Ferno XT


Summary of Contents for Ferno XT
- Page 1 User and maintenance manual Immobilisation and Extrication device XT - XT PRO - XT Floating Read this manual Rel.01102019 English carefully and keep it Pub. No. MU-086-G for future reference...
-
Page 2: Table Of Contents
6.4 Thigh strap application ___________________ 23 6.5 Using auxiliary handles ___________________ 23 6.6 Xt pro ________________________________ 25 7 - Components of the Xt Floating Extrication Device _ 28 7.1 Preparation procedures ___________________ 29 7.2 Head immobilisation _____________________ 31 7.3 Chest immobilisation, longitudinal retaining strip application _________________________________ 34 ©... -
Page 3: Ferno Technical Support
Intellectual property declaration warranty and liability, see chapter Warranty, page 52. The information in this manual is the property of Ferno S.R.L. - Via Benedetto Zallone 26, 40066 Pieve di Cento (Bologna) Italy. All patent rights, design, construction, reproduction, use and ©... -
Page 4: Safety Information
Untrained users may injure themselves, cause damage and/or be transmitted by blood, such as HIV-1 or Hepatitis, follow physical harm. Allow only trained and qualified staff to use the XT the instructions on disinfection and cleaning in this manual extrication device. -
Page 5: Glossary Of Symbols
The information and safety labels contain important information that the user needs to know. Read and follow the label instructions. Replace worn and damaged labels immediately. To obtain replacement labels, contact Ferno S.R.L.'s Customer Service. (page 2). The label shown below is attached to the device. -
Page 6: 2- Operator Training And Skills
Holes for restraint securing (15) ● TWO trained and qualified operators are recommended for Ergonomic side handles (2) ● correct use of the extrication device XT. In case of heavy QHI (Quick Head Immobilizer) patients always refer to local protocols. ● Neoprene triangular head immobiliser ●... -
Page 7: Components (Extrication Device)
Yellow chest Red chest upper restraint upper restraint Green groin lower restraint Black groin lower restraints Lifting and carrying handles (4) USER AND MAINTENANCE MANUAL Additional free copies can be downloaded online at www.ferno.it. (page 2). © Ferno s.r.l. MU-086-G Rel.01102019... -
Page 8: General Specifications
Untrained users may injure themselves, cause notice. For further details, please contact Ferno's Customer damage and/or physical harm. Allow only trained Service (page 2). and qualified staff to use the XT extrication device WARNING Materials Never exceed the load capacity of the extrication Board XT carbon fibre composite material device specified in this manual. -
Page 9: Configuration Of The Extrication Device
2. Repeat the same operations with the other two straps in the two side holes no. 3 and 14 (to identify the holes see Figure 4, page 10). Figure 2 - Triangular head immobiliser application © Ferno s.r.l. MU-086-G Rel.01102019... -
Page 10: Chin Strap Qhi Application
Figure 3 - Neoprene red strap application 4.4 Restraint configuration HEAD END The XT extrication device is equipped with two upper chest restraints (yellow and red) and two lower groin restraints (black and green). The upper chest restraints must be applied in a crossed configuration, while the groin restraints must be secured on the same side. - Page 11 7. Firmly tighten the restraint around the hole. 8. Move the red lifting and carrying handle outwards so that it is always within easy reach of the operator. Figure 6 - Crossed configuration of chest restraints © Ferno s.r.l. MU-086-G Rel.01102019...
- Page 12 5. Pull the restraint and tie a knot by inserting the green buckle in the restraint slot. 6. Firmly tighten the restraint around the hole. Figure 8 - Green groin restraint application Detail 8D - Green restraint applied and buckled © Ferno s.r.l. MU-086-G Rel.01102019...
-
Page 13: Use Of The Extrication Device
In any case, always observe local healthcare ● instructions and regulations. Always assist the patient and never leave them alone ● during the operations with the device. © Ferno s.r.l. MU-086-G Rel.01102019... -
Page 14: Quick Extrication
5. Operator 2: before extricating the patient, seizes the two orange upper lifting and carrying handles, making sure that they pass under the patient's armpit (Figure 10D). 6. Operator 2: extricates the patient. 7. Both operators: take the patient away from the scenario. Figure 10 - Quick extrication sequence © Ferno s.r.l. MU-086-G Rel.01102019... -
Page 15: Precautionary Extrication
5. Operator 1: repositions the patient on the device (Figure 14). Figure 13 - Extrication device insertion Figure 14 - Patient repositioning © Ferno s.r.l. MU-086-G Rel.01102019... - Page 16 9. Operator 1: once all restraints have been applied and fastened, operator 1 takes the chin strap from its bag, adjusts its length and gives the opposite end to operator 2 (Figure 18). Figure 17 - Green restraint buckled Figure 18 - Cervical spine final fastening © Ferno s.r.l. MU-086-G Rel.01102019...
- Page 17 Figure 20 - Extrication with the carrying handles Detail: Hold the carrying handles 13. Both operators: complete the extrication procedure by placing the patient on the chosen medical device (Figure 21). Figure 21 - Positioning on backboard © Ferno s.r.l. MU-086-G Rel.01102019...
-
Page 18: Xt Pro (Extrication Device) Components
XT-PRO Extrication Device 6 - XT PRO (extrication device) components tested according to EN1498 © Ferno s.r.l. MU-086-G Rel.01102019... -
Page 19: Preparation Procedures
XT-PRO Extrication Device CONFIGURATION OF THE EXTRICATION DEVICE 6.1 Preparation procedures SNAP-HOOK LIFTING TAPE TRIANGULAR HEAD IMMOBILISER HEAD CUSHION - QHI CHIN STRAP RED UPPER CHEST RESTRAINT YELLOW UPPER CHEST RESTRAINT COBRA BUCKLE LEG HOOPS LEG HOOPS © Ferno s.r.l. MU-086-G Rel.01102019... - Page 20 XT-PRO Extrication Device TRIANGULAR HEAD IMMOBILISER QHI HEAD CUSHION CHIN STRAP FIXED CHEST STRAP CHEST STRAP THIGH STRAP THIGH STRAP WARNING Check that all XT-PRO slots allow the strap to pass. © Ferno s.r.l. MU-086-G Rel.01102019...
-
Page 21: Head Immobilisation
1- Insert the straps in the head end hole from inside the extrication device. 2- Insert the strap in the first loop of the fastening buckle. 3- Then insert it in the second loop and pull to fasten the strap. Warning! - Failure to complete the three passages may cause undesired loosening of the strap. © Ferno s.r.l. MU-086-G Rel.01102019... -
Page 22: Chest Immobilisation
Warning! - Make sure that the resulting restraint, once properly buckled, crosses the patient's chest from above the shoulder to the opposite armpit. - Make sure that the coupled buckles have the same colour code. © Ferno s.r.l. MU-086-G Rel.01102019... -
Page 23: Thigh Strap Application
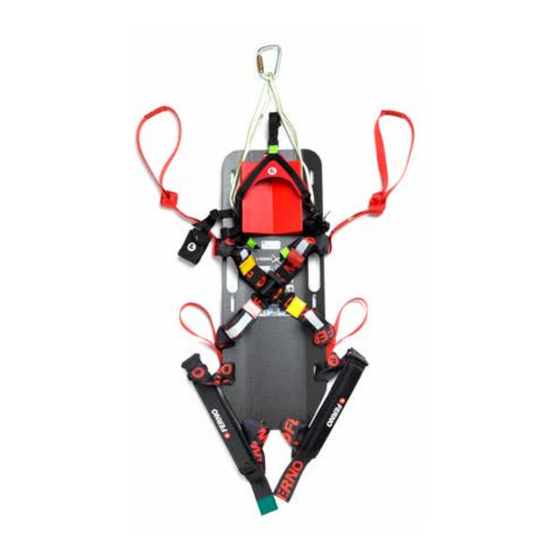
For example, they can be connected to the middle handles to make them longer and allow extrication even with larger patients. They can be directly secured to the board using any available hole. © Ferno s.r.l. MU-086-G Rel.01102019... - Page 24 XT-PRO Extrication Device In case of extrications or transports in complex environments, the XT can be hanged by means of an anchor device (EN 566:2006), such as a validated textile ring with a minimum length of 120 cm, and a connector (EN 362).
-
Page 25: Xt Pro
XT-PRO Extrication Device 6.6 XT PRO POSITIONING PROCEDURES Prepare the XT PRO with the straps open and ready to fasten the patient. Warning! Before use, always check that the straps are correctly placed (according to the manufacturer's instructions), and comply with the operational check and disinfection program. - Page 26 Now fasten the patient's chest with the colour-coded straps (yellow and red chest straps). Buckle the yellow chest strap. Buckle the red chest strap. WARNING! Duly adjust the straps' tension, making sure that they are firm and well balanced. © Ferno s.r.l. MU-086-G Rel.01102019...
- Page 27 XT-PRO Extrication Device Buckle the black thigh strap. Buckle the green thigh strap. To move the patient, use the specific red handles. Follow the reference procedures for patient handling. © Ferno s.r.l. MU-086-G Rel.01102019...
-
Page 28: Components Of The Xt Floating Extrication Device
XT-Floating Extrication Device 7 - Components of the XT Floating Extrication Device FLOATING KIT PART NO. FLOATING KIT © Ferno s.r.l.. MU-086-C Rel.12062019... -
Page 29: Preparation Procedures
HEAD IMMOBILISER FLOAT CHIN STRAP QHI HEAD CUSHION YELLOW TRANSVERSE RETAINING STRIP CARRYING HANDLES RED TRANSVERSE LEFT RIGHT RETAINING STRIP SIDE SIDE BREAST FLOATS LONGITUDINAL RETAINING STRIP FOOT END Figure 1 - Restraint configuration (operator view) © Ferno s.r.l. MU-086-C Rel.12062019... - Page 30 RED TRANSVERSE RETAINING STRIP LONGITUDINAL RETAINING STRIP WARNING Head fastening systems, triangular head immobiliser and chin strap are attached to the head-end float and to the connection above the main floats by means of special rings. © Ferno s.r.l. MU-086-G Rel.01102019...
-
Page 31: Head Immobilisation
XT-Floating Extrication Device 7.2 HEAD IMMOBILISATION Fit the QHI head cushion with the relevant Velcro strap. Secure the head-end float with the three adjustable straps. The chin strap is already attached to the ring on one end of this float. © Ferno s.r.l. MU-086-G Rel.01102019... - Page 32 Warning! For a correct fitting, stretch the strap as much as possible, as the following figures show. Once fastened, arrange and lock the excess strap using the buckle on the back of the XT as the side image shows. Warning! Repeat the previous operation for all three fastening points. Always lock the excess strap.
- Page 33 Always lock the excess strap. Secure the triangular head immobiliser to the top ring only (A). The fitting will be completed afterwards, using the suitable rings above the main floats. This operation is described subsequently. Warning! Rings (B) and (C) are intended for the chin strap. © Ferno s.r.l. MU-086-G Rel.01102019...
-
Page 34: Chest Immobilisation, Longitudinal Retaining Strip Application
RETAINING STRIP APPLICATION Fasten the straps to the board by sliding their metal buckle inside the relevant slots. Repeat the operation for all six fastening points. Warning! Arrange the straps so that their length-adjustment end remains outside. © Ferno s.r.l. MU-086-G Rel.01102019... -
Page 35: Main Floats
Insert the female buckle on the belt; this buckle will be closed onto the male buckle under the legs. Connect the second float in the same way. To complete the assembly, connect the free end of the shoulder fastening belt to the fixing element on the board. Warning! Make sure that all three passages in the buckle are correctly realised. © Ferno s.r.l. MU-086-G Rel.01102019... -
Page 36: Carrying Handles
Fasten the straps to the board by sliding their metal buckle inside the relevant slots. Repeat the operation for the two points. 7.5 CARRYING HANDLES Tie the supplied carrying handles in a cow hitch near the pelvis and above the shoulders. © Ferno s.r.l. MU-086-G Rel.01102019... -
Page 37: Triangular Head Immobiliser Fitting
Warning! When fixing the shoulder fastening belts, make sure that the side with the rings for the head immobiliser remains outwards. Warning! Make sure that all three passages in the buckle are correctly realised. © Ferno s.r.l. MU-086-G Rel.01102019... - Page 38 XT-Floating Extrication Device © Ferno s.r.l. MU-086-G Rel.01102019...
-
Page 39: Xt Floating
XT-Floating Extrication Device 7.7 XT FLOATING POSITIONING PROCEDURES Adopt the safety position with the patient in water, leaving the back free for the subsequent positioning of the XT Floating. Position the XT Floating under the patient's back. Warning! - Prepare the board straps so that they do not interfere with this operation. - Page 40 Secure the head with the triangular immobiliser and tighten it. Warning! - It is important that the triangular immobiliser is well tightened to guarantee the cervical spine alignment. Warning! - Usually the head immobiliser firmly secures the head. If deemed necessary, a chin strap can be added to improve immobilisation. © Ferno s.r.l. MU-086-C Rel.12062019...
- Page 41 This strap must be well stretched. Complete the immobilisation by fastening the last yellow transverse retaining strip on the chest. Warning! This strap must be well stretched. Move the patient with the suitable carrying handles. © Ferno s.r.l. MU-086-C Rel.12062019...
-
Page 42: Maintenance
Ferno Technical Support Service for repair/maintenance. See chapter Technical Support. INSPECTION BEFORE USE If the XT undergoes particularly heavy use, if it is used To ensure optimal use of the device, it is important to in an environment contaminated by hazardous chemical... -
Page 43: Xt-Floating Maintenance
After that, the customer is responsible for contacting acids that can destroy fibres. Ferno Technical Support Service for repair/maintenance. See chapter Technical Support. If the XT-PRO undergoes particularly heavy use, is used in an environment contaminated by hazardous chemical 8.3 XT-FLOATING maintenance substances or for carrying heavy loads, maintenance should preferably be carried out on a more frequent basis. -
Page 44: Cleaning
The extrication device should be inspected regularly by maintenance personnel. If signs of wear or damage are found during inspection, discontinue use of the device and immediately contact Ferno's Technical Support Service to request repairs or maintenance. See section Technical Support. - Page 45 4. Before starting sanitisation, move all restraint hooks upwards. 5. Sanitisation is carried out by immersing the restraints in a container and leaving them to soak in water with sanitising product, and leaving the metal parts outside the container. © Ferno s.r.l. MU-086-G Rel.01102019...
-
Page 46: Storage
Important Important Store the XT extrication device indoors, in a dry place When not in use, store the device in an indoor environment and away from direct sunlight. If exposed to sunlight that is dry and protected from direct sunlight. - Page 47 XT Extrication Device XT PRO - INSPECTION SHEET XT PRO User Data Serial no. company Manufacturing year Purchased on internal serial no. First used on user name Inspection frequency Person in charge of inspection Overhaul frequency Product service life Product log:...
- Page 48 XT Extrication Device Chest and thigh straps The straps do not show any damage or cuts The straps are correctly positioned, according to Ferno’s instructions and colour code The straps are firmly fastened to the board The cow hitch that connects the straps to the board has been tied as...
- Page 49 XT Extrication Device XT FLOATING - INSPECTION SHEET XT FLOATING User Data Serial no. company Manufacturing year Purchased on internal serial no. First used on user name Inspection frequency Person in charge of inspection Overhaul frequency Product service life Product log:...
- Page 50 XT Extrication Device Straps and floating system The straps do not show any damage or cuts The straps do not show any damage near the slots of the XT carbon board The straps are correctly positioned, according to Ferno’s instructions and colour code...
-
Page 51: Accessories
Code Red head immobiliser with triangle and neck strap QHI-B (black bag included) Storage and carry bag for extrication device XT and XT Pro 10-1605-001 Storage and carry bag for extrication device XT Floating 10-1605-002 Set of 4 black restraints (coloured plastic buckles) -
Page 52: Warranty
2 months from discovery. In the event of a conformity - However, warranty does not cover travel, shipping, defect, Ferno S.R.L., at no cost to the Customer, shall restore transport and packing costs. the product conformity by repairing/replacing the product or reducing of the price, until the termination of the contract, in - Ferno S.R.L. -
Page 53: Warranty Claims And Complaints
• further to the conditions indicated in section “Warranty Terms and Conditions”. - Ferno S.R.L. cannot, in any event, be held liable for direct or indirect damage due to usage that is non-compliant with the instructions in the user manual or the intended purpose of the product. -
Page 54: Training Record
XT Extrication Device TRAINING RECORD Date Instructor Name Training Type © Ferno s.r.l. MU-086-C Rel.12062019... -
Page 55: Maintenance Record
XT Extrication Device MAINTENANCE RECORD Date Type of Maintenance Maintenance Technician © Ferno s.r.l. MU-086-C Rel. 12062019... -
Page 56: Ferno S.r.l. Mu-086-G Rel
Rel.12062019 Pub. No. MU-086-C Ferno S.R.L. Via Benedetto Zallone 26 40066 - Pieve di Cento (BO) - ITALY Telephone (toll-free in Italy) 800.501.711 Phone +39 0516860028 +39 0516861508 E-mail info@ferno.it Website www.ferno.it © Ferno s.r.l. MU-086-G Rel.01102019...
Need help?
Do you have a question about the XT and is the answer not in the manual?
Questions and answers