Table of Contents
Advertisement
Quick Links
Advertisement
Table of Contents

Subscribe to Our Youtube Channel
Related Manuals for Salvis VitalityEVO-Pro


Summary of Contents for Salvis VitalityEVO-Pro
- Page 1 SALVIS VitalityEVO-Easy Pressure Steamer SALVIS VitalityEVO-Pro Pressure Steamer Operating instructions en-GB Translation of the original operating instructions Read the operating instructions before installing and commissioning the appliance!
-
Page 2: Table Of Contents
Table of contents page User information ..............Important information about these operating instructions . - Page 3 Table of contents page Displaying and exporting HACCP logs ..........Displaying HACCP logs .
-
Page 4: User Information
User information Thank you for choosing a product made by SALVIS . It is very important to us that you enjoy your SALVIS product, and find that it makes your work easier and more productive. Important information about these operating instructions Please read the operating instructions carefully before starting to use the appliance. -
Page 5: Intended Use
Intended use ● The appliance must be used only for cooking, steaming, regenerating or heating food, or keeping food warm. ● The appliance is for commercial use and must be operated as follows: − By instructed and trained personnel − With the drip tray inserted −... -
Page 6: Safety Instructions
Safety instructions ● Packaged products must be cooked only in heat-resistant containers that have been approved for food use. ● Do not store sensitive foods in the temperature range 10–70°C in the cooking chamber for pro longed periods. Bacteria can multiply very rapidly at temperatures within this range. ●... - Page 7 ● The water softener lid must not be removed while the appliance is in use. ● The appliance must not be operated if the mains cable/mains plug is damaged. To avoid the risk of electric shock, the mains cable/mains plug must be replaced by an authorised customer ser vice technician or electrician.
-
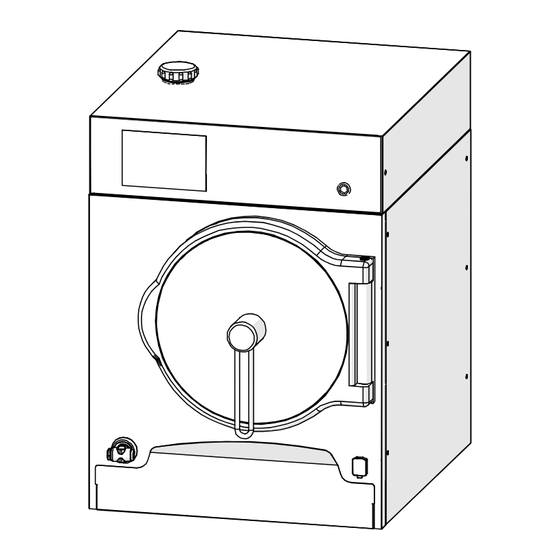
Page 8: Description Of The Appliance
Description of the appliance ● Cooking times can be set in increments of one second/minute. This ensures you achieve the best cooking results. ● Dishes can be cooked to a precise temperature, with or without pressure. When the cooker is pressurised, temperatures exceeding 100°C are used for cooking. -
Page 9: Familiarise Yourself With The Control/Display Panel
Familiarise yourself with the control/display panel 3.2.1 Overview of control system variants After the control system is switched on and has powered up, various user interfaces appear ac cording to the appliance's feature level. Control system operating features for Control system operating features for " "... -
Page 10: Instructions For Using The Touch Screen
3.2.2 Instructions for using the touch screen Control/display panel: Touch screen ● The appliance's control system is operated by using the touch screen. ● The touch screen is operated by tapping the screen with a fingertip. Only a short tap is needed. -
Page 11: Commissioning
Commissioning Proper operation requires the following: ‒ The appliance must be correctly connected by the authorised Customer Service (page 71 , sec tion 15.) ‒ The built-in water softener must be configured to the existing water hardness (page 65 , sec tion 12.). - Page 12 Placement of the core temperature sen sor if not used . If the core temperature sensor is not requi Hook red for the cooking process: ‒ Fix the cable to the hook Bracket ‒ Place the core temperature sensor in the bracket ●...
-
Page 13: Switching On The Appliance
Switching on the appliance CAUTION! Steam can escape in the cooking chamber during the heating-up process. Do not work in the cooking chamber during the heating-up process. . Open the water tap. . Switch on the mains switch upstream of the appliance. . -
Page 14: Working With The Core Temperature Sensor (Optional)
Working with the core temperature sensor (optional) ● The internal temperature of the food being cooked is measured precisely by the core temperature sensor. Once the configured core temperature is reached, the appliance is automatically switched off and a buzzer sounds. ●... -
Page 15: Starting/Ending The Cooking Process
Starting/ending the cooking process 4.5.1 Starting the cooking process For instructions on product selection/changing settings, see from page 18 , section 6. Starting the cooking process ● The symbol in the key lights up green. . Tap the "Start/Stop" key. ●... -
Page 16: Ending The Cooking Process
4.5.2 Ending the cooking process WARNING! Risk of scalding! Open the cooking chamber door carefully. Allow steam and hot air to escape in a controlled manner to avoid endangering anyone. Ending the cooking process For instructions about adjusting acoustic signals, see from page 45 , section 9. -
Page 17: Using The Pull-Out Shower Head With Automatic Retraction (Optional)
Using the pull-out shower head with automatic retraction (optional) ● Use the pull-out shower head only in the cooking chamber. ● Always ensure that the water drain can handle the amount of water you spray into the chamber. Function Pull-out shower head ●... -
Page 18: Using Operating Modes And Cooking Programs
Using operating modes and cooking programs This section 6. describes all of the options. The figures and functions may deviate from the figures shown here, depending on the features equipped for the appliance. Configuring the cooking process – manual settings This section (6.1) also provides you with information about basic functions and their configuration options. - Page 19 Switching from timed cooking to core temperature For instructions about using the core temperature sensor, see page 14 , section 4.4 There are two ways to select the core temperature function. 1st option – Change over with the "Core tempera ture"...
- Page 20 Selecting additional functions Additional functions ● The "AQA" key is activated permanently and can not be deactivated. . Tap the additional functions you want to use. ● The key is shaded dark grey and has a border. . Use the "Enter" key to confirm the additional functions set.
- Page 21 Selecting the additional function "Start time" Additional functions The start time can be pre-defined. . Tap the "Start time" key. ● The key is shaded dark grey and has a border. . Use the "Enter" key to confirm the additional functions set.
-
Page 22: Adding Cooking Steps/Combinations
Adding cooking steps/combinations Up to 20 cooking steps can be combined. Cookbook option: The cooking steps can be stored in the cookbook (see page 33 , section 7.1). Starting manual settings (1st cooking step) (Sample figure: feature level with options). . - Page 23 Displaying/changing cooking steps in the overview Tap the value window . Tap the "Cooking steps overview" key ● The "Cooking steps overview" window is shown. If more cooking steps have been created than can be shown on the display screen: .
- Page 24 Deleting individual cooking steps in the overview window . Tap the "Cooking steps overview" key ● The "Cooking steps overview" window is shown. If more cooking steps have been created than can be shown on the display screen: . Tap the screen and use your finger to scroll the cooking steps displayed up or down.
-
Page 25: Using Revitalisation
Using revitalisation If this function is activated, the "Revitalisation" key is shown. To add the "Revitalisation" key to the home screen, see from page 45 , section 9. (figure 12). With these functions, you can prepare the ready-to-serve dishes specifically for à la carte or ban quet catering business. -
Page 26: Using Cooking Methods
Using cooking methods If this function is activated, the "Cooking method" key is displayed. To add the "Cooking method" key to the home screen, see from page 45 , section 9. (figure 12). Seven pre-set cooking methods are configured for the cooking method feature. Starting the cooking method . -
Page 27: Using Special Programs
Using special programs The "Special programs" key is shown if this option is included with the appliance and activated. To add the "Special programs" key to the home screen, see from page 45 , section 9. (figure 12). Selecting special programs . -
Page 28: Using Cooking Programs From The Cookbook
Using cooking programs from the cookbook If the appliance is equipped with this option and it is activated, the "Cookbook" key is displayed. To add the "Cookbook" key to the home screen, see from page 45 , section 9. (figure 12). Products can be entered, changed and deleted in the cookbook (see page 33 , section 7.). - Page 29 Switch between cookbook views Cookbook . Tap the "Change view" key. ● The display switches to pictogram view. Key legend: Cookbook Switch to pictogram view. Switch to list view. Displaying/changing cooking steps in the overview Cookbook window . Tap the product you want. ●...
-
Page 30: Working With Categories (Menu Groups)
Cooking process window – cooking process started ● AQA: The quantity/cooking time is adjusted auto matically. The automatic quantity/cooking time adjustment is permanently set and cannot be de activated. ● After AQA is complete: the remaining time is dis played. ●... -
Page 31: Working With Favourites (Preferred Products)
Selecting a product . Scroll the display by tapping and moving up or down. . Tap the product you want. ● A border is added to the selected product. . Tap the "Start/Stop" key. ● The cooking process starts. ● The "Cooking process" window is shown. ●... - Page 32 Selecting a product . Tap the product you want. ● A border is added to the product. . Tap the "Start/Stop" key. ● The cooking process starts. ● The "Cooking process" window is shown. ● The symbol in the "Start/Stop" key changes from green to red.
-
Page 33: Creating, Changing And Deleting Cookbook Products
Creating, changing and deleting cookbook products This function is a part of the cookbook. Creating, saving and assigning products Up to 20 cooking steps can be combined. Starting manual settings . Tap the "Manual" key ● The "Operating Modes" window is shown. Configuring settings . - Page 34 Adding a cooking step . Tap the "New cooking step" key. ● The "Settings" window is shown. ● The "1/1" display switches to "2/2". . Configure the settings, e.g. temperature, time, core temperature, additional functions. ● If you require additional cooking steps, repeat this step until you have created all the cooking steps you need.
- Page 35 Add an information item Name You can enter any additional information here. . Tap the "Info" key. Info Category Info ● A box for entering text is displayed. . Enter the text you want. . Tap the "Confirm" key. Name Info Key legend: Confirm...
- Page 36 Adding an image No. Name Images for meals have been created as factory defaults. If you would like to use your own images, you must Info Category first import them into appliance storage. For instructions about importing digital photos, see page 55 , figure 17 .
-
Page 37: Changing Settings For Products In The Cookbook
Saving the settings Please note . Tap the "Save" key. ● The product is saved in the cookbook and as Cookbook has been saved. signed to the selected category or favourites. ● The window for confirming the save process is shown. -
Page 38: Deleting A Product From The Cookbook
Changing the settings Name You can make changes here to the number, name, info, category/favourites and image. For a more detailed description, see page 34 from figure 4. . Tap the "Save" key. ● The changes are saved to the cookbook. ●... -
Page 39: Creating And Deleting Categories
Selecting and deleting a product Cookbook . Tap the product to be deleted. ● A border is added to the product. . Tap the "Delete" key. ● A confirmation dialog is shown. . Tap the "Confirm" key. ● The window for confirming the save process is Please note shown. -
Page 40: Deleting Categories With Products
Entering the name Name . Enter a name for the category. . Tap the "Enter" key. ● An overview of the images stored in the system is shown. Key legend: Switch between keyboard layouts. Move the cursor to the left or right. Delete text from right to left. - Page 41 Selecting categories . Tap the category to be deleted. ● The category is shown with a border. ● The "Delete" key is active only when there are no more products in the category. . Tap the "Confirm" key. ● The products assigned to this category are dis played.
- Page 42 Saving the change Please note . Tap the "Confirm" key. Program with the same ● The category assignment in the cookbook is number exists deleted. Please confirm with OK to overwrite ● The window for confirming the save process is shown.
-
Page 43: Displaying And Exporting Haccp Logs
Displaying and exporting HACCP logs HACCP is an abbreviation for Hazard Analysis Critical Control Points ● The HACCP log is required in order to audit process flows. ● These logs are an important tool for process owners and help them to prove that they have ful filled their duties of care. -
Page 44: Exporting Haccp Logs To A Usb Drive
Scrolling the display Day display -------------------------------------- If more data is available than can be shown on the Date:2013-02-05 11:12:03 Manual program display screen: 11:02:03 Start 11:02:04 Target 60° heating 0% dura tion:10:00h 11:05:04 Cooking chamber 65 °C . Tap the screen and use your finger to scroll the 11:05:08 Cancel ---------------------------------------- display up or down. -
Page 45: Configuring The Control System And User Interface
Configuring the control system and user interface All of the possible settings are shown in the following figures. Depending on equipped appliance features, several setting options will be non-functional, e.g. greyed-out and not available for selec tion or the window is not shown on the control panel. Starting screen settings/setup . - Page 46 Configuring the display for Display ‒ Screen brightness ‒ Keyboard layout Brightness ‒ Cookbook sort order Keyboard . Setting screen brightness – tap the slider and Cookbook sorting move to the left or right. ‒ Left = dark, right = bright .
- Page 47 Calibrating/aligning the display Caution! Incorrect calibration will mean that the touch screen Touch Touch calibration auto-zero no longer responds to taps as input! If this happens, the calibration process must be carried out by using a PC mouse. To do so, connect the PC mouse to the USB port and follow the on-screen instructions by moving the mouse cursor.
- Page 48 Setting the acoustic signals (tones) Sounds Several sound files are included as a factory default. These Program end can be used variously for a range of different messages. Step change . Turn the volume up so that a selected sound can Warning sig...
- Page 49 Setting the date and time Date/time ● These values are arranged in columns. Year Month Hour . Tap the column to be changed and scroll until the value you want appears in the selection bar. Time format . Time format – tap the value you want. Date format ‒...
- Page 50 Enabling the PIN/restricting modification permissions User If you want to allow only certain people to change settings, you can block access by entering a PIN. Delete PIN No PIN (Personal Identification Number) is set as a factory default. Start screen Manual If you have forgotten the PIN you entered, this can only be deleted by the authorised Customer Service.
- Page 51 Setting the start screen User This setting can be used to specify the display that should be shown after the appliance is turned on. Delete PIN . Tap the box or arrow key. Start screen Manual ● The available display options are shown. .
- Page 52 Setting up the home screen/allocating and arranging Start Standard functions on the display window Start screen configuration This setting can be used to specify the functions that should Revitalisati Manual Cook. be displayed in the display area and their on-screen position. method The pre-sets configured here are displayed when the home Spec.
- Page 53 Resetting to factory settings Other Settings that have been made by the user, such as the cook Technician popup book and user settings, will be reset. As a precaution, save Factory set the user settings to a USB drive first. For instructions about tings Water softener credit remaining data export, see page 55 , figure 18 (USB activation optio...
- Page 54 Activating the "Technician popup" function Other Expired appliance activities are shown in the "Technician Technician popup popup" window. This screen can be used for troubleshoo Factory set ting. tings Water softener credit remaining The "Technician popup" key must be activated in order to be able to show and hide the technician popup during operation.
- Page 55 16 Configuring the HACCP logs HACCP is an abbreviation for Hazard Analysis Critical Control Points HACCP logs are kept for 60 days. Once this 60-day period has elapsed, the logs are automati cally deleted. For instructions on exporting data, see page 55 , figure 18 (only possible with USB activation option). .
-
Page 56: Exporting And Importing Data
Setting standard cooking data Standard settings operating parameters This screen lets you adjust cooking data to your own opera Steaming tional circumstances. This data is then shown after the rele Pressureless cooking Pressure cooking (0.5 bar) vant operating mode, cooking method or special program is Pressure cooking (1 bar) selected. -
Page 57: Data Export: Information About The Data Structure On The Usb Drive
10.1 Data export: Information about the data structure on the USB drive ● Depending on the relevant number of selected areas, for example cookbooks, sounds or images, only the corresponding folders for these areas – e.g. "cookbooks", "pictograms", "so unds" – are copied to the USB drive. ●... -
Page 58: Data Import: Information About The "Replace/Add" Key
10.2 Data import: information about the "Replace/Add" key Import Area Sounds When you access the menu, "Add" is activated. Images Important: when the "Replace" function is used, the folder Cookbooks User configuration content is first deleted before copying the data from the USB drive. -
Page 59: Exporting Data - Save Data Example
10.3 Exporting data – save data example Examples of using exported data: ‒ To back up sounds, images, cookbooks and the user configuration. ‒ To import into other appliances in order to standardise user interfaces within a company. Starting screen settings/setup . -
Page 60: Importing Data - Replace Cookbook(S) Example
10.4 Importing data – replace cookbook(s) example You can use this function to standardise cookbooks across multiple appliances, for example. As a precaution, export your existing data to a separate USB drive before replacing data (For in structions about exporting, see section 10.3) For information about data import requirements, see page 57 , section 10.1 Starting screen settings/setup . - Page 61 Data import: USB stick -> control system Import Area Sounds Importing (example: replacing all cookbooks Images in the control system) Cookbooks User configuration . Insert the USB drive into the USB port. Import options Replace For instructions about inserting the USB drive, see Import page 55 , figure 17 ●...
-
Page 62: Cleaning And Care
Cleaning and care Keep the appliance and the cooking chamber clean. Reheating old grease and food residues will impair the odour and taste of food being cooked. Instructions ● Clean the appliance/cooking chamber at least once a day, depending on the level of soiling. ●... -
Page 63: Cleaning And Care Of The Seal On The Cooking Chamber Door
. Thoroughly clean and rub dry the seal seat. . Rub a thin coat of a food-grade emulsion (kitchen oil) or cooking oil onto the seal. ● SALVIS Non-Stick, Protection and Care (care emulsion) 0.5 l – item no. ET100060 Seal . -
Page 64: Rinsing And Cleaning The Drain And Valves
11.5 Rinsing and cleaning the drain and valves Daily: perform this rinsing and cleaning procedure daily. Weekly: perform the rinsing and cleaning procedure with ice cubes once a week. ● During the rinsing and cleaning procedure, the drain lines and the drain valve are cleaned. ●... -
Page 65: Regenerating The Water Softener
Cleaning process Cleaning in progress/keep cooking cham ber door closed ● The progress bar indicates the time left for the process. Once the cleaning process has completed: ‒ The "Cleaning program" display disappears ‒ The "Start screen" display appears ‒ Perform manual cleaning tasks, see from page 63 , section 11.3 and 11.4. - Page 66 Opening the regeneration window . Tap the "Regenerate" key. ● The "Regeneration" window is shown. Starting the regeneration process ● The symbol in the "Start/Stop" key lights up green. . Tap the "Start/Stop" key. ● The message "Open water softener lid" is dis Regeneration played.
- Page 67 Prompt to replace the water softener lid Regeneration ● Important! Screw the water softener lid back on Close the water soft tightly: this avoids any risk of water escaping from ener! the water softener. . Screw the water softener lid onto the water sof tener.
-
Page 68: Faults And Troubleshooting
Faults and troubleshooting If faults occur with the appliance, please check these faults against the following table: Fault Possible cause Remedy Display screen Main switch upstream of the Turn on the main switch. does not re appliance not turned on. spond after swit... - Page 69 Fault Possible cause Remedy The pull-out Leaks, limescale deposits, To continue using the appliance, you can shower head is material fatigue. deactivate the use of the pull-out shower leaking or faulty. head in the software (see page 54, figure 15). For repairs, notify the authorised Customer Service.
- Page 70 Fault Possible cause Remedy Fault display: Water drain too hot Open the water tap. Allow the appliance to cool. No. 4003 If the fault occurs again, contact the autho rised Customer Service. Fault display: The core temperature sensor Notify your authorised customer service function has been activated in representative.
-
Page 71: Technical Data
Technical data Technical data Pressure Steamer D311S . . . Cooking chamber capacity 3x GN 1/1-65 2x GN 1/1-100 1x GN 1/1-200 Article no. D311S . . . Voltage, total connected load and fuses 16 kW 400 V 3N 50 Hz 3x 25 A 16 kW 230 V 3 50 Hz 3x 40 A 16 kW 440 V 3 50 Hz 3x 25 A Thermal output, sensitive:... -
Page 72: Transporting The Appliance
15.1 Transporting the appliance IMPORTANT! Risk of damaging seals on the underside of the appliance! ‒ Take care not to damage the seals during transportation. ‒ Remove the in-transit protection only once all supply/drain lines are connected and the appliance has been set up at its final installation site. -
Page 73: Setup
15.3 Setup ● Minimum clearances − 50 mm on each side (left and right) − 20 mm at the rear (for angled Ethernet connectors, clearance of >50 mm is required) ● Do not set the appliance up adjacent to/on heat sources. ●... -
Page 74: Connections
15.4 Connections Water connection G 3/4 Rear: network connection Equipotential bond (Ethernet/LAN) ing connection Type plate Appliance foot Drain diameter 20 mm Electrical connection and connection for demand management system or energy optimisation system Steam generator air valve and overflow relief valve View from below 15.5... -
Page 75: Water Drain
15.6 Water drain ● The hoses and waste pipes used must be heat-resistant to >100°°C. ● Lay the waste pipe and hose with an elevation drop of at least 3% to the drain. ● Ensure that the waste pipe does not become narrower along its length. ●... -
Page 76: Connecting To An Energy Optimisation Unit (Optional)
● Make sure that the protective conductor system for the in-house electrical installation is installed according to regulations. ● An electrical main switch must be installed upstream and must be easily accessible. The switch must reliably disconnect and isolate the appliance from the electrical system. The contact opening must be at least 3 mm. -
Page 77: Maintenance
Maintenance DANGER! Hazardous electric voltage! Risk of electric shock that could result in serious injury or death! ● Maintenance work on electrical appliances must be carried out by the authorised Customer Service or a qualified electrician. . Switch off the appliance and lock it out so it cannot be switched back on. ●... -
Page 78: Translation Of Ecdeclaration Of Conformity
Translation of ECDeclaration of Conformity This declaration relates only to the appliances in the condition in which they were placed on the market. The declaration is invalidated if the product has been converted or modified without consent. We hereby declare that the machines identified below comply with the appropriate provisions of the Machinery Directive 2006/42/EC on the basis of their design and construction, and in the versions placed on the market by us. - Page 79 79 / 80...
- Page 80 Artikel-Nr. 889860 / 7.19 / SALVIS AG Nordstrasse 15 4665 Oftringen, Switzerland Phone: +41 62 788 18-18 Fax: +41 62 788 18-98 Internet: www.salvis.ch Email: info@salvis.ch smart cooking...
Need help?
Do you have a question about the VitalityEVO-Pro and is the answer not in the manual?
Questions and answers