Table of Contents
Advertisement
Quick Links
Advertisement
Table of Contents

Summary of Contents for DefendCam Defend X
- Page 1 - Your 24h Safe Guarder User Manual V 1. 0...
- Page 2 Here you can find information about the camera’s features and functions, as well as information to aid in troubleshooting. Support Many of the setup and installation sections have corresponding introductions on Defend X official website, please go to: www.defendcamera.com For access to details of the cloud service and your subscription plans, go to: Your DefendCam App www.defendcamera.com...
-
Page 3: Table Of Contents
1. Introduction to the Camera ....................2. Setup Your Camera ......................... 2.1 Get the Camera Ready........................ 3 2.2 Get the DefendCam App......................6 2.3 Add Your Camera to Your App....................7 2.4 Configure Your Camera....................... 9 3. Manage Your Camera ...................... -
Page 4: Introduction To The Camera
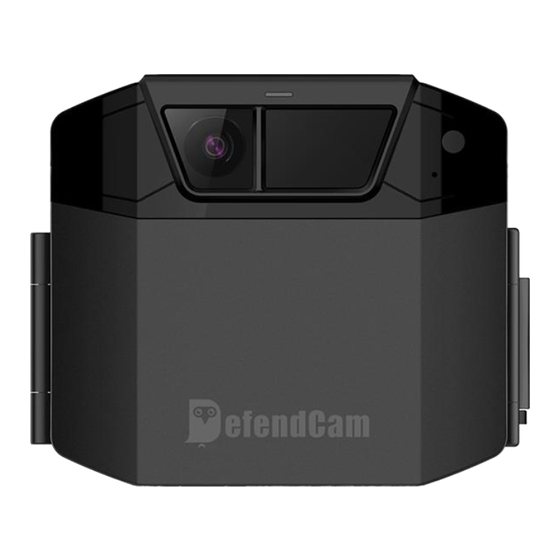
1. Introduction to the Camera Front View Right View Inside View... - Page 5 ① Working Status Indicator Light ⑬ Working Status Shift Button ② PIR Motion Sensor ⑭ Power Charging Indicator Light ③ Lens ⑮ Micro SD Card Slot ④ IR LEDs ⑯ Micro USB Port ⑤ Built in Mic ⑰ Preview/Navigation Button ⑥...
-
Page 6: Setup Your Camera
Button Network Status/ To check network status; to navigate to next options; to reset ㉓ Navigation Button/Reset the camera when pressing up to 15 seconds. When it is pressed down by close of the camera cover, the camera enters into auto photo/video taking mode; Working Status Shift When it is released by opening of camera cover, and the ⑬... - Page 7 Note: Except for powered by DC power (12V/1A output), the internal batteries of the camera can be also charged by solar power and other external power supply kits (sold separately) that with 9V/1A output. For uninterrupted camera use, you can consider adopting these spare power sources on hand for long term outdoor use.
-
Page 8: Get The Defendcam App
There is no SD card included in the camera package, please purchase one and insert it in the camera. 2.2 Get the DefendCam App Download the DefendCam app for your smartphone by scanning QR codes below or those on the camera packing box or searching for DefendCam in the app store. -
Page 9: Add Your Camera To Your App
Note: If you already use the DefendCam app, make sure that you are using the latest version. To find out if an update is available, go to the app store and search. 2.3 Add Your Camera to Your App After successfully installed the app, please tap the DefendCam app icon on your mobile device to launch the app, and follow below steps to add your camera to the app. - Page 10 2.Click “Camera” icon, then click “+” to 3.Switch ON camera, please press menu add your DefendX cameras. button to enter main interface. Scan QR code on the camera. 5.Please select your home router and 4.Please name your camera for enter the password (camera doesn't device management.
- Page 11 Wi-Fi according to the ID on the QR code. Then it will prompt on the QR code, the default password the boot operation after success or abc.1234. At last, click back to DefendCam app failure. at the top left corner.
-
Page 12: Configure Your Camera
2.4 Configure Your Camera 1) Camera Operation Menu Press “ Menu ” button to enter camera setting menu; to navigate setting interface by pressing navigation buttons “ ← ”, “ → ”, press “ OK ” to confirm the configurations, “... - Page 13 Menu Options Functions (Default Settings Marked in Red) Camera QR Code The identification for you to recognize, add & manage the camera Photo/Video Camera Mode Photo: camera shoots photos based on configured Multi-shot & Image Size; Video: camera shoots videos based on configured Video Length/Size. OFF/ON(HH:MM:SS) Select “ON”, press “OK”, to set the interval;...
- Page 14 2) App Function List : Add New Cameras, tap this icon to add new camera. : Arm/Disarm, tap this icon to turn off/on PIR/Time Lapse working mode. : Settings, tap this icon to enter settings page of the App. : Battery Status, this icon shows you left power volume of the camera. : New recordings, this icon shows volume of camera feeds.
-
Page 15: Manage Your Camera
3) Remote Camera Settings “ ” icon on top right of each camera on the app, you will go to the interface for camera setting. Below is a list of settings you can change remotely on the phone App. (Default Settings Marked in Red) Camera Name Programmable up to 12 characters in length Camera Mode... -
Page 16: Edit The Camera
FollowthestepsindicatedontheAppandcameratofinishtheaddingprocess. For detailed instruction, please refer to the steps explained in chapter 2.3 to add new cameras. 3.2 Edit the Camera To modify the login information of your camera, follow the steps below: 1) Tap “ ” to enter your account info page 2)Tap the account icon to enter camera account editing page 3) Tap “... -
Page 17: Reset The Camera
3.3 Reset the Camera To reset the camera to factory original settings, please stay at main interface and press the right “ Navigation ” button up to 15 seconds, then release and a prompt “ Complete ” means the camera has been reset successfully. Note: A reset of the camera will remove all personal settings you made on the camera, include the WiFi network info you configured on successfully. -
Page 18: View & Manage Your Contents
Note : A camera will be able to be added from another DefendCam account only after it is deleted from the previous account it has been added before. 4.View & Manage Your Contents The photos and videos taken are firstly stored on camera SD card, then sent to your encrypted DefendCam cloud storage space, and for permanent record of the contents in need, you will need to download them timely to your local Gallery. -
Page 19: View & Manage You Contents On Cloud
4.2 View & Manage You Contents on Cloud Even without fetching your camera, you can also view and manage your camera contents at any time via your phone App DefendCam. For photos and videos sent from camera, we offer free cloud storage for rolling contents of latest period and selectable value-added services for larger &... -
Page 20: View & Manage Your Contents In Gallery
2) Download/delete your contents on cloud You can download/delete the contents under a camera either in batch by tapping icon “ ” and then confirm to download/delete at bottom of the page, or tap into a single photo or video to download/delete one by one. 3) Share your contents on cloud When you tap into a single photo or video, there is a “... - Page 21 1) View your contents in Gallery Tap icon “Gallery” -> Tap “Select” on top left (it appears a camera list) -> Choose your target camera on the list -> View downloaded contents under the camera. The photos/videos downloaded from the cloud are sorted by cameras. You can tap the left date bar or the calendar icon “...
-
Page 22: Place & Mount Your Camera
5.Place & Mount Your Camera 5.1 Place Your Camera Defend X’s App view function allows you to see what your camera sees when placing the camera. By viewing the photos/videos sent to App on site, you can adjust the camera to monitor the precise area that you want. -
Page 23: Mount Your Camera
5.2 Mount Your Camera You can place your camera on a shelf or other flat surface, or you can mount it to the wall, trees or any other poles. 1) To place the camera on Surface When you place the camera on surface, you can place it directly or use the provided bracket to place it on the surfaces. -
Page 24: Manage Your Subscription Plans
2) To mount the camera on trees/poles 6.Manage Your Subscription Plans DefendCam includes several days of unlimited free trial of all value-added services for every new account user. The free trial counts from the date when the 1st camera is added to the account. -
Page 25: Q&A And Troubleshooting
Coding: H.264 Video FHD 1080P@30FPS; HD 720P@30FPS; WVGA File Format: MOV Storage Medium Micro SD Card (4-32GB) Trigger Time 0.4s Audio Microphone and Speaker IR LED 850nm IR Flash Rang 8-10m Wireless Transmission 2.4 GHz Wi-Fi, IEEE 802.11b/g/n, WEP / WPA-PSK / WPA2-PSK Power Supply 2 built-in 3.7V 18650 rechargeable Li-on batteries USB Interface... - Page 26 d. Damage of hardware or Please contact customer service for instruction. burnout of circuit 2) When I scan the QR code to add a camera, why can’t I add it? Possible reasons Solutions a. The camera is not on the server cloud, and it shows “The Very rare situation.
- Page 27 Turn off the Power Switch button and turn on again. 8) How about if I want to add the cameras with another DefendCam account? Please make sure the camera is not added by other account. If it is already added,...
- Page 28 Add the camera as a new on the new account. 9) How about if I log in my DefendCam account on another mobile device? Yes. You can do that, but for safety purpose of your account, the account can be only logged in on one mobile device at the same time, which means when you log in your account on another device, your account on the previous device will be logged out.
-
Page 29: Warranty
The configured WiFi network is not stable, and the network traffic results in low successful transmission rate and longer transmission time. 14) How about if I forget the DefendCam account name and password? Forget account name: If a camera is added under this account, then you can track back your account by providing your camera Mac address to customer service;... - Page 31 su p p o r t @ d e fe n d c a m e ra . c o m w w w . d e f e n d c a m e r a . c o m...
Need help?
Do you have a question about the Defend X and is the answer not in the manual?
Questions and answers