Table of Contents
Advertisement
Advertisement
Table of Contents

Related Manuals for Redsbaby SKIP


Summary of Contents for Redsbaby SKIP
- Page 1 SKIP Stroller IN S T RU C T I O N M A N UA L Getting ready for more adventures.
-
Page 2: Table Of Contents
We’re with you, for the journey. Using your Redsbaby SKIP Unfolding Folding Engaging and releasing the brake Locking the front wheels Using the 5-point safety harness Adjusting the seat Using the tether strap Lifting and carrying your Redsbaby SKIP safely Adjusting the footrest Product Care... -
Page 3: General Instructions
This document contains important information and must be kept for future reference. Beautiful Please read thoroughly before commencing assembly, and use of your Redsbaby SKIP. Incorrect assembly, and use can be dangerous and result in serious injury or even death. moments There may be slight variations in the design of your product to that shown in the images of this instruction manual. -
Page 4: Warranty Information
All soft good seams, bindings and zippers. • The Redsbaby SKIP and its accessories come with a 24 Month Warranty to cover against faults in materials and To the extent permitted by law, the following are not workmanship when your products are used under normal... - Page 5 To submit a warranty claim please visit the Support Airline/transport damage: check your Redsbaby product • Centre page on our website, www.redsbaby.com.au and carefully after it has been handled by the airline (or other complete the Warranty Claim form. The more detailed...
-
Page 6: Warnings And Safety Precautions
• The harness can form loops which may cause a strangulation hazard. Never leave a harness connected when not fitted to a child in the Redsbaby SKIP. • Use the tether strap to stop the Redsbaby SKIP rolling away. - Page 7 • Do not lift or carry the Redsbaby SKIP when a child is in • Do not lift or carry the Redsbaby SKIP when fully G ENER AL SAFE T Y assembled.
-
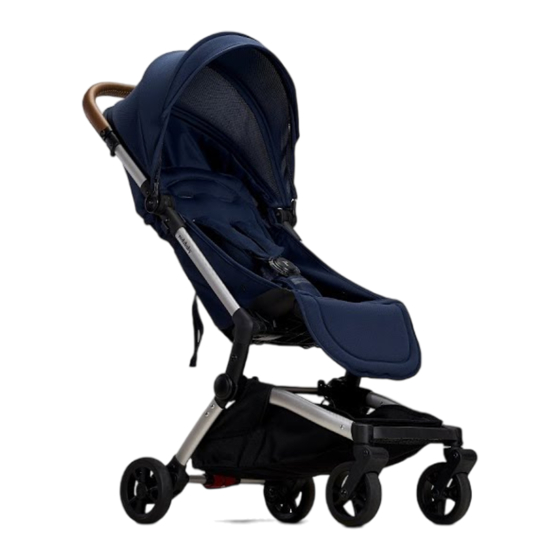
Page 8: Features And Components
S K I P S T R O L L E R I N S T R U C T I O N M A N U A L S K I P S T R O L L E R I N S T R U C T I O N M A N U A L Features and components M A XIMUM WEIG HT... -
Page 9: Assembly Instructions
Front and back wheels bar facing upward and close to your body. 2. Unlatch the red frame fold lock on the side of the SKIP The front and back wheels will come fully assembled on and push the frame away. - Page 10 To fold the frame 3. Place one hand on the handle bar and gently lift up. The SKIP will unfold as you lift up. 1. Fold back the canopy. 2. Pull the latch located on the bottom of the seat in an upward direction until it touches the seat back.
- Page 11 S K I P S T R O L L E R I N S T R U C T I O N M A N U A L S K I P S T R O L L E R I N S T R U C T I O N M A N U A L 3.
- Page 12 2. Ensure the frame fold lock is engaged. IM P O RTA N T: • Do not lift or carry the Redsbaby SKIP when a child is in it. • Do not lift or carry the Redsbaby SKIP when fully assembled.
-
Page 13: Engaging And Releasing The Brake
The brake is located between the rear wheels of the 1. Press downwards on the buttons located on the front of Redsbaby SKIP. The brake is identified by its red colour. the front wheel housing until you hear and feel a ‘click’. -
Page 14: Using The 5-Point Safety Harness
S K I P S T R O L L E R I N S T R U C T I O N M A N U A L S K I P S T R O L L E R I N S T R U C T I O N M A N U A L Using the 5-Point Safety Harness 2. -
Page 15: Adjusting The Seat
S K I P S T R O L L E R I N S T R U C T I O N M A N U A L S K I P S T R O L L E R I N S T R U C T I O N M A N U A L Adjusting the seat 3. -
Page 16: Using The Tether Strap
IM P O RTA N T: IM P O RTA N T: The footrest will move freely in the upwards direction Do not lift or carry the Redsbaby SKIP when a child • and doesn’t lock into place. This is normal and allows is in it. -
Page 17: Product Care
Store the Redsbaby SKIP in a dry, well-ventilated and • safe place. Do not use your Redsbaby SKIP if any screws are loose • or missing or if any component is damaged. IM P O RTA N T:... - Page 18 S K I P S T R O L L E R I N S T R U C T I O N M A N U A L S K I P S T R O L L E R I N S T R U C T I O N M A N U A L Exciting times ahead.
- Page 19 S K I P S T R O L L E R I N S T R U C T I O N M A N U A L ‘REDSBABY’ is a registered trademark of Redsbaby Pty Ltd ABN 68 625 563 519 ©Redsbaby Pty Ltd 2019.
Need help?
Do you have a question about the SKIP and is the answer not in the manual?
Questions and answers