Advertisement
Available languages
Available languages
Quick Links
Laminier- und
Thermobindegerät
Laminator and
Thermal Binder
Plastifieuse-thermorelieuse
Plastificatrice e
rilegatrice a caldo
Aparato laminado y
encuadernadora térmica
Máquina de plastificação e
encadernação térmica
Lamineer- en
thermisch inbindapparaat
Stroj na laminování a tepelné
spojování
Μηχάνημα πλαστικοποίησης
και θερμοκόλλησης
Olympia Business Systems Vertriebs GmbH
Zum Kraftwerk 1
D-45527 Hattingen
http://www.olympia-vertrieb.de
(21.11.2011)
Advertisement
Chapters

Subscribe to Our Youtube Channel
Related Manuals for Olympia TBL 1300 Combo


Summary of Contents for Olympia TBL 1300 Combo
- Page 1 Aparato laminado y encuadernadora térmica Máquina de plastificação e encadernação térmica Lamineer- en thermisch inbindapparaat Stroj na laminování a tepelné spojování Μηχάνημα πλαστικοποίησης και θερμοκόλλησης Olympia Business Systems Vertriebs GmbH Zum Kraftwerk 1 D-45527 Hattingen http://www.olympia-vertrieb.de (21.11.2011)
-
Page 2: Table Of Contents
TBL 1300 Combo Bedienungsanleitung .....3 Operating Instructions ....17 Mode d’emploi ......30 Manuale d’uso ......44 Manual de instrucciones....58 Manual de instruções ....72 Gebruiksaanwijzing .....86 Návod k obsluze ......99 Οδηγίες Χρήσης ......112... -
Page 3: Bedienungsanleitung
TBL 1300 Combo Laminier- und Thermobindegerät Bedienungsanleitung [DEUTSCH] 11.2011... - Page 4 Wichtige Sicherheitshinweise............... 5 Sicherheitshinweise Laminiergerät ..........5 Sicherheitshinweise Thermobindegerät........6 Haftungsausschluss ................6 Bestimmungsgemäßer Gebrauch ............6 Bedienelemente..................7 Bedienelemente am Gerät ............7 Funktionstasten und Anzeigeelemente........8 Inbetriebnahme..................8 Bedienung .................... 9 Gerät ein- und ausschalten ............9 Laminiergerät ................9 6.2.1 Kaltlaminieren ..............
-
Page 5: Wichtige Sicherheitshinweise
Wichtige Sicherheitshinweise Um ein zuverlässiges Arbeiten mit dem Gerät zu gewährleisten, beachten Sie bitte Folgendes: Lesen Sie diese Bedienungsanleitung bitte sorgfältig durch und ● beachten Sie sie bei der Handhabung Ihres Geräts. Bewahren Sie die Bedienungsanleitung für die zukünftige Benutzung ●... -
Page 6: Sicherheitshinweise Thermobindegerät
Laminieren Sie keine hitzeempfindlichen Materialien mit diesem Gerät, ● wie z. B. Thermopapier. Metallische Gegenstände können nicht laminiert werden. ● Beim Laminieren von feuchten Dokumenten erzielen Sie schlechte ● Laminierergebnisse. Halten Sie lose Teile von Bekleidung, Krawatten, Schmuck, langes Haar ●... -
Page 7: Bedienelemente
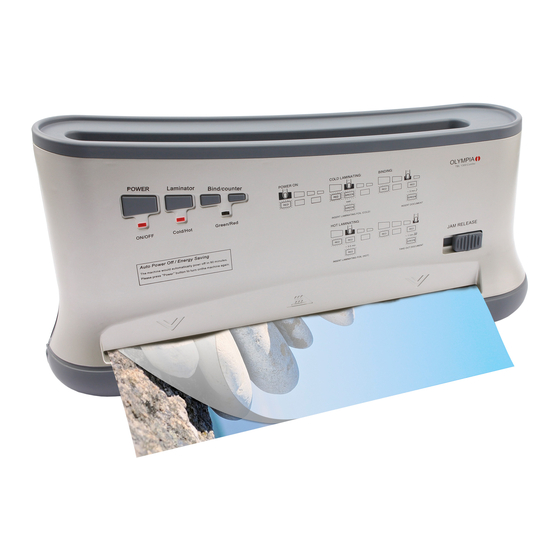
Jede andere Verwendung gilt als nicht bestimmungsgemäß. Eigenmächtige Veränderungen oder Umbauten sind nicht zulässig. Bedienelemente Bedienelemente am Gerät Bedien- und Anzeigeelemente Bindeschacht Stauentriegelungsschieber (Laminierfunktion) Laminiereinzug (vorne) Herausziehbarer Halter (Abkühlvorrichtung) Laminierauslauf (hinten) Griff des herausziehbaren Halters... -
Page 8: Funktionstasten Und Anzeigeelemente
Funktionstasten und Anzeigeelemente Ein-/Aus-Taste (POWER ON/OFF) Laminier-Taste Vorheiz-Taste Thermobinde-Taste POWER-LED (Anzeige Gerät ein/aus) Laminier-LED (grün = Kaltlaminieren; rot = Heißlaminieren) (blinkend = warten; dauerhaft leuchtend = betriebsbereit) Thermobinden-LED (rot & blinkend = Aufheizvorgang; grün & dauerhaft leuchtend = betriebsbereit/fertig) Inbetriebnahme Platzieren Sie das Gerät auf einer stabilen und ebenen Oberfläche. -
Page 9: Bedienung
Sicherheitshinweis: Die Steckdose muss in der Nähe des Geräts angebracht und leicht zugänglich sein. Sie können somit im Notfall das Gerät schnell vom Stromnetz trennen. Bedienung Gerät ein- und ausschalten 1. Drücken Sie die Ein-/Aus-Taste (POWER). Die POWER-LED leuchtet rot. Das Gerät ist an. 2. -
Page 10: Heißlaminieren
5. Führen Sie die Folientasche zusammen mit dem Laminiergut gerade und mit der geschlossenen Seite voran in den Laminiereinzug ein. Der Laminiervorgang erfolgt automatisch. Hinweis: Um ein Falten der Laminierfolie zu vermeiden, darf die offene Seite der Folientasche niemals zuerst in den Laminiereinzug eingeführt werden. -
Page 11: Folienstau Beseitigen
6.2.3 Folienstau beseitigen Um Folienstaus schnell zu beseitigen, ist das Gerät mit einem Stauentriegelungsschieber (JAM RELEASE) ausgerüstet. Wenn die Laminierfolie blockiert, gehen Sie folgendermaßen vor: 1. Schalten Sie das Gerät aus: Drücken Sie die Ein-/Aus-Taste, bis die POWER-LED erlischt. 2. Stellen Sie den Stauentriegelungsschieber (JAM RELEASE) ganz nach rechts. -
Page 12: Überhitzungsschutz (Auto-Off)
8. Während des Bindevorgangs blinkt die Thermobinden-LED wieder rot. Nach etwa 1 Minute ist der Bindevorgang abgeschlossen und die Thermobinden-LED leuchtet dauerhaft grün. Drei Signaltöne signalisieren auch akustisch, dass die Thermobindung fertiggestellt wurde. Vorsicht: Die gebundene Mappe ist nach dem Binden im Rückenbereich sehr heiß! 9. -
Page 13: Transportwalzen Reinigen
Transportwalzen reinigen Ablagerungen und Klebereste an den Transportwalzen können das Lami- nierergebnis beeinflussen. Darum müssen die Transportwalzen in regelmäßigen Abständen gereinigt werden: 1. Warten Sie, bis die Laminier-LED dauerhaft rot leuchtet. 2. Führen Sie ein gefaltetes Blatt Papier in den Laminiereinzug ein. 3. -
Page 14: Technische Daten
Dokument mindestens 10 unterschritten. Minuten auf dem Halter stehen. Falls das Problem nicht behoben werden konnte, wenden Sie sich an unsere Hotline, siehe Kapitel „Garantie”. Technische Daten TBL 1300 Combo Anzeigeelement: POWER-LED (rot) Laminiergerät Maximale Laminierbreite: 320 mm Maximale Dicke zu... -
Page 15: 10 Entsorgungshinweis
Empfohlene Abkühldauer: > 10 Minuten Anzeigeelemente: LED (grün, rot; blinkend, dauerhaft leuchtend) Besondere Merkmale: Optische und aktustische Anzeige von Betriebsbereitschaft und Ende Bindevorgang Herausziehbarer Halter für das Abkühlen von Bindemappen (Abkühlvorrichtung) Automatisches Öffnen der Staubabdeckung Farbe: schwarz-silber Abmessungen (B x T x H): 435 x 115 x 225 mm Gewicht: 2 kg... -
Page 16: 11 Garantie
Kann jedoch der Fehler telefonisch nicht beseitigt werden, bitten wir Sie, ● das Gerät in der Originalverpackung an folgende Anschrift zu senden: Service-Center Hattingen Zum Kraftwerk 1 45527 Hattingen Garantiereparaturen können nur mit beigefügtem Kaufbeleg erfolgen. Herzlichen Dank für Ihr Verständnis. Mit freundlichen Grüßen Ihre Olympia Business Systems Vertriebs GmbH... -
Page 17: Operating Instructions
TBL 1300 Combo Laminator and Thermal Binder Operating Instructions [ENGLISH] 11.2011... - Page 18 Important Safety Information .............. 19 Safety information, laminator ........... 19 Safety information, thermal binder ........... 20 Exemption From Liability ..............20 Intended Use ..................20 Operating Elements................21 Operating elements on the device ........... 21 Function buttons and indicator elements ......... 22 Starting Up..................
-
Page 19: Important Safety Information
Important Safety Information Please observe the following to ensure the device is used reliably and safely: Read this operating manual thoroughly and observe the instructions and ● information in it when operating the device. Keep this operating manual in a safe place for future reference. ●... -
Page 20: Safety Information, Thermal Binder
Do not laminate heat sensitive materials, such as thermal paper, in the ● device. Metallic objects cannot be laminated. ● Lamination of moist documents produces poor results. ● Keep loose clothing, ties, jewellery, long hair and other loose objects ● away from the laminator infeed slot. -
Page 21: Operating Elements
Operating Elements Operating elements on the device Operating and indicator elements Binder infeed slot Jam Release sliding switch (laminating function) Laminator infeed (front) Pull-out tray (cooling device) Laminator discharge (rear) Handle for the pull-out tray... -
Page 22: Function Buttons And Indicator Elements
Function buttons and indicator elements POWER ON/OFF switch Laminator button Bind/Counter button (start preheating) Bind/Counter button (start thermal binding) POWER LED (indicator: device on/off) Laminator LED (green = cold lamination; red = hot lamination) (flashing = waiting; continuously on = ready for use) Thermal binder LED (red &... -
Page 23: Operation
Safety note: The power socket must be in the immediate vicinity of the device and easily accessible. This enables you to disconnect the device from the power supply quickly in an emergency. Operation Switching the device on and off 1. Press the POWER button. The POWER LED lights up red. The device is switched on. -
Page 24: Hot Laminating
5. Guide the laminating foil pocket containing the document to be laminated in the laminator infeed straight and with the closed side first. The laminating process occurs automatically. Note: To prevent the lamination foil from creasing, never feed the open side of the lamination foil pocket first in the laminator infeed. When inserting the lamination foil pocket, observe the instructions on the infeed slot. -
Page 25: Clearing Jammed Lamination Foil
6.2.3 Clearing jammed lamination foil The device is equipped with a JAM RELEASE sliding switch to clear foil jams quickly. Proceed as follows if the lamination foil jams: 1. Switch the device off: Press the POWER button until the POWER LED goes out. -
Page 26: Overheating Protection (Auto Off)
8. The Bind/Counter LED flashes red during the binding process. The binding process is completed after about 1 minute and the Bind/Counter LED lights up green continuously. Three acoustic signals also indicate that the thermal binding process has finished. Caution: The bound folder is very hot in the spine area after binding! 9. -
Page 27: Cleaning The Transport Rollers
Cleaning the transport rollers Deposits and residual adhesive on the transport rollers can influence the results of the laminating process. Therefore, clean the transport rollers at regular intervals: 1. Wait until the Laminator LED lights up red continuously. 2. Insert a piece of folded paper in the laminator infeed. 3. -
Page 28: Technical Data
10 minutes. If the problem cannot be solved, contact our Hotline; refer to Chapter "Guarantee". Technical Data TBL 1300 Combo Indicator element: POWER LED (red) Laminator Maximum laminating width: 320 mm Max. -
Page 29: 10 Disposal
Pull-out tray for cooling bound documents (cooling device) Automatic opening of the dust cover Colour: Black-silver Dimensions (W x D x H): 435 x 115 x 225 mm Weight: 2 kg Power supply: 230 V, 50 Hz Rated input power: Max. -
Page 30: Mode D'emploi
TBL 1300 Combo Plastifieuse-thermorelieuse Mode d'emploi [FRANÇAIS] 11.2011... - Page 31 Consignes de sécurité importantes ............ 32 Consignes de sécurité relatives à la plastifieuse ..... 32 Consignes de sécurité relatives à la thermorelieuse ....33 Exclusion de la garantie ..............33 Utilisation conforme à son usage ............33 Éléments de manipulation ..............34 Éléments de manipulation situés sur l'appareil......
-
Page 32: Consignes De Sécurité Importantes
Consignes de sécurité importantes Afin de garantir un travail fiable avec l'appareil, veuillez tenir compte des points suivants : Lisez attentivement ce mode d'emploi et tenez-en compte lorsque vous ● vous manipulez votre appareil. Conservez-le pour une future utilisation. ● N'utilisez celui-ci que dans des pièces fermées et sèches. -
Page 33: Consignes De Sécurité Relatives À La Thermorelieuse
Ne plastifiez pas avec cet appareil des matériaux sensibles à la chaleur ● tels que le papier photosensible. Des objets métalliques ne peuvent pas être plastifiés. ● Vous obtiendrez de mauvais résultats si vous plastifiez des documents ● humides. N'approchez pas de la fente d'introduction de la plastifieuse des parties ●... -
Page 34: Éléments De Manipulation
Toute autre utilisation est considérée comme non conforme à son usage. Des modifications ou transformations arbitraires sont interdites. Éléments de manipulation Éléments de manipulation situés sur l'appareil Éléments de manipulation et d'affichage Fente pour reliure Poussoir de libération de bourrage (fonction plastifieuse) Fente d'introduction plastifieuse (à... -
Page 35: Touches De Fonction Et Éléments D'affichage
Touches de fonction et éléments d'affichage Touche marche/arrêt (POWER ON/OFF) Touche plastification Touche préchauffage Touche thermoreliure LED POWER (affichage appareil marche/arrêt) LED plastification (verte = plastification à froid ; rouge = plastification à chaud) (clignotante = en attente ; allumée en permanence = prête à fonctionner) LED thermoreliure (rouge &... -
Page 36: Manipulation
Consignes de sécurité : Celle-ci doit se trouver à proximité de l'appareil et être facile d'accès. En cas d'urgence, vous pouvez ainsi séparer rapidement l'appareil du réseau électrique. Manipulation Allumer/Éteindre l'appareil 1. Appuyez sur la touche marche/arrêt (POWER). La LED POWER devient rouge. -
Page 37: Plastification À Chaud
5. Introduisez la pochette avec le document à plastifier, côté fermé en premier, dans la fente d'introduction de la plastifieuse. L'opération de plastification se fait automatiquement. Remarque : Afin d'éviter que le film forme un pli, n'introduisez jamais en premier le côté ouvert de la pochette dans la fente. Lors de l'introduction de la pochette, veuillez tenir compte des instructions placées au niveau de la fente d'introduction. -
Page 38: Éliminer Un Bourrage
6.2.3 Éliminer un bourrage Afin d'éliminer rapidement des bourrages, l'appareil est équipé d'un poussoir de libération de bourrage (JAM RELEASE). Si le film est bloqué, procédez de la manière suivante : 1. Éteignez l'appareil : Appuyez sur la touche marche/arrêt jusqu'à ce que la LED POWER s'éteigne. -
Page 39: Protection Thermique (Auto-Off)
8. La LED thermoreliure clignote alors de nouveau rouge. La reliure est terminée au bout d'1 minute env. et la LED thermoreliure repasse à la couleur verte en permanence. Trois bips sonores signalent que la thermoreliure est achevée. Prudence : la chemise reliée est alors très chaude au niveau de la tranche ! 9. -
Page 40: Nettoyer Les Rouleaux De Transport
Nettoyer les rouleaux de transport Des dépôts et des restes de colle subsistant sur les rouleaux de transport peuvent influencer le résultat de la plastification. C'est pourquoi vous devez nettoyer les rouleaux de transport à intervalles réguliers : 1. Attendez que la LED plastification soit rouge en permanence. 2. -
Page 41: Données Techniques
10 minutes sur le a été trop court. support. Si vous n'avez pas pu remédier au problème, adressez-vous à notre ligne directe, voir chapitre Garantie”. Données techniques TBL 1300 Combo Élément d'affichage : LED POWER (rouge) Plastifieuse Largeur maximale de 320 mm plastification : Épaisseur maximale des... - Page 42 Thermorelieuse Largeur de reliure maximale : 335 mm (pour format A4) Capacité de reliure maximale : 200 feuilles (70g/m dans la chemise ≤ 20 mm Temps de reliure : env. 1 minute Durée de préchauffage : 3 à 5 minutes Durée de refroidissement >...
-
Page 43: 10 Remarque Concernant L'élimination
10 Remarque concernant l'élimination Ce symbole (la poubelle rayée) signifie que ce produit doit, en fin de vie, être apporté à un organisme de reprise ou de collecte séparée disponible pour l'utilisateur final. Ce symbole est uniquement valable dans les États de l'Espace économique européen 11 Garantie Cher client,... -
Page 44: Manuale D'uso
TBL 1300 Combo Plastificatrice e rilegatrice a caldo Manuale d'uso [ITALIANO] 11.2011... - Page 45 Indicazioni di sicurezza importanti............46 Indicazioni di sicurezza relative alla plastificatrice....46 Indicazioni di sicurezza relative alla termorilegatrice....47 Esclusione di responsabilità ............... 47 Impiego conforme agli usi previsti ............47 Elementi di comando ................48 Elementi di comando sull'apparecchio........48 Tasti funzione ed elementi di visualizzazione ......
-
Page 46: Indicazioni Di Sicurezza Importanti
Indicazioni di sicurezza importanti Un utilizzo sicuro dell'apparecchio richiede l'osservanza di quanto segue: Leggere attentamente queste istruzioni d'uso ed osservarle ● scrupolosamente durante l'utilizzo dell'apparecchio. Conservare le istruzioni d'uso per gli utilizzi futuri. ● L'apparecchio va usato esclusivamente in ambienti chiusi e asciutti. ●... -
Page 47: Indicazioni Di Sicurezza Relative Alla Termorilegatrice
In caso di plastificazione di documenti umidi i risultati saranno ● insoddisfacenti. Tenere lontano dalla fessura di inserimento della plastificatrice lembi di ● indumenti, cravatte, gioielli, capelli lunghi o altri oggetti simili. Pericolo di lesioni! Indicazioni di sicurezza relative alla termorilegatrice La superficie dell'apparecchio si surriscalda durante il funzionamento. -
Page 48: Elementi Di Comando
Elementi di comando Elementi di comando sull'apparecchio Elementi di comando e visualizzazione Vano di rilegatura Selettore di rimozione intasamenti (funzione plastificazione) Fessura di inserimento (anteriore) Ripiano estraibile (dispositivo di raffreddamento) Fessura di uscita (posteriore) Impugnatura del ripiano estraibile... -
Page 49: Tasti Funzione Ed Elementi Di Visualizzazione
Tasti funzione ed elementi di visualizzazione Interruttore di accensione/spegnimento (POWER ON/OFF) Tasto per plastificazione Tasto per preriscaldamento Tasto per termorilegatura LED di POWER (indica apparecchio acceso/spento) LED di plastificazione (verde = plastificazione a freddo; rosso = plastificazione a caldo) (lampeggiante = attesa; sempre acceso = pronto all'esercizio) LED di termorilegatura (rosso &... -
Page 50: Esercizio
Indicazione di sicurezza: La presa deve trovarsi in prossimità dell'apparecchio ed essere facilmente accessibile. In caso d'emergenza è così possibile scollegare rapidamente l'alimentazione elettrica dell'apparecchio. Esercizio Accensione e spegnimento dell'apparecchio 1. Premere il tasto ON/OFF (POWER). La spia LED di POWER si accende di rosso. -
Page 51: Plastificazione A Caldo
3. Eliminare la pellicola protettiva dalla pellicola per plastificazione. 4. Posizionare l'oggetto da plastificare nella tasca trasparente in modo da lasciare su tutti i lati un margine di ca. 3 - 5 mm dal bordo della pellicola. 5. Introdurre la tasca e l'oggetto da plastificare in modo diritto e dal lato chiuso nella fessura di inserimento. -
Page 52: Rimozione Di Pellicole Intasate
Attenzione: L'apparecchio è molto caldo dopo la plastificazione! Pericolo di lesioni! 6.2.3 Rimozione di pellicole intasate Per eliminare rapidamente possibili intasamenti da pellicola, l'apparecchio è dotato di apposito selettore di rimozione intasamenti (JAM RELEASE). Con pellicola di plastificazione bloccata, procedere come segue: 1. -
Page 53: Protezione Antisurriscaldamento (Autospegnimento)
6. Introdurre la copertina per termorilegatura con il lato chiuso in basso dall'alto della fessura di inserimento. Un dispositivo di bloccaggio integrato mantiene la carta diritta. 7. Premere il tasto di termorilegatura per dare inizio alla procedura di rilegatura. 8. Durante la procedura di rilegatura, la spia LED di termorilegatura lampeggia di nuovo in rosso. -
Page 54: Pulizia E Cura
Pulizia e cura Pulizia esterna dell'apparecchio Attenzione: Prima di pulire l'apparecchio con un panno umido, scollegare sempre la spina dalla presa di corrente! Pulire l'involucro con un panno inumidito in sapone neutro e acqua. Nota: Non utilizzare solventi o detergenti corrosivi. Pulizia dei rulli di trasporto Incrostazioni e residui di adesivo sui rulli di trasporto possono influire sul risultato di plastificazione. - Page 55 Si veda il capitolo La pellicola di plastificazione “Rimozione di pellicole non è stata introdotta in intasate”. modo diritto all'interno della Si veda il capitolo “Pulizia fessura di introduzione della dei rulli di trasporto”. plastificatrice. Introdurre la pellicola di La pellicola si laminazione in modo diritto intasa.
-
Page 56: Specifiche Tecniche
Specifiche tecniche TBL 1300 Combo Elemento di visualizzazione: LED di POWER (rosso) Plastificatrice Max. larghezza di 320 mm plastificazione: Max. spessore dei documenti 0,6 mm da plastificare: Spessore della pellicola di 75 - 125 mic laminazione: Velocità di plastificazione: 250 mm al minuto... -
Page 57: 10 Nota Sullo Smaltimento
Misure (L x P x H): 435 x 115 x 225 mm Peso: 2 kg Tensione di alimentazione: 230 V, 50 Hz Assorbimento: max. 320 W, 1,45 A Spegnimento automatico: 90 min dopo stand-by La conformità con le normative EU è confermata dal marchio 10 Nota sullo smaltimento Questo simbolo (il bidone sbarrato) indica che l'utilizzatore finale è... -
Page 58: Manual De Instrucciones
TBL 1300 Combo Aparato laminado y encuadernadora térmica Manual de instrucciones [ESPAÑOL] 11.2011... - Page 59 Advertencias de seguridad importantes..........60 Advertencias de seguridad para el aparato laminador .... 60 Advertencias de seguridad para la encuadernadora térmica .. 61 Exclusión de responsabilidad............. 61 Uso previsto..................61 Elementos de manejo................. 62 Elementos de mando en el aparato ......... 62 Teclas de función y elementos de indicación ......
-
Page 60: Advertencias De Seguridad Importantes
Advertencias de seguridad importantes Tenga en cuenta los aspectos siguientes a fin de garantizar un trabajo fiable con el aparato: Lea el presente manual de instrucciones detenidamente y téngalo en ● cuenta a la hora de manejar su aparato. Guarde el manual de instrucciones para cualquier utilización posterior. ●... -
Page 61: Advertencias De Seguridad Para La Encuadernadora Térmica
caso, el aparato, las películas transparentes de laminación y el documento sufrirían daños. No lamine materiales termosensibles como, por ejemplo, papel térmico, ● con este aparato. No se pueden laminar objetos metálicos. ● La laminación de documentos húmedos conlleva un mal resultado de ●... -
Page 62: Elementos De Manejo
debiendo superar el espesor total de los documentos a laminar (fotos, figuras, tarjetas, papel, etc.) los 0,6 mm como máximo. La encuadernación de un máximo de 200 hojas de papel (70g/m ) en ● carpetas de encuadernación térmica especiales con un ancho de 20 mm como máximo. -
Page 63: Teclas De Función Y Elementos De Indicación
Soporte extraíble (dispositivo de enfriamiento) Salida de laminación (atrás) Manija del soporte extraíble Teclas de función y elementos de indicación Tecla de encendido/apagado (POWER ON/OFF) Tecla de laminación Tecla de calentamiento previo Tecla de encuadernación térmica LED POWER (indicación de aparato encendido/apagado) LED de laminación (verde = laminación en frío;... -
Page 64: Puesta En Servicio
Puesta en servicio Posicione el aparato sobre una superficie estable y nivelada. ● Atención: Compruebe si la indicación de tensión del aparato coincide con la de su red de corriente (230 V, 50 Hz). Conecte la clavija de alimentación a una caja de enchufe estándar ●... -
Page 65: Laminación En Caliente
Atención: Si ha utilizado el aparato laminador poco antes para la laminación en caliente, es necesario que este se enfríe primero. El LED de laminación parpadea en verde durante el proceso de enfriamiento. El período de enfriamiento es de algunos minutos. Advertencia: Para la laminación en frío, utilice exclusivamente películas transparentes de laminación en frío. -
Page 66: Eliminar Un Atasco De Película Transparente
lado abierto de la funda de película transparente de laminación en la entrada de laminación. Al introducir la funda de película transparente rogamos que observe las instrucciones en la entrada de laminación. Atención: La película transparente de laminación saliente está muy caliente y muy blanda después de la laminación. -
Page 67: Encuadernadora Térmica
Encuadernadora térmica 6.3.1 Encuadernación térmica 1. Asegúrese de que el aparato está conectado. Ver el capítulo "Encender y apagar el aparato". 2. Pulse la tecla de calentamiento previo para iniciar el proceso de calentamiento. 3. El LED de encuadernación térmica parpadea en rojo durante el proceso de calentamiento. -
Page 68: Protección Contra Sobrecalentamientos (Auto-Off)
6.3.2 Protección contra sobrecalentamientos (Auto-off) El aparato está equipado con una protección contra sobrecalentamientos (Auto-off) para proteger las carpetas de encuadernación térmica no retiradas frente a un sobrecalentamiento. Cuando el proceso de encuadernación ha terminado, sonará una señal. Al mismo tiempo se activa la protección contra sobrecalentamientos. Si no se vuelve a pulsar la tecla de encuadernación térmica al cabo de 90 minutos, se apaga la alimentación eléctrica electrónicamente (Auto-off). -
Page 69: Solución De Problemas
Solución de problemas Problema Diagnóstico y causa Solución La clavija de alimentación no Enchufe la clavija de está correctamente alimentación correctamente en enchufada en la caja de la caja de enchufe. enchufe. Pulse la tecla de La indicación No se ha encendido el encendido/apagado hasta que POWER no se aparato. -
Page 70: Datos Técnicos
10 minutos en el soporte. Si no ha sido posible eliminar el problema, póngase en contacto con nuestra línea de asistencia telefónica. Ver el capítulo "Garantía". Datos técnicos TBL 1300 Combo Elemento de indicación: LED POWER (rojo) Aparato laminador Máxima anchura de 320 mm laminación:... -
Page 71: 10 Indicaciones De Eliminación
Tiempo de encuadernación: Aproximadamente 1 minuto Período de calentamiento: 3-5 minutos Período de enfriamiento > 10 minutos recomendado: Elementos de indicación: LED (verde, rojo; parpadeante, iluminado de forma permanente) Características particulares: Indicación visual y acústica de la disposición de servicio y de la finalización del proceso de encuadernación Soporte extraíble para el enfriamiento de las carpetas de encuadernación (dispositivo de... -
Page 72: Manual De Instruções
TBL 1300 Combo Máquina de plastificação e encadernação térmica Manual de instruções [PORTUGUÊS] 11.2011... - Page 73 Importantes avisos de segurança ............74 Avisos de segurança - Máquina de plastificar ......74 Avisos de segurança Máquina de encadernação térmica ..75 Cláusula de desresponsabilização............. 75 Utilização conforme as especificações ..........75 Elementos de comando..............76 Elementos de comando no aparelho ........76 Elementos de comando e de indicação ........
-
Page 74: Importantes Avisos De Segurança
Importantes avisos de segurança De modo a garantir um trabalho seguro com a máquina tenha, por favor, em atenção os seguintes pontos: Leia atentamente este manual de instruções e tenha-o em ● consideração ao manusear o aparelho. Deve guardar o manual de instruções para uma consulta posterior. ●... -
Page 75: Avisos De Segurança Máquina De Encadernação Térmica
Objectos metálicos não podem ser plastificados. ● Ao plastificar documentos húmidos atingirá maus resultados de ● plastificação. Manter peças de roupa largas, gravatas, joalharia, cabelo comprido ou ● outros objectos soltos afastados da abertura de entrada de plastificação. Risco de ferimento! Avisos de segurança Máquina de encadernação térmica A superfície do aparelho aquece durante o uso. -
Page 76: Elementos De Comando
Elementos de comando Elementos de comando no aparelho Elementos de comando e de indicação Ranhura de encadernação Disp. deslizante de desbloqueio anti-obstrução (função de plastificação) Entrada para plastificar (a frente) Suporte extensível (disp. de arrefecimento) Saída de plastificação (atrás) Pega do suporte extensível... -
Page 77: Elementos De Comando E De Indicação
Elementos de comando e de indicação Tecla de ligar / desligar (POWER ON/OFF) Tecla para plastificar Tecla de pré-aquecimento Tecla de encadernação térmica POWER-LED (indicação de ligar/desligar do aparelho) LED de plastificação (verde = plastificar a frio; vermelho = plastificar a quente) (piscando = a aguardar;... -
Page 78: Operação
Aviso de segurança: A tomada deve estar perto do aparelho e de fácil acesso. Assim o aparelho pode ser desligado da rede eléctrica rapidamente numa emergência. Operação Ligar e desligar o aparelho 1. Pressione a tecla de ligar/desligar (POWER). A LED POWER fica acesa a vermelho. -
Page 79: Plastificar A Quente
5. Introduza de forma linear a película de plastificar juntamente com o objecto a plastificar primeiro com o seu lado fechado na abertura de entrada de plastificação. O processo de plastificação ocorre automaticamente. Nota: para evitar o dobrar da película de plastificação, o lado aberto da película de plastificação nunca pode ser introduzido primeiro na abertura de entrada da máquina de plastificar. -
Page 80: Remover Uma Obstrução De Película
5. Ao terminar a plastificação deve desligar o aparelho e retirar a ficha da tomada. Deixe que o aparelho arrefeça antes de, eventualmente, arrumá-lo. Cuidado: Após a plastificação o aparelho está quente! Risco de ferimento! 6.2.3 Remover uma obstrução de película Para remover obstruções por películas o aparelho é... -
Page 81: Proteção De Sobreaquecimento (Auto-Off)
Nota: Tenha em atenção a capacidade máxima de encadernação, veja o capítulo „Dados técnicos“. 5. No lado traseiro do aparelho deve puxar o suporte para fora (disp. de arrefecimento) para possibilitar a entrada das capas de encadernação térmica na ranhura de encadernação. 6. -
Page 82: Manutenção & Limpeza
Manutenção & limpeza Limpar o exterior do aparelho Atenção: Antes de efectuar a limpeza húmida do aparelho retire sempre a ficha de rede! A caixa poderá ser limpa com um pano ligeiramente molhado em sabonete suave e água limpa. Aviso: Não utilize dissolventes ou produtos de limpeza agressivos. Limpar os cilindros de transporte Depósitos e resíduos de cola nos cilindros de transporte podem influenciar o resultado da plastificação. - Page 83 Veja o capítulo “Eliminar congestionamentos de Não inseriu a película de película”. plastificar de modo linear na abertura de entrada de Veja o capítulo “Limpar os plastificação. cilindros de transporte”. Introduza a película de Congestionamento plastificar de modo linear e de película primeiro com o seu lado fechado na abertura de...
-
Page 84: Dados Técnicos
Dados técnicos TBL 1300 Combo Elementos de indicação: LED POWER (vermelho) Máquina de plastificar Largura máxima de 320 mm plastificação: Espessura máx. dos 0,6 mm documentos a serem plastificados: Espessura de películas de 75 a 125 mic plastificar: Velocidade de plastificação:... -
Page 85: 10 Avisos Para A Eliminação
Medidas (L x P x A): 435 x 115 x 225 mm Peso: 2 kg Alimentação de tensão: 230 V, 50 Hz Consumo no máx. 320 W, 1,45 A Desligamento automático: 90 min após o standby A conformidade com as directivas da UE é confirmada pelo símbolo CE. -
Page 86: Gebruiksaanwijzing
TBL 1300 Combo Lamineer- en thermisch inbindapparaat Gebruiksaanwijzing [NEDERLANDS] 11.2011... - Page 87 Belangrijke veiligheidsaanwijzingen ........... 88 Veiligheidsaanwijzingen lamineerapparaat......88 Veiligheidsaanwijzingen thermisch inbindapparaat ....89 Aansprakelijkheid ................89 Bedoeld gebruik.................. 89 Bedieningselementen ................. 90 Bedieningselementen op het apparaat ........90 Knoppen en weergave-elementen ........... 91 Apparaat in gebruik nemen ..............91 Apparaat gebruiken ................92 Apparaat in- en uitschakelen............
-
Page 88: Belangrijke Veiligheidsaanwijzingen
Belangrijke veiligheidsaanwijzingen Volg de onderstaande aanwijzingen op om er zeker van te zijn dat u het apparaat op de juiste manier gebruikt: Lees deze gebruiksaanwijzing aandachtig door en volg ze op bij het ● gebruik van het apparaat. Bewaar de gebruiksaanwijzing voor toekomstig gebruik. ●... -
Page 89: Veiligheidsaanwijzingen Thermisch Inbindapparaat
Bij het lamineren van vochtige documenten bereikt u slechte ● lamineerresultaten. Houd loszittende delen van kleding, stropdassen, sieraden, lang haar of ● andere losse voorwerpen weg van de lamineerinvoer. Kans op persoonlijk letsel! Veiligheidsaanwijzingen thermisch inbindapparaat Het oppervlak van het apparaat wordt tijdens gebruik heet. ●... -
Page 90: Bedieningselementen
Bedieningselementen Bedieningselementen op het apparaat Bedienings- en weergave-elementen Inbindschacht Ontgrendelingsschuif voor vastgelopen folie (lamineerfunctie) Lamineerinvoer (voor) Uittrekbare houder (afkoelingsinrichting) Lamineeruitgang (achter) Handgreep van de uittrekbare houder... -
Page 91: Knoppen En Weergave-Elementen
Knoppen en weergave-elementen Aan/Uit-knop (POWER ON/OFF) Lamineerknop Voorverwarmingsknop Thermisch inbinden-knop POWER-led (weergave Apparaat aan/uit) Lamineer-led (groen = koudlamineren; rood = heetlamineren) (knipperend = wachten; continu verlicht = gereed voor gebruik) Thermisch inbinden-led (rood & knipperend = opwarmen; groen & continu brandend= gereed voor gebruik/klaar) Apparaat in gebruik nemen Plaats het apparaat op een stabiel en vlak oppervlak. -
Page 92: Apparaat Gebruiken
Veiligheidsaanwijzing: Het stopcontact moet zich in de buurt van het apparaat bevinden en goed bereikbaar zijn. U kunt zodoende in geval van nood het apparaat snel van het lichtnet scheiden. Apparaat gebruiken Apparaat in- en uitschakelen 1. Druk op de Aan/Uit-knop (POWER). De POWER-led brandt continu rood. Het apparaat is aan. -
Page 93: Heetlamineren
5. Voer het lamineerhoesje samen met het te lamineren document met de gesloten zijde eerst in de lamineerinvoer in. Het lamineerproces verloopt automatisch. Opmerking: Om vouwen in de lamineerfolie te voorkomen mag de open zijde van het lamineerhoesje nooit als eerste in de lamineerinvoer worden ingevoerd. -
Page 94: Vastgelopen Folie Verwijderen
6.2.3 Vastgelopen folie verwijderen Om vastgelopen folie snel te kunnen verwijderen is het apparaat met een ontgrendelingsschuif (JAM RELEASE) uitgerust. Als de lamineerfolie blokkeert, gaat u als volgt te werk: 1. Schakel het apparaat uit: Druk op de Aan/Uit-knop totdat de POWER-led uitgaat. -
Page 95: Beveiliging Tegen Oververhitting (Auto-Off)
8. Gedurende het inbindproces knippert de Thermisch inbinden-led rood. Na ongeveer 1 minuut is het inbindproces afgesloten en de Thermisch inbinden-led brandt continu groen. Drie waarschuwingstonen signaleren ook akoestisch dat het thermisch inbindproces voltooid is. Voorzichtig: De gebonden map is na het inbinden in de rugzone zeer heet! 9. -
Page 96: Transportwalsen Reinigen
Transportwalsen reinigen Aangekoekt materiaal en lijmresten op de transportrollen kunnen het lamineerresultaat verslechteren. Daarom moeten de transportrollen regelmatig worden gereinigd: 1. Wacht totdat de Lamineer-led continu rood brandt. 2. Voer een gevouwen vel papier in de lamineerinvoer in. 3. Herhaal de procedure met een nieuw vel papier totdat op het papier geen afzettingen of lijmresten meer zichtbaar zijn. -
Page 97: Technische Gegevens
Als het probleem niet kon worden verholpen, wendt u zich tot onze hotline, zie de paragraaf 'Garantie'. Technische gegevens TBL 1300 Combo Weergave-element: POWER-led (rood) Lamineerapparaat Maximale lamineerbreedte: 320 mm Maximale dikte van de te... -
Page 98: 10 Gescheiden Inzameling
Inbindtijd: ong. 1 minuut Opwarmingsduur: 3-5 minuten Geadviseerde afkoelingsduur: > 10 minuten Weergave-elementen: Led (groen, rood; knipperend, continu brandend) Bijzondere kenmerken: Optische en akoestische weergave van Gereedheid voor gebruik en Einde Inbindproces Uittrekbare houder voor de afkoeling van Inbindmappen (afkoelingsinrichting) Automatisch openen van de stofafdekking Kleur: Zwart-zilver... -
Page 99: Návod K Obsluze
TBL 1300 Combo Stroj na laminování a tepelné spojování Návod k obsluze [ČESKY] 11.2011... - Page 100 Důležitá bezpečnostní upozornění........... 101 Bezpečnostní upozornění laminátor ........101 Bezpečnostní upozornění Stroj na tepelné spojování ... 102 Vyloučení záruky ................102 Použití k danému účelu ..............102 Ovládací prvky.................. 103 Ovládací prvky na přístroji............103 Tlačítka funkcí a kontrolky............104 Uvedení...
-
Page 101: Důležitá Bezpečnostní Upozornění
Důležitá bezpečnostní upozornění Respektujte prosím následující pokyny, aby bylo zaručeno spolehlivé zacházení s přístrojem: Pozorně si prosím pročtěte tento návod k obsluze a dodržujte jej při ● manipulaci s přístrojem. Návod k obsluze uschovejte pro pozdější použití. ● Přístroj se smí používat pouze v suchých, uzavřených prostorách. ●... -
Page 102: Bezpečnostní Upozornění Stroj Na Tepelné Spojování
Kovové předměty nelze laminovat. ● Laminováním vlhkých dokumentů dosáhnete jen špatných výsledků. ● Volné součásti oděvu, kravaty, šperky, dlouhé vlasy nebo jiné volné ● předměty udržujte v dostatečné vzdálenosti od vstupního otvoru. Nebezpečí zranění! Bezpečnostní upozornění Stroj na tepelné spojování Povrch přístroje je v době... -
Page 103: Ovládací Prvky
Ovládací prvky Ovládací prvky na přístroji Ovládací prvky a kontrolky Spojovací jamka Posuvné zařízení k uvolnění nakupené fólie (funkce laminování) Vstupní otvor laminování (vpředu) Výsuvná část (chladicí zařízení) Výstup laminování (vzadu) Úchytka výsuvné části... -
Page 104: Tlačítka Funkcí A Kontrolky
Tlačítka funkcí a kontrolky Tlačítko Zap./Vyp. (POWER ON/OFF) Tlačítko laminování Tlačítko předehřevu Tlačítko tepelného spojování POWER-LED (kontrolka přístroj zapnut/vypnut) LED kontrolka laminování (zelená = laminování za studena; červená = laminování za tepla) (blikající = čekat; trvale svítící = provozuschopno) LED kontrolka tepelného spojování (červená... -
Page 105: Obsluha
Bezpečnostní upozornění: Zásuvka se musí nacházet v blízkosti přístroje a musí být snadno dostupná. Můžete tak v nouzovém případě rychle přerušit dodávku elektřiny. Obsluha Přístroj zapnout a vypnout 1. Stisněte tlačítko Zap./Vyp. (POWER). Kontrolka POWER svítí červeně. Přístroj je zapnut. 2. -
Page 106: Laminování Za Tepla
5. Laminovací fólii zaveďte spolu s laminovaným materiálem do vstupního otvoru uzavřenou stranou napřed. Laminování proběhne automaticky. Upozornění: Laminovací fólie nesmí být nikdy zavedena do vstupního otvoru otevřenou stranou napřed, jen tak lze zabránit zvrásnění fólie. Při zavádění laminovací fólie dbejte prosím pokynů uvedených na vstupním otvoru laminování. -
Page 107: Odstranit Nakupení Fólie
6.2.3 Odstranit nakupení fólie Přístroj je vybaven posuvným zařízením k uvolnění nakupené fólie (JAM RELEASE). Pokud je laminovací fólie zablokovaná, postupujte následovně: 1. Vypněte přístroj: Stiskněte tlačítko Zap./Vyp., dokud nezhasne POWER- LED kontrolka. 2. Posuvné zařízení k uvolnění nakupené fólie (JAM RELEASE) nastavte úplně... -
Page 108: Ochrana Proti Přehřátí (Auto-Off)
tepelného spojování svítí nepřetržitě zeleně. Tři zvuková znamení akusticky signalizují, že bylo provedeno tepelné spojení. Pozor: Zadní strana spojené mapy je po spojení velmi horká! 9. Spojovací mapu odstraňte a položte ji asi na 10 minut na chladicí zařízení. Upozornění: Dodržujte dobu chlazení. Příliš krátká doba chlazení může způsobit uvolnění... -
Page 109: Očistit Posouvací Válečky
Očistit posouvací válečky Usazeniny a zbytky lepidel na posouvacích válečcích mohou ovlivnit výsledek laminování. Proto je nutné posouvací válečky pravidelně očišťovat. 1. Vyčkejte, dokud nebude LED kontrolka laminování nepřetržitě svítit červeně. 2. Zaveďte do vstupního otvoru přeložený list papíru. 3. Tento postup opakujte s použitím nového listu papíru tak dlouho, dokud budou na papíře viditelné... -
Page 110: Technické Údaje
Doba chlazení byla nejméně 10 minut ležet ve nedostačující. výsuvné části. V případě, že se závadu nepodařilo odstranit, obraťte se na naši horkou linku, viz odstavec „Záruka”. Technické údaje TBL 1300 Combo Kontrolka: POWER-LED (červená) Laminátor Maximální šířka 320 mm laminovaného dokumentu: Maximální... -
Page 111: 10 Pokyny K Likvidaci
Doba zahřívání: 3-5 minut Doporučená doba chlazení: > 10 minut Kontrolky: LED (zelená, červená; blikající, nepřetržitě svítící) Zvláštní znaky: Optické a akustické upozornění na provozuschopnost a konec procesu spojení Výsuvná část k vychladnutí termomap (chladicí zařízení) Automatické otvírání krytu chránícího před prachem Barva: černostříbrná... - Page 112 TBL 1300 Combo Μηχάνημα πλαστικοποίησης και θερμοκόλλησης Οδηγίες Χρήσης [ΕΛΛΗΝΙΚΑ] 11.2011...
- Page 113 Σημαντικές υποδείξεις ασφαλείας ............ 114 Υποδείξεις ασφαλείας Συσκευή πλαστικοποίησης ....114 Υποδείξεις ασφαλείας Συσκευή θερμοκόλλησης ....115 Γενική εξαίρεση της εγγύησης ............115 Χρήση σύμφωνα με τον προορισμό ..........115 Στοιχεία χειρισμού ................116 Στοιχεία χειρισμού στη συσκευή ..........116 Πλήκτρα...
-
Page 114: Σημαντικές Υποδείξεις Ασφαλείας
Σημαντικές υποδείξεις ασφαλείας Για να διασφαλιστεί μία αξιόπιστη εργασία με τη συσκευή λάβετε υπόψη σας τα παρακάτω: Διαβάστε παρακαλώ προσεκτικά αυτές τις Οδηγίες Χρήσης και λάβετε ● τις υπόψη κατά το χειρισμού της συσκευής σας. Φυλάξτε τις Οδηγίες Χρήσης για μελλοντική χρήση. ●... -
Page 115: Υποδείξεις Ασφαλείας Συσκευή Θερμοκόλλησης
Μην κόβετε το μέγεθος των διαφανειών πλαστικοποίησης. Οι ● δημιουργηθείσες ακμές κοπής θα μπορούσαν να προκαλέσουν τη συσσώρευση των διαφανειών. Μην χρησιμοποιείτε κατά τη θερμή πλαστικοποίηση διαφάνειες ● πλαστικοποίησης, οι οποίες προβλέπονται για ψυχρή πλαστικοποίηση. Θα προκαλούσατε ζημιά στη συσκευή, στις διαφάνειες πλαστικοποίησης... -
Page 116: Στοιχεία Χειρισμού
πλαστικοποίησης από 75 μέχρι 125 mic , όπου το συνολικό πάχος των προς πλαστικοποίηση εγγράφων (φωτογραφίες, εικόνες, καρτ- ποστάλ, χαρτί κλπ.) επιτρέπεται να βρίσκεται στα μέγιστο 0,6 mm το δέσιμο του μέγιστου αριθμού των 200 φύλλων χαρτιού (70g/m ) σε ●... -
Page 117: Πλήκτρα Λειτουργίας Και Στοιχεία Ενδείξεων
Ανοιγόμενη βάση (Διάταξη ψύχρανσης) Λαβή της ανοιγόμενης βάσης Έξοδος πλαστικοποίησης (Πίσω τμήμα) Πλήκτρα λειτουργίας και στοιχεία ενδείξεων Πλήκτρο Εντός/Εκτός (POWER ON/OFF) Πλήκτρο πλαστικοποίησης Πλήκτρο προθέρμανσης Πλήκτρο θερμοκόλλησης... -
Page 118: Έναρξη Λειτουργίας
Λυχνία POWER-LED (Ένδειξη συσκευή εντός/εκτός) Λυχνία LED πλαστικοποίησης (πράσινη = ψυχρή πλαστικοποίηση, κόκκινη = θερμή πλαστικοποίηση) (αναβοσβήνει = αναμονή μόνιμα αναμμένη = έτοιμη προς λειτουργία) Λυχνία LED θερμοκόλλησης (κόκκινη & αναβόσβημα = λειτουργία προθέρμανσης, πράσινη & μόνιμα αναμμένη = έτοιμη προς λειτουργία/έτοιμο) Έναρξη... -
Page 119: Ψυχρή Πλαστικοποίηση
6.2.1 Ψυχρή πλαστικοποίηση 1. Διασφαλίστε, η συσκευή να είναι ενεργοποιημένη, βλέπε κεφάλαιο „Ενεργοποίηση και απενεργοποίηση συσκευής”. 2. Πατήστε το πλήκτρο πλαστικοποίησης, μέχρι να ανάβει η λυχνία LED πλαστικοποίησης πράσινα. Όταν η λυχνία LED πλαστικοποίησης ανάβει συνεχώς πράσινα, η συσκευή είναι έτοιμη προς λειτουργία για ψυχρή πλαστικοποίηση. Προσοχή: Εάν... -
Page 120: Αντιμετώπιση Συσσώρευσης Διαφανειών
3. Τοποθετήστε το προς πλαστικοποίηση υλικό έτσι στη θήκη διαφανειών, ώστε να υπάρχει από όλες τις πλευρές μία απόσταση περίπου 3 μέχρι 5 mm από το περιθώριο της διαφάνειας πλαστικοποίησης. 4. Εισάγετε τη θήκη διαφανειών μαζί με το υλικό πλαστικοποίησης σε ευθεία και... -
Page 121: Συσκευή Θερμοκόλλησης
5. Καθαρίστε τους κυλίνδρους μεταφοράς από αποθέσεις και υπολείμματα κόλλας, με το να εισάγετε ένα διπλωμένο φύλλο χαρτί στην εισαγωγή πλαστικοποίησης, βλέπε κεφάλαιο „Καθαρισμός κυλίνδρου μεταφοράς”. Υπόδειξη: Σε περίπτωση που οι συσσωρεύσεις φύλλου επαναλαμβανόνται συνεχώς ή όταν οι συσσωρευμένες διαφάνειες δεν μπορεί... -
Page 122: Προστασία Υπερθέρμανσης (Auto-Off)
9. Αφαιρέστε το ντοσιέ θερμοκόλλησης και τοποθετήστε το για περίπου 10 λεπτά στη διάταξη κρυώματος. Υπόδειξη: Τηρήστε το χρόνο κρυώματος. Πολύ παρατεταμένος χρόνος κρυώματος έχει ως αποτέλεσμα χαλαρά φύλλα! 10. Για περισσότερα δεσίματα επαναλάβετε τα βήματα 1 μέχρι 9. 11. Όταν έχετε ολοκληρώσει τη θερμοκόλληση, απενεργοποιήστε τη συσκευή και... -
Page 123: Αντιμετώπιση Προβλημάτων
Αντιμετώπιση προβλημάτων Πρόβλημα Διάγνωση & Αιτία Αντιμετώπιση Το φις δεν έχει τοποθετηθεί Τοποθετήστε το φις στη σωστά στην ηλεκτρική πρίζα. πρίζα με το σωστό τρόπο. Πατήστε το πλήκτρο Η συσκευή δεν έχει Εντός/Εκτός, μέχρι να Η ένδειξη POWER ενεργοποιηθεί. ανάβει η λυχνία POWER δεν... -
Page 124: Τεχνικά Στοιχεία
χρόνου κρυώματος. τουλάχιστον 10 λεπτά στη βάση. Όταν το πρόβλημα δεν μπορεί να αντιμετωπιστεί, απευθυνθείτε στην τηλεφωνική γραμμή εξυπηρέτησης πελατών μας Hotline (βλέπε κεφάλαιο „Εγγύηση“). Τεχνικά στοιχεία TBL 1300 Combo Στοιχείο ένδειξης: Λυχνία POWER-LED (κόκκινη) Συσκευή πλαστικοποίησης Μέγιστο πλάτος 320 mm πλαστικοποίησης:... - Page 125 Μέγιστη δυναμικότητα 200 φύλλα (70g/m σε ντοσιέ θερμοκόλλησης ≤ 20 mm δεσίματος: Χρόνος δεσίματος: περ. 1 λεπτό Διάρκεια προθέρμανσης: 3-5 λεπτά Συνιστώμενη διάρκεια > 10 λεπτά κρυώματος: Στοιχεία ενδείξεων: Λυχνία LED (πράσινη, κόκκινη, αναβοσβήνει, ανάβει συνεχώς) Ιδιαίτερα χαρακτηριστικά: Οπτική και ακουστική ένδειξη της λειτουργικής ετοιμότητας...
-
Page 126: 10 Υπόδειξη Αποκομιδής
10 Υπόδειξη αποκομιδής Αυτό το σύμβολο (κάδος απορριμμάτων σε διαγραφή) σημαίνει, ότι αυτό η αποκομιδή αυτού του προϊόντος θα πρέπει μετά το τέλος διάρκειας ζωής του να γίνεται σε ένα για τον τελικό χρήστη διαθέσιμο, δίκτυο επιστροφής ή μεμονωμένο δίκτυο. Αυτό... - Page 127 Compatibility, EMC): EN 55014-1:2006 +A1:2009 +A2:2011 EN 55014-2:1997+A1:2001 +A2:2008 EN 61000-3-2:2006 +A1:2009 +A2:2009 EN 61000-3-3:2008 OLYMPIA Business Systems Vertriebs GmbH Zum Kraftwerk 1 45527 Hattingen Phone: 0 23 24 / 68 01-0 Fax: 0 23 24 / 68 01-99 E-Mail: olympia@olympia-vertrieb.de...
- Page 128 Diese Bedienungsanleitung dient der Information. Ihr Inhalt ist nicht Vertragsgegenstand. Alle angegebenen Daten sind lediglich Nominalwerte. Die beschriebenen Ausstattungen und Optionen können je nach den länderspezifischen Anforderungen unterschiedlich sein. Wir behalten uns inhaltliche und technische Änderungen vor.
Need help?
Do you have a question about the TBL 1300 Combo and is the answer not in the manual?
Questions and answers