Advertisement
Table of Contents
- 1 Package Contains
- 2 Features
- 3 Transmitter View and Parts Identification
- 4 Receiver View and Parts Identification
- 5 Replace Batteries
- 6 Attach the Set to Camera
- 7 Use the JM-II to Take Photos in 5 Modes
- 8 Single Shot
- 9 Unlimited Continuous Shots
- 10 Bulb Shutter Function
- 11 5S Delay Shot
- 12 3 Continuous Shots
- 13 Use the Receiver as a Wired Remote Switch
- Download this manual
Model: JM-II
Wireless Remote Controller
English Manual Instruction
Thank you for purchasing JJC JM-II series wireless remote controller. For the best
performance, please read this instruction carefully before using. You must read it
throughly and fully understand this manual to avoid improper operation lead to damage of
the product.
Advertisement
Table of Contents

Subscribe to Our Youtube Channel
Related Manuals for JJC JM-II Series


Summary of Contents for JJC JM-II Series
-
Page 1: Wireless Remote Controller
Wireless Remote Controller English Manual Instruction Thank you for purchasing JJC JM-II series wireless remote controller. For the best performance, please read this instruction carefully before using. You must read it throughly and fully understand this manual to avoid improper operation lead to damage of... - Page 2 JJC JM-II Series Radio Frequency Wireless Shutter is designed for most DSLR and SLR cameras that have a remote socket on the camera body. The system works at a 433MHZ frequency and has 16 available channels. What’s more, this wireless remote system adopts a technology to allow the transmitter trigger the receiver without direct line of sight up to 30 meters.
- Page 3 Features JM Receiver: Battery type: CR-2 3V lithium battery × 1 Operating temperature: 5 °C to 40 °C (40 °F to 105 °F) Net weight : Approx 19g Dimensions: 48 × 38 × 29mm (with cold shoe mount) JM Transmitter: ...
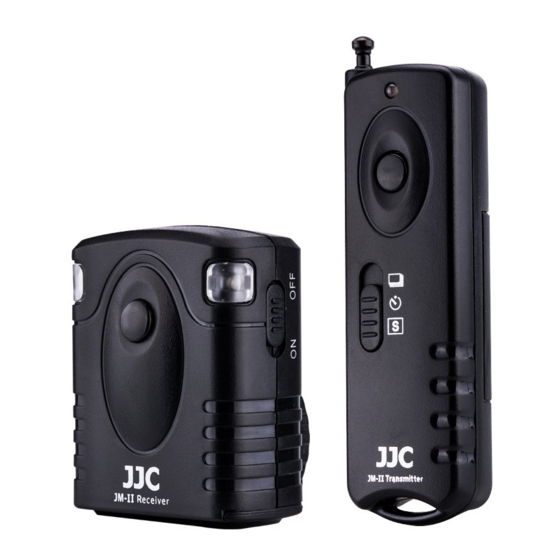
- Page 4 Receiver ① Left status LED ② Right status LED ③ Shutter button ④ Battery cover ⑤ Channel setting switch ⑥ 1/4"-20 tripod mount socket ⑦ Cold shoe mount ⑧ Lock nut ① ON/OFF switch ② Remote socket...
- Page 5 Replace Batteries Tear off the plastic protector of the batteries if your batteries have. Then just slide to remove the covers toward the direction of the arrow sign on the battery covers . Insert the fresh battery, please ensure the batteries are put into a correct direction. Do not install batteries in the reverse direction as this could cause the batteries to leak corrosive liquids, generate heat or explode.
- Page 6 (the appearance of this end for different cameras may varies). Note: Please remember not to connect the cable round the wrong way. For any JJC connecting cord , please always keep in mind that the end as the picture shown left should...
- Page 7 Turn ON the power of the receiver and the camera. Use the JM-II to Take Photos in 5 Modes Transmitter Mode Dial Function Camera Drive Mode Single shot Single shooting Unlimited continuous shots Continuous shots Manual Mode Wireless bulb Shutter Speed: BULB 5s Delay shot Single shooting 3 continuous shots...
- Page 8 Single shot Shift mode dial to single shot section while select the camera to single shot mode. Half press the shutter button of transmitter to focus. 2. Then full press the shutter button, the camera will take a picture instantly. ...
- Page 9 Then full press while holding the shutter button of transmitter until the transmitter LED light OFF, the receiver will now lock the shutter for continuous shot. To release the shutter lock, press the shutter button of the transmitter again, the receiver will unlock the shutter.
- Page 10 Then full press while holding the shutter button of transmitter until the transmitter LED light OFF, the receiver will now lock the shutter for BULB. To release the shutter lock, press the shutter button of the transmitter again, the receiver will unlock the shutter. Then you will get a long exposure photo as the picture shown below.
- Page 11 Then full press the shutter button, the camera will take a picture after 5 seconds count down. You will get a delay shot photo. 3 continuous shots Shift the mode dial of the transmitter to 3 continuous shot section while select the camera to single shot mode.
- Page 12 JJC is a trademark of JJC Company ONE YEAR UNCONDITIONAL GUARANTEE If for any reason, this JJC product fails within ONE YEAR of the date of purchase, return this product to your JJC dealer or contact service@jjc.cc and it will be exchanged for you at no charge (not include shipping cost).
Need help?
Do you have a question about the JM-II Series and is the answer not in the manual?
Questions and answers