
Related Manuals for Gantner GAT ECO.Side Lock 7000 BA


Summary of Contents for Gantner GAT ECO.Side Lock 7000 BA
- Page 1 GAT ECO.Side Lock 7000 BA / NW BA Battery-Powered Multi-Technology Electronic Lock Installation, Commissioning, Operation Document Version 1.4 www.gantner.com HB_GAT-GAT-ECOSide-Lock7000-BA--EN_14...
- Page 2 Some of these names may be trademarks or registered trademarks of the corresponding company. Contact For general inquiries of further information on the GAT ECO.Side Lock 7000 BA and GAT ECO.Side Lock 7000 NW BA, see the contact information below. Contact address of manufacturer:...
- Page 3 GAT ECO.Side Lock 7000 BA / NW BA Important Information Dear Customer, Our aim is to ensure that our product operates with safety and to your complete satisfaction. To achieve this aim, please take this opportunity to familiarize yourself with the following guidelines.
- Page 4 GAT ECO.Side Lock 7000 BA / NW BA 2. Property Damage Messages Property damage messages are used to describe potentially hazardous situations that may lead to property damage. These messages have the same layout as safety messages but use the signal word "NOTICE" instead of “CAUTION”.
- Page 5 Do not attempt to repair a product after a defect, failure, or damage is detected. In addition, do not put the product back into operation. In such cases, it is essential to contact your GANTNER representative or the GANTNER support hotline.
- Page 6 GAT ECO.Side Lock 7000 BA / NW BA The GAT ECO.Side Lock 7000 BA / NW BA was developed and fabricated under the quality management standard ISO 9001 and GANTNER Electronic GmbH is also certified according to standard ISO 14001.
-
Page 7: Table Of Contents
Measurement Diagrams for Installation ....................20 Door Width ............................20 Dimensions of the GAT ECO.Side Lock 7000 BA and GAT NET.Lock Bolt Sets ....... 20 3.10 Installation in Lockers with Non-Metallic Doors (Except Glass) ............. 22 Installation Requirements for the GAT ECO.Side Lock 7000 BA and Non-Metallic Doors ....23 Installation Instructions for the GAT ECO.Side Lock 7000 BA and Non-Metallic Doors ..... - Page 8 General Information ..........................39 Setup for Configuration in GAT Config Manager ................... 39 View and Edit the GAT ECO.Side Lock 7000 BA Configuration Settings ..........41 Upload Configuration Settings to the GAT ECO.Side Lock 7000 BA ............ 42 Updating the GAT ECO.Side Lock 7000 BA Firmware................43 Configuration Settings of the GAT ECO.Side Lock 7000 BA ..............
-
Page 9: Introduction
1.3 Contact & Inquiries If you have any questions concerning the GAT ECO.Side Lock 7000 BA / NW BA, please contact your local sales partner or directly with one of the GANTNER branch offices. The contact details of the branch offices are provided on the cover of this manual. -
Page 10: Target Group
- Service technicians and cleaning personnel (service and maintenance). - End users of the GAT ECO.Side Lock 7000 BA / NW BA (user manual). Where not explicitly stated, the information in this manual is intended for all target groups in general. -
Page 11: General Information
7000 BA is possible. The GAT ECO.Side Lock 7000 BA is installed on the inner side of the locker body. A bolt set is mounted on the inside of the locker door. The bolt set holds the door shackle which inserts into the GAT ECO.Side Lock 7000 BA and locks the door. -
Page 12: Terminology
General term for the GAT ECO.Side Lock 7000 BA. Locker The term "locker" is used to describe all possible locker applications that can be fitted with a GANTNER electronic lock. Typical applications include a changing room locker, a deposit box, or a private box. -
Page 13: Rfid Technology
- “ICLS”: HID iCLASS ® The GAT ECO.Side Lock 7000 BA has a multi-technology RFID reader (LEGIC advant) that allows it to operate with a range of RFID technologies. The information in this manual is applicable for the following technologies that can be used with the GAT ECO.Side Lock 7000 BA. -
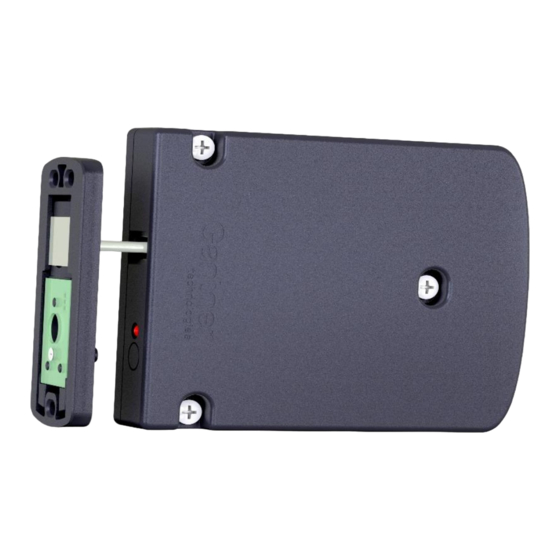
Page 14: System Components
GAT ECO.Side Lock 7000 BA / NW BA General Information 2.5 System Components The GAT ECO.Side Lock 7000 BA system consists of the following system parts. 1. GAT ECO.Side Lock 7000 BA / NW BA For lockers with non-metallic For lockers with glass doors doors 4. - Page 15 Optional data carrier. Not included in the GAT ECO.Basic Set B BA. Can be used instead of another MASTER data carrier in order to unlock a locked GAT ECO.Side Lock 7000 BA. Unlike the MASTER data carriers the OPEN MASTER data carrier can only open but not lock a locker.
- Page 16 GAT ECO.Side Lock 7000 BA / NW BA General Information www.gantner.com HB_GAT-GAT-ECOSide-Lock7000-BA--EN_14...
-
Page 17: Installation
3 INSTALLATION This chapter describes the process and what must be considered to install the GAT ECO.Side Lock 7000 BA and NW BA into lockers with metallic, non-metallic, and glass doors. Since the mounting process is identical for both lock variants, the general term GAT ECO.Side Lock 7000 BA is used. -
Page 18: Test Installation
The door opens without resistance (ensure retaining hardware such as springs are correctly calibrated). Also test the GAT ECO.Side Lock 7000 BA using a data carrier, ideally of the same type to be used with the locker system, to ensure the data carrier functions as required. Once the test installation is successfully completed, the remaining locks can be installed in the same way. -
Page 19: Door Status Contact
3.6 Door Status Contact The GAT ECO.Side Lock 7000 BA has a feedback contact (2 in Figure 3.3) that is activated by the door contact (1 in Figure 3.3) when the locker door is closed. It is important that this contact remains clean and undamaged to ensure the correct functionality of the GAT ECO.Side Lock 7000 BA. -
Page 20: Measurement Diagrams For Installation
Figure 3.4 - Minimum door width Dimensions of the GAT ECO.Side Lock 7000 BA and GAT NET.Lock Bolt Sets Figure 3.5 - Dimensions of the GAT ECO.Side Lock 7000 BA (dimensions in mm – inches shown in brackets) www.gantner.com HB_GAT-GAT-ECOSide-Lock7000-BA--EN_14... - Page 21 GAT ECO.Side Lock 7000 BA / NW BA Installation Figure 3.6 - Dimensions of the GAT NET.Lock BoltSet 7100 (dimensions in mm – inches in brackets) Figure 3.7 - Dimensions of the GAT NET.Lock BoltSet 7200 (dimensions in mm – inches in brackets) Figure 3.8 - Dimensions of the GAT NET.Lock BoltSet 7300 (dimensions in mm –...
-
Page 22: Installation In Lockers With Non-Metallic Doors (Except Glass)
3.10 Installation in Lockers with Non-Metallic Doors (Except Glass) For lockers with non-metallic doors, the GAT ECO.Side Lock 7000 BA is mounted on the left or right inner locker wall depending on whether it is a right or left-hinged locker door. The GAT NET.Lock Bolt Set 7100 is mounted on the inside of the locker door. -
Page 23: Installation Requirements For The Gat Eco.side Lock 7000 Ba And Non-Metallic Doors
Lock 7000 BA. Ideally the bolt set should touch the front of the lock (see Figure 3.9). The locker door, the bolt set, and the front side of the GAT ECO.Side Lock 7000 BA must be perpendicular and parallel to each other. If not, the door contact in the GAT ECO.Side Lock 7000 BA can potentially not function correctly. -
Page 24: Installation Instructions For The Gat Eco.side Lock 7000 Ba And Non-Metallic Doors
Complete the following steps to install the GAT ECO.Side Lock 7000 BA into lockers with non-metallic doors. ► Drill 3 holes (3 in Figure 3.9) for the GAT ECO.Side Lock 7000 BA into the locker wall inner side according to the information in "3.10.1 Installation Requirements for the GAT ECO.Side Lock 7000 BA and Non-Metallic... -
Page 25: Installation In Lockers With Metallic Doors
3.11 Installation in Lockers with Metallic Doors For lockers with metallic doors, the GAT ECO.Side Lock 7000 BA is mounted on the left or right inner locker wall depending on whether it is a right or left-hinged locker door. Two cutouts must be made in the locker door - one in the inner door sheet and one in the outer door sheet. -
Page 26: Cutouts In The Locker Door
GAT ECO.Side Lock 7000 BA / NW BA Installation Cutouts in the Locker Door The following cutouts must be made on the inner and outer walls of the locker door in order to mount the GAT NET.Lock BoltSet 7200 and label carrier. The measurements for the cutouts are as follows. -
Page 27: Installation Requirements For The Gat Eco.side Lock 7000 Ba And Metallic Doors
Lock 7000 BA. Ideally the bolt set should touch the front of the lock (see measurement in Figure 3.11). The locker door, the bolt set, and the front side of the GAT ECO.Side Lock 7000 BA must be perpendicular and parallel to each other. -
Page 28: Installation Instructions For The Gat Eco.side Lock 7000 Ba And Metallic Doors
Installation Instructions for the GAT ECO.Side Lock 7000 BA and Metallic Doors Complete the following steps to install the GAT ECO.Side Lock 7000 BA into lockers with metallic doors. ► Drill 3 holes (3 in Figure 3.11) for the GAT ECO.Side Lock 7000 into the locker wall inner side according to the information in section "3.11.2 Installation Requirements for the GAT ECO.Side Lock 7000 BA and Metallic... -
Page 29: Installation In Lockers With Glass Doors
3.12 Installation in Lockers with Glass Doors For lockers with glass doors, the GAT ECO.Side Lock 7000 BA is mounted on the left or right inner locker wall depending on whether it is a right or left-hinged locker door. The GAT NET.Lock Bolt Set 7300 (with metal support attached) are glued to the inner side of the locker door. -
Page 30: Installation Requirements For The Gat Eco.side Lock 7000 Ba And Glass Doors
Lock 7000 BA. Ideally the bolt set should touch the front of the lock (see Figure 3.15). The locker door, the bolt set, and the front side of the GAT ECO.Side Lock 7000 BA must be perpendicular and parallel to each other. If not, the door contact in the GAT ECO.Side Lock 7000 BA can potentially not function correctly. -
Page 31: Installation Instructions For The Gat Eco.side Lock 7000 Ba And Glass Doors
Complete the following steps to install the GAT ECO.Side Lock 7000 BA into lockers with glass doors. ► Drill 3 holes (3 in Figure 3.15) for the GAT ECO.Side Lock 7000 BA into the locker wall inner side according to the information in section “3.11.2 Installation Requirements for the GAT ECO.Side Lock 7000 BA and Metallic... - Page 32 GAT ECO.Side Lock 7000 BA / NW BA Installation www.gantner.com HB_GAT-GAT-ECOSide-Lock7000-BA--EN_14...
-
Page 33: Commissioning
If the battery becomes too weak, the locker can no longer be locked. The GAT ECO.Side Lock 7000 BA indicates a weak battery state with five red flashes of the LED and five acoustic signals during a locking attempt. -
Page 34: Replacing The Battery
Replacing the Battery The battery of the GAT ECO.Side Lock 7000 BA must be replaced when the LED flashes red 5 times and 5 beeps are emitted during a locking attempt. In this state, the GAT ECO.Side Lock 7000 BA can no longer be locked until the battery is replaced. -
Page 35: Usb Connection
“6.5.3. BATTERY Data Carrier”). In addition, the time and date must be set again using a PC and GAT Config Manager (see section “5 CONFIGURATION”). ► Unscrew the 3 screws that hold the GAT ECO.Side Lock 7000 BA to the locker wall and remove the lock from the locker. - Page 36 Commissioning ► Plug the Micro-B connector of the USB cable into the USB port on the GAT ECO.Side Lock 7000 BA. o After connecting the GAT ECO.Side Lock 7000 BA to the PC/laptop for the first time, the lock drivers are installed, and the lock is automatically recognized.
-
Page 37: Automatic Antenna Adjustment
4.4 Automatic Antenna Adjustment The antenna of the GAT ECO.Side Lock 7000 BA must be calibrated to ensure the optimal reading range for the RFID data carriers. To complete this calibration, the lock is equipped with an automatic antenna adjustment function that is activated using the SERVICE data carrier or via GAT Config Manager. - Page 38 GAT ECO.Side Lock 7000 BA / NW BA Commissioning www.gantner.com HB_GAT-GAT-ECOSide-Lock7000-BA--EN_14...
-
Page 39: Configuration
The GAT ECO.Side Lock 7000 BA is configured using a PC/laptop and GAT Config Manager software. The configuration file must only be uploaded to the GAT ECO.Side Lock 7000 BA once. The configuration file for the first lock in the system is saved in GAT Config Manager and can then be uploaded to each lock that requires the same configuration. - Page 40 (2 in Figure 5.2) by clicking on the “Add location” button (1 in Figure 5.2). Figure 5.2 – GAT Config Manager – Add location ► To add a GAT ECO.Side Lock 7000 BA to a location, right-click on the location and select “Add ECO.Side Lock 7000” from the “Add Device” menu (Figure 5.3).
-
Page 41: View And Edit The Gat Eco.side Lock 7000 Ba Configuration Settings
Complete the following steps to view the configuration settings. ► Select the GAT ECO.Side Lock 7000 BA from the “Devices” directory (1 in Figure 5.4), which is displayed here as “GAT ECO.Side Lock 7000”. -
Page 42: Upload Configuration Settings To The Gat Eco.side Lock 7000 Ba
5.4 Upload Configuration Settings to the GAT ECO.Side Lock 7000 BA When you are finished configuring the GAT ECO.Side Lock 7000 BA settings in GAT Config Manager, it is important to finalize the configuration by uploading the file to the lock. Complete the following steps to finalize the configuration. -
Page 43: Updating The Gat Eco.side Lock 7000 Ba Firmware
GANTNER periodically releases firmware updates for the GAT ECO.Side Lock 7000 BA. In order to take advantage of the latest features, it is recommended to update the GAT ECO.Side Lock 7000 BA to the latest firmware during configuration or at regular intervals. -
Page 44: Configuration Settings Of The Gat Eco.side Lock 7000 Ba
- “Free locker unique number” Locker Number The number of the locker where the GAT ECO.Side Lock 7000 BA is installed can be defined. The locker number setting is found here: Configuration > Operating mode > General > Locker number ►... -
Page 45: Auto-Unlock
MASTER Data Carriers Up to 10 MASTER data carriers (usually in card format) can be assigned to the GAT ECO.Side Lock 7000 BA to allow the locker to be opened in special circumstances, e.g., when a user has lost their data carrier. For this functionality, the MASTER data carriers must be first assigned to the GAT ECO.Lock 7xxx F/ISO, which is done here:... -
Page 46: Configuration Settings Table
GAT ECO.Side Lock 7000 BA / NW BA Configuration Configuration Settings Table The following table lists all the configuration information available for the GAT ECO.Side Lock 7000 BA in GAT Config Manager. Options Description Format Default Operating mode General Operating mode... - Page 47 Bootloader version of the device Integer Firmware Vers Firmware version of the device Integer LockEngineVers Lock logic version of the device Integer Table 5.1 – Configuration settings for the GAT ECO.Side Lock 7000 BA in GAT Config Manager www.gantner.com HB_GAT-GAT-ECOSide-Lock7000-BA--EN_14...
- Page 48 GAT ECO.Side Lock 7000 BA / NW BA Configuration www.gantner.com HB_GAT-GAT-ECOSide-Lock7000-BA--EN_14...
-
Page 49: Operation
6.1 General The GAT ECO.Side Lock 7000 BA can operate in "free locker" mode or "personal locker" mode. In free locker mode, the locker user may select any unoccupied locker they want to use. In personal locker mode, locker users are assigned a specific locker to which only they have access. -
Page 50: Free Locker Mode (With Or Without Duration Of Use Function)
For data carriers that are configured with an expiry date, the date is checked by the GAT ECO.Side Lock 7000 BA. If the date has passed, the locker cannot be used. -
Page 51: Free Locker Universal Mode
Invalid data carriers: The LED flashes red briefly and the GAT ECO.Side Lock 7000 BA does not complete the locking action. Possible reasons for this include: - Another locker has already been locked using the data carrier. -
Page 52: Free Locker Unique Number Mode
► a) Valid data carriers: The LED flashes green briefly and the locking action is carried out. b) Invalid data carriers: The LED flashes red briefly and the GAT ECO.Side Lock 7000 BA does not complete the locking action. ► Release the locker door. -
Page 53: Personal Locker Expiry Date Mode
► Within 5 seconds, hold the PROGRAM data carrier next to the reading field again. ► If the action is successful, the LED flashes red 3 times and the GAT ECO.Side Lock 7000 BA switches off. o All data carriers are now deleted from the lock and cannot use the locker any more. - Page 54 Valid data carriers: The information on the data carrier is saved in the lock. The locker state will switch, i.e., the locker will open when it was locked or will lock when it was open. b) Invalid data carriers: The LED flashes red briefly and the GAT ECO.Side Lock 7000 BA switches off without carrying out an action.
-
Page 55: Gat Eco.basic Set B Ba
MASTER Data Carrier MASTER data carriers can lock and unlock any GAT ECO.Side Lock 7000 BA in a system. If a user’s data carrier is lost, an emergency opening of the corresponding locker can be carried out using a MASTER data carrier. Three MASTER data carriers are included in the Basic Set and they are only valid for the respective system. -
Page 56: Open Master Data Carrier
OPEN MASTER Data Carrier The OPEN MASTER data carriers can unlock any GAT ECO.Side Lock 7000 BA in a system. If a user’s data carrier is lost, an emergency opening of the corresponding locker can be carried out using an OPEN MASTER data carrier. -
Page 57: Battery Data Carrier
BATTERY Data Carrier After the battery is replaced in the GAT ECO.Side Lock 7000 BA, the lock is in battery replacement mode and must be returned to the normal operating mode using the BATTERY data carrier. The internal action counter is reset to zero when the BATTERY data carrier is used. -
Page 58: Signalization Overview
6.7 Signalization Overview The electronics in the GAT ECO.Side Lock 7000 BA are activated by pushing the locker door shut, i.e., when the door shackle is fully inserted into the opening of the lock. This activation is signaled by the LED flashing orange once. -
Page 59: Cleaning And Maintenance
This chapter provides information for the technicians and cleaning personnel who are responsible for the periodical cleaning and maintenance of the GAT ECO.Side Lock 7000 BA / NW BA (the general term GAT ECO.Lock 7000 BA is used for both locks in the following description). -
Page 60: Cleaning
7.4 Maintenance The GAT ECO.Side Lock 7000 BA system components are maintenance-free, i.e., regular maintenance of the mechanical parts is not required. Should a malfunction be detected during functional testing that cannot be remedied, the corresponding faulty part(s) must be replaced. -
Page 61: Technical Data
GAT ECO.Side Lock 7000 BA / NW BA Technical Data 8 TECHNICAL DATA 8.1 Power Supply Power supply: 1 x 3.6 V lithium battery, size AA, capacity 2.4 Ah GANTNER approved battery: EU: Tadiran SL-860/S US: Tadiran TL-4903/S Battery lifetime: Up to 10 years* at +20 °C (68 °F) -
Page 62: Control And Display Elements
GAT ECO.Side Lock 7000 BA / NW BA Technical Data 8.4 Control and Display Elements Control element: Door contact in lock Display element: LED (red / green) to indicate the different operating states 8.5 Interfaces Interface type: USB 2.0 Interface connection: USB type Micro-B 8.6 Housing... - Page 64 GANTNER's distribution partner network actively supports customers in over 60 countries. Please visit www.gantner.com Schruns, Austria Houten, Netherlands Sydney, Australia T +43 5556 73784-0 T+31 33 43 284 16 T +61 29011 8114 info@gantner.com info@gantner.nl info-aus@gantner.com London, GB Bochum, Germany...
Need help?
Do you have a question about the GAT ECO.Side Lock 7000 BA and is the answer not in the manual?
Questions and answers