Table of Contents
Advertisement
Available languages
Available languages
Advertisement
Table of Contents

Related Manuals for Defy DUF300


Summary of Contents for Defy DUF300
- Page 1 翻页 广东奥马冰箱有限公司 80g双胶纸 说明书 梁嘉莉 CKDY-Z01 黄英婷 郭钇君 2019-04-09...
- Page 2 DUF300 REFRIGERATOR Refrigeration Page 1 Instruction manual...
-
Page 4: Table Of Contents
Contents Introduction Transporting & unpacking Important! Safety Warnings HCA Warning Do’s and Don’ts Freezer description Fitting the door handle Reversing the door Installation Electrical Installation Operation Temperature setting Deep freeze information Defrosting the freezer Maintenance & cleaning Trouble shooting Page 2... - Page 5 Read this manual before initial installation and operation of the Freezer! Dear Customer, Congratulations on the purchase of your new Freezer. Please read this manual carefully before using your Freezer for the first time and then store it within easy reach for future reference. We trust you will enjoy years of trouble free use.
-
Page 6: Introduction
Introduction The manufacturer shall be free of any responsibility should the instructions in this book not be followed. Please keep these instructions in a safe place for future reference. This Freezer is intended for household use only and must not be used for any other purpose. -
Page 7: Safety Warnings
Safety Warnings To obtain the best possible performance and trouble free operation from your freezer it is very important to carefully read these instructions. This owners manual must be handed over to the new owner should ownership change. This freezer must only be used for its intended purpose i.e. the storing and freezing of edible foodstuff. -
Page 8: Hca Warning
Safety Warnings Leave the freezer to stand for at least 12 hours before switching on to allow the compressor oil to settle if transported horizontally. If your Freezer has a lock, keep it locked and store the key in a safe place and out of reach of children. -
Page 9: Do's And Don'ts
Do’s and Don’ts Do’s Do – Defr ost food fr om the fr eezer thor oughly in a fr idge or in a micr owave oven following defrosting and cooking instructions. Do – Ensur e that the fr eezer door is completely closed after each use. Do –... -
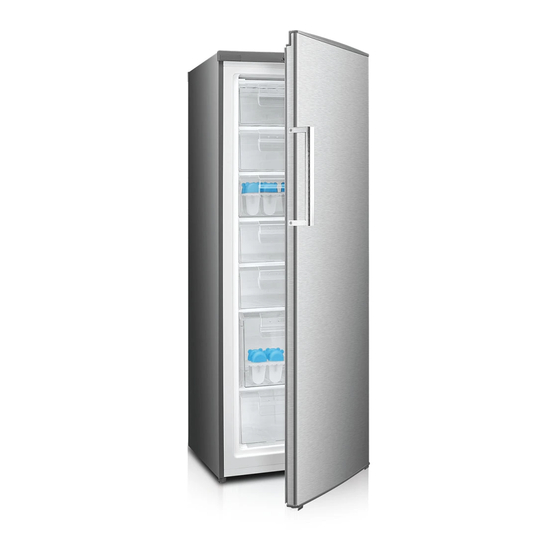
Page 10: Freezer Description
Freezer Description Fitting the door handle. (Depends on model) Page 8... -
Page 11: Reversing The Door
3. Remove the cover and screws from the Reversing the Door left side and fit them to right side. Tools required: Philip’s screwdriver, Flat bladed screwdriver, Hexagonal spanner. Ensure the unit is unplugged and empty. To remove the door, it is necessary to tilt the unit backwards. - Page 12 5. Unscrew and remove the bottom hinge 7.Unscrew the top hinge pin and mount it pin, flip the bracket over and refit it. to the left hole. 8. Stand the unit upright and fit the door onto the bottom hinge. Ensure the bottom hinge pin is inserted in the door hole.
-
Page 13: Installation
Installation Caution: Never plug the Freezer into the wall socket during installation. Risk of death or serious injury may occur. DO NOT connect your freezer to the electricity supply until all packing and transit protectors have been removed. Do not plug in the Freezer if you notice a failure. -
Page 14: Temperature Setting
Adjusting the feet The freezer may move if the adjustable legs are not properly levelled on the floor and the doors and magnetic seal alignments will not be properly positioned. Levelling the adjustable legs on the floor: Level your freezer by turning the front legs as shown in the illustration below. The corner where the legs are is lowered when the leg is turned in the direction of the black arrow and raised when turned in the opposite direction. -
Page 15: Deep Freeze Information
Deep freeze information Pre-packed commercially frozen food should be stored in accordance with the frozen food manufacturer’s instructions. • To ensure that the high quality achieved by the frozen food manufacturer and the food retailer is maintained, the following should be remembered: Put packages in the freezer as soon as possible after purchase. -
Page 16: Defrosting The Freezer
Defrosting the freezer Defrost the freezer whenever the ice build up on the inside wall exceeds 5 mm in thickness. Begin by removing the plug from the wall socket and then proceed as follows: Open the door and leave it open during defrosting. Remove the freezer baskets. Remove the contents of the freezer, wrap them in newspaper and store in a cool place. -
Page 17: Trouble Shooting
Trouble shooting Please review this list before calling a service centre. This list includes frequent complaints that do not arise from defective workmanship or material usage. Some of the features described below may not apply to your model. Symptom Check The freezer does not Make sure the freezer plug is securely plugged in. - Page 18 Warranty This certificate is issued by DEFY APPLIANCES (PTY) LIMITED manufacturers of Defy and Ocean products, hereinafter the Company, to the original purchaser only, of the appliance described on the certificate and shall constitute the only warranty given in respect of this appliance.
- Page 19 DUF300 RÉFRIGÉRATEUR Assistance téléphonique (service après-vente) Réfrigération Manuel d’utilisation...
- Page 20 Merci de lire ce manuel avant l’installation et la mise en marche de lu congélateur pour la première fois ! Chère cliente, cher client, Félicitations pour l’achat de votre nouveau congélateur. Veuillez lire attentivement ce manuel avant d’utiliser votre congélateur pour la première fois. Par la suite, conservez-le à...
- Page 21 Introduction Le fabricant décline toute responsabilité en cas de non-respect des instructions contenues dans ce manuel. Veuillez conserver ces instructions soigneusement pour référence ultérieure. Ce congélateur est destiné à un usage domestique seulement et ne doit pas être utilisé à d’autres fins.
- Page 22 Précautions relatives à la sécurité Afin d’obtenir le meilleur résultat possible et un fonctionnement sans encombre de votre congélateur, • veuillez lire ces instructions attentivement. Ce manuel d’utilisation doit être remis au nouveau propriétaire en cas de revente de cet appareil. •...
- Page 23 Précautions relatives à la sécurité Attendez au moins 12 heures avant de brancher le congélateur, pour que l’huile du compresseur se • stabilise s’il a été transporté couché. Si votre congélateur est doté d’un dispositif de verrouillage, maintenez-le fermé et gardez la clé dans •...
- Page 24 À faire / À ne pas faire À faire À faire – Faire décongeler les aliments du congélateur dans un réfrigérateur ou au four à micro-ondes en suivant les instructions de décongélation et de cuisson. À faire – S’assurer que la porte du congélateur est complètement fermé après chaque utilisation. À...
- Page 25 Description du congélateur Commande du thermostat Tiroirs Pied réglable Fixer la poignée de porte (En fonction du modèle) Page 7...
- Page 26 Retirez le cache et les vis du côté Réversibilité de la porte Outils nécessaires : Tournevis cruciforme, gauche et fixez-les sur le côté droit. tournevis à tête plate, clé hexagonale. Assurez-vous que l’appareil est débranché et • vide. Afin d’enlever la porte, il est nécessaire •...
- Page 27 Dévissez et retirez la tige métallique de Dévissez la tige métallique de la la charnière inférieure, retournez le charnière supérieure et fixez-la dans le trou support et fixez-le. de gauche. Dévissez Remettez l’appareil à la verticale et placez la porte sur la charnière inférieure. Assurez-vous que la tige métallique de charnière inférieure est correctement insérée dans le trou de la porte.
- Page 28 Installation Attention: Ne branchez jamais le congélateur à la prise murale au cours de l’installation. Vous vous exposeriez à un risque de mort ou à de blessures graves. NE CONNECTEZ PAS votre congélateur à l’alimentation électrique avant d’avoir enlevé tous les emballages et protections de transport.
- Page 29 Réglage des pieds Le congélateur peut bouger si ses pieds réglables ne sont pas bien fixés sur le sol et si les portes et les joints d’étanchéité magnétiques ne sont pas correctement positionnés. Bien fixer les pieds réglables sur le sol : Vous pouvez équilibrer le congélateur en tournant les pieds avant, tel qu’illustré...
- Page 30 Informations concernant la congélation Les aliments vendus préemballés et surgelés doivent être conservés conformément aux instructions du • fabricant des produits congelés. Afin de garantir que la qualité supérieure recherchée par le fabricant et le détaillant des produits • congelés soit atteinte, il convient de se rappeler les points suivants : Mettez les paquets dans le congélateur aussi rapidement que possible après l’achat.
- Page 31 Dégivrage du congélateur Dégivrez le congélateur lorsque l’accumulation de glace sur la paroi intérieure dépasse 5 mm d’épaisseur. Commencez par retirer la fiche de la prise murale, puis procédez comme suit : Ouvrez la porte et laissez-la ouverte pendant le dégivrage. Retirez les paniers. Videz le •...
- Page 32 Dépannage Veuillez consulter cette liste avant de contacter un centre de SAV. Cette liste comprend des plaintes fréquentes qui ne résultent pas de défauts de fabrication ou d’utilisation matérielle. Certaines des fonctionnalités décrites ci-dessous peuvent ne pas s’appliquer à votre modèle. Symptômes Vérification ...
- Page 33 Garantie Ce certificat est édité par les fabricants DEFY APPLIANCES (PTY) LIMITED des produits Defy et Ocean, nommés ci-après la Société, à destination de l’acheteur d’origine uniquement de l’appareil décrit sur le certificat, et constituera la seule garantie donnée concernant cet appareil.
- Page 34 DUF300 FRIGORÍFICO Linha de apoio ao cliente (serviço pós-venda) Refrigeração Manual de instruções...
- Page 35 Leia este manual antes da instalação inicial e do primeiro funcionamento da arca! Caro cliente, Parabéns pela compra da sua nova arca. Leia cuidadosamente este manual antes de utilizar a sua arca pela primeira vez e depois guarde-o num local de fácil acesso para referência futura. Estamos confiantes de que desfrutará...
- Page 36 Introdução O fabricante deverá estar livre de qualquer responsabilidade no caso de as instruções indicadas no presente manual não serem respeitadas. Para facilitar a consulta, guarde estas instruções num local seguro. Esta arca destina-se apenas a uso doméstico e não deverá ser utilizada com qualquer outro objetivo.
- Page 37 Avisos sobre a segurança Para obter o melhor desempenho e um funcionamento sem problemas da sua arca, é muito • importante que leia cuidadosamente estas instruções. Este manual de proprietário deve ser entregue ao novo proprietário caso esta arca mude de •...
- Page 38 Avisos sobre a segurança No caso de a arca ter sido transportada na horizontal, deixe-a na vertical durante, pelo • menos, 12 horas antes de a ligar para que o óleo do compressor estabilize. Se a sua arca tiver uma fechadura, mantenha-a fechada e guarde a chave num lugar •...
- Page 39 Procedimentos corretos e incorretos Corretos Correto – Descongelar comida da arca com cuidado num frigorífico ou micro-ondas, seguindo as instruções de descongelamento e de preparação. Correto – Assegurar-se de que a porta da arca fica completamente fechada após cada utilização. Correto –...
- Page 40 Descrição da arca Botão do termóstato Gavetas Pés de nivelamento Montagem do puxador da porta. (Consoante o modelo) Página 7...
- Page 41 3 Retire a cobertura e os parafusos do lado Inverter a porta esquerdo e coloque-os no lado direito. Ferramentas necessárias: Chave de fendas Philips, chave de fendas plana e chave inglesa hexagonal. Certifique-se de que a unidade está • desligada e vazia. Para retirar a porta, é...
- Page 42 5 Desparafuse e retire o pino da dobradiça 7 Desaparafuse o pino da dobradiça inferior, rode o suporte e volte a colocá-lo. superior e coloque-o no orifício esquerdo. Desaparafusar 8. Coloque a unidade na vertical e encaixe a porta na dobradiça inferior. Certifique-se de que o pino da dobradiça esquerda está...
- Page 43 Instalação Cuidado: Nunca ligue a arca à tomada de parede durante a instalação. Poderá ocorrer perigo de morte ou ferimentos graves. NÃO ligue a arca à corrente elétrica enquanto não tiver retirado todas as proteções de embalagem e de transporte. Não ligue a arca se constatar uma falha.
- Page 44 Ajuste dos pés A arca pode mover-se no caso de as pernas ajustáveis não estarem corretamente niveladas no pavimento e as portas e os alinhamentos da vedação magnética não estarem corretamente posicionados. Nivelamento dos pés ajustáveis no pavimento: Nivele a arca rodando os seus pés da frente conforme ilustrado na figura abaixo. Os cantos onde se encontram os pés baixam quando o pé...
- Page 45 Informações sobre congelação profunda Os alimentos embalados pré-congelados devem ser armazenados de acordo com as instruções do • fabricante do alimento num compartimento de armazenamento de alimentos congelados. Paragarantir que é atingida e mantida a alta qualidade dos alimentos congelados, deverá ter em conta •...
- Page 46 Descongelação da arca Descongele a arca sempre que o gelo acumulado na parede interior exceder os 5 mm de espessura. Comece por remover a ficha da tomada de parede e, em seguida, proceda da seguinte forma: Abra a porta e deixe-a aberta durante o descongelamento. Retire os cestos da arca. •...
- Page 47 Resolução de problemas Reveja esta lista antes de contactar um centro de assistência técnica. Esta lista abrange as reclamações frequentes que não resultam de defeitos de fabrico ou desgaste do material. Algumas das funções descritas abaixo podem não existir no seu produto. Sintoma Verifique Assegure-se de que a ficha da arca está...
- Page 48 Garantia Este certificado é emitido pela DEFY APPLIANCES (PTY) LIMITED, a fabricante dos produtos Defy e Ocean, doravante designada por “Empresa”, apenas para o comprador original do equipamento descrito no certificado e constituirá a única garantia dada relativamente a este equipamento.
- Page 49 CKDY-Z01...
Need help?
Do you have a question about the DUF300 and is the answer not in the manual?
Questions and answers