Table of Contents
Advertisement
2
nd
Generation CentriMag
CentriMag
Blood Pumping Systems
READ THE CENTRIMAG AND PEDIMAG PUMP INSTRUCTIONS FOR USE
(IFU) AND THE ENTIRE CONTENTS OF THIS MANUAL BEFORE USING THIS
Thoratec Clinical & Technical Support Phone number(s)
Emergency HeartLine™:
Thoratec Corporation
Main Switchboard:
Manufacturer:
Thoratec Switzerland GmbH
Technoparkstrasse 1
CH-8005 Zürich
Switzerland
www.thoratec.com
2
nd
Generation CentriMag System Operating Manual (US)
© 2019 Thoratec – Document No PL-0047, Rev 09 (May 2019)
Operating Manual
For use with
™
and PediMag
DEVICE.
™
System
™
Tel: +1-800-456-1477
Tel: +1-925-847-8600
Fax: +1-925-847-8574
US Headquarters:
Thoratec Corporation
6035 Stoneridge Drive
Pleasanton, CA 94588
USA
www.thoratec.com
PL-0047, Rev 09
May 2019
DCO No 19-008
Page 1 of 130
Advertisement
Table of Contents

Related Manuals for Thoratec CentriMag


Summary of Contents for Thoratec CentriMag
- Page 1 6035 Stoneridge Drive CH-8005 Zürich Pleasanton, CA 94588 Switzerland www.thoratec.com www.thoratec.com PL-0047, Rev 09 May 2019 DCO No 19-008 Generation CentriMag System Operating Manual (US) Page 1 of 130 © 2019 Thoratec – Document No PL-0047, Rev 09 (May 2019)
-
Page 2: Table Of Contents
Power Assembly ....................46 6.9 Requirements for Connecting Additional Equipment ......... 46 SETTING UP ....................47 7.1 Unpacking ......................48 Generation CentriMag System Operating Manual (US) Page 2 of 130 © 2019 Thoratec – Document No PL-0047, Rev 09 (May 2019) - Page 3 Operation of the Blood Pump ................85 8.2 Generation CentriMag Primary Console Alarm/Alert Strategy ..... 89 8.3 Alarms ........................ 92 Generation CentriMag System Operating Manual (US) Page 3 of 130 © 2019 Thoratec – Document No PL-0047, Rev 09 (May 2019)
- Page 4 Appendix IV – Electromagnetic Immunity ............125 12.5 Appendix V – Similarities & Differences Between 1 Generation & 2 Generation Primary Consoles ................130 Generation CentriMag System Operating Manual (US) Page 4 of 130 © 2019 Thoratec – Document No PL-0047, Rev 09 (May 2019)
-
Page 5: Manual Overview
Generation CentriMag Primary Console. Section 10: Emergency describes procedures for managing the 2 Generation CentriMag Primary Console during defibrillation and in the event of equipment malfunction. Section 11: Disposal of Equipment describes the procedure for proper disposal of used Console batteries and 2 Generation CentriMag Primary Consoles that have reached end of useful service life. -
Page 6: Indications & Contraindications
2.2 Contraindications for Use The CentriMag and PediMag Systems are contraindicated for use as a cardiotomy suction device. The Systems are also contraindicated for patients who are unable or unwilling to be treated with appropriate anticoagulation such as Heparin or comparable alternative. -
Page 7: General Conventions And Limited Warranty
Patents: One or more U.S. patents, including U.S. Patent Number 6,100,618, cover this product and its use. Trademarks: THORATEC, the THORATEC LOGO, and THORATEC CORPORATION, are all registered trademarks of Thoratec Corporation. HeartLine™ is a trademark of Thoratec Corporation. CentriMag™ and PediVAS™ are registered trademarks of Thoratec Corporation and/or its subsidiaries. -
Page 8: Warnings & Precautions
System in the immediate vicinity of each patient whenever the CentriMag or PediVAS Blood Pump is used. The backup Console must be connected to the backup Motor and to the backup Flow Probe, have a battery... -
Page 9: Description
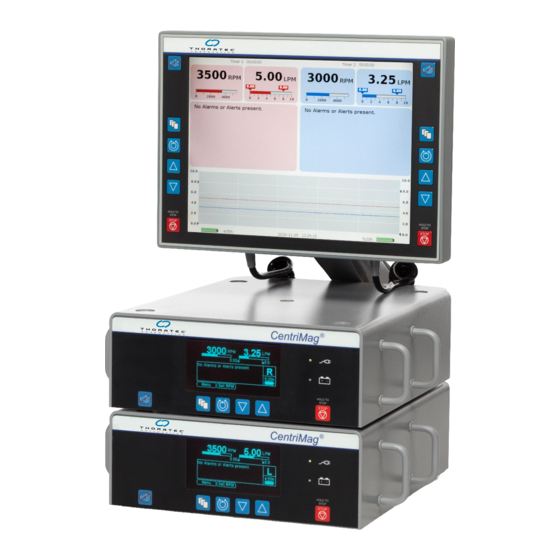
5 DESCRIPTION 5.1 General Overview There are two different CentriMag System versions, Version 1 and Version 2, which can be distinguished by physical characteristics and functional features (Table 1): Table 1: Distinction between Version 1 & Version 2 Physical characteristics... - Page 10 Figure 1: CentriMag Blood Pump Figure 2: CentriMag Motor Generation CentriMag System Operating Manual (US) Page 10 of 130 © 2019 Thoratec – Document No PL-0047, Rev 09 (May 2019)
- Page 11 Figure 3: 2 Generation CentriMag Primary Console Figure 4: Mag Monitor Version 1 Generation CentriMag System Operating Manual (US) Page 11 of 130 © 2019 Thoratec – Document No PL-0047, Rev 09 (May 2019)
- Page 12 Figure 5: Mag Monitor Version 2 Figure 6: Flow Probe Generation CentriMag System Operating Manual (US) Page 12 of 130 © 2019 Thoratec – Document No PL-0047, Rev 09 (May 2019)
- Page 13 Generation CentriMag Primary Console is operated in an identical manner and has the same Console display, alarms and alerts. However, the maximum flow range for the PediMag Pump is 1.5 LPM compared to the maximum flow of the CentriMag Pump of 10.0 LPM.
- Page 14 Blood Pump and em-tec Pediatric Flow Probe for PediMag Pump) 5.1.2 Optional CentriMag and PediMag System Components The following components are available as optional accessories to the CentriMag and PediMag Systems (Table 3): Table 3: Optional Elements of the System...
- Page 15 Figure 9: Axial support (a) and stabilization against tilting (b) of the impeller by passive magnetic forces in the Blood Pump Generation CentriMag System Operating Manual (US) Page 15 of 130 © 2019 Thoratec – Document No PL-0047, Rev 09 (May 2019)
- Page 16 If a Mag Monitor is unavailable, the Pump and Motor can be controlled via the 2 Generation CentriMag Primary Console. When operated in this manner, a number of features that can only be accessed via the Mag Monitor will not be available. These include; stopwatch 7.14...
- Page 17 The Mag Monitor back panel (Figure 10 and Figure 11) provides the required electrical inputs and outputs needed to connect the Mag Monitor to one or two 2 Generation CentriMag Primary Consoles. Each connector provides the input from, and output to, one Console. 5.1.4.2.2 USB port – Logger Data As shown in Figure 10 and Figure 11, a USB port is provided on the rear panel of the Monitor between the two round connectors.
- Page 18 Thoratec representative. Do not use this RS232 port without contacting your local Thoratec representative. USB Port (Strictly for downloading data to a Memory-Stick) Figure 10: Mag Monitor Back Panel Version 1 USB Port RS232 Port (Strictly for downloading data to a...
- Page 19 WARNING The Mag Monitor can only be operated when it is connected to the 2 Generation CentriMag Primary Console. The Console may be operational on AC or, in combination with the 2 Generation CentriMag Primary Console Version 2, on battery. Operating the Mag Monitor while the Console runs on battery shortens the battery runtime.
- Page 20 0-10.0 LPM or 0 – 3.0 LPM depending on probe size. The Flow Probes provided with the 1 Generation CentriMag Primary Console are not Generation CentriMag System Operating Manual (US) Page 20 of 130 © 2019 Thoratec – Document No PL-0047, Rev 09 (May 2019)
- Page 21 “--.--“. If the probe detects forward flow of more than 10 LPM then it will display as “^^.^^ LPM”. The Flow Probe used with the CentriMag Pump is an em-tec Adult Flow Probe that is compatible with 3/8” ID PVC tubing with a 3/32” wall thickness. The Flow Probe used with the PediMag Pump is an em-tec Pediatric Flow Probe that is compatible with 1/4”...
- Page 22 5.1.5.2 2 Generation CentriMag Primary Console Back Panel The 2 Generation CentriMag Primary Console back panel (Figure 14) provides the required mechanical inputs and outputs needed to operate a CentriMag or PediMag Blood Pump. Motor Connector P1 & P2 Monitor Connector...
- Page 23 The 2 Generation CentriMag System uses a sterile, single-use, disposable, polycarbonate, CentriMag or PediMag Centrifugal Blood Pump (Figure 15 a and b). The use of magnetic levitation eliminates the need for bearings and seals in the blood pathway. Elimination of these components is designed to minimize blood trauma and the potential for hemolysis and thrombus formation.
- Page 24 Figure 17 for a complete CentriMag VAS Circuit (including the Pump, tubing and one set of Cannulae that is provided in the VAD Kit Specific Cannulae are provided in the VAD Kit for the CentriMag RVAS HDE and CentriMag VAS Pivotal Trial. The VAD Kit is only available for IDE and HDE indications for use.
- Page 25 3/8” x 3/8” Tubing Connector Instructions for Use 5.1.8 PediMag Blood Pump Unlike the CentriMag Blood Pump which is packaged either individually or as a kit with additional components, the PediMag Blood Pump is individually packaged without other components. Generation CentriMag System Operating Manual (US) Page 25 of 130 ©...
- Page 26 Console is to provide basic life-support in the event of a main Console malfunction. Specific Cannulae are provided in the VAD Kit for the CentriMag RVAS HDE and CentriMag VAS Pivotal. The VAD Kit is only available for IDE and HDE indications for use.
- Page 27 5.1.11 System Cart The 2 Generation CentriMag Primary Console and the Mag Monitor are designed to be used with a custom designed System Cart. The System Cart along with the recommended placement of the components may be seen in Figure 19.
-
Page 28: Required User Supplied Items
More detailed information regarding the software version can be found in Section 12.2. 5.2 Required User Supplied Items The following item, required for use with the CentriMag and PediMag Systems when used in the VAS configuration, is not provided by Thoratec: ... -
Page 29: Specifications And General Description
Motor enclosure. Not suitable for use in an oxygen None Not for oxygen rich environment rich environment. Generation CentriMag System Operating Manual (US) Page 29 of 130 © 2019 Thoratec – Document No PL-0047, Rev 09 (May 2019) -
Page 30: Specifications
Electromagnetic interference (EMI) sources in the vicinity of the System may interfere with Console performance. If changes occur in the operating parameters of the Console due to Generation CentriMag System Operating Manual (US) Page 30 of 130 © 2019 Thoratec – Document No PL-0047, Rev 09 (May 2019) -
Page 31: Permanent Magnet Considerations
EMI. The 2 Generation CentriMag Primary Console may interfere with the operation of other equipment in close proximity. Do not place equipment, other than an additional 2 Generation Primary CentriMag Console, near the main Console or Motor. - Page 32 The Mag Monitor incorporates the same six soft keypads found on the 2 Generation CentriMag Primary Console control panel. The first keypad (at the top) silences the alarm audio and also serves as the keypad to be depressed to acknowledge the alarm condition, and the last (at the bottom) stops the Blood Pump.
- Page 33 Figure 21: Mag Monitor Version 1 Figure 22: Mag Monitor Version 2 Generation CentriMag System Operating Manual (US) Page 33 of 130 © 2019 Thoratec – Document No PL-0047, Rev 09 (May 2019)
- Page 34 The symbols used on the Console and Mag Monitor and Flow Probes, and their meanings are listed in Table 8. Generation CentriMag System Operating Manual (US) Page 34 of 130 © 2019 Thoratec – Document No PL-0047, Rev 09 (May 2019)
- Page 35 This keypad is used to select/modify Increase the value for the displayed item to On the Mag be adjusted. Monitor’s Front Panel Generation CentriMag System Operating Manual (US) Page 35 of 130 © 2019 Thoratec – Document No PL-0047, Rev 09 (May 2019)
- Page 36 LPM. Markers show the current settings of the Maximum and Minimum flow limits. Generation CentriMag System Operating Manual (US) Page 36 of 130 © 2019 Thoratec – Document No PL-0047, Rev 09 (May 2019)
- Page 37 Motor Power dot located on top of connector On the Console’s Connector facilitates alignment of Motor LEMO Back Panel connector. Generation CentriMag System Operating Manual (US) Page 37 of 130 © 2019 Thoratec – Document No PL-0047, Rev 09 (May 2019)
- Page 38 On the Console’s Mag Monitor Back Panel and (CAN/12V) Connection for the Mag Monitor. Mag Monitor’s Connector Back Panel (2 pieces) Generation CentriMag System Operating Manual (US) Page 38 of 130 © 2019 Thoratec – Document No PL-0047, Rev 09 (May 2019)
- Page 39 Back Panel (Version 2 only) Generation CentriMag Primary Console Serial Number Label On the Console Back Panel Version 1 Generation CentriMag System Operating Manual (US) Page 39 of 130 © 2019 Thoratec – Document No PL-0047, Rev 09 (May 2019)
- Page 40 Thoratec' production site conforms to a range of compliance measures and is subject to periodic follow-up inspections to verify continued conformance. Generation CentriMag System Operating Manual (US) Page 40 of 130 © 2019 Thoratec – Document No PL-0047, Rev 09 (May 2019)
- Page 41 Near the top joint crush and cut. Do not place hand on Crush of the Monitor Arm. or into joint area. Generation CentriMag System Operating Manual (US) Page 41 of 130 © 2019 Thoratec – Document No PL-0047, Rev 09 (May 2019)
- Page 42 If the alert/alarm condition has not been resolved, pressing the ALARM ACKNOWLEDGE keypad temporarily mutes the audio alert indication if the Generation CentriMag System Operating Manual (US) Page 42 of 130 © 2019 Thoratec – Document No PL-0047, Rev 09 (May 2019)
- Page 43 If the alert/alarm condition is resolved and then reoccurs. (E.g. transient FLOW BELOW MINIMUM condition resolves and then reoccurs). The original text message Generation CentriMag System Operating Manual (US) Page 43 of 130 © 2019 Thoratec – Document No PL-0047, Rev 09 (May 2019)
- Page 44 The tubing clamp must be removed before returning to normal pumping activity. Generation CentriMag System Operating Manual (US) Page 44 of 130 © 2019 Thoratec – Document No PL-0047, Rev 09 (May 2019)
- Page 45 IEC 60601-1-1. If in doubt, consult the Thoratec service department prior to connecting any accessory to the analog and digital interfaces.
-
Page 46: Digital Display Information
Local laws take priority over the above mentioned requirements. If in doubt, consult your local representative or the technical service department. Generation CentriMag System Operating Manual (US) Page 46 of 130 © 2019 Thoratec – Document No PL-0047, Rev 09 (May 2019) -
Page 47: Setting Up
These values are stored in the Console’s permanent memory and recalled each time the Console is powered up. Generation CentriMag System Operating Manual (US) Page 47 of 130 © 2019 Thoratec – Document No PL-0047, Rev 09 (May 2019) -
Page 48: Unpacking
Thoratec for repair or maintenance. WARNING Never put containers of liquids on top of or in the immediate vicinity of the 2 Generation CentriMag Primary Console. Always prevent liquids from entering the device, since this can cause permanent damage to the Console. WARNING... -
Page 49: Mag Monitor Mounting
Monitor it is crucial that the Monitor is securely fixed to a solid object. This can be achieved with the Monitor Arm provided by Thoratec and Ergotron. The Monitor Arm can be mounted either on the edge of a horizontal or vertical solid surface or on a vertical pole. For instructions on how to set-up the Monitor Arm refer also to the manual provided by Ergotron. - Page 50 2. Mount the Monitor Arm root joint plate on the adapter plate: Use four screws to mount the root joint plate of the Monitor Arm to the adapter plate. Make sure the orientation of Generation CentriMag System Operating Manual (US) Page 50 of 130 © 2019 Thoratec – Document No PL-0047, Rev 09 (May 2019)
- Page 51 4. Mount the Monitor Arm Clamp on the object where the Mag Monitor is to be fixed (a solid surface or a solid pole). The two clamping possibilities are shown in Figure 26. Generation CentriMag System Operating Manual (US) Page 51 of 130 © 2019 Thoratec – Document No PL-0047, Rev 09 (May 2019)
- Page 52 Moving parts of the Monitor Arm can crush and cut causing severe injury. Do not place hand on or into joint area. Generation CentriMag System Operating Manual (US) Page 52 of 130 © 2019 Thoratec – Document No PL-0047, Rev 09 (May 2019)
- Page 53 Figure 28: Hand Crush Warning on Monitor Arm Generation CentriMag System Operating Manual (US) Page 53 of 130 © 2019 Thoratec – Document No PL-0047, Rev 09 (May 2019)
-
Page 54: Motor Mounting
It is crucial that the Motor is securely fixed to a solid object. This can be achieved with the Motor Bracket provided by Thoratec. The Motor Bracket can be mounted on a vertical pole. 7.3.1 Steps required to set-up the Motor Bracket and the Motor: 1. - Page 55 Bracket and use the threaded hole at the bottom of the Motor. The Motor Screw can be screwed by hand to allow for easy removal of the Motor. Make sure the screws are sufficiently tightened. Generation CentriMag System Operating Manual (US) Page 55 of 130 © 2019 Thoratec – Document No PL-0047, Rev 09 (May 2019)
-
Page 56: Powering Up
Insert the Power Cord into the AC Power Connection located on the back of the 2 Generation CentriMag Primary Console. Flip and press the connector latching mechanism over the base of the power connector in order to fully secure the power cord to the Console. - Page 57 AC wall outlet. Figure 32: BVAD Configuration – all Console power cords must be inserted directly into the AC wall outlet. Generation CentriMag System Operating Manual (US) Page 57 of 130 © 2019 Thoratec – Document No PL-0047, Rev 09 (May 2019)
- Page 58 AC wall outlet – DO NOT connect via a power strip. WARNING To avoid the risk of electric shock, the CentriMag equipment must only be connected to a mains supply with a protective earth. Insert the LEMO connector on the Motor cable into the Motor connection on the rear of the 2 Generation CentriMag Primary Console.
-
Page 59: Self-Test Initiation
WARNING Use of Flow Probes from sources other than Thoratec is not recommended. Flow probes that are not obtained from Thoratec may not function, may cause the 2 Generation CentriMag Console to malfunction, or may lead to missing or inaccurate flow information. -
Page 60: Configuring The 2 Nd Generation Centrimag Primary Console
Monitor (Figure 34); however, most of the selections described below are accessible through the Mag Monitor as well as on the Console’s user interface (Figure 35). Generation CentriMag System Operating Manual (US) Page 60 of 130 © 2019 Thoratec – Document No PL-0047, Rev 09 (May 2019) - Page 61 Pump using the UP and DOWN ARROWS. Depressing the MENU keypad leads to different user options that can be accessed by scrolling through the options: Generation CentriMag System Operating Manual (US) Page 61 of 130 © 2019 Thoratec – Document No PL-0047, Rev 09 (May 2019)
- Page 62 - LANGUAGE SELECTION - DATA LOGGER (Mag Monitor only) - COPY DATA (Mag Monitor only) - MANAGEMENT (Mag Monitor only) Generation CentriMag System Operating Manual (US) Page 62 of 130 © 2019 Thoratec – Document No PL-0047, Rev 09 (May 2019)
-
Page 63: Nd Generation Centrimag Primary Console Bios
Generation CentriMag Primary Console BIOS Note: The System cannot be used while the Console BIOS is being accessed. If a Mag Monitor is attached it will display only the Thoratec logo while the BIOS is being accessed. The Console BIOS contains engineering information about the Console. For additional 7.24... -
Page 64: Setting The 2 Nd Generation Centrimag Primary Console Max Flow Alert
If the System detects flow in excess of 10 LPM the digital flow display will not display a numerical flow, but will display upwards pointing arrows: “^^.^^ LPM” Generation CentriMag System Operating Manual (US) Page 64 of 130 © 2019 Thoratec – Document No PL-0047, Rev 09 (May 2019) -
Page 65: Setting The 2 Nd Generation Centrimag Primary Console Min Flow Alert
During weaning and periods of sustained low flow it may be necessary to reevaluate and consider increasing the level of anticoagulation. Generation CentriMag System Operating Manual (US) Page 65 of 130 © 2019 Thoratec – Document No PL-0047, Rev 09 (May 2019) -
Page 66: Entering The Pressure Menu
7.11 Setting the Max or Min Pressure Alert Settings for the P1 Transducer Figure 40: Mag Monitor MENU Structure Setting the Max or Min Pressure Alert Settings for the P1 Transducer Generation CentriMag System Operating Manual (US) Page 66 of 130 © 2019 Thoratec – Document No PL-0047, Rev 09 (May 2019) -
Page 67: Setting The Max Or Min Pressure Alert Settings For The P2 Transducer
1. Install the Pressure Probes into the Pressure Probe Cables and connect the Cables into the mating connectors P1 and P2 on the back of the 2 Generation CentriMag Primary Generation CentriMag System Operating Manual (US) Page 67 of 130 © 2019 Thoratec – Document No PL-0047, Rev 09 (May 2019) - Page 68 2. To activate the pressure subsystem from the Mag Monitor, depress the MENU keypad to display EXTENDED MENU and ENTER. Press MENU to display the PRESSURE Generation CentriMag System Operating Manual (US) Page 68 of 130 © 2019 Thoratec – Document No PL-0047, Rev 09 (May 2019)
- Page 69 The 2 Generation CentriMag Primary Console will support use of a single pressure probe. However, when only one pressure probe is used, no differential pressure reading will be displayed.
-
Page 70: Stopwatches
Once the timer has been stopped the System will offer the option to RESET, which will clear the timer. Generation CentriMag System Operating Manual (US) Page 70 of 130 © 2019 Thoratec – Document No PL-0047, Rev 09 (May 2019) -
Page 71: Flow Range
MENU key to scroll through the menu options until the FLOW RANGE option is displayed. Select between the two options using the arrow keys. Generation CentriMag System Operating Manual (US) Page 71 of 130 © 2019 Thoratec – Document No PL-0047, Rev 09 (May 2019) -
Page 72: Changing The Flow Recorder Speed
MENU option is displayed and then use the MENU key to scroll through the menu options until the RECORDER SPEED option is displayed. Select between the two available options using the arrow keys. Generation CentriMag System Operating Manual (US) Page 72 of 130 © 2019 Thoratec – Document No PL-0047, Rev 09 (May 2019) -
Page 73: Setting The Console Speed Step Resolution
Pump will increase with each depression of the UP or DOWN ARROW keypads when using the SET RPM option. Generation CentriMag System Operating Manual (US) Page 73 of 130 © 2019 Thoratec – Document No PL-0047, Rev 09 (May 2019) -
Page 74: Selecting Displayed Language
SPANISH, DUTCH, and ITALIAN. Press the SELECT keypad to lock in the language selection. The language selected will be stored in permanent memory by the 2 Generation CentriMag Primary Console and recalled each time the Console is powered up. Generation CentriMag System Operating Manual (US) Page 74 of 130... -
Page 75: Setting The 2 Nd Generation Centrimag Primary Console Flow Limit Sensitivity
SENSITIVE mode increases the flow data sampling frequency in order to detect shorter duration low flow events compared to the NORMAL mode. As a result, a sudden, brief Generation CentriMag System Operating Manual (US) Page 75 of 130 © 2019 Thoratec – Document No PL-0047, Rev 09 (May 2019) -
Page 76: Setting The Application Mode
Setting Application Mode The 2 Generation CentriMag Primary Console can be used for a variety of conditions. The display for each Console can be set to identify the Console as the L or R Console identifying use an LVAD (L), or as an RVAD (R). The specific mode must be selected during startup, and can be altered through the user menu. -
Page 77: The System Data Logger
System Data Logger The 2 Generation CentriMag Primary Console has the ability to record significant events. To access the DATA LOGGER setting, depress the MENU keypad and scroll down to the EXTENDED MENU option, then use the MENU key to scroll through the menu options until the DATA LOGGER option appears. - Page 78 There are 9 different types of events and each has its own associated icon. The icons and the associated events are shown in the table below (Table 11). Generation CentriMag System Operating Manual (US) Page 78 of 130 © 2019 Thoratec – Document No PL-0047, Rev 09 (May 2019)
- Page 79 The System records the date the event took place. For information on setting the System 7.24 clock see Section on the Mag Monitor Management Software. d) Details on the event. Generation CentriMag System Operating Manual (US) Page 79 of 130 © 2019 Thoratec – Document No PL-0047, Rev 09 (May 2019)
- Page 80 Generation CentriMag System Operating Manual (US) Page 80 of 130 © 2019 Thoratec – Document No PL-0047, Rev 09 (May 2019)
-
Page 81: Copy Logger Data To A Usb Memory Stick
UP and DOWN arrows. The logger data copy process will be initiated. This is indicated with a blinking USB Memory Stick Icon in the status bar on the Mag Monitor (left of the Generation CentriMag System Operating Manual (US) Page 81 of 130 © 2019 Thoratec – Document No PL-0047, Rev 09 (May 2019) -
Page 82: Mag Monitor Description And Connections
The Mag Monitor is designed to display information derived from one or two 2 Generation CentriMag Primary Consoles. It is possible, therefore, to view data when the System is operated in the univentricular configuration (LVAS or RVAS) or when the System is used in the BiVAS configuration (LVAS + RVAS). -
Page 83: Accessing The Mag Monitor Management Application
MANAGEMENT entry. Select START and CONFIRM using the UP and DOWN arrows. The Mag Monitor will reboot and display the words “MANAGEMENT. LOADING Generation CentriMag System Operating Manual (US) Page 83 of 130 © 2019 Thoratec – Document No PL-0047, Rev 09 (May 2019) -
Page 84: Blood Pump Set-Up
5) Data Logger View Mode Setting: Always “Normal” 6) Application Software Version 7.25 Blood Pump Set-up Refer to the CentriMag and PediMag Blood Pump Instructions for Use for proper setup and operation of the Blood Pump. WARNING Always fully unscrew the Pump retaining screw built into the Motor before inserting and locking the Blood Pump in the Motor receptacle. -
Page 85: Operating
Pump afterload (>1000 RPM for large return cannula or low arterial pressure and >1600 RPM with small return cannula or high arterial pressure) Generation CentriMag System Operating Manual (US) Page 85 of 130 © 2019 Thoratec – Document No PL-0047, Rev 09 (May 2019) - Page 86 Console’s front panel for five seconds manually stops the Blood Pump if the Blood Pump is running. While depressing the STOP keypad the message TO STOP PUMP HOLD DOWN Generation CentriMag System Operating Manual (US) Page 86 of 130 © 2019 Thoratec – Document No PL-0047, Rev 09 (May 2019)
- Page 87 5 minutes without adequate anticoagulation, as the risk of thromboembolism is increased after blood has remained stagnant in the Blood Pump, circuit and Cannulae. Generation CentriMag System Operating Manual (US) Page 87 of 130 © 2019 Thoratec – Document No PL-0047, Rev 09 (May 2019)
- Page 88 4. Slowly increase the RPM until the flow rate is at the desired level. The RPM and LPM will be displayed on the 2 Generation CentriMag Primary Console. Generation CentriMag System Operating Manual (US) Page 88 of 130 © 2019 Thoratec – Document No PL-0047, Rev 09 (May 2019)
-
Page 89: Nd Generation Centrimag Primary Console Alarm/Alert Strategy
Acknowledge button indicates the alarm/alert condition has not been resolved or has reoccurred. If the alarm/alarm condition cannot be resolved the user should refer to Generation CentriMag System Operating Manual (US) Page 89 of 130 © 2019 Thoratec – Document No PL-0047, Rev 09 (May 2019) - Page 90 As shown in Table 13, the 2 Generation CentriMag Primary Console features 6 alarms and 20 alerts: Generation CentriMag System Operating Manual (US) Page 90 of 130 © 2019 Thoratec – Document No PL-0047, Rev 09 (May 2019)
- Page 91 Yes (60 Sec.) Alert BATTERY CHARGER FAIL Yes (60 Sec.) BATTERY MAINTAINANCE Yes (Permanent – visual Alert REQUIRED message remains) Generation CentriMag System Operating Manual (US) Page 91 of 130 © 2019 Thoratec – Document No PL-0047, Rev 09 (May 2019)
-
Page 92: Alarms
In the event of an Alarm condition (see Table 15, for alarm condition listing), the 2 Generation CentriMag Primary Console stop the Blood Pump. The Primary Console allows the user to acknowledge the Alarm, which for all but two high priority alarms silences the audio alarm advisory, but will not remove the visual message, and will usually not allow pumping to continue until the alarm condition no longer exists. -
Page 93: Thoratec – Document No Pl-0047, Rev 09 (May
It is intended that systemic anticoagulation be utilized while the System is in use. Anticoagulation levels should be determined by the physician based on risks and benefits to the patient. Generation CentriMag System Operating Manual (US) Page 93 of 130 © 2019 Thoratec – Document No PL-0047, Rev 09 (May 2019) - Page 94 The following table can be used to determine how to correct an alarm or alert condition. Generation CentriMag System Operating Manual (US) Page 94 of 130 © 2019 Thoratec – Document No PL-0047, Rev 09 (May 2019)
- Page 95 If the alarm repeats, switch to backup Console, Motor and Flow Probe according the procedure described in Section 10.1. Generation CentriMag System Operating Manual (US) Page 95 of 130 © 2019 Thoratec – Document No PL-0047, Rev 09 (May 2019)
- Page 96 Flow Probe according the procedure described in Alert SYSTEM ALERT Section 10.1. Resume support. Record the alarm message and contact your local Thoratec representative. Generation CentriMag System Operating Manual (US) Page 96 of 130 © 2019 Thoratec – Document No PL-0047, Rev 09 (May 2019)
- Page 97 Consider recalibrating the transducer if alert cannot be MAXIMUM explained by conventional troubleshooting. Consider reducing RPM to reduce the pressure if appropriate. Generation CentriMag System Operating Manual (US) Page 97 of 130 © 2019 Thoratec – Document No PL-0047, Rev 09 (May 2019)
-
Page 98: Battery Operation
Console for approximately 120 minutes at 5.5 LPM and 3,500 RPM when used with the CentriMag Blood Pump and approximately 180 minutes at 1.0 LPM and 3,000 RPM when used with the PediMag Blood Pump. The switch from AC power to battery power is automatic and is accomplished without interruption of patient support as long as the battery has a charge. - Page 99 CentriMag Primary Console Version 2 on battery, the Mag Monitor will shorten the battery run time. WARNING If a LOW BATTERY alert message is displayed, AC power should be restored as quickly as possible. If the 2 Generation CentriMag Primary Console is operating on batteries and a BATTERY BELOW MINIMUM alarm message is displayed, the Blood Pump is likely to stop at any time without further warning.
-
Page 100: Patient Transport
Console. The 2 Generation CentriMag Primary Console may be connected to the CentriMag System Transporter (Figure 55), or placed on a Cart (Figure 19) so that the unit can be moved during transport. Figure 55: 2... - Page 101 Generation CentriMag Primary Console in a location where the display is visible. 6) 2 Generation CentriMag Primary Consoles require up to 170 watts of power for each Console. Ensure that the transport vehicle is able to provide the necessary power for all of the main and backup equipment.
-
Page 102: Shut Down By Operator
Section 21.5, Radiated RF Emissions Test, Category M 8.6 Shut Down by Operator If the 2 Generation CentriMag System is no longer used, then the System shut down can be executed as follows: 8.1.3 1) Stop the Pump (see Section “Manually Stopping the Blood Pump”). -
Page 103: Maintenance
Immediately after removing a patient from CentriMag/PediMag support, the 2 Generation CentriMag Primary Console should be thoroughly cleaned using the following procedure: Disconnect AC power before cleaning the exterior of the Primary Console. Clean the exterior of the Primary Console with bactericidal solution, by spraying the solution on a cloth and wiping off the unit. -
Page 104: Recommended Preventive Maintenance
WARNING The 2 Generation CentriMag Primary Console should not be covered with plastic or insulating material during use or AC powered storage as it may overheat and malfunction. 9.3 Recommended Preventive Maintenance The services listed in Table 16 are to be performed by qualified personnel trained by Thoratec. -
Page 105: Battery Maintenance
To ensure proper operation and patient safety, only Thoratec-approved spare parts must be used to maintain this device. The user may NOT replace the internal battery without proper training by Thoratec or its distributor. Please request assistance by calling Thoratec Customer Service if the internal battery requires replacement. -
Page 106: Motor Visual Inspection
Motor Body Figure 56: CentriMag Motor 1) Visually inspect the CentriMag Motor connector for bent or broken pins. Check for burn marks or melted plastic. Figure 57: Motor Connector Pin View Note: If there are any issues while connecting the CentriMag Motor to the CentriMag Console, inspect the Motor port on the rear of the Console for damage, particularly for any broken pins that may be lodged inside. - Page 107 2) Visually inspect the entire length of the CentriMag Motor cable, including both bend reliefs (see Figures 58 and 59), for any damage such as separations of the bend reliefs, deformations, kinks, or cuts. These types of damage indicate wear and tear or previous rough handling of the cable, which has the potential to result in internal wire damage.
- Page 108 Figure 61: Undamaged and Intact Motor Cable Figure 62: Damaged Motor Cable Figure 63: Damaged Motor Cable Generation CentriMag System Operating Manual (US) Page 108 of 130 © 2019 Thoratec – Document No PL-0047, Rev 09 (May 2019)
-
Page 109: Emergency / Troubleshooting
10.1 Switching to Backup Hardware A backup 2 Generation CentriMag Console and Motor should be transported with the patient and immediately available for use at all times. Should the main Console or Motor cease to function, it will be necessary to replace the hardware by disconnecting the Blood Pump from the main Motor and Console and switching to a backup Motor and backup Console. - Page 110 AC power, with the main power switch OFF. The battery for the backup Console must be periodically assessed according to section 9.3 and 9.4. Generation CentriMag System Operating Manual (US) Page 110 of 130 © 2019 Thoratec – Document No PL-0047, Rev 09 (May 2019)
-
Page 111: Switching To Another Blood Pump
Pump. Ensure that a backup 2 Generation CentriMag System is available, powered and in the immediate vicinity. If cardioversion is attempted without discontinuing support consideration should be given to reducing the RPM of the Pump (or Pumps for BVAD support) to reduce the likelihood of Right-Left imbalance and Pump inlet obstruction. -
Page 112: Electrosurgical Units
Mag Monitor display flickers while the ESU is activated. If the 2 Generation CentriMag System is used concurrently with an Electrosurgery unit, Thoratec recommends that the user should read and follow the electrocautery manufacturer’s instructions for prevention of interference with other electronic devices. -
Page 113: Disposal Of Equipment
Please act according to your local rules and do not treat electronic waste as normal household waste. Proper disposal of electronic waste helps prevent potential negative consequences for the environment and human health. Generation CentriMag System Operating Manual (US) Page 113 of 130 © 2019 Thoratec – Document No PL-0047, Rev 09 (May 2019) -
Page 114: Appendices
12 APPENDICES 12.1 Appendix I – Primary Console Alarms and Alerts Generation CentriMag System Operating Manual (US) Page 114 of 130 © 2019 Thoratec – Document No PL-0047, Rev 09 (May 2019) - Page 115 If the alarm repeats, switch to backup Console, Motor and Flow Probe according the procedure described in Section 10.1. Generation CentriMag System Operating Manual (US) Page 115 of 130 © 2019 Thoratec – Document No PL-0047, Rev 09 (May 2019)
- Page 116 Flow Probe according the procedure described in Alert SYSTEM ALERT 10.1 Section . Resume support. Record the alarm message and contact your local Thoratec representative. Generation CentriMag System Operating Manual (US) Page 116 of 130 © 2019 Thoratec – Document No PL-0047, Rev 09 (May 2019)
- Page 117 Consider recalibrating the transducer if alert cannot be MAXIMUM explained by conventional troubleshooting. Consider reducing RPM to reduce the pressure if appropriate. Generation CentriMag System Operating Manual (US) Page 117 of 130 © 2019 Thoratec – Document No PL-0047, Rev 09 (May 2019)
- Page 118 If so, carefully monitor the status of the battery charge Alert ON BATTERY indicator, while using the System on battery. Re-connect to AC-outlet, as soon as possible. Generation CentriMag System Operating Manual (US) Page 118 of 130 © 2019 Thoratec – Document No PL-0047, Rev 09 (May 2019)
-
Page 119: Appendix Ii - Technical Specification
12.2 Appendix II – Technical Specification Generation CentriMag System Operating Manual (US) Page 119 of 130 © 2019 Thoratec – Document No PL-0047, Rev 09 (May 2019) - Page 120 IFD: SW-0033-01 Rev 02 Application Software SPS-MSP: SW-0034-01 Rev 02 SPS-PIC: SW-0043-01 Rev 00 Max. Product Life 5 years Generation CentriMag System Operating Manual (US) Page 120 of 130 © 2019 Thoratec – Document No PL-0047, Rev 09 (May 2019)
- Page 121 Rev 00 CPLD: SW-0061-01 Rev 00 Max. Product Life 5 years Use only USB-compatible Memory Sticks USB Port (FAT/FAT32 formatted) Generation CentriMag System Operating Manual (US) Page 121 of 130 © 2019 Thoratec – Document No PL-0047, Rev 09 (May 2019)
- Page 122 14.3 mm (9/16”) Material Polyvinyl Chloride Calibrated for Fluid Blood at 37 ºC Temperature (ºC) Probe Calibration Tubing Type Tygon S-50-HL Generation CentriMag System Operating Manual (US) Page 122 of 130 © 2019 Thoratec – Document No PL-0047, Rev 09 (May 2019)
- Page 123 11.1 mm (7/16”) Material Polyvinyl Chloride Calibrated for Fluid Blood at 37 ºC Temperature (ºC) Probe Calibration Tubing Type Tygon S-50-HL Generation CentriMag System Operating Manual (US) Page 123 of 130 © 2019 Thoratec – Document No PL-0047, Rev 09 (May 2019)
-
Page 124: Appendix Iii - Electromagnetic Emissions
Guidance and manufacturer’s declaration – electromagnetic emissions The 2 Generation CentriMag System is intended for use in the electromagnetic environment specified below. The customer or the user of the 2 Generation CentriMag System should assure that it is used in such an environment. -
Page 125: Appendix Iv - Electromagnetic Immunity
12.4 Appendix IV – Electromagnetic Immunity Generation CentriMag System Operating Manual (US) Page 125 of 130 © 2019 Thoratec – Document No PL-0047, Rev 09 (May 2019) - Page 126 Guidance and manufacturer’s declaration – electromagnetic immunity The 2 Generation CentriMag System is intended for use in the electromagnetic environment specified below. The customer or the user of the 2 Generation CentriMag System should assure that it is used in such an environment.
- Page 127 Guidance and manufacturer’s declaration – electromagnetic immunity The 2 Generation CentriMag System is intended for use in the electromagnetic environment specified below. The customer or the user of the 2 Generation CentriMag System should assure that it is used in such an environment.
- Page 128 If the measured field strength in the location in which the Generation CentriMag System is used exceeds the applicable RF compliance level above, the 2 Generation CentriMag System should be observed to verify normal operation. If abnormal performance is...
- Page 129 2 Generation CentriMag System The 2 Generation CentriMag System is intended for use in an electromagnetic environment in which radiated RF disturbances are controlled. The customer or the user of the 2 Generation CentriMag System can help prevent electromagnetic interference by maintaining a minimum distance between portable and...
-
Page 130: Appendix V - Similarities & Differences Between
Width: 26.6 cm / 10.5 in Width: 26.0 cm / 10.2 in Depth: 33.0 cm / 13.0 in Depth: 32.0 cm / 12.6 in Generation CentriMag System Operating Manual (US) Page 130 of 130 © 2019 Thoratec – Document No PL-0047, Rev 09 (May 2019)
Need help?
Do you have a question about the CentriMag and is the answer not in the manual?
Questions and answers