Thoratec HEARTMATE II Instructions For Use Manual
Left ventricular assist system
Hide thumbs
Also See for HEARTMATE II:
- Patient handbook (310 pages) ,
- Instructions for use manual (59 pages) ,
- Replacing manual (2 pages)
Table of Contents
Advertisement
Advertisement
Chapters
Table of Contents

Related Manuals for Thoratec HEARTMATE II


Summary of Contents for Thoratec HEARTMATE II
- Page 1 Instructions for Use Featuring the Mobile Power Unit...
- Page 3 Thoratec Corporation ® EART ENTRICULAR SSIST YSTEM Instructions for Use...
- Page 5 Website: www.thoratec.com Thoratec Corporation continually strives to provide the highest quality of products for mechanical circulatory support. Specifications may change without notice. HeartMate II, Thoratec, and the Thoratec logo are registered trademarks, and HeartLine is a trademark of Thoratec Corporation.
-
Page 7: Table Of Contents
System Operations - - - - - - - - - - - - - - - - - 2-1 HeartMate II Left Ventricular Assist Device Overview - - - - - - - - - - - - - 2-3... - Page 8 Guidelines for Power Cable Connectors- - - - - - - - - - - - - - - - - - - - 7-33 What Not To Do: Driveline and Cables - - - - - - - - - - - - - - - - - - - - 7-34 HeartMate II Left Ventricular Assist System Instructions for Use...
- Page 9 Technical Specifications - - - - - - - - - - - - - - - B-1 HeartMate II Product List - - - - - - - - - - - - - - C-1 Safety Testing and Classification...
-
Page 11: Preface
This manual contains information needed to properly and safely operate the HeartMate II Left Ventricular Assist System. Users of the HeartMate II Left Ventricular Assist System should have a practical knowledge of the principles of mechanical circulatory support and should be aware of the physiological and psychological needs of a patient undergoing mechanical ventricular support. -
Page 13: Introduction
INTRODUCTION This section provides an introduction to the HeartMate II Left Ventricular Assist System. Understanding Warnings and Cautions - - - - - - - - - - - - - - - -1-3 Overview - - - - - - - - - - - - - - - - - - - - - - - - - - - - - - - -1-4... -
Page 15: Understanding Warnings And Cautions
In this manual, warnings and cautions that are relevant to a specific procedure or piece of equipment appear at the start of each applicable section. WARNING ! Warnings appear in the manual in this format. CAUTION ! Cautions appear in the manual in this format. HeartMate II Left Ventricular Assist System Instructions for Use... -
Page 16: Overview
1 Introduction Overview The HeartMate II Left Ventricular Assist System is an axial-flow, rotary ventricular assist system that generates flows up to 10 liters per minute (lpm). One end of the Left Ventricular Assist Device is attached to the apex of the left ventricle; the other end of the device connects to the ascending aorta. - Page 17 Charger, or HeartMate 14 Volt Lithium-Ion batteries) before use. • Do not use the HeartMate II Left Ventricular Assist Device in pregnant women or in women likely to become pregnant. A growing fetus may dislodge the pump, which may result in device failure, catastrophic bleeding, or death. Instruct women of childbearing age to use reliable contraception if sexually active.
- Page 18 • If HeartMate II patients are approved for showering, they must always use the Shower Bag. When installed properly, the Shower Bag protects external system components from water or moisture. If external system components have contact with water or moisture, the pump may stop.
-
Page 19: Indications
Introduction 1 Indications The HeartMate II Left Ventricular Assist System is indicated for use as a “bridge to transplantation” for cardiac transplant candidates who are at risk of imminent death from non-reversible left ventricle failure. It is also indicated for use in patients with New York... -
Page 20: Pre-Use Requirements
Pre-Use Requirements A thorough understanding of the technical principles, clinical applications, and risks associated with left ventricular support is required before using the HeartMate II Left Ventricular Assist System. It is suggested that patients possess a minimum 5th grade educational level and shall be ®... -
Page 21: Equipment Overview
Volt Lithium-Ion batteries can power the system for up to 10–12 hours, depending on the activity level of the patient. For more information, see page 3-45. Table 1.1 HeartMate II System Components HeartMate II Left Ventricular Assist System Instructions for Use... - Page 22 The Power Module plugs into an AC outlet to provide power Power Module to the HeartMate II system. The Power Module is used in the clinical setting when the patient requires monitoring using the System Monitor. The System Controller and the Power Module are connected through the Power Module patient cable.
- Page 23 The Shower Bag is used to protect external system components from water or moisture—outside in heavy rain or snow, and always for every shower. HeartMate II patients may be allowed to shower when the driveline exit site has healed and with permission of their doctor. If...
- Page 24 For more information, see page 6-60. Protection Bag The Protection Bag stores and protects the backup System Controller. For more information, see page 6-59. Table 1.1 HeartMate II System Components (Continued) 1-12 HeartMate II Left Ventricular Assist System Instructions for Use...
-
Page 25: Required, Backup, And Optional Components & Equipment
Introduction 1 Required, Backup, and Optional Components & Equipment The HeartMate II Left Ventricular Assist System is designed for use both inside and outside of the hospital. Specific system components and equipment may be required for each setting. Components and equipment that are required for implant and ICU transfer are listed in Table 1.2. - Page 26 In addition, device malfunction may necessitate emergency treatment. Therefore, patients should not be more than two hours from a healthcare facility that has trained personnel who are capable of treating a HeartMate II patient. Components for a Discharged Patient...
-
Page 27: Principles Of Operation
The pressure-flow curves, also known as the H-Q curves, illustrate this relationship (Figure 1.2). The H-Q curves were created by operating the HeartMate II Left Ventricular Assist Device in a mock loop. For each speed, the pump outlet resistance was progressively increased, and the resulting flow and pressure were measured. - Page 28 1 Introduction The HeartMate II Left Ventricular Assist Device is connected to the circulation via a sealed inflow conduit and sealed outflow graft that are attached to the left ventricle and ascending aorta, respectively (Figure 1.3). Sealed Outflow Graft Sealed...
-
Page 29: Explanation Of Parameters
“suction event.” A speed-control circuit that automatically decreases device speed during a suction event is a key feature of the HeartMate II system. Once the suction event resolves, the device resumes operation at its previously set fixed speed setting. - Page 30 Under otherwise stable conditions, a significant drop in value may indicate a decrease in circulating blood volume. Pulsatility index values near or above 10 may indicate potential problems. For PI values near 10 or above, please contact Thoratec Corporation. For Thoratec contact information, see page iii.
-
Page 31: System Operations
System. HeartMate II Left Ventricular Assist Device Overview - - - - - - - - - -2-3 System Controller Overview- - - - - - - - - - - - - - - - - - - - - - 2-10... -
Page 33: Heartmate Ii Left Ventricular Assist Device Overview
System Operations 2 HeartMate II Left Ventricular Assist Device Overview The HeartMate II Left Ventricular Assist Device (Figure 2.1) is an axial flow rotary heart pump that is connected in parallel to the native circulation. The sealed inflow conduit of the Left Ventricular Assist Device attaches to the apex of the left ventricle. - Page 34 The driveline connects the pump to the System Controller, which then connects to a power source. The HeartMate II Left Ventricular Assist System is powered by an external power source: either the Power Module or Mobile Power Unit that connects to an AC electrical outlet, or two portable 14 Volt Lithium-Ion batteries (see Powering the Pump Motor on page 2-8).
- Page 35 HeartMate II Implant Configuration An inflow conduit is inserted into the left ventricular apex of the heart as shown in Figure 2.3. An outflow graft is attached to the ascending aorta. HeartMate II Left Ventricular Assist System Instructions for Use...
- Page 36 The bearings on the inlet and outlet sides of the rotor assembly are shaped in the form of balls and cups and withstand radial and axial loads. The outer boundary of the bearing surfaces are washed directly by the main flow field. HeartMate II Left Ventricular Assist System Instructions for Use...
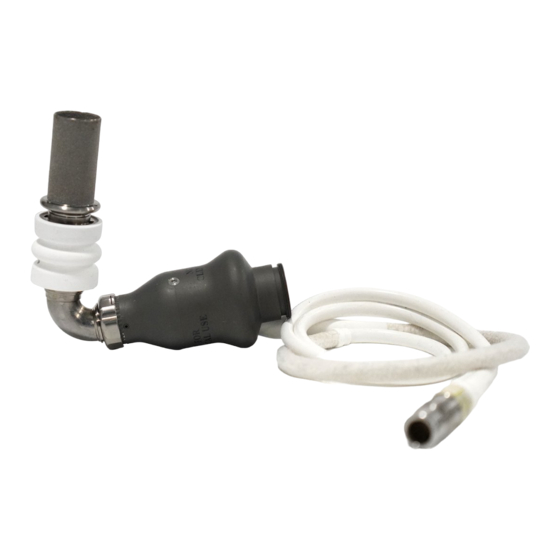
- Page 37 In both versions, textured surfaces coat the inner lumen of the inflow conduit and the outflow elbow. The textured surfaces stimulate tissue growth and create a natural lining. IMPORTANT! Unsealed grafts require pre-clotting before use (see the HeartMate II Left Ventricular Assist System Instructions for Use, document number 105747 or 103883).
- Page 38 If the driveline or driveline connector appears damaged, please contact Thoratec Corporation for assistance. See Thoratec contact information on page iii. X-ray images and System Controller log files are useful to assess the extent and location of the damage. If the driveline or driveline conductors are damaged, the pump should be replaced as soon as possible.
- Page 39 System Controller is in use during a power emergency (see Maintaining Backup System Controller Readiness: Charging and Self Test on page 2-51). HeartMate II Left Ventricular Assist System Instructions for Use...
-
Page 40: System Controller Overview
2 System Operations System Controller Overview The HeartMate II System Controller is a small computer that controls and monitors system operation. It sends power and operating signals to the Left Ventricular Assist Device and adjusts device operation to maintain programmed levels of cardiac support. The System Controller identifies alarm conditions and initiates Hazard and Advisory alarms. - Page 41 System Controller Backup Battery Power. This section provides a functional overview with instructions on how to replace the 11 Volt Lithium-Ion backup battery that is inside the System Controller. See page 2-39. HeartMate II Left Ventricular Assist System Instructions for Use 2-11...
- Page 42 • If a HeartMate II patient is approved for showering, he or she must always use the Shower Bag during every shower. The Shower Bag protects external system components from water or moisture. If external system components have contact with water or moisture, the pump may stop.
- Page 43 The 11 Volt Lithium-Ion backup battery inside the HeartMate II System Controller provides enough power to run the implanted HeartMate II pump for at least 15 minutes if the main power source (Power Module, Mobile Power Unit, or two HeartMate 14 Volt Lithium-Ion batteries) is disconnected or fails.
- Page 44 An active driveline fault displayed on the System Monitor (System Controller Alarms on page 7-3). High pulsatility index (PI) readings on the System Controller. Feeling pump vibrations. Fluid oozing from the external portion of the driveline. Pump stoppage. 2-14 HeartMate II Left Ventricular Assist System Instructions for Use...
- Page 45 HeartMate II patients with sight or hearing impairment may need extra help using the System Controller. • Use only those accessories specified or sold by Thoratec. Do not cover the System Controller with insulating material, such as a blanket, to avoid elevated temperature.
- Page 46 (Figure 2.7). HeartMate II patients (and their family members/caregivers) must be thoroughly trained on how to interpret and use the user interface prior to discharge (see Educating and Training Patients, Families, and Caregivers on page 6-67).
- Page 47 This is an Advisory alarm. If the black power cable disconnects or becomes loose, promptly restore the connection. For more information, see page 7-17. Table 2.2 System Controller User Interface Components HeartMate II Left Ventricular Assist System Instructions for Use 2-17...
- Page 48 System Controller). To check the status of the System Controller’s backup battery, see Viewing Pump and System Information on the System Controller Screen on page 2-20. Table 2.2 System Controller User Interface Components (Continued) 2-18 HeartMate II Left Ventricular Assist System Instructions for Use...
- Page 49 ) at the same time to display the last six System Controller alarms on the screen. For more information, see page 7-5. Table 2.2 System Controller User Interface Components (Continued) HeartMate II Left Ventricular Assist System Instructions for Use 2-19...
- Page 50 (Speed) screen. A dot at the bottom of each screen provides navigational information about which of the five screens is in view. 2-20 HeartMate II Left Ventricular Assist System Instructions for Use...
- Page 51 Table 2.3 System Controller Display Screen Sequence Note: On-screen messages come in many different languages and can be changed from the System Monitor to support your patient’s needs. See System Controller Language on page 4-45. HeartMate II Left Ventricular Assist System Instructions for Use 2-21...
- Page 52 It is impossible to connect (or disconnect) the driveline without first rotating the safety tab on the back of the System Controller into the “unlocked” position. Safety Tab Figure 2.9 The Safety Tab Covers the Red Button 2-22 HeartMate II Left Ventricular Assist System Instructions for Use...
- Page 53 2. Move the driveline connector safety tab to the unlocked position (Figure 2.10). Figure 2.10 Unlock the Safety Tab 3. Align the arrow/alignment mark on the driveline with the arrow on the System Controller socket (Figure 2.11). Figure 2.11 Align the Arrows HeartMate II Left Ventricular Assist System Instructions for Use 2-23...
- Page 54 If there is a problem with the connection, the System Controller immediately alarms with a Driveline Disconnected alarm. This is a Hazard alarm. See Driveline Disconnected Alarm on page 7-13 for details. 2-24 HeartMate II Left Ventricular Assist System Instructions for Use...
- Page 55 Grasp only the metal end of the driveline while removing it. Do not pull on or bend the driveline (Figure 2.14). Figure 2.14 Grasp the Metal End and Remove the Driveline HeartMate II Left Ventricular Assist System Instructions for Use 2-25...
- Page 56 System Controller and System Monitor (see System Monitor Setup on page 4-5). The data link does not work without a white-to-white connection. During routine operation, the HeartMate II Left Ventricular Assist System is powered by one of the following power sources: •...
- Page 57 Mobile Power Unit Power See page 3-30. Figure 2.16 The HeartMate II Left Ventricular Assist Device on Battery Power (top), Power Module Power (right), and Mobile Power Unit Power (bottom) The System Controller continually monitors the connection status of the power cable connectors.
- Page 58 3. Release the battery button ( ). All the audible indicators/lights should remain on for 15 seconds, after which the audible indicators/lights stop, the screen goes black, and the self test is complete. 2-28 HeartMate II Left Ventricular Assist System Instructions for Use...
- Page 59 Controller. Do not use a System Controller that fails its self test. Replace it with the backup System Controller and contact Thoratec for a new backup controller. IMPORTANT! If an alarm occurs during a self test, the self test terminates and the alarm’s on-screen indicator remains active.
- Page 60 Controller’s backup battery (the battery inside the System Controller). To check the status of the System Controller’s backup battery, see Viewing Pump and System Information on the System Controller Screen on page 2-20. 2-30 HeartMate II Left Ventricular Assist System Instructions for Use...
- Page 61 2 green bars = Running on the Power Module backup battery and 25%–50% of battery power remains. 1 green bar = Running on the Power Module backup battery and less than 25% of battery power remains. HeartMate II Left Ventricular Assist System Instructions for Use 2-31...
- Page 62 If either the yellow diamond or the red battery illuminate, immediately replace the depleted batteries with a fully-charged pair, or switch to the Power Module or Mobile Power Unit (see Switching Power Sources on page 3-58). 2-32 HeartMate II Left Ventricular Assist System Instructions for Use...
- Page 63 HeartMate 14 Volt Lithium-Ion batteries). • Connected to the Left Ventricular Assist Device via the driveline. • Sending power to the pump via the driveline. • Controlling and monitoring physiological and operating conditions. HeartMate II Left Ventricular Assist System Instructions for Use 2-33...
- Page 64 Not responding to user interface button pushes. • Not charging the 11 Volt Lithium-Ion backup battery inside the System Controller. • Disconnected from and not communicating with the System Monitor. 2-34 HeartMate II Left Ventricular Assist System Instructions for Use...
- Page 65 Able to perform a System Controller self test. • Disconnected from the driveline. • Displaying charging status or any active alarms. • Not responding to silence alarm ( ) or display ( ) buttons. HeartMate II Left Ventricular Assist System Instructions for Use 2-35...
- Page 66 2. Connect the driveline to the System Controller (see Connecting the Driveline to the System Controller on page 2-23). 3. The Pump Running symbol is illuminated green ( ) and the System Controller is in Run Mode. 2-36 HeartMate II Left Ventricular Assist System Instructions for Use...
- Page 67 “Charging Complete” appears on the screen when the battery has finished charging. After the backup battery is charged, the System Controller can either be put into Run Mode for immediate use or into Sleep Mode to await future use. HeartMate II Left Ventricular Assist System Instructions for Use 2-37...
- Page 68 3 dots, 2 dots, 1 dot). 4. When the countdown ends, the screen goes black, the Pump Running symbol is black ), and the System Controller is in Sleep Mode. 2-38 HeartMate II Left Ventricular Assist System Instructions for Use...
- Page 69 System Operations 2 System Controller Backup Battery Power To maintain continuous operation of the HeartMate II Left Ventricular Assist Device during an unexpected power loss, the System Controller uses an internal 11 Volt Lithium-Ion backup battery, which is installed in a running System Controller after the sterile field is broken, and after pump implantation.
- Page 70 When 6 months or less remain before expiration, the Battery Replacement Reminder indicates that it is time to replace the backup battery (Figure 2.25). Figure 2.25 Backup Battery Second Replacement Reminder 2-40 HeartMate II Left Ventricular Assist System Instructions for Use...
- Page 71 System Monitor Admin screen. See Admin Screen on page 4-42. OR THIS TASK YOU NEED • 1 replacement 11 Volt Lithium-Ion backup battery (obtained from Thoratec) • 1 lever to remove the screw cover of the battery compartment (included with the replacement 11 Volt Lithium-Ion backup battery) •...
- Page 72 4. Use the screwdriver to loosen the four screws on the battery compartment cover (Figure 2.28). Figure 2.28 Use the Screwdriver to Loosen the Screws 5. Remove the battery compartment cover. 2-42 HeartMate II Left Ventricular Assist System Instructions for Use...
- Page 73 System Controller. 11. Place the backup battery inside the battery compartment (Figure 2.30). Figure 2.30 Place the Battery Inside the Battery Compartment 12. Place the cover over the battery compartment. HeartMate II Left Ventricular Assist System Instructions for Use 2-43...
- Page 74 To resolve a System Controller Clock Not Set advisory alarm, use the System Monitor to reset the System Controller clock (see Date and Time on page 4-43). Make sure the System Monitor clock is correct before relying on it. 2-44 HeartMate II Left Ventricular Assist System Instructions for Use...
-
Page 75: The Backup System Controller
System Operations 2 The Backup System Controller HeartMate II patients receive two System Controllers: one to actively use (running), and a reserve (backup) in case the running System Controller experiences a failure. Overview: Running Versus Backup System Controller See page 2-46. - Page 76 2 System Operations Overview: Running Versus Backup System Controller Every HeartMate II patient receives a backup System Controller, which is identical to the running System Controller and is programmed with the same settings as the running System Controller. If a failure occurs on the running System Controller, it may need to be replaced with the backup System Controller.
- Page 77 1. Remove the System Controller, the 11 Volt Lithium-Ion backup battery, and the Patient Handbook from the System Controller packaging. 2. Connect the backup System Controller to the Power Module. HeartMate II Left Ventricular Assist System Instructions for Use 2-47...
- Page 78 3. Set the “Fixed Speed” to the settings that are entered into the patient’s running System Controller (Figure 2.35). For more information, see Select Fixed Speed on page 4-22. Figure 2.35 Select Fixed Speed Screen 2-48 HeartMate II Left Ventricular Assist System Instructions for Use...
- Page 79 For more information, see Admin Screen on page 4-42. Figure 2.37 Admin Screen 6. Set the System Controller’s language, if needed, via the Admin screen (shown above). For more information, see System Controller Language on page 4-45. HeartMate II Left Ventricular Assist System Instructions for Use 2-49...
- Page 80 (5 dots, 4 dots, 3 dots, 2 dots, 1 dot) (Figure 2.39). When the countdown ends, the System Controller is in Sleep Mode. Figure 2.39 Hold Screen 10. Remember to give the Patient Handbook to the patient. 2-50 HeartMate II Left Ventricular Assist System Instructions for Use...
- Page 81 System Controller on Power Module Power (left) and Battery Power (right) 2. When the System Controller is connected to power, its user display screen shows “Charging” or “Charging Complete” (Figure 2.41). Figure 2.41 System Controller Charging or Charging Complete HeartMate II Left Ventricular Assist System Instructions for Use 2-51...
- Page 82 6. Put the backup System Controller into its Protection Bag (Figure 2.43). For more information, see Using the Protection Bag on page 6-59. Figure 2.43 Backup System Controller in Protection Bag 2-52 HeartMate II Left Ventricular Assist System Instructions for Use...
- Page 83 These can include native cardiac output, cognitive function, etc., which may change over the course of LVAD support, and therefore, should be periodically reassessed. Figure 2.44 Unlock the Safety Tab on the Running System Controller HeartMate II Left Ventricular Assist System Instructions for Use 2-53...
- Page 84 2. Replace the System Controller. Multiple Power Sources Available With In-use Power Source Only (2 of these power sources available: Power (Power Module OR Mobile Power Unit OR Module, Mobile Power Unit, Batteries and Batteries and Clips) Clips) a. Move the IMPORTANT! Keep the white connector’s power source...
- Page 85 See Switching Operating Modes on page 2-36. 6. Do not use the old, replaced System Controller ever again. To request a new backup System Controller and for instructions on returning the old one, please contact Thoratec Corporation. For Thoratec contact information, see page iii.
- Page 87 POWERING THE SYSTEM This section describes the various methods that can be used to power the HeartMate II Left Ventricular Assist System. Power Overview - - - - - - - - - - - - - - - - - - - - - - - - - - - -3-3...
-
Page 89: Power Overview
Battery Charger—The Battery Charger is needed to charge, test, and calibrate the 14 Volt Lithium-Ion batteries. The Battery Charger can accommodate up to four batteries at one time. See page 3-65. HeartMate II Left Ventricular Assist System Instructions for Use... -
Page 90: Powering The System
The following components are required for connecting the Power Module to the System Controller: • HeartMate Power Module with an installed Power Module backup battery • Power Module patient cable • Power Module power cord • HeartMate II System Controller HeartMate II Left Ventricular Assist System Instructions for Use... - Page 91 • Do not use equipment or supplies other than those specified or sold by Thoratec Corporation. The use of unauthorized replacement parts may affect electromagnetic compatibility of the Power Module with other devices. Potential interference may occur between the Power Module and other devices.
- Page 92 Increase the distance between the Power Module and the affected devices. Connect affected devices to an electrical outlet different from the outlet used to power the Power Module. • Power Module service and maintenance must be performed only by Thoratec-trained personnel. CAUTION ! •...
- Page 93 Connect the Power Module patient cable. Installing the Power Module Backup Battery After receiving the Power Module, a Thoratec-trained individual must open the Power Module to install its backup battery. This must be done prior to using the Power Module.
- Page 94 5. Use the crosshead (Phillips) screwdriver to remove the metal bracket that will hold the internal battery in place (Figure 3.4). Figure 3.4 Remove the Metal Bracket 6. Remove the Power Module backup battery from the packaging. HeartMate II Left Ventricular Assist System Instructions for Use...
- Page 95 9. Use the crosshead (Phillips) screwdriver to reattach the metal bracket. Make sure the white connectors and wires are not trapped under the metal bracket. Make sure the connection is secure (Figure 3.7). Figure 3.7 Reattach Metal Bracket HeartMate II Left Ventricular Assist System Instructions for Use...
- Page 96 (Figure 3.9). Figure 3.9 Tighten the Screws IMPORTANT! Be sure to reconnect the Power Module backup battery after the Power Module is transported or shipped for service. 3-10 HeartMate II Left Ventricular Assist System Instructions for Use...
- Page 97 Power Module use. Do not use an outlet that is controlled by a wall switch. Do not use an adapter plug for an ungrounded wall outlet. Do not use portable, multiple outlet (power strip) adapters. HeartMate II Left Ventricular Assist System Instructions for Use 3-11...
- Page 98 It can take up to 3 hours to charge the backup battery. For international travel, the patient needs a Thoratec power cord that is compatible with the local voltage and that meets applicable national plug, rated voltage, rated current, and safety agency marks and specifications.
- Page 99 Power Module, and then insert the patient cable into the socket (Figure 3.14). The cable clicks into place when fully engaged in the socket. Figure 3.14 Align the Red Dots HeartMate II Left Ventricular Assist System Instructions for Use 3-13...
- Page 100 If the Power Module patient cable remains connected to the Power Module when not in use, make sure the Power Module patient cable does not become damaged, and is placed to ensure the patient does not trip or fall. 3-14 HeartMate II Left Ventricular Assist System Instructions for Use...
- Page 101 Before Use on page 3-7). 3. Grasp the single-connector end of the Power Module patient cable (Figure 3.17). Single Connector Figure 3.17 Single-Connector End of the Power Module Patient Cable HeartMate II Left Ventricular Assist System Instructions for Use 3-15...
- Page 102 8. Place the black and white System Controller power cable connectors within easy reach (Figure 3.20). White Connector Black Connector Figure 3.20 Black and White System Controller Power Cable Connectors 3-16 HeartMate II Left Ventricular Assist System Instructions for Use...
- Page 103 Power Module patient cable connector. Do not try to join together misaligned connectors; doing so causes damage. Firmly push together the two connectors. Securely hand tighten the connector nut. Do not use tools. HeartMate II Left Ventricular Assist System Instructions for Use 3-17...
- Page 104 3 Powering the System Figure 3.23 System Controller Power Cables Connected to Power Module Patient Cables 3-18 HeartMate II Left Ventricular Assist System Instructions for Use...
- Page 105 • One of the lights does not come on 4. If any of these conditions occur, please contact Thoratec Corporation. For Thoratec contact information, see page iii. Otherwise, the Power Module passed the self test and is ready for use.
- Page 106 The Power Module has an internal backup battery. A new Power Module backup battery provides approximately 30 minutes of backup power to the HeartMate II system if power fails or is disconnected. Over time, the internal battery may provide shorter periods of backup power.
- Page 107 Table 3.1 Power Module Backup Battery Charge Status Indicators Power Module Backup Battery is charged when battery symbol is green Figure 3.24 Green Charge Symbol Indicates that the Power Module Backup Battery is Charged HeartMate II Left Ventricular Assist System Instructions for Use 3-21...
- Page 108 To clear the alarm, first disconnect the Power Module from AC power and then connect the internal backup battery according to instructions in Installing the Power Module Backup Battery on page 3-7. 3-22 HeartMate II Left Ventricular Assist System Instructions for Use...
- Page 109 2. Inspect the Power Module for dents, chips, cracks, or other signs of damage. Do not use a Power Module that appears damaged. Contact Thoratec Corporation for a replacement, if needed. 3. Use a crosshead (Phillips) screwdriver to loosen the two ¼-turn screws from the rear panel.
- Page 110 AC power. To silence the alarm, press the silence alarm button ( on the user panel. The alarm clears when AC power is applied to the Power Module. 3-24 HeartMate II Left Ventricular Assist System Instructions for Use...
- Page 111 9. Use the crosshead (Phillips) screwdriver to tighten the two ¼-turn screws. Make sure the screws are tight and the cover is securely closed (Figure 3.33). Figure 3.33 Tighten the Screws HeartMate II Left Ventricular Assist System Instructions for Use 3-25...
- Page 112 1. Place the Power Module on a flat, stable surface. 2. Inspect the Power Module for dents, chips, cracks, or other signs of damage. Do not use a Power Module that appears damaged. Contact Thoratec Corporation for a replacement, if needed.
- Page 113 8. Gently fold the wires and white connector along the top of the battery and over the metal bracket screws (Figure 3.38). Figure 3.38 Gently Fold the Wires and Connector Along the Top 9. Replace the battery compartment cover. HeartMate II Left Ventricular Assist System Instructions for Use 3-27...
- Page 114 10. Use the crosshead (Phillips) screwdriver to tighten the two ¼-turn screws. Make sure the screws are tight and the cover is securely closed (Figure 3.39). Figure 3.39 Tighten the Screws 3-28 HeartMate II Left Ventricular Assist System Instructions for Use...
- Page 115 Table 3.2 Audio Alarm Silence Periods Caring for the Power Module See Cleaning and Maintenance on page 8-4 for warnings, cautions, and instructions on caring for the Power Module. HeartMate II Left Ventricular Assist System Instructions for Use 3-29...
-
Page 116: Using The Mobile Power Unit
The Mobile Power Unit (Figure 3.40): • Provides power to the System Controller and pump. • Powers the system while the patient is sleeping or relaxing indoors. • Echoes System Controller alarms. 3-30 HeartMate II Left Ventricular Assist System Instructions for Use... - Page 117 “EPC” or “PSD”. • Care should be taken when small children or pets are present. There is a potential for strangulation from the system’s cables. HeartMate II Left Ventricular Assist System Instructions for Use 3-31...
- Page 118 Avoid covering the Mobile Power Unit, such as with a blanket. Covering the Mobile Power Unit may reduce the ability to hear important system alarms or may cause the Mobile Power Unit to fail due to overheating. 3-32 HeartMate II Left Ventricular Assist System Instructions for Use...
- Page 119 Mobile Power Unit if either cable shows signs of damage. • When moving the Mobile Power Unit to a different location or AC power source, first connect the System Controller to HeartMate 14 Volt batteries. HeartMate II Left Ventricular Assist System Instructions for Use 3-33...
- Page 120 This is an Advisory alarm. When the Replace Mobile Power Unit Battery symbol illuminates, replace the internal batteries in the Mobile Power Unit. For more information, see page 7-28. Table 3.3 Mobile Power Unit User Interface Components 3-34 HeartMate II Left Ventricular Assist System Instructions for Use...
- Page 121 2. Ensure that the power cord is unplugged from the Mobile Power Unit. 3. Inspect the Mobile Power Unit for dents, chips, cracks, or other signs of damage. Do not use a Mobile Power Unit that appears damaged. Contact Thoratec Corporation for a replacement, if needed.
- Page 122 (Figure 3.42). Remove and dispose of the battery installation reminder tag, if present. Figure 3.42 Remove the Battery Compartment Cover 6. If replacing batteries, gently pull the ribbon to remove the depleted batteries from the case. 3-36 HeartMate II Left Ventricular Assist System Instructions for Use...
- Page 123 (Figure 3.44). Figure 3.44 Tighten the Screw 10. Dispose of or recycle the depleted batteries in compliance with all applicable local, state, and federal regulations. HeartMate II Left Ventricular Assist System Instructions for Use 3-37...
- Page 124 Power Unit use. Do not use an outlet that is controlled by a wall switch. Do not use an adapter; a portable, multiple outlet power strip; a ground fault interrupter (GFI); or a residual current device (RCD) outlet. 3-38 HeartMate II Left Ventricular Assist System Instructions for Use...
- Page 125 Note: If the green “Power On” light does not come on, plug the power cord into another electrical outlet. If the green light still does not come on, the Mobile Power Unit may have a problem. Do not use a defective device. Contact Thoratec Corporation for a replacement, if needed.
- Page 126 Like the power cable connectors on the System Controller, the connectors on the Mobile Power Unit patient cable are also color coded (see Figure 3.47). When connecting the System Controller to the Mobile Power Unit patient cable, always connect white-to-white and black-to-black. 3-40 HeartMate II Left Ventricular Assist System Instructions for Use...
- Page 127 Place the batteries with their attached battery clips within easy reach. Unscrew and disconnect only the white System Controller power cable connector from the attached battery clip. Do not remove the black connector! HeartMate II Left Ventricular Assist System Instructions for Use 3-41...
- Page 128 (Figure 3.49). Do not try to join together misaligned connectors, which can damage them. Figure 3.49 Carefully Align the Connectors Firmly push together the two connectors (). Figure 3.50 Push Together the Two Connectors 3-42 HeartMate II Left Ventricular Assist System Instructions for Use...
- Page 129 Firmly push together the two connectors. Tighten the connector nut until secure. Hand tighten only—do not use tools. Figure 3.52 System Controller Power Cables Connected to Mobile Power Unit Patient Cable Connectors HeartMate II Left Ventricular Assist System Instructions for Use 3-43...
- Page 130 Do not put the Mobile Power Unit into water or liquid. Never clean the Mobile Power Unit while it is providing power to the pump; switch to another power source first. Before cleaning the Mobile Power Unit, unplug all connections. 3-44 HeartMate II Left Ventricular Assist System Instructions for Use...
-
Page 131: Using Heartmate 14 Volt Lithium-Ion Batteries
Powering the System 3 Using HeartMate 14 Volt Lithium-Ion Batteries Using battery power for the HeartMate II Left Ventricular Assist System allows for greater patient mobility than when connected to the Power Module or Mobile Power Unit. On battery power, patients can enjoy activities outdoors or away from home such as shopping, gardening, or running errands. - Page 132 IMPORTANT! HeartMate batteries only work in matching pairs with matching compatible clips. The HeartMate II Left Ventricular Assist System is optimized for operation with two batteries, but the system can run on only one battery for a very short period (minutes). For example, when switching from batteries to the Power Module or Mobile Power Unit (or vice versa), operation will continue on a single battery while connections are made.
- Page 133 WARNING ! • Use only Thoratec-supplied HeartMate 14 Volt Lithium-Ion batteries with the HeartMate II Left Ventricular Assist System. Using the wrong batteries may cause the pump to stop. • HeartMate 14 Volt Lithium-Ion batteries must be charged before use (see Charging HeartMate Batteries on page 3-71).
- Page 134 Keep batteries out of the reach of children. • Keep batteries clean and dry. • Dispose of or recycle an expired battery in accordance with local, state, and federal regulations. 3-48 HeartMate II Left Ventricular Assist System Instructions for Use...
- Page 135 When battery power drops below 10%, only one green blinking bar comes on. Figure 3.58 On-Battery Power Gauge: Press Battery Symbol to Activate Bars OR THIS TASK YOU NEED • 1 HeartMate 14 Volt Lithium-Ion battery • Battery Charger HeartMate II Left Ventricular Assist System Instructions for Use 3-49...
- Page 136 7. If four or fewer bars light, the battery is not fully charged. Return it to the pocket for more charging. If the power gauge continues to show four or fewer bars after additional charging, the battery may be defective—do not use it. Contact Thoratec Corporation for a replacement, if needed.
- Page 137 (LED) for the bar may be broken or burned out. If this happens, please contact Thoratec Corporation. For Thoratec contact information, see page iii. IMPORTANT! Depending on how long a battery has been in storage, its power gauge may not work until after the battery undergoes its first charge.
- Page 138 4. Place the black and white System Controller power cable connectors within reach (Figure 3.59). 5. Unscrew and disconnect only the white System Controller power cable connector from its current power source. Do not disconnect the other connector. 3-52 HeartMate II Left Ventricular Assist System Instructions for Use...
- Page 139 9. Repeat Steps 5 through 8 for the black System Controller power cable connector and the second battery clip connector. Figure 3.61 System Controller Power Cables Connected to Battery Clips HeartMate II Left Ventricular Assist System Instructions for Use 3-53...
- Page 140 Module or Mobile Power Unit, or until no further power remains. When adequate power is supplied, the pump reverts to the previous mode and speed, and the red battery alarm clears. 3-54 HeartMate II Left Ventricular Assist System Instructions for Use...
- Page 141 Disconnected alarm will come on. This is normal. Pick up one of the charged batteries; locate the orange arrow on the battery. Make sure you pick up a charged battery rather than a depleted battery. HeartMate II Left Ventricular Assist System Instructions for Use 3-55...
- Page 142 Wearing and Carrying HeartMate Batteries/Battery Clips For warnings, cautions, and instructions on wearing and carrying HeartMate batteries, battery clips, and the System Controller, see Wearing and Carrying the System Components on page 6-27. 3-56 HeartMate II Left Ventricular Assist System Instructions for Use...
- Page 143 360 cycles or 36 months from the date of manufacture, whichever comes first. After this time, battery performance cannot be guaranteed. Call Thoratec Corporation for a replacement when either of these milestones is reached. See Storage and Transport on page 8-3.
-
Page 144: Switching Power Sources
7. Unscrew the black System Controller and black Power Module patient cable connectors. The Power Cable Disconnected alarm will come on. This is normal. 8. Put aside the black Power Module patient cable connector. 3-58 HeartMate II Left Ventricular Assist System Instructions for Use... - Page 145 4. Unscrew the white System Controller and white Mobile Power Unit patient cable connectors. The Power Cable Disconnected alarm will come on. This is normal. 5. Put aside the white Mobile Power Unit patient cable connector. HeartMate II Left Ventricular Assist System Instructions for Use 3-59...
- Page 146 11. Place at least two additional charged batteries in the travel case. IMPORTANT! When not in use, place the Mobile Power Unit where it will not become damaged, dirty, or wet, and so it will not cause tripping or falling. 3-60 HeartMate II Left Ventricular Assist System Instructions for Use...
- Page 147 2. Perform a Power Module self test (see Performing a Power Module Self Test on page 3-19). 3. If the Power Module fails the test, please contact Thoratec Corporation; otherwise, continue with Step 4. 4. Line up the red dot on the patient cable with the red dot near the “heart” socket (...
- Page 148 The alarm will stop. 16. Press the battery release button on one of the battery clips to release its battery. 17. Repeat Step 16 for the second battery. 3-62 HeartMate II Left Ventricular Assist System Instructions for Use...
- Page 149 Controller power cable connector. The alarm will stop. 9. Unscrew the black connector from its battery clip. The Power Cable Disconnected alarm will come on. This is normal. 10. Put aside the battery clip and attached battery. HeartMate II Left Ventricular Assist System Instructions for Use 3-63...
- Page 150 Power Unit is powering the system. Store the battery clips in a clean, dry location until next use. 15. Place the depleted batteries into the Battery Charger for charging (see Charging HeartMate Batteries on page 3-71). 3-64 HeartMate II Left Ventricular Assist System Instructions for Use...
-
Page 151: Battery Charger Overview
Powering the System 3 Battery Charger Overview The Battery Charger (Figure 3.67) is designed to charge the HeartMate 14 Volt Lithium-Ion batteries that are used to power the HeartMate II Left Ventricular Assist System during battery-powered operation. Specifically, the Battery Charger can: •... - Page 152 HeartMate batteries that were originally used with the HeartMate power base unit. • Be sure to use only equipment and supplies that are authorized by Thoratec Corporation. If you use unauthorized parts, potential interference may occur between the Battery Charger and other devices.
- Page 153 Battery Charger on a flat, sturdy surface. 2. Inspect the Battery Charger for dents, chips, cracks, or other signs of damage. Do not use a Battery Charger that seems damaged. Contact Thoratec Corporation for a replacement, if needed. 3. Examine the four battery charging pockets. Make sure the pockets are clean and empty (no batteries), and free of dust or debris.
- Page 154 Do not use an adapter plug for an ungrounded wall outlet. Do not use portable, multiple outlet (power strip) adapters. IMPORTANT! If the patient will travel internationally, the patient will need a Thoratec power cord that is compatible with the local voltage and that meets applicable national plug, rated voltage, rated current, and safety agency marks and specifications.
- Page 155 Press and Hold Buttons 1 and 3 to Change the Display Mode 3. After "English" appears on the display (Figure 3.73), release buttons 1 and 3. Figure 3.73 English Text Display HeartMate II Left Ventricular Assist System Instructions for Use 3-69...
- Page 156 7. When the desired display mode appears, press and release the 1 button. IMPORTANT! The charger conducts a self test. If the test is successful, "HeartMate CHARGER" appears on the screen. 3-70 HeartMate II Left Ventricular Assist System Instructions for Use...
-
Page 157: Charging Heartmate Batteries
(green, yellow, or red) located next to the pocket is illuminated (Figure 3.75). Figure 3.75 Charge Status Lights (Green, Yellow, Red) for Pockets 1 through 4 HeartMate II Left Ventricular Assist System Instructions for Use 3-71... - Page 158 1. Place a battery into one of the four battery charging pockets, so the battery power gauge is at the top and facing forward (Figure 3.76). Figure 3.76 Battery Charger with Batteries Inserted in All Pockets 3-72 HeartMate II Left Ventricular Assist System Instructions for Use...
- Page 159 If the battery cannot be charged in a different pocket, the battery is defective. Do not use the defective battery. Contact Thoratec Corporation for a replacement, if needed. See Battery Charger Alarms on page 7-30 for information on advisory messages and troubleshooting, including how to read alarm codes when a red light comes on.
-
Page 160: Calibrating Heartmate 14 Volt Lithium-Ion Batteries
O CALIBRATE THE BATTERY WHEN PROMPTED • Within ten seconds of the start of the blinking yellow light, press and release the number button for this pocket. The charger begins calibrating the battery. 3-74 HeartMate II Left Ventricular Assist System Instructions for Use... - Page 161 12 hours. Under normal conditions, you should have four charged batteries available so that you can exchange batteries twice during a 12-hour calibration cycle. HeartMate II Left Ventricular Assist System Instructions for Use 3-75...
-
Page 162: Using The Charger To Check Battery Power
Total number of uses/charges for this battery • How much power the battery can potentially hold if fully charged (measured in mAh) After 10 seconds, the display panel returns to the default ("HeartMate CHARGER") screen. 3-76 HeartMate II Left Ventricular Assist System Instructions for Use... -
Page 163: Care And Maintenance Of The Battery Charger
Battery Charger after the patient leaves the hospital. Disposing of the Battery Charger See Product Disposal on page 8-9 for information about disposing of the Battery Charger. HeartMate II Left Ventricular Assist System Instructions for Use 3-77... - Page 165 SYSTEM MONITOR This section describes how to use the System Monitor to program and monitor the HeartMate II Left Ventricular Assist System. Overview - - - - - - - - - - - - - - - - - - - - - - - - - - - - - - - -4-3...
-
Page 167: Overview
Program system parameters, such as pump speed. • Assess and track alarm conditions. • View and save performance data. • Record data at specific intervals to download for review and analysis. HeartMate II Left Ventricular Assist System Instructions for Use... -
Page 168: System Monitor
Keep the Power Module free of excessive lint and dust, and away from heat or humidity sources such as a fireplace, radiant heater, nebulizer, or steam kettle, as the Power Module may fail to operate properly. HeartMate II Left Ventricular Assist System Instructions for Use... -
Page 169: System Monitor Setup
(3-prong) AC electrical outlet that is dedicated to Power Module use. Do not use an outlet that is controlled by a wall switch. Do not use an adapter plug for an ungrounded wall outlet. Do not use portable, multiple outlet (power strip) adapters. HeartMate II Left Ventricular Assist System Instructions for Use... - Page 170 The System Controller power cable connectors are properly connected to the Power Module power cable connectors (white-to-white and black-to-black). 9. If the System Monitor still does not work, please contact Thoratec Corporation for assis- tance. For Thoratec contact information, see page iii.
- Page 171 1 running System Controller connected to the Power Module via Power Module patient cable • 1 working, in-use Power Module • 1 System Monitor • 1 System Monitor data cable • Functioning and grounded (3-prong) AC electrical outlet • 1 AC power cord HeartMate II Left Ventricular Assist System Instructions for Use...
- Page 172 System Monitor to engage the two feet on the System Monitor into the holding grommets on the Power Module (Figure 4.6). Figure 4.6 Engage the System Monitor Feet in the Grommets on the Power Module HeartMate II Left Ventricular Assist System Instructions for Use...
-
Page 173: System Monitor Interface
If the icon is not flashing or has disappeared, check the System Monitor-Power Module cable connections and restart the System Monitor (see Setting Up the System Monitor for Use with the Power Module on page 4-5). HeartMate II Left Ventricular Assist System Instructions for Use... -
Page 174: Clinical Screen
A Silence Alarm button accompanies any active, audible alarm. Press this button to silence any Hazard alarm and the Power Cable Disconnected alarm for two minutes, and all other Advisory alarms for four hours. When the System Controller 4-10 HeartMate II Left Ventricular Assist System Instructions for Use... - Page 175 Pump Flow Above (left) and Below (right) Region of Accurate Flow Estimation To turn off the pump flow display, touch the screen anywhere within the Pump Flow box (Figure 4.10). Figure 4.10 Pump Flow Display On (left) and Off (right) HeartMate II Left Ventricular Assist System Instructions for Use 4-11...
- Page 176 Under the following conditions, the pump can only be started from the System Monitor’s Clinical or Settings screen by pressing the Pump Start button: • The fixed speed setting is below 8,000 rpm. • The System Controller’s backup battery is not installed. 4-12 HeartMate II Left Ventricular Assist System Instructions for Use...
- Page 177 Driveline Disconnected Message When the pump is stopped using the Pump Stop button, “- - - -” appears in the Pump Speed box. See Figure 4.15. Figure 4.15 Pump Stopped HeartMate II Left Ventricular Assist System Instructions for Use 4-13...
- Page 178 The pump power is displayed in the Pump Power box located below the Pulse Index box. Pump power is the amount of power being provided to the pump motor. Pump power ranges between 0.0 to 25.5 watts (Figure 4.18). Figure 4.18 Pump Power 4-14 HeartMate II Left Ventricular Assist System Instructions for Use...
- Page 179 Battery Backup First Replacement Reminder Screen • When 6 months or less remain before the battery expiration, a reminder, “Backup Battery Expiring - Replace,” displays (Figure 4.20). Figure 4.20 Battery Backup Second Replacement Reminder Screen HeartMate II Left Ventricular Assist System Instructions for Use 4-15...
-
Page 180: Clinical Screen
(Figure 4.21). Once that occurs, the Backup Battery Replacement reminders no longer display on the Clinical screen. Figure 4.21 Replace Backup Battery Alarm: Clinical and Alarms Screens 4-16 HeartMate II Left Ventricular Assist System Instructions for Use... - Page 181 System Monitor 4 You can view detailed backup battery information on the Settings screen or Admin screen (Figure 4.22). Figure 4.22 Backup Battery Information HeartMate II Left Ventricular Assist System Instructions for Use 4-17...
- Page 182 • LOW FLOW x min—This text banner indicates the duration of the alarm (from the start of the alarm to the present, in minutes). The Pump Flow box turns red. 4-18 HeartMate II Left Ventricular Assist System Instructions for Use...
- Page 183 Advisory can be silenced for 5 minutes; all other Advisory alarms with audible tones can be silenced for four hours. See Silencing Alarms via the System Monitor on page 4-32. HeartMate II Left Ventricular Assist System Instructions for Use 4-19...
-
Page 184: Settings Screen
Status of important parameters such as the set fixed speed and low speed limit. • Alarm Silence Status: on, off, or extended. • System Monitor and System Controller parameters. Figure 4.24 Settings Screen Showing System Status 1 and 2 4-20 HeartMate II Left Ventricular Assist System Instructions for Use... - Page 185 Lithium-Ion backup battery has been used. High numbers may indicate that a patient is inappropriately relying on the backup battery for non-emergency support. Figure 4.25 Settings Screen Showing System Status 1 and 3 HeartMate II Left Ventricular Assist System Instructions for Use 4-21...
- Page 186 IMPORTANT! You must press Enter to save a new speed setting. If you exit using another button or let the screen automatically return to the Clinical screen after 60 seconds, changes are not saved. 4-22 HeartMate II Left Ventricular Assist System Instructions for Use...
- Page 187 (or is clinically acceptable based on the echocardiographic evaluation). Record the patient’s current heart rate, blood pressure, and pump speed. HeartMate II Left Ventricular Assist System Instructions for Use 4-23...
- Page 188 Use the buttons in the Select Low Speed Limit box to increase or decrease the low speed limit (Figure 4.27). Figure 4.27 Settings Screen with Select Low Speed Limit Box 4-24 HeartMate II Left Ventricular Assist System Instructions for Use...
- Page 189 These types of PI events are more likely to be triggered in cases of low pulsatility. HeartMate II Left Ventricular Assist System Instructions for Use 4-25...
- Page 190 Initially, the WARNING: Low Speed Operation advisory alarm and then the LOW FLOW Hazard alarm appear, both without an audible alarm (Figure 4.29). Figure 4.29 Pump Stop Countdown in Process 4-26 HeartMate II Left Ventricular Assist System Instructions for Use...
- Page 191 IMPORTANT! Press the “Yes” button to restart the pump at the previously set mode and speed. IMPORTANT! Auscultation over the pump pocket is recommended to verify that the pump is running. HeartMate II Left Ventricular Assist System Instructions for Use 4-27...
- Page 192 Under the following conditions, the pump can only be started from the System Monitor’s Clinical or Settings screen by pressing the Pump Start button: • The fixed speed setting is below 8,000 rpm. • The System Controller’s backup battery is not installed. 4-28 HeartMate II Left Ventricular Assist System Instructions for Use...
-
Page 193: Alarms Screen
If an alarm occurs while you are viewing the Save Data, History, or Admin screen, an audible alarm sounds, but no message is displayed. When this happens, switch to the Alarms screen for details. HeartMate II Left Ventricular Assist System Instructions for Use 4-29... - Page 194 Alarms screen. There are no adjustable alarm presets, and alarm conditions are not user adjustable in the HeartMate II Left Ventricular Assist System. There are no alarm delays in the HeartMate II Left Ventricular Assist System. Multiple alarms may be highlighted at the same time.
- Page 195 Controller Clock Not Set—The System Controller's clock has not been set via the System Monitor's administration screen (see Date and Time on page 4-43). Figure 4.33 Alarms Screen with Multiple Active Alarms HeartMate II Left Ventricular Assist System Instructions for Use 4-31...
- Page 196 The Alarm Silence indicator in the parameters box will display Extended. IMPORTANT! If the Silence Alarm button on the System Controller is pressed, the System Monitor’s extended silence is cancelled. 4-32 HeartMate II Left Ventricular Assist System Instructions for Use...
- Page 197 Hazard alarm. When the alarm has been activated, it can only be cleared via the System Monitor. The ability to clear this alarm permits further troubleshooting. Figure 4.35 Driveline Fault Alarm Buttons HeartMate II Left Ventricular Assist System Instructions for Use 4-33...
-
Page 198: Save Data Screen
Controller Event History Figure 4.36 Save Data Screen IMPORTANT! Alarm messages do not appear on the Save Data, History, or Admin Screens. Go to the Alarms screen to view alarm messages. 4-34 HeartMate II Left Ventricular Assist System Instructions for Use... - Page 199 0.5 hour, and hourly increments from 1 to 24 hours. The default setting for Record Interval is Off. IMPORTANT! If the Record Interval is set to Off, events such as alarms are recorded as they occur. HeartMate II Left Ventricular Assist System Instructions for Use 4-35...
- Page 200 Press the Modify button to display the Controller Event Recorder screen shown in Figure 4.39. On-screen instructions provide information to help you change the recording settings. Figure 4.39 Controller Event Recorder—Settings Screen 4-36 HeartMate II Left Ventricular Assist System Instructions for Use...
- Page 201 Admin screen to set the time and date. See Date and Time on page 4-43 for specific instructions on setting the clock. 4. Use the on-screen keypad to enter a patient identification description (up to 15 charac- ters). HeartMate II Left Ventricular Assist System Instructions for Use 4-37...
- Page 202 7. Press any button to return to the Save Data screen, or allow the System Monitor to auto- matically return to the Clinical screen after 60 seconds. 8. You may remove the data card from the System Monitor. Figure 4.43 Data Captured Successfully 4-38 HeartMate II Left Ventricular Assist System Instructions for Use...
- Page 203 Thoratec Corporation for assistance. See Thoratec contact information on page iii. Sending Information to Thoratec Corporation To send data such as log files to Thoratec for diagnostic purposes, you need a card reader that works with CompactFlash™ media. A card reader is necessary to transmit data from CompactFlash media to a computer so that the data can then be sent via e-mail.
-
Page 204: History Screen
Command Button—A Save to Card button is displayed at the bottom left corner of the screen. See Data Card on page 4-35 for specific instructions on saving events to a data card. 4-40 HeartMate II Left Ventricular Assist System Instructions for Use... - Page 205 "PI Event" indicates a sudden change in a patient’s volume status, arrhythmias, sudden change in power, or sudden change in pump speed. HeartMate II Left Ventricular Assist System Instructions for Use 4-41...
-
Page 206: Admin Screen
Use the Admin screen to set the System Monitor date and time, and to modify technical parameters such as pump speed, power, flow, or the pulsatility index (Figure 4.49). Figure 4.49 Admin Screen 4-42 HeartMate II Left Ventricular Assist System Instructions for Use... - Page 207 For example, to enter the date and time 10/11/10 15:58, type "1011101558." If less than ten digits are entered, an error message appears. 2. Press Save Changes to save the new date and time. HeartMate II Left Ventricular Assist System Instructions for Use 4-43...
- Page 208 4. Select "Yes" if the date and time are correct. Figure 4.51 Confirm Date and Time IMPORTANT! The System Monitor does not automatically update for daylight savings time. Daylight savings time changes must be entered manually. 4-44 HeartMate II Left Ventricular Assist System Instructions for Use...
- Page 209 Available languages are listed in alphabetic order. The first language listed is the one currently in use on the System Controller (Figure 4.52). Note: English is the only language available on the System Monitor. Figure 4.52 Select Language Screen HeartMate II Left Ventricular Assist System Instructions for Use 4-45...
- Page 210 15 minutes during a power-loss emergency. Items capitalized are fixed characteristics of the backup battery. Items in mixed case are variable and change with backup battery use (Figure 4.53). Figure 4.53 Backup Battery Information Screen 4-46 HeartMate II Left Ventricular Assist System Instructions for Use...
- Page 211 The Technical Parameters box contains a Modify button that is used to change technical parameters. Press this button to display the Technical Parameters screen. This screen provides access to the parameters. Access to this screen is restricted to Thoratec personnel only (Figure 4.54).
- Page 213 Device Explant - - - - - - - - - - - - - - - - - - - - - - - - - - - - 5-49 HeartMate II Left Ventricular Assist System Instructions for Use...
-
Page 215: Surgical Considerations
• Do not use the HeartMate II Left Ventricular Assist Device in pregnant women or in women likely to become pregnant. A growing fetus may dislodge the pump, which may result in device failure, catastrophic bleeding, or death. Instruct women of childbearing age to use reliable contraception if sexually active. -
Page 216: Surgical Procedures
CAUTION ! • The HeartMate II Sizer is supplied non-sterile and must be sterilized prior to use. • The HeartMate II Sizer approximates the size and shape of the HeartMate II device and should not be considered an exact replica. -
Page 217: Equipment And Supplies Required For Implant
Surgical Procedures 5 Equipment and Supplies Required for Implant The HeartMate II Left Ventricular Assist System Implant Kit (with Sealed Grafts) is supplied sterile and for single use only. Store components in a cool, dry place away from strong electromagnetic fields (see Equipment Storage and Care on page 8-1). - Page 218 Large basin • Vent needle • CV major surgical set • Heavy nonabsorbable ligature • Catheter-tipped syringe with Sterile Saline for Injection • Swan-Ganz catheter • Arterial line • Transesophageal ECHO HeartMate II Left Ventricular Assist System Instructions for Use...
-
Page 219: Preimplant Procedures
• Do not implant the HeartMate II Left Ventricular Assist Device if it has been dropped. • Never operate the HeartMate II Left Ventricular Assist Device in air, as this will immediately damage the device. - Page 220 The HeartMate II Sizer is a surgical accessory that is intended to facilitate implantation of the HeartMate II pump by simulating the size and shape of the actual device. It is not required for the HeartMate II pump implantation surgical procedure. It is intended to support intra-operative placement of the pump and sizing of the pocket.
- Page 221 Surgical Procedures 5 Decontamination and Sterilization Processing The HeartMate II Sizer is a reusable device. Clean and sterilize using the procedures listed below. Thorough cleaning and rinsing should begin as soon as possible after use of the device. Point of Use Containment devices are cleaned separately from the instruments and therefore have separate cleaning methods.
- Page 222 Limitations on Repeat processing has minimal effect on these instruments. Reprocessing End of life is normally determined by wear and damage due to use. 5-10 HeartMate II Left Ventricular Assist System Instructions for Use...
- Page 223 3 minutes 50 minutes (wrapped) The HeartMate II Sizer will require a cool down of approximately 20 minutes after sterilization and prior to use. IMPORTANT! It is the responsibility of the user to ensure that the sterilization process as performed achieves the desired result. Recommended procedures are intended as a general guide for sterilization of reusable medical devices.
- Page 224 1 System Monitor data cable for connecting the System Monitor to the Power Module • 1 Power Module patient cable IMPORTANT! During implant, the HeartMate II Left Ventricular Assist System must be oper- ated using the System Monitor and Power Module as shown in Figure 5.2. Figure 5.2...
- Page 225 4. Observe the System Monitor screen. After the monitor is turned on, the HeartMate logo screen, similar to the screen in Figure 5.3, should appear. Figure 5.3 HeartMate Logo Screen HeartMate II Left Ventricular Assist System Instructions for Use 5-13...
- Page 226 The Power Module is receiving adequate power from a functioning AC outlet (green “Power On” light is illuminated). 7. If the System Monitor still does not work, replace it for purposes of this procedure, and then contact Thoratec for troubleshooting. For Thoratec contact information, see page iii. 5-14...
- Page 227 System Controller System Controller System Controller Package Backup Battery Sterile Contents Non-Sterile Contents Figure 5.5 System Controller Sterile and Non-Sterile Packaged Components HeartMate II Left Ventricular Assist System Instructions for Use 5-15...
- Page 228 Both the Power Module and System Controller will alarm signifying that the System Controller is powered but not connected to the HeartMate II Left Ventricular Assist Device. Do not connect the System Controller to the Left Ventricular Assist Device at this time.
- Page 229 Left Ventricular Assist Device is turned on via the System Monitor Pump Start command. The System Controller Backup Battery Not Installed alarm also remains active until the System Controller backup battery is installed, after the device implant procedure. HeartMate II Left Ventricular Assist System Instructions for Use 5-17...
- Page 230 5 Surgical Procedures Preparing the Pump OR THIS TASK YOU NEED • 1 HeartMate II Left Ventricular Assist Device with driveline • 1 HeartMate II System Controller • 1 System Monitor, connected to the Power Module • 1 Power Module, connected to the System Monitor and plugged into an AC electrical outlet •...
- Page 231 4. Attach the tunneling bullet to the driveline connector. Confirm that the bullet is screwed on securely. 5. Leave the System Controller power cables connected to the Power Module. If the power cables are disconnected, the extended alarm silence will be reset. HeartMate II Left Ventricular Assist System Instructions for Use 5-19...
- Page 232 3. Remove the sealed inflow conduit from the inner tray. The inner tray is sterile; it may be introduced into the sterile field. 5-20 HeartMate II Left Ventricular Assist System Instructions for Use...
- Page 233 The bend relief should be disengaged for the de-airing procedure (see De-Airing the Pump on page 5-35). 7. The thread protectors should remain attached to the screw-ring connector for use with the attachment to the HeartMate II Sizer. HeartMate II Left Ventricular Assist System Instructions for Use 5-21...
- Page 234 5 Surgical Procedures Priming the Pump/Sealed Inflow Conduit Assembly OR THIS TASK YOU NEED • 1 HeartMate II Left Ventricular Assist Device, prepared for use (see Preparing the Pump on page 5-18) • 1 sealed inflow conduit • Sterile laps •...
- Page 235 IMPORTANT! Some fluid leakage will occur through the connections. However, the sealed inflow conduit graft should not leak. If leaking occurs from the sealed inflow conduit, replace it with a new sealed inflow conduit. HeartMate II Left Ventricular Assist System Instructions for Use 5-23...
-
Page 236: Implant Procedures
(LV) apical cannulation with the pump positioned inferior to the diaphragm and the sealed outflow graft attached to the ascending aorta. Figure 5.12 HeartMate II Implantation Configuration 5-24 HeartMate II Left Ventricular Assist System Instructions for Use... - Page 237 • Do not use the HeartMate II Left Ventricular Assist Device in pregnant women or in women likely to become pregnant. A growing fetus may dislodge the pump, which may result in device failure, catastrophic bleeding, or death.
- Page 238 HeartMate II patient, the device to be implanted should be placed in close proximity to the pump (approximately 10 cm) and the telemetry verified. If a patient receives a HeartMate II and has a previously implanted device that is found to be susceptible to this programming interference, Thoratec Corporation recommends replacing the implantable cardiac defibrillator device with one that is not prone to programming interference.
- Page 239 Once the Left Ventricular Assist Device is activated, reduce cardiopulmonary bypass flow rapidly to provide ample blood flow to the Left Ventricular Assist Device. Whenever possible, maintain the HeartMate II at a pump flow greater than 3 lpm and a pump speed greater than 8,000 rpm.
- Page 240 5 Surgical Procedures Considerations for Preperitoneal or Intra-abdominal Placement The HeartMate II Left Ventricular Assist Device may be surgically implanted in either the preperitoneal or intra-abdominal location. As described below, the preperitoneal technique requires creating a pocket for the device above the posterior rectus sheath and transversalis fascia and below the rectus abdominis and internal oblique muscles.
- Page 241 Preparing the HeartMate II Sizer on page 5-8. 2. After creating the pocket, place the Sizer in the pocket in lieu of the HeartMate II pump. 3. Make any adjustments to pocket size based on the fit and positioning of the Sizer within the pocket.
- Page 242 OR THIS TASK YOU NEED • 1 HeartMate II Left Ventricular Assist Device, prepared for use (see Preparing the Pump on page 5-18) • 1 HeartMate II tunneler or other tunneling tool •...
- Page 243 Then separate the sutures and tie them tight—with 6 to 7 throws on each knot—to gather the myocardium around the felt cuff. HeartMate II Left Ventricular Assist System Instructions for Use 5-31...
- Page 244 Remove the centering fixture after securing the sewing cuff, but before inserting the sealed inflow conduit. Figure 5.14 Preparing the Ventricular Apex Site 5-32 HeartMate II Left Ventricular Assist System Instructions for Use...
- Page 245 Figure 5.15. Correct: Silicone Sleeve is Not Incorrect: Twisted Silicone Twisted Sleeve Figure 5.15 Flexible Silicone Sleeve on the Sealed Inflow Conduit (Correct and Incorrect) HeartMate II Left Ventricular Assist System Instructions for Use 5-33...
- Page 246 Attaching Proximal End of Sealed Outflow Graft to Pump Outflow Elbow IMPORTANT! A shorter 7.6 cm (3 in) bend relief is available as a standalone, sterile item. For details, see HeartMate II Product List on page C-1. 5-34 HeartMate II Left Ventricular Assist System Instructions for Use...
- Page 247 Surgical Procedures 5 Use of the HeartMate II Sizer may help in determining the appropriate graft length. When using the Sizer, the thread protector must be attached to the screw ring connector on the sealed outflow graft. For more information, see Using the HeartMate II Sizer on page 5-29.
- Page 248 6,000 rpm. Figure 5.17 Clinical Screen—Initial Pump Startup 7. To initiate HeartMate II pump operation, remove the bullet from the device driveline and attach the driveline to the System Controller (see Connecting the Driveline to the System Controller on page 2-23).
- Page 249 The pump speed is below 8,000 rpm. • The driveline is disconnected. Figure 5.18 Clinical Screen During Initial Pump Startup (typical) Figure 5.19 Settings Screen During Initial Pump Startup (typical) HeartMate II Left Ventricular Assist System Instructions for Use 5-37...
- Page 250 Metal Metal Fitting Clip Locking Bend Relief Screw Ring Correct: Fully Connected Incorrect: Not Fully Connected Figure 5.20 Bend Relief Connection to the Sealed Outflow Graft (Correct and Incorrect) 5-38 HeartMate II Left Ventricular Assist System Instructions for Use...
- Page 251 IMPORTANT! The pump flow displays “- - -” or “+ + +” when flow cannot be accurately calculated. HeartMate II Left Ventricular Assist System Instructions for Use 5-39...
- Page 252 • The fixed speed is set to 8,000 rpm or higher. • The System Controller’s backup battery is installed and any button is pushed on the System Controller. 5-40 HeartMate II Left Ventricular Assist System Instructions for Use...
- Page 253 The fixed speed setting is below 8,000 rpm. • The System Controller’s backup battery is not installed. IMPORTANT! Auscultation over the pump pocket is recommended to verify the pump is running. HeartMate II Left Ventricular Assist System Instructions for Use 5-41...
- Page 254 Figure 5.23 Sealed Outflow Bend Relief Collar (left) and Placement of the Sealed Outflow Bend Relief Collar (right) Close the collar around the connection until the collar halves touch together. 5-42 HeartMate II Left Ventricular Assist System Instructions for Use...
- Page 255 Sealed Outflow Bend Relief Collar Closed and Sutured 4. Obtain hemostasis and close all wounds in the standard fashion. Prior to leaving the O.R., immobilize the driveline with the HeartMate Stabilization Belt or other abdominal binder. HeartMate II Left Ventricular Assist System Instructions for Use 5-43...
-
Page 256: Postimplant Procedures
5 Surgical Procedures Postimplant Procedures Transferring the Patient Out of the Operating Room 1. Switch the HeartMate II Left Ventricular Assist System from the Power Module to battery power (see Switching from the Power Module to Battery-Powered Operation on page 3-58). - Page 257 Do not short circuit a battery or store it haphazardly in a box or drawer where it may short circuit or be short circuited by contact with metal objects. Do not remove a battery from its original packaging until required for use. HeartMate II Left Ventricular Assist System Instructions for Use 5-45...
- Page 258 Use the Lever to Remove the Screw Cover 2. Use the screwdriver to loosen the four screws on the battery compartment cover (Figure 5.28). Figure 5.28 Use the Screwdriver to Loosen the Screws 5-46 HeartMate II Left Ventricular Assist System Instructions for Use...
- Page 259 7-24). To resolve the advisory, use the System Monitor to reset the System Controller clock (see Date and Time on page 4-43). Be sure the System Monitor clock is correct before relying on it. HeartMate II Left Ventricular Assist System Instructions for Use 5-47...
- Page 260 Compliance is mandatory. Accordingly, all device-tracking paperwork shipped with the device must be completed and promptly returned to Thoratec. In addition, any device malfunctions must be reported to Thoratec by the implanting center. 5-48...
-
Page 261: Device Explant
8. Remove the sealed outflow graft remnant from the aorta and repair the anastomotic site. 9. Dispose of all explanted components in accordance with local regulations for biohazardous materials. Alternatively, use the HeartMate Explant Kit to return the explanted components to Thoratec for disposal. HeartMate II Left Ventricular Assist System Instructions for Use 5-49... - Page 262 5 Surgical Procedures Using the HeartMate Explant Kit An explanted HeartMate II Left Ventricular Assist Device should be shipped to Thoratec Corporation for analysis within 48 hours of explant. Ship overnight for weekday delivery, using the HeartMate Explant Kit. IMPORTANT! Do not place dry ice into the box for shipment.
- Page 263 • Date the shipping box was packed for shipment 12. Close and tape the shipping box securely. Place the Thoratec return address label on the outside of the shipping box. Clearly write the RGA number in the space provided on the label.
- Page 265 Ongoing System Assessment and Care - - - - - - - - - - - - - - 6-64 Educating and Training Patients, Families, and Caregivers - - - - 6-67 HeartMate II Left Ventricular Assist System Instructions for Use...
-
Page 266: Patient Care And Management
6 Patient Care and Management HeartMate II Left Ventricular Assist System Instructions for Use... -
Page 267: Postoperative Patient Care
Patient Care and Management 6 Postoperative Patient Care Proper care of a patient who is supported by the HeartMate II Left Ventricular Assist System requires a thorough understanding of the system operation and patient condition. WARNING ! • There is risk of embolism at pump explant or reoperation if manipulation of the pump or conduit is performed prior to the initiation of cardiopulmonary bypass and stoppage of Left Ventricular Assist Device pumping. - Page 268 • Do not use the HeartMate II Left Ventricular Assist Device in pregnant women or in women likely to become pregnant. A growing fetus may dislodge the pump, which may result in device failure, catastrophic bleeding, or death.
- Page 269 If open chest defibrillation is required, it is advised that the HeartMate II Left Ventricular Assist System be disconnected prior to delivering the shock. • Do not try to fix any of the equipment yourself. If HeartMate II equipment needs service, contact appropriate, Thoratec-trained personnel. •...
- Page 270 • Do not place objects other than the HeartMate II system components into the wearable accessories. Placing objects other than HeartMate II components into a wearable accessory may damage the wearable accessory.
-
Page 271: Ongoing Patient Assessment And Care
Patient Care and Management 6 Ongoing Patient Assessment and Care Patient Assessment HeartMate II patient assessment may include, but is not limited to, assessment of the following: • Pump function • Pump speed, flow, motor power, pulse index (PI), mode of operation •... - Page 272 Systemic prophylaxis with antifungal agents, such as fluconazole, is reported to have met with moderate success in preventing fungal infection. However, no clinical trials have been conducted to verify the efficacy of antifungal prophylaxis. HeartMate II Left Ventricular Assist System Instructions for Use...
- Page 273 • Initiate nutritional support to correct nutritional deficits. Refer to Thoratec's Infection Control Guidelines (document number 102512) for detailed information about approaches to successful infection control that are used by experienced Left Ventricular Assist Device implant centers that have low rates of infection.
-
Page 274: Unique Treatment Options And Important Clinical Considerations
Unique Treatment Options and Important Clinical Considerations Magnetic Resonance Imaging (MRI) Use of diagnostic MRI is contraindicated in any patient with an implanted HeartMate II Left Ventricular Assist Device. The presence of ferromagnetic parts within the pump makes exposure to strong electromagnetic fields a risk factor for acute pump failure. - Page 275 Static electricity can damage the electrical parts of the system and cause the Left Ventricular Assist Device to stop. Avoid activities that may cause static electricity, such as vacuuming or touching older style televisions or computer screens. HeartMate II Left Ventricular Assist System Instructions for Use 6-11...
- Page 276 Prior to implanting an implantable cardiac defibrillator (ICD) or implantable pacemaker (IPM) in a HeartMate II patient, the ICD or IPM device to be implanted should be placed in close proximity to the pump (approximately 10 cm) and the telemetry verified. If a patient...
- Page 277 Fluid leakage from the external portion of the lead. • Cessation of pumping. If you suspect a damaged driveline, please contact Thoratec Corporation for assis- tance. See Thoratec contact information on page iii. HeartMate II Left Ventricular Assist System Instructions for Use...
-
Page 278: Using The Shower Bag
6 Patient Care and Management Using the Shower Bag Although the external components of the HeartMate II Left Ventricular Assist System are moisture-resistant, they are not waterproof. Take care to protect external system components from water or moisture—outside in heavy rain or snow, and always for every shower. - Page 279 (see Caring for the Driveline Exit Site on page 6-8). Driveline Note: It is normal that the driveline gets wet while showering. Figure 6.2 Shower Bag in Use HeartMate II Left Ventricular Assist System Instructions for Use 6-15...
- Page 280 6 Patient Care and Management WARNING ! • Do not allow patients to shower without a doctor’s permission. HeartMate II patients may be allowed to shower, but only after sufficient postoperative healing, and only with a doctor’s permission. • Do not allow patients to swim or take tub baths while implanted with the pump.
- Page 281 3. Adjust the shoulder strap so the Shower Bag fits the patient without pulling on or moving the driveline. Tighten or lengthen the straps until they are secure but still comfortable. HeartMate II Left Ventricular Assist System Instructions for Use 6-17...
- Page 282 3. Unclip the top of the Shower Bag by squeezing the clip prongs together and pulling the slide out of the buckle (Figure 6.6). Figure 6.6 Squeeze the Clip Prongs Together and Slide Out the Buckle 6-18 HeartMate II Left Ventricular Assist System Instructions for Use...
- Page 283 5. Unzip and open the cover of the water-resistant enclosure. 6. Place the batteries, battery clips, and attached power cables into the Shower Bag (Figure 6.8). Figure 6.8 Place the Batteries and Battery Clips Into the Bag HeartMate II Left Ventricular Assist System Instructions for Use 6-19...
- Page 284 Slide Controller Into Pocket 8. Prepare to close the cover by positioning the power cables inside the water-resistant enclosure (Figure 6.10). Figure 6.10 Position the Power Cables Inside the Bag 6-20 HeartMate II Left Ventricular Assist System Instructions for Use...
- Page 285 Close and Zip the Cover 10. Close the lid over the zippered enclosure, carefully positioning the driveline down the side of the bag (Figure 6.12). Figure 6.12 The Driveline Exiting a Closed Shower Bag HeartMate II Left Ventricular Assist System Instructions for Use 6-21...
- Page 286 2. Carefully lift and remove the Shower Bag shoulder strap from around the patient’s neck. 3. Place the Shower Bag on a stable surface. IMPORTANT! Do not move or pull on the driveline exit site. Do not kink or sharply bend the driveline. 6-22 HeartMate II Left Ventricular Assist System Instructions for Use...
- Page 287 Always hang the Shower Bag and allow it to air dry. Make sure the Shower Bag is completely dry before using it for another shower. See Cleaning and Maintenance on page 8-4 for complete instructions on caring for all wearable accessories, including the Shower Bag. HeartMate II Left Ventricular Assist System Instructions for Use 6-23...
-
Page 288: Using The Stabilization Belt
Wearing the Stabilization Belt IMPORTANT! The Stabilization Belt is not sterile. The exit site must be bandaged before applying the Stabilization Belt (see Caring for the Driveline Exit Site on page 6-8). 6-24 HeartMate II Left Ventricular Assist System Instructions for Use... - Page 289 3. Wrap the upper strap of the Stabilization Belt around the patient’s waist, above the driveline exit site. Make sure the driveline exits between the two straps. HeartMate II Left Ventricular Assist System Instructions for Use 6-25...
- Page 290 Repeat Steps a–b with as many lead locks as needed to securely fasten the driveline to the belt. 7. Attach the tab to the belt. Readjust as required (Figure 6.18). Figure 6.18 Attach the Tab to the Belt 6-26 HeartMate II Left Ventricular Assist System Instructions for Use...
-
Page 291: Wearing And Carrying The System Components
Battery Holster See page 6-46. Holster Vest See page 6-52. Travel Bag Consolidated Bag See page 6-60. See page 6-38. Figure 6.19 Wearable Accessories to Hold or Carry External System Components HeartMate II Left Ventricular Assist System Instructions for Use 6-27... - Page 292 Common activities may include, but are not limited to: exercising, dressing, traveling, playing with children, gardening, hiking, cooking, and dancing. The patient should consult with his or her doctor about daily activities and any changes in activity level or routine. 6-28 HeartMate II Left Ventricular Assist System Instructions for Use...
- Page 293 CAUTION ! • The HeartMate II Left Ventricular Assist System uses lights and sounds to indicate how it is working. If the patient has trouble hearing or seeing, he or she may need extra help to hear or see the lights and sounds.
- Page 294 The System Controller Neck Strap (Figure 6.20) can be worn around the neck or across the body. It attaches to the System Controller with two small straps. Figure 6.20 Wearing the System Controller Neck Strap 6-30 HeartMate II Left Ventricular Assist System Instructions for Use...
- Page 295 Controller, either vertically or horizontally (Figure 6.22). Attachment Points Attachment Points Figure 6.21 Attachment Points on the System Controller Figure 6.22 System Controller Suspended on System Controller Neck Strap Horizontally (left) and Vertically (right) HeartMate II Left Ventricular Assist System Instructions for Use 6-31...
- Page 296 Neck Strap. 5. Slide the rubber strap on the Neck Strap through an attachment point on the System Controller (Figure 6.24). Figure 6.24 Slide the Rubber Strap Through the Attachment Point 6-32 HeartMate II Left Ventricular Assist System Instructions for Use...
- Page 297 1. Carefully remove the Neck Strap and System Controller from around the patient’s neck and place them on a stable surface. 2. Unbuckle the two straps and remove the Neck Strap from the System Controller. HeartMate II Left Ventricular Assist System Instructions for Use 6-33...
- Page 298 1 running System Controller on Power Module or Mobile Power Unit power • 1 Belt Attachment • 1 personal belt (up to 2 in or 5.1 cm wide) or 1 provided nylon clip belt 6-34 HeartMate II Left Ventricular Assist System Instructions for Use...
- Page 299 5. Slide the System Controller, cable-free end first, into the Belt Attachment with the display screen facing out (Figure 6.30). Figure 6.30 Slide the System Controller Into the Belt Attachment HeartMate II Left Ventricular Assist System Instructions for Use 6-35...
- Page 300 7. Clip the two-banded strap into place (Figure 6.32). Make sure both prongs are fully engaged in the clip. Figure 6.32 Clip the Strap Into Place 8. Fasten the belt and Belt Attachment around the patient’s waist. Adjust and tighten the belt as necessary. 6-36 HeartMate II Left Ventricular Assist System Instructions for Use...
- Page 301 4. To remove the System Controller from the Belt Attachment: Unclip the two-banded strap from the Belt Attachment. Slide the System Controller out of the Belt Attachment and place the items on a stable surface. HeartMate II Left Ventricular Assist System Instructions for Use 6-37...
- Page 302 Strap Red Protective Tabs Figure 6.33 Consolidated Bag The Consolidated Bag can be worn across the body using a shoulder strap and supported at the waist using a waist strap. 6-38 HeartMate II Left Ventricular Assist System Instructions for Use...
- Page 303 A tag inside the Consolidated Bag indicates whether the bag is intended to be worn on the right or left side. HeartMate II Left Ventricular Assist System Instructions for Use 6-39...
- Page 304 Bag and on the box that it ships in. 5. Adjust the shoulder strap and belt so the bag fits the patient properly. Tighten or lengthen the strap and belt until they are secure but still comfortable. 6-40 HeartMate II Left Ventricular Assist System Instructions for Use...
- Page 305 Bag. 4. Slide the System Controller into its holder so the user interface faces out (Figure 6.37). Figure 6.37 Slide the System Controller Into the Holder in the Consolidated Bag HeartMate II Left Ventricular Assist System Instructions for Use 6-41...
- Page 306 Stretch the Strap Over the System Controller and Between the Cables 6. Place the first battery into the Consolidated Bag, with the battery clip and cable facing out (Figure 6.39). Figure 6.39 Place the Battery in the Bag 6-42 HeartMate II Left Ventricular Assist System Instructions for Use...
- Page 307 Arrange the Cables Around the Edge of the Bag 8. Place the second battery into the Consolidated Bag, with the battery clip and cable facing out (Figure 6.41). Figure 6.41 Place the Second Battery in the Bag HeartMate II Left Ventricular Assist System Instructions for Use 6-43...
- Page 308 10. Carefully close the Consolidated Bag, with the System Controller power cables inside the bag and the driveline between the protective red tabs (Figure 6.43). Figure 6.43 Close the Bag so the Driveline Exits Between the Red Tabs 6-44 HeartMate II Left Ventricular Assist System Instructions for Use...
- Page 309 Transfer from battery power to the Power Module or Mobile Power Unit (see Switching Power Sources on page 3-58). • Remove components from the Consolidated Bag and place them into another wearable accessory. HeartMate II Left Ventricular Assist System Instructions for Use 6-45...
- Page 310 A Belt Attachment is designed to conceal and carry the System Controller. The Battery Holster is available in one size and is adjustable to accommodate most HeartMate II patients (Figure 6.45). 6-46 HeartMate II Left Ventricular Assist System Instructions for Use...
- Page 311 2 fully-charged HeartMate 14 Volt Lithium-Ion batteries • 2 14 Volt battery clips • 1 Battery Holster • 1 Belt Attachment • 1 clip-style belt or the patient’s own belt HeartMate II Left Ventricular Assist System Instructions for Use 6-47...
- Page 312 Make Sure the Power Cables and Driveline are Not Twisted 3. To insert the batteries and attached battery clips into each holster: Open each VELCRO flap (Figure 6.47). Figure 6.47 Open the VELCRO Flap 6-48 HeartMate II Left Ventricular Assist System Instructions for Use...
- Page 313 4. Have the patient put on the holster. 5. Put on and secure the Belt Attachment around the patient’s waist. Adjust and tighten the belt as needed. 6. Slide the System Controller into the Belt Attachment. HeartMate II Left Ventricular Assist System Instructions for Use 6-49...
- Page 314 Place the fully-charged battery and attached battery clip into the empty holster. Close the holster flap. Repeat Steps a-g for the second depleted battery. 3. Recharge the depleted batteries in the Battery Charger (see Charging HeartMate Batteries on page 3-71). 6-50 HeartMate II Left Ventricular Assist System Instructions for Use...
- Page 315 8. Recharge the low-charged batteries (see Charging HeartMate Batteries on page 3-71). 9. Store the Battery Holsters in a clean, dry location (see Equipment Storage and Care on page 8-1). HeartMate II Left Ventricular Assist System Instructions for Use 6-51...
- Page 316 System Controller with the Holster Vest. The Belt Attachment cover provides visibility and immediate access to the user interface on the System Controller. 6-52 HeartMate II Left Ventricular Assist System Instructions for Use...
- Page 317 1 running System Controller on Power Module or Mobile Power Unit power • 1 assembled Holster Vest with Belt Attachment • 2 fully-charged HeartMate 14 Volt Lithium-Ion batteries O PUT ON THE OLSTER 1. Gather equipment; place within easy reach. HeartMate II Left Ventricular Assist System Instructions for Use 6-53...
- Page 318 Insert one battery and attached battery clip into the holster, so the clip points up and the battery points down (Figure 6.53). Figure 6.53 Insert Battery and Clip into Holster 6-54 HeartMate II Left Ventricular Assist System Instructions for Use...
- Page 319 10. Slide the clip ends of the two-banded strap into the clip socket. The clip will click into place when securely fastened. 11. Transfer from the Power Module or Mobile Power Unit to battery power (see Switching from the Power Module to Battery-Powered Operation on page 3-58). HeartMate II Left Ventricular Assist System Instructions for Use 6-55...
- Page 320 (Figure 6.55). Figure 6.55 Use the VELCRO Tabs to Hold the Power Cables in Place 13. Put the patient’s belt through the VELCRO tabs to help secure the holsters in place. 6-56 HeartMate II Left Ventricular Assist System Instructions for Use...
- Page 321 Close the flap on the holster. Figure 6.56 Exchanging a Battery 3. Repeat Step 2 to exchange the second depleted battery. 4. Recharge the depleted batteries (see Charging HeartMate Batteries on page 3-71). HeartMate II Left Ventricular Assist System Instructions for Use 6-57...
- Page 322 8. Recharge the low-charged batteries (see Charging HeartMate Batteries on page 3-71). 9. Store the Holster Vest in a clean, dry location (see Equipment Storage and Care on page 8-1). 6-58 HeartMate II Left Ventricular Assist System Instructions for Use...
- Page 323 IMPORTANT! Do not store or carry anything in the Protection Bag other than the backup System Controller and attached power cables. IMPORTANT! Do not store or carry the backup System Controller outside of recommended environmental conditions (see Equipment Storage and Care on page 8-1). HeartMate II Left Ventricular Assist System Instructions for Use 6-59...
- Page 324 Travel Bag OR THIS TASK YOU NEED • 1 Protection Bag with backup System Controller and cables stored inside • 2 spare fully-charged 14 Volt Lithium-Ion batteries • 1 Travel Bag 6-60 HeartMate II Left Ventricular Assist System Instructions for Use...
- Page 325 3. Place fully-charged, spare batteries into the side pockets of the Travel Bag (Figure 6.60). Figure 6.60 Insert Spare Batteries Into the Travel Bag 4. Zip closed the inner compartment and snap shut the top lid. HeartMate II Left Ventricular Assist System Instructions for Use 6-61...
-
Page 326: Preparing For Sleep
8-1). Preparing for Sleep HeartMate II patients must be attached to the Power Module or Mobile Power Unit during sleep or any time when sleep is likely. During sleep, the System Controller and driveline must be immobilized to reduce movement or pulling on the driveline exit site. The HeartMate Stabilization Belt or an abdominal binder may be used to immobilize the driveline and System Controller. - Page 327 Keep the replacement System Controller nearby for convenient access in the event of an emergency that requires replacement of the running System Controller. • Keep a flashlight, fully-charged batteries, and battery clips within reach to be prepared for a power outage. HeartMate II Left Ventricular Assist System Instructions for Use 6-63...
-
Page 328: Ongoing System Assessment And Care
Transient alarms due to short or open circuits, often associated with movement of the patient or the driveline. High pump power associated with reduced pump speed (as recorded in the System Controller event log file). 6-64 HeartMate II Left Ventricular Assist System Instructions for Use... - Page 329 Fluid leakage from the external portion of the driveline. Cessation of pumping. IMPORTANT! If you suspect that a HeartMate II patient has a damaged driveline, please contact Thoratec Corporation for assistance. See Thoratec contact information on page iii. X-ray images and System Controller event history (log files) may be useful to assess the extent and location of the damage.
- Page 330 When carrying the System Controller in a zippered carrying case, do not “catch” the power cables in the carrying case zipper. • Do not let the power cables become twisted. Figure 6.61 Do Not Bend System Controller Power Cables 6-66 HeartMate II Left Ventricular Assist System Instructions for Use...
-
Page 331: Educating And Training Patients, Families, And Caregivers
Using, charging, testing, and calibrating HeartMate 14 Volt Lithium-Ion batteries • Battery Charger • Mobile Power Unit • Stabilization Belt 3. Using the wear and carry accessories to hold and carry system components HeartMate II Left Ventricular Assist System Instructions for Use 6-67... - Page 332 Emergency telephone contacts • Replacing the running System Controller with the backup System Controller 6. Exit site care 7. Showering 8. Preparing for sleep 9. Travel 10. Warnings and cautions 6-68 HeartMate II Left Ventricular Assist System Instructions for Use...
- Page 333 ALARMS AND TROUBLESHOOTING This section describes the primary alarms and troubleshooting of the HeartMate II Left Ventricular Assist System. System Controller Alarms - - - - - - - - - - - - - - - - - - - - - - - -7-3...
-
Page 335: System Controller Alarms
Monitor and the System Monitor displayed on the System Controller System Controller Controller Clock not set Driveline Fault Internal Fault Backup Battery Fault Backup Battery not installed HeartMate II Left Ventricular Assist System Instructions for Use... -
Page 336: Alarms And Troubleshooting
The timer on the screen counts up in seconds, indicating how long the alarm has been occurring. Figure 7.1 shows the alarm screen layout. Alarm Message Duration Timer Figure 7.1 Alarm Screen HeartMate II Left Ventricular Assist System Instructions for Use... - Page 337 A dot at the bottom of each screen provides navigational information about which screen is in view (see Figure 7.2). Date and Time of Alarm Alarm Type Duration of Alarm Navigation Information Figure 7.2 Sample Alarm History Screen HeartMate II Left Ventricular Assist System Instructions for Use...
- Page 338 Press Press display button a FOURTH time to display the fifth alarm. Press Press display button a FIFTH time to display the sixth alarm. Table 7.2 Viewing Alarm History Screens HeartMate II Left Ventricular Assist System Instructions for Use...
- Page 339 ( ) and display ( ) buttons. To exit from the alarm history feature, simultaneously press the two buttons again. HeartMate II Left Ventricular Assist System Instructions for Use...
- Page 340 Available Languages On-screen messages on the user interface can be displayed in multiple languages. Use the System Monitor to view and select the desired language (see System Controller Language on page 4-45). HeartMate II Left Ventricular Assist System Instructions for Use...
- Page 341 14 Volt Lithium-Ion batteries). with less than 5 See page 7-16. min. remaining Table 7.3 System Controller Hazard Alarms IMPORTANT! The Pump Running symbol ( ) is always green when the pump is running. HeartMate II Left Ventricular Assist System Instructions for Use...
- Page 342 None Driveline fault the System Monitor. See page 7-22. Table 7.4 System Controller Advisory Alarms IMPORTANT! The Pump Running symbol ( ) is always green when the pump is running. 7-10 HeartMate II Left Ventricular Assist System Instructions for Use...
- Page 343 Note: Displayed as an active alarm only when connected to the System Monitor. See page 7-24. Table 7.4 System Controller Advisory Alarms IMPORTANT! The Pump Running symbol ( ) is always green when the pump is running. HeartMate II Left Ventricular Assist System Instructions for Use 7-11...
- Page 344 3. Clinically evaluate patient. • 2 minutes or until a new hazard alarm occurs. Alarm silence period: • To silence this alarm, press the silence alarm button ( Table 7.5 Pump Off Alarm 7-12 HeartMate II Left Ventricular Assist System Instructions for Use...
- Page 345 • To silence this alarm, press the silence alarm button ( Alarm silence period: Note: You may have to push the silence alarm button twice to silence the alarm. This is normal. Table 7.6 Driveline Disconnected Alarm HeartMate II Left Ventricular Assist System Instructions for Use 7-13...
- Page 346 When adequate power is supplied, the pump reverts to the previous speed, the fixed speed, and the red battery alarm clears. 7-14 HeartMate II Left Ventricular Assist System Instructions for Use...
- Page 347 3. Clinically evaluate patient. • 2 minutes or until a new hazard alarm occurs. Alarm silence period: • To silence this alarm, press the silence alarm button ( Table 7.8 Low Flow Alarm HeartMate II Left Ventricular Assist System Instructions for Use 7-15...
- Page 348 • 2 minutes or until a new hazard alarm occurs. Alarm silence period: • To silence this alarm, press the silence alarm button ( Table 7.9 Low Battery Power Alarm (< 5 minutes) 7-16 HeartMate II Left Ventricular Assist System Instructions for Use...
- Page 349 • 2 minutes or until a new hazard alarm occurs. Alarm silence period: • To silence this alarm, press the silence alarm button ( Table 7.10 Power Cable Disconnected Alarm HeartMate II Left Ventricular Assist System Instructions for Use 7-17...
- Page 350 3. If reconnecting to the Mobile Power Unit does not resolve the alarm, promptly connect to a different power source. See When to Connect to the Mobile Power Unit on page 3-40. 7-18 HeartMate II Left Ventricular Assist System Instructions for Use...
- Page 351 It should remain with the patient at all times for easy access in an emergency. See The Backup System Controller on page 2-45 for details about the backup System Controller. HeartMate II Left Ventricular Assist System Instructions for Use 7-19...
- Page 352 • 4 hours or until any new alarm occurs. Alarm silence period: • To silence this alarm, press the silence alarm button ( Table 7.13 System Controller Backup Battery Fault Alarm 7-20 HeartMate II Left Ventricular Assist System Instructions for Use...
- Page 353 3. Clinically evaluate the patient. • 4 hours or until any new alarm occurs. Alarm silence period: • To silence this alarm, press the silence alarm button ( Table 7.14 Low Speed Alarm HeartMate II Left Ventricular Assist System Instructions for Use 7-21...
- Page 354 One or more of the redundant wires inside the driveline may Alarm means: be damaged or broken. Clinicians should: To resolve alarm: 1. Contact Thoratec to determine best next steps. Table 7.15 Driveline Fault Alarm 7-22 HeartMate II Left Ventricular Assist System Instructions for Use...
- Page 355 • 4 hours or until any new alarm occurs. Alarm silence period: • To silence this alarm, press the silence alarm button ( Table 7.16 System Controller Backup Battery Not Installed Alarm HeartMate II Left Ventricular Assist System Instructions for Use 7-23...
- Page 356 Controller’s internal clock (see Date and Time on page 4-43). To resolve alarm: Note: Be sure the System Monitor clock is correct. Table 7.17 System Controller Clock Not Set Alarm 7-24 HeartMate II Left Ventricular Assist System Instructions for Use...
-
Page 357: Power Module Alarms
See Table 7.18 for a description of Power Module alarms and how to respond to them. IMPORTANT! If an audio alarm sounds from the Power Module without an accompanying visual indicator illuminating at the same time, please contact Thoratec Corporation for assis- tance. For Thoratec contact information, see page iii. Silence Alarm... - Page 358 Advisory Fault yellow wrench indicator Internal malfunction Switch to a new set of charged detected within the Power batteries. Module. accompanied by continuous audio tone Table 7.18 Power Module Alarms 7-26 HeartMate II Left Ventricular Assist System Instructions for Use...
- Page 359 Power Module audio tone becomes constant and you can no longer silence the alarm. You can only silence a red Hazard LO BATT alarm by switching to another power source. HeartMate II Left Ventricular Assist System Instructions for Use 7-27...
-
Page 360: Mobile Power Unit Alarms
Indicators on the Mobile Power Unit Note: If you hear an alarm for the Mobile Power Unit but no light comes on, please contact Thoratec Corporation for assistance. For Thoratec contact information, see page iii. 7-28 HeartMate II Left Ventricular Assist System Instructions for Use... - Page 361 Promptly switch to two fully-charged detected within the HeartMate 14 Volt Lithium-Ion batteries. Advisory Alarm Mobile Power Unit. Yellow wrench light with beeping audio tone Table 7.19 Mobile Power Unit Alarms HeartMate II Left Ventricular Assist System Instructions for Use 7-29...
-
Page 362: Battery Charger Alarms
The alarm code is one letter followed by four numbers. Alarm codes related to batteries begin with the letter "B." Record the alarm code and save it for future reference. 6. Remove the defective battery from use. 7-30 HeartMate II Left Ventricular Assist System Instructions for Use... - Page 363 IMPORTANT! Do not use a damaged or defective charger until it is repaired or replaced. Until you have a safe and reliable way to recharge batteries, use the HeartMate Power Module to power your HeartMate system. HeartMate II Left Ventricular Assist System Instructions for Use 7-31...
- Page 364 SXXXX—Charger pocket (slot) fault with alarm code # = X—“X” equals the battery charge cycle count mAh = XXXX—Battery charge capacity in milliamp-hour Table 7.20 Battery Charger Display Panel Messages 7-32 HeartMate II Left Ventricular Assist System Instructions for Use...
-
Page 365: Guidelines For Power Cable Connectors
• Never twist connectors or pull them apart at an angle. Figure 7.6 Align Half Circles Connector Nut Figure 7.7 Turn Nut on the Connector HeartMate II Left Ventricular Assist System Instructions for Use 7-33... -
Page 366: What Not To Do: Driveline And Cables
Left Ventricular Assist Device to stop. If the driveline or cables become twisted, kinked, or bent, carefully unravel and straighten. CAUTION ! Do not twist, kink, or sharply bend the driveline. 7-34 HeartMate II Left Ventricular Assist System Instructions for Use... - Page 367 Alarms and Troubleshooting 7 CAUTION ! Do not twist, kink, or sharply bend the System Controller power cables. HeartMate II Left Ventricular Assist System Instructions for Use 7-35...
- Page 368 7 Alarms and Troubleshooting CAUTION ! Do not twist, kink, or sharply bend the Power Module patient cable. 7-36 HeartMate II Left Ventricular Assist System Instructions for Use...
- Page 369 Do not connect a System Controller to both the Mobile Power Unit and the Power Module at the same time, or damage to the controller and injury to the patient may occur. First connect to HeartMate 14 Volt batteries. HeartMate II Left Ventricular Assist System Instructions for Use 7-37...
- Page 370 7 Alarms and Troubleshooting 7-38 HeartMate II Left Ventricular Assist System Instructions for Use...
- Page 371 EQUIPMENT STORAGE AND CARE This section provides information on how to store and care for the HeartMate II Left Ventricular Assist System. Storage and Transport - - - - - - - - - - - - - - - - - - - - - - - - -8-3...
- Page 373 (-20°C to 40°C) (500 to 1060) Wear and Carry Accessories, -4°F to 131°F 20% to 85% Not applicable including Shower (-20°C to 55°C) Table 8.1 Acceptable Environmental Conditions for Packaged Storage and Transport HeartMate II Left Ventricular Assist System Instructions for Use...
-
Page 374: Equipment Storage And Care
8 Equipment Storage and Care Cleaning and Maintenance Although the HeartMate II Left Ventricular Assist System does not have external moving components and thus requires little planned maintenance, the external components should undergo routine and periodic inspections, cleaning, and maintenance as prescribed in this section. - Page 375 Fluid leakage from the external portion of the driveline. • Cessation of pumping. If you suspect a damaged driveline, please contact Thoratec Corporation for assistance. See Thoratec contact information on page iii. HeartMate II Left Ventricular Assist System Instructions for Use...
- Page 376 If corrosion is observed, report the condition to Thoratec Corporation. For Thoratec contact information, see page iii. Cleaning and service should be performed only by Thoratec-trained personnel. Do not attempt to clean or repair equipment on you own. Thoroughly wash any areas where contact with corroded batteries is made.
- Page 377 Cleaning the Battery Charger The Battery Charger requires little maintenance. However, it should be inspected routinely for the safest and best possible performance. For more information, see the Safety Checklists on page F-1. HeartMate II Left Ventricular Assist System Instructions for Use...
- Page 378 Shower Bag. Periodically inspect the wear and carry accessories for damage or wear. If an accessory appears damaged or worn, do not use it. Contact Thoratec Corporation with questions or to order a replacement, if needed. Cleaning the HeartMate Stabilization Belt Keep the Stabilization Belt clean to help it work properly.
-
Page 379: Product Disposal
System Monitor's internal battery in compliance with all applicable local, state, and federal regulations. Never incinerate discarded System Monitor batteries. Medical Waste The explanted HeartMate II Left Ventricular Assist Device and attached driveline must be disposed of in compliance with all applicable local, state, and federal regulations concerning medical waste. - Page 381 SUMMARY OF CLINICAL STUDIES Summary of Clinical Studies This section contains summaries of the HeartMate II Left Ventricular Assist System clinical studies. Bridge-to-Transplantation (BTT) Study Overview- - - - - - - - - - - - A-3 Destination Therapy (DT) Study Overview- - - - - - - - - - - - - - - A-20...
-
Page 383: Bridge-To-Transplantation (Btt) Study Overview
HeartMate II LVAS as a BTT device in end-stage heart failure patients who are listed for cardiac transplant and at imminent risk of death. Effectiveness of the device was assessed on the basis of the percentage of patients surviving either to cardiac transplantation or 180 days of LVAS support while being listed UNOS 1A/1B. -
Page 384: A Summary Of Clinical Studies
Continued Access Protocol. Of the 279 patients enrolled, 194 patients have been followed to a study outcome point, and if ongoing on HeartMate II LVAS support, for at least one year as of September 14, 2007, and are presented in the following clinical summary. - Page 385 Summary of Clinical Studies A The overall mean age in the HeartMate II LVAS study was 51 years (range 16–69 years). The smallest patient implanted had a BSA of 1.33m . The largest patient had a BSA of 2.62m . The mean BSA was 1.99m .
- Page 386 “patient survival to cardiac transplantation or 180 days of LVAS support while remaining listed status 1A or 1B.” The HeartMate II pivotal study was to be prospectively determined successful if the one-sided 95% lower confidence limit of the true success rate exceeded 65%, the Performance Goal.
- Page 387 Figure A.2 Figure A.3 plot the competing outcomes (transplantation, weaning due to myocardial recovery, expiration, ongoing LVAS support, and study withdrawal) for the Primary Study Cohort and the Aggregate Data, respectively. HeartMate II Left Ventricular Assist System Instructions for Use...
- Page 388 0.10 Weaned = 1% 0.00 Months Post Implant Transplant Weaned Withdrawn Expired Ongoing Figure A.2 Competing Outcome Plot of HeartMate II Bridge-to-Transplant Primary Study Cohort (n=126) 1.00 0.90 0.80 0.70 Transplanted = 40% 0.60 0.50 Ongoing = 39% 0.40 0.30 0.20...
- Page 389 Table A.5 for each data cohort. Adverse events were defined as events that occurred while on HeartMate II LVAS support that may have a deleterious effect on the patient. The incidence of adverse events defined as serious are presented in Table A.6.
- Page 390 36 (29%) 11 (19%) 6 (60%) 53 (27%) * Bleeding requiring PRBC 2 units or surgery ** Includes transient ischemic attacks (TIA) and nonstroke neurological events Table A.5 All Adverse Events HeartMate II Left Ventricular Assist System Instructions for Use...
- Page 391 10 (8%) 4 (7%) 3 (30%) 17 (9%) * Bleeding requiring PRBC 2 units or surgery ** Includes transient ischemic attacks (TIA) and nonstroke neurological events Table A.6 Serious Adverse Events HeartMate II Left Ventricular Assist System Instructions for Use A-11...
- Page 392 Primary (n=126) 1.25 0.83 0.13 0.00 0.00 CAP (n=58) 0.91 0.00 0.00 0.00 0.00 Small BSA (n=10) 0.00 0.00 0.00 0.00 0.00 Table A.7 Adverse Event Rate per Patient-Year by Time Interval HeartMate II Left Ventricular Assist System Instructions for Use...
- Page 393 0.00 0.00 0.00 0.00 Small BSA (n=10) 0.00 0.00 0.00 0.50 0.00 Aggregate (n=194) 0.00 0.00 0.04 0.04 0.00 Table A.7 Adverse Event Rate per Patient-Year by Time Interval (Continued) HeartMate II Left Ventricular Assist System Instructions for Use A-13...
- Page 394 A Summary of Clinical Studies No new adverse events were observed in the HeartMate II LVAS study that have not been seen in previous studies of ventricular assist devices. The study was not powered for a specific analysis of the adverse events.
- Page 395 0.833 Table A.9 Estimated Clinical HeartMate II LVAD Reliability Wear and fatigue of the percutaneous lead connecting the HeartMate II LVAS blood pump to the external System Controller may result in damage that has the potential to interrupt pump function, which may require a reoperation to replace the pump, or result in death.
- Page 396 Figure A.4 and Figure A.5. These measures were obtained at baseline, 1 month, 3 months, and 6 months (study outcome). Despite major heart surgery and adverse events, HeartMate II patients appeared to have improved functional capacity. 100%...
- Page 397 Figure A.6 and Figure A.7, below. These measures were obtained at baseline, 1 month, 3 months and 6 months (study outcome). Despite major heart surgery and adverse events, HeartMate II patients appeared to have improved quality of life. Primary Small...
- Page 398 % Alive at 1 Year Cohort Transplanted Year Post Explant Post Explant (or Recovered) Primary 58 (2) 51 (2) 100% Small Aggregate Data 69 (2) 60 (2) Table A.11 One-year Postexplant Survival HeartMate II Left Ventricular Assist System Instructions for Use...
- Page 399 Of the 194 patients who were followed to a study outcome or, if ongoing on HeartMate II LVAS support, for at least a year, the majority were male (77% males versus 23% females). Some statistically significant differences were observed in some baseline hemodynamic and biochemistry parameters, but they are not considered to be clinically significant.
-
Page 400: Destination Therapy (Dt) Study Overview
A Summary of Clinical Studies Destination Therapy (DT) Study Overview The objective of the study was to determine the safety and effectiveness of the HeartMate II LVAS as a destination therapy (DT) device in end-stage heart failure patients who were not candidates for cardiac transplantation. - Page 401 VAD implant without experiencing a stroke resulting in a Modified Rankin Score > 3. The HeartMate II was judged a success if the proportion of HeartMate II patients who achieved the composite endpoint was equal to or better than the HeartMate XVE comparison group.
- Page 402 A Summary of Clinical Studies Primary Study Cohort DT Patient Population The HeartMate II was implanted as destination therapy in patients who were not candidates for cardiac transplantation. Patients were ineligible for transplant primarily due to age (28%), recent history of cancer (9%), obesity (7%), and substance abuse or insufficient social support (7%).
- Page 403 Arrhythmias 0.6762 Ventricular 0.2337 Arrhythmias Ventricular Pacing 0.1225 Biventricular 0.6423 Pacing Implantable Cardiac 0.5619 Defibrillator (ICD) Stroke 0.8403 * Fisher’s exact test Table A.13 Primary Study Cohort: Baseline Cardiovascular History HeartMate II Left Ventricular Assist System Instructions for Use A-23...
- Page 404 Modified Rankin Score > 3, or reoperation to repair or replace the device. Complete follow-up was obtained for all 200 Primary Study Cohort patients. The results of the analysis demonstrated statistical superiority of the HeartMate II (P < 0.0001). Forty-six percent (62/134) of the patients randomized into the HeartMate II cohort successfully achieved the composite endpoint, while only 11% (7/66) of patients randomized into the HeartMate XVE cohort achieved the composite endpoint.
- Page 405 Patients who were transplanted, explanted, or had their HeartMate XVE exchanged to a HeartMate II were censored at that time in the analysis. As seen in Figure A.9, there is a clinically significant difference in overall As Treated survival favoring the HeartMate II when compared to the HeartMate XVE.
- Page 406 Limit at end of interval Note: Censored = at time of transplant, explant, or crossover from XVE to HeartMate II Table A.15 Primary Study Cohort As Treated: Kaplan-Meier of Overall Survival HeartMate II Left Ventricular Assist System Instructions for Use...
- Page 407 Ongoing on HMII 0.30 Transplanted 0.20 Explanted 0.10 0.00 Months Post Implant Ongoing on XVE Transplant Explanted Ongoing on HMII Expired Figure A.11 Competing Outcomes for HeartMate XVE LVAS As Treated HeartMate II Left Ventricular Assist System Instructions for Use A-27...
- Page 408 Expired on LVAS Support 52 (39%) 31 (53%) Note: Includes one patient who crossed over to HeartMate II and was subsequently transplanted Table A.16 Competing Outcome Status at Two Years As Treated HeartMate II Left Ventricular Assist System Instructions for Use...
- Page 409 Inflow Obstruction VAD Dysfunction/fail Infection Miscellaneous: Amyloidosis Cancer Ischemic Bowel Unknown Withdrawal of Support Multisystem Organ Failure Table A.17 Primary Study Cohort As Treated: Causes of Death During LVAS Support HeartMate II Left Ventricular Assist System Instructions for Use A-29...
- Page 410 Pump Housing [0%–2%] [0%–8%] Sepsis [28%–44%] [31%–57%] Right Heart Failure [16%–30%] [20%–44%] Inotropes Only [13%–27%] [16%–38%] RVAD [1%–7%] [0%–11%] Table A.18 Primary Study Cohort As Treated: Incidence of Serious Adverse Events HeartMate II Left Ventricular Assist System Instructions for Use...
- Page 411 Hemolysis [1%–7%] [0%–0%] Confirmed Malfunctions [15%–30%] [10%–31%] * Includes transient ischemic attacks (TIA) and nonstroke neurological events Table A.18 Primary Study Cohort As Treated: Incidence of Serious Adverse Events (Continued) HeartMate II Left Ventricular Assist System Instructions for Use A-31...
- Page 412 Favors HM II Favors HM XVE regarding statistical significance *** Unable to calculate risk ratio; no events occurred with one device Table A.19 Primary Study Cohort As Treated: Rates of Serious Adverse Events HeartMate II Left Ventricular Assist System Instructions for Use...
- Page 413 0.00 0.00 0.00 Device Thrombosis HMII 0.10 0.02 0.02 0.03 0.00 0.00 0.00 0.00 Table A.20 Primary Study Cohort As Treated: Serious Adverse Event Rate per Patient-Year by Time Interval HeartMate II Left Ventricular Assist System Instructions for Use A-33...
- Page 414 The malfunctions of the HeartMate II pump were primarily related to the percutaneous lead that connects the implanted pump with the external System Controller. Repair procedures were developed that can extend the useful life of the external portion of the percutaneous lead;...
- Page 415 59 HeartMate XVE patients in the Primary Study Cohort and 58 HeartMate XVE patients in the Randomized Continuous Access Protocol (CAP) Cohort. In contrast to the HeartMate II in which failures were predominately related to one component, the percutaneous lead, the HeartMate XVE had several failure modes, as shown in Table A.22.
- Page 416 HeartMate XVE observed in this study is provided in Table A.23. Time (months) Clinical Reliability* at 80% Confidence Level *Weibull analysis parameters: beta = 1.1515, eta = 1023.9663, rho = 0.9023 Table A.23 Clinical Reliability Calculations HeartMate II Left Ventricular Assist System Instructions for Use...
- Page 417 Thirty-six (36) of the reoperations that occurred in the Primary Study Cohort were due to the need for pump replacements (21 in the HeartMate XVE and 15 in the HeartMate II). Of the 59 patients implanted with the HeartMate XVE, 20 patients received 21 pump exchanges.
- Page 418 HeartMate XVE patients to analyze. No significant difference in QoL was seen between HeartMate II and HeartMate XVE groups. An additional measure of QoL was time spent out of hospital. Once implanted, HeartMate II patients spent 87% of their support time out of hospital compared to 69% for patients implanted with the HeartMate XVE (As Treated analysis).
- Page 419 No. pts HM II perform- ing test % pt HM II perform- 100% 100% ing test Table A.25 Primary Study Cohort As Treated: NYHA Class I or II Compliance HeartMate II Left Ventricular Assist System Instructions for Use A-39...
- Page 420 HM II No. pts at interval No. pts HM II perform- ing test % pt HM II perform- 100% ing test Table A.26 Primary Study Cohort As Treated: Six-Minute Walk Test Compliance HeartMate II Left Ventricular Assist System Instructions for Use...
- Page 421 HM II No. pts at interval No. pts HM II perform- ing test % pt HM II perform- 100% ing test Table A.27 Primary Study Cohort As Treated: MLWHF Testing Compliance HeartMate II Left Ventricular Assist System Instructions for Use A-41...
- Page 422 Number represents number of patients Error Bars=Standard Deviation HMII 1 Month 3 Months 6 Months 12 Months 18 Months Baseline 24 Months Figure A.16 Primary Study Cohort As Treated: KCCQ Clinical Summary Score Over Time HeartMate II Left Ventricular Assist System Instructions for Use...
- Page 423 No. pts at interval No. pts HM II perform- ing test % pt HM II perform- 100% ing test Table A.28 Primary Study Cohort As Treated: KCCQ Testing Completion by Follow-up Intervals HeartMate II Left Ventricular Assist System Instructions for Use A-43...
- Page 424 HeartMate II are shared by both males and females. Adverse event rates between males who received the HeartMate II compared to males who...
- Page 425 8 thromboembolic events to her lower extremities. In conclusion, the gender analysis shows that the benefits and risks of the HeartMate II are similar for males and females and that the observed treatment effect was not influenced by gender.
-
Page 426: Post-Approval Studies
(BTT) indication was conducted as a condition of FDA approval. The purpose of the PAS was to assess whether the commercial use of the HeartMate II was comparable to other available commercial devices that were approved in the US for the same indication for use, bridge-to-transplant. - Page 427 IVAD: Thoratec Implantable VAD Table A.30 HeartMate II Post-Approval Study: Device Type Patient demographic data for both the HeartMate II and the Comparison group were collected at baseline. Table A.31 summarizes the baseline characteristics of the two groups. There were no statistical differences between the two groups, except for medical history;...
- Page 428 Data Source All data were collected via INTERMACS, the Interagency Registry of Mechanically Assisted Circulatory Support. The patients included the first consecutive 169 HeartMate II patients who gave their consent for inclusion in the INTERMACS registry and an equal number of patients from a comparison group that included patients who were implanted with other LVAD devices and enrolled in INTERMACS.
- Page 429 As specified in the HeartMate II LVAS Post-Approval Study protocol, the study would be considered a success if the success rate of the HeartMate II patients were as good or better than the success rate of the comparison group. Success was defined as LVAS support for at least 180 days or to transplant, or to explant due to myocardial recovery and survival for at least 60 days postexplant.
- Page 430 1 (1%) 2 (1%) Explant other than recovery Total Not Success 17 (10%) 35 (21%) * P = 0.0064 using Fisher’s exact test Table A.32 HeartMate II Post-Approval Study: Patient Status HeartMate II Left Ventricular Assist System Instructions for Use...
- Page 431 Summary of Clinical Studies A 100% HeartMate II (n=169) Comparison (n=166) Logrank Analysis P = 0.0004 Months Figure A.17 HeartMate II Post-Approval Study: Kaplan-Meier Analysis of Survival HeartMate II Left Ventricular Assist System Instructions for Use A-51...
- Page 432 0.06 0.06 0.07 0.09 0.14 0.14 end of interval Patients are censored at time of transplant, weaning off device, or last follow-up on LVAD support. Table A.33 Kaplan-Meier Analysis of Survival HeartMate II Left Ventricular Assist System Instructions for Use...
- Page 433 Wound Dehiscence 1.8% 1.8% * Event may have multiple sites of infection ** May include transient ischemic attack, or confusion Table A.34 HeartMate II Post-Approval Study: All Cause Adverse Events HeartMate II Left Ventricular Assist System Instructions for Use A-53...
- Page 434 76.6 +/- 16.2 55.0 +/- 21.2 SD = standard deviation Total Score: Lower score indicates improved Qol Thermometer: Higher score indicates improved Qol Table A.35 HeartMate II Post-Approval Study: Quality of Life (EuroQol) HeartMate II Left Ventricular Assist System Instructions for Use...
- Page 435 Summary of Clinical Studies A Functional Analysis The functional status of patients within the HeartMate II and comparison cohort were assessed via Six-Minute Walk Test, and New York Heart Association (NYHA) classification. Table A.36 and Table A.37 include data collected for this analysis.
- Page 436 Feet walked (mean +/- SD) 1034.0 +/- 518.0 1724 Not Done: Too sick Not Done: Other reason Not Done: Unknown reason SD = standard deviation Table A.36 HeartMate II Post-Approval Study: Six-Minute Walk Test (Continued) HeartMate II Left Ventricular Assist System Instructions for Use...
- Page 437 2 (3%) 0 (0%) Unknown 25 (38%) 7 (47%) Interval: 2 years Patients at start of Interval Class I 9 (19%) 2 (20%) Table A.37 HeartMate II Post-Approval Study: NYHA Classification HeartMate II Left Ventricular Assist System Instructions for Use A-57...
- Page 438 PAS retrospectively. This was in anticipation of a reduction in use of the HeartMate XVE and IVAD control devices after FDA approval of the HeartMate II as a bridge to transplant. In all, 114 of the 166 control patients were retrospective and thus were not concurrent to the HeartMate II study patients.
-
Page 439: Post-Approval Overview Of Risk Of Thrombosis
(suspected and/or confirmed) observed in the Bridge to Transplant (BTT) clinical trial, the Destination Therapy (DT) clinical trial, and the world-wide experience (BTT and DT) that was reported to Thoratec as of January 11, 2013. Clinical... - Page 440 5. Schmitto JD, Avsar M, Haverich A: Increase in left ventricular assist device thrombosis. N Engl J Med 2014;370:1463-4. 6. Stulak JM, Maltais S: A different perspective on thrombosis and the HeartMate II. N Engl J Med 2014;370:1467-8. HeartMate II Left Ventricular Assist System Instructions for Use...
- Page 441 J Heart Lung Transplant 2014;33:51-9. 4. Kirklin JK, Naftel DC, Pagani FD, et a.: Pump Thrombosis in the Thoratec HeartMate II device: An update analysis of the INTERMACS registry. J Heart Lung Transplant 2015; 34: 1515-1526 5.
- Page 442 1. Maltais S, Kilic A, Nathan S, et al. PREVENtion of HeartMate II Pump Thrombosis Through Clinical Management: The PREVENT multi-center study. J Heart Lung Transplant. 2017 Jan;36(1):1-12. 2. Klodell CT, Massey HT, Adamson RM et al.: Factors Related to Pump Thrombosis With the Heartmate II Left Ventricular Assist Device. J Card Surg. 2015 Oct;30(10):775-80.
- Page 443 Pump thrombosis was defined as an event in which the pump or its conduits contain a thrombus that results in or could potentially induce circulatory failure. HeartMate II Left Ventricular Assist System Instructions for Use A-63...
- Page 444 This can be reported via direct visual inspection (documented by a photograph if available) upon pump explantation or by sending the pump back to Thoratec Corporation for evaluation. Any pump explanted for suspected device thrombosis should be sent back to Thoratec Corporation for analysis.
- Page 445 15 (5.0%) Pump Replacements for Suspected Pump 13 (4.3%) Thrombosis Pump Replacements, urgent transplantation 16 (5.3%) or deaths due to suspected thrombosis Table A.40 Incidence of Pump Thrombosis at 6 months HeartMate II Left Ventricular Assist System Instructions for Use A-65...
- Page 446 Bleeding requiring surgery 49 (16%) Early Bleeding (?30 days) 101 (34%) GI Bleeding 64 (21%) Hemorrhagic Stroke 8 (2.7%) Ischemic Stroke 12 (4.0%) Table A.42 Incidence of Bleeding, hemorrhagic stroke, and pump thrombosis: HeartMate II Left Ventricular Assist System Instructions for Use...
- Page 447 HMII LVAD. The primary endpoint was met and demonstrated that a strict adherence to a set of predetermined surgical and medical recommendations can lead to a low incidence of confirmed PT with the HeartMate II three months post-implantation. It emphasized the need to conform to good surgical strategies, postoperative heparin bridging and early optimal speed management (≥...
- Page 448 A Summary of Clinical Studies HeartMate II Left Ventricular Assist System Instructions for Use...
- Page 449 TECHNICAL SPECIFICATIONS This section provides the technical specifications for the HeartMate II Left Ventricular Assist System. HeartMate II Left Ventricular Assist System Instructions for Use...
- Page 451 Technical Specifications B Specifications The technical specifications for the HeartMate II Left Ventricular Assist System are listed here. For ordering information and catalog numbers, see HeartMate II Product List on page C-1. HeartMate II Left Ventricular Assist System Implant Kit (Sealed)
-
Page 452: B Technical Specifications
1. Maintain Pump Speed (Note: Pump Speed is the characteristic that the physician uses to set the desired blood flow.) 2. Alarm for Pump Speed performance outside of the essential performance limits. 3. Prevent Leakage in Blood Path. HeartMate II Left Ventricular Assist System Instructions for Use... - Page 453 84.6 g (2.98 oz) 10950 cumulative discharge minutes, as tracked by the System Controller and reported on the System Monitor, or 3 years from the date of PRODUCT LIFE manufacture, whichever comes first. HeartMate II Left Ventricular Assist System Instructions for Use...
- Page 454 ACTIVE FUNCTIONS Isolated power to patient during tethered operation Communication interface between System Controller and System Monitor When new, AC power failure backup battery (30 minutes to operate HeartMate II Left Ventricular Assist System) MONITORING FUNCTIONS Isolated bidirectional data link to external System Monitor...
- Page 455 System Controller To provide connection between the System Controller and the Power FUNCTION Module 6.1 m (20 ft) LENGTH One year from date of first use PRODUCT LIFE HeartMate II Left Ventricular Assist System Instructions for Use...
- Page 456 Height 12.7 cm (5.0 in) 6.1 m (20 ft) CABLE LENGTH 1.4 kg (3.0 lb) - with three AA (LR6) batteries WEIGHT Two years from date of first use PRODUCT LIFE HeartMate II Left Ventricular Assist System Instructions for Use...
- Page 457 DIMENSIONS Length 80 mm (3.15 in) Width 92 mm (3.75 in) Height 32 mm (1.25 in) 104 g (3.7 oz)—without battery WEIGHT Two years from date of first use PRODUCT LIFE HeartMate II Left Ventricular Assist System Instructions for Use...
- Page 458 DIMENSIONS Length 370 mm (14.5 in) Width 216 mm (8.5 in) Height 227 mm (9 in) 3.6 kg (8 lb) WEIGHT Two years from date of first use PRODUCT LIFE B-10 HeartMate II Left Ventricular Assist System Instructions for Use...
- Page 459 Displays current date and time. Permits control of date/time and technical Admin Screen parameters. DIMENSIONS Length 305 mm (12.0 in) Depth 165 mm (6.5 in) Height 245 mm (10.0 in) 2.49 kg (5.5 lb) WEIGHT HeartMate II Left Ventricular Assist System Instructions for Use B-11...
- Page 460 B Technical Specifications HeartMate Consolidated Bag Slim profile shoulder bag for use with HeartMate II Left Ventricular Assist TYPE System Allows patient to wear and carry HeartMate II batteries, battery clips, and FUNCTION System Controller For use with: System Controller...
- Page 461 For small users less than 160 lb (73 kg) For medium users 160–240 lb (73–109 kg) SIZES For large users greater than 240 lb (109 kg) Two years of continuous use PRODUCT LIFE HeartMate II Left Ventricular Assist System Instructions for Use B-13...
- Page 462 System Controller Neck Strap, Belt Attachment, and Protection TYPE • System Controller Neck Strap and Belt Attachment provide options for the patient to wear HeartMate II System Controller FUNCTION • Protection Bag protects the backup System Controller and cables when not in use...
- Page 463 Provides a convenient way to carry and transport the backup FUNCTION System Controller and spare batteries For use with HeartMate II Left Ventricular Assist System PRODUCT COMPATIBILITY The Travel Bag accommodates the weight of the batteries and System Controller with a significant safety factor to allow for STRENGTH forces imparted by daily activities.
- Page 465 HEARTMATE II PRODUCT LIST This section lists the HeartMate II products. HeartMate II Left Ventricular Assist System Instructions for Use...
-
Page 466: C Heartmate Ii Product List
C HeartMate II Product List HeartMate II Left Ventricular Assist System Instructions for Use... - Page 467 HeartMate II Left Ventricular Assist System Products All Thoratec products are supported with a comprehensive one-year warranty, including parts and labor. For a complete list of all Thoratec products, including country specific catalog numbers, contact Thoratec Corporation (see page iii for contact information) for Customer Service assistance or reference a current-year Thoratec product catalog.
- Page 468 Sewing Ring with Centering Fixture Kit 1065 3 per kit. HeartMate Explant Kit Supplied non-sterile. 28717 No charge with Returned Materials Authorization for explanted pump. HeartMate II Patient Support Kit* - “Pocket Controller” with Equipment • 1 Power Module • 1 Battery Charger •...
- Page 469 HeartMate II Product List C ITEM CATALOG NUMBER HeartMate II Patient Support Kit* - “Pocket Controller” with Equipment • 1 HeartMate II System Controller (“Pocket Controller”) • 1 11 Volt Lithium-Ion System Controller (“Pocket Controller”) Backup Battery • 2 HeartMate 14 Volt Lithium-Ion Battery Sets (4 per set) •...
- Page 470 Connects to System Controller through the Power Module patient cable (Catalog Number 103426). Mobile Power Unit Provides power to the HeartMate II system when connected via a power 107754 cord to a functioning AC electrical outlet, for home use. Battery Charger...
- Page 471 PC Card Reader Used for transmitting data from CompactFlash media to a 102504 computer so the data can be sent via e-mail. System Monitor Data Cable 103859 Connects Power Module to System Monitor. HeartMate II Left Ventricular Assist System Instructions for Use...
- Page 472 Travel Bag 1260 HeartMate Stabilization Belt, Medium/Large Two stabilization belts with six lead locks. 100760 Supplied non-sterile. HeartMate Stabilization Belt, Small Two stabilization belts with six lead locks. 100759 Supplied non-sterile. HeartMate II Left Ventricular Assist System Instructions for Use...
- Page 473 SAFETY TESTING AND CLASSIFICATION This section provides safety testing and classification information for the HeartMate II Left Ventricular Assist System. Safety Testing and Classification - - - - - - - - - - - - - - - - - - - -D-3...
-
Page 475: Safety Testing And Classification
Safety Testing and Classification D Safety Testing and Classification The HeartMate II Left Ventricular Assist System has been thoroughly tested and Classified by Underwriters Laboratories, LLC (UL) to the fire, casualty, and electric shock hazard requirements of the following safety standards, as applicable: •... -
Page 476: D Safety Testing And Classification
Only when connected to System Controller. • Battery Charger–IPX0:Non-protected against ingress of water • HeartMate II Left Ventricular Assist Device Applied parts • System Controller Table D.1 Declaration Concerning General Safety Standards HeartMate II Left Ventricular Assist System Instructions for Use... - Page 477 Safety Testing and Classification D Declaration and Guidance for Electromagnetic Emissions The HeartMate II Left Ventricular Assist System is intended for use in the electromagnetic environment specified below. The customer or the user of the HeartMate II Left Ventricular Assist System should assure that it is used in such an environment.
- Page 478 D Safety Testing and Classification Declaration and Guidance for Electromagnetic Immunity The HeartMate II Left Ventricular Assist System is intended for use in the electromagnetic environment specified below. The customer or the user of the HeartMate II Left Ventricular Assist System should assure that it is used in such an environment.
- Page 479 The HeartMate II Left Ventricular Assist Device, System Controller, and batteries are intended for use in the electromagnetic environment specified below. The customer or the user of the HeartMate II Left Ventricular Assist Device, System Controller, and batteries should assure that they are used in such an electromagnetic environment.
- Page 480 To assess the electromagnetic environment due to fixed RF transmitters, an electromagnetic site survey should be considered. If the measured field strength in the location in which the HeartMate II Left Ventricular Assist System is used exceeds the applicable RF compliance level above, HeartMate II Left Ventricular Assist System should be observed to verify normal operation.
- Page 481 Safety Testing and Classification D The HeartMate II Left Ventricular Assist System is protected against the effects of external cardiac defibrillation within the limits established per EN 45502-1:1997. However, it is advised that the HeartMate II Left Ventricular Assist System be disconnected from the System Controller during the use of open-heart defibrillation.
- Page 482 Note 4: These guidelines may not apply in all situations. Electromagnetic propagation is affected by absorption and reflection from structures, objects and people. Note 5: The HeartMate II Left Ventricular Assist System was tested to 56 V/m, per IEC-61000-4-3, in the wireless telephone bands between 825 to 960 MHz and 1.4 to 2.0 GHz.
-
Page 483: Testing And Classification: Power Module
Increase the separation between the equipment. • Connect the equipment into an outlet on a circuit different from that to which the other devices are connected. • Consult Thoratec Corporation for assistance. HeartMate II Left Ventricular Assist System Instructions for Use D-11... - Page 484 Degree of protection against harmful IPX0 ingress of water Table D.6 Declaration Concerning General Safety Standards for HeartMate Power Module HeartMate II Left Ventricular Assist System Instructions for Use...
- Page 485 Safety Testing and Classification D Declaration and Guidance for Electromagnetic Emissions for HeartMate Power Module The HeartMate II Left Ventricular Assist System with Power Module is intended for use in the electromagnetic environment specified below. The customer or the user of the HeartMate II Left Ventricular Assist System should assure that it is used in such an environment.
-
Page 486: Testing And Classification: Mobile Power Unit
Increase the separation between the equipment. • Connect the equipment into an outlet on a circuit different from that to which the other devices are connected. • Consult Thoratec Corporation for assistance. HeartMate II Left Ventricular Assist System Instructions for Use... - Page 487 Degree of protection against harmful IP22 ingress of water Table D.8 Declaration Concerning General Safety Standards for the Mobile Power Unit HeartMate II Left Ventricular Assist System Instructions for Use D-15...
- Page 488 D Safety Testing and Classification Declaration and Guidance for Electromagnetic Emissions for the Mobile Power Unit The HeartMate II Left Ventricular Assist System with Mobile Power Unit is intended for use in the electromagnetic environment specified below. The customer or the user of the HeartMate II Left Ventricular Assist System should assure that it is used in such an environment.
-
Page 489: Testing And Classification: Battery Charger
Increase the separation between the equipment. • Connect the equipment into an outlet on a circuit different from that to which the other devices are connected. • Consult Thoratec Corporation for assistance. HeartMate II Left Ventricular Assist System Instructions for Use D-17... - Page 490 Mode of Operation Continuous Type of protection against mains shock Class I (grounded) Degree of protection against harmful IPX0 ingress of water Table D.10 Declaration Concerning General Safety Standards for Battery Charger HeartMate II Left Ventricular Assist System Instructions for Use...
- Page 491 MIL-STD-461F are not likely to cause any interference in nearby electronic equipment. Table D.11 Declaration and Guidance Concerning Electromagnetic Emissions for Battery Charger HeartMate II Left Ventricular Assist System Instructions for Use D-19...
- Page 492 3 A/m 30 A/m Magnetic Field in a typical commercial or hospital IEC 61000-4-8 environment. EN 61000-4-8 Table D.12 Declaration and Guidance Concerning Electromagnetic Immunity for the Battery Charger HeartMate II Left Ventricular Assist System Instructions for Use...
- Page 493 Charger. Over the frequency range 150 kHz to 80 MHz, field strengths should be less than 3 V/m. Table D.13 Declaration and Guidance Concerning Electromagnetic Immunity for the Battery Charger HeartMate II Left Ventricular Assist System Instructions for Use D-21...
- Page 494 D Safety Testing and Classification WARNING ! • Do not use equipment or supplies other than those specified or sold by Thoratec Corporation. The use of unauthorized replacement parts may result in increased emissions or decreased immunity of the HeartMate Left Ventricular Assist System.
-
Page 495: Testing And Classification: Heartmate 14 Volt Lithium-Ion Batteries
Increase the separation between the equipment. • Connect the equipment into an outlet on a circuit different from that to which the other devices are connected. • Consult Thoratec Corporation for assistance. HeartMate II Left Ventricular Assist System Instructions for Use D-23... - Page 496 Degree of protection against harmful IP24 only when connected to System Controller ingress of water and particulate matter through Battery Clip Table D.14 Declaration Concerning General Safety Standards for HeartMate 14 Volt Lithium-Ion Batteries HeartMate II Left Ventricular Assist System Instructions for Use...
- Page 497 The HeartMate II Left Ventricular Assist System with 14 Volt Lithium-Ion batteries is intended for use in the electromagnetic environment specified below. The customer or the user of the HeartMate II Left Ventricular Assist System should assure that it is used in such an environment.
- Page 498 Declaration and Guidance for Electromagnetic Immunity for HeartMate 14 Volt Lithium-Ion Batteries The HeartMate II Left Ventricular Assist System with 14 Volt Lithium-Ion batteries is intended for use in the electromagnetic environment specified below. The customer or the user of the HeartMate II Left Ventricular Assist System with 14 Volt Lithium-Ion batteries should assure that it is used in such an environment.
- Page 499 Safety Testing and Classification D The HeartMate II Left Ventricular Assist System with 14 Volt Lithium-Ion batteries is intended for use in the electromagnetic environment specified below. The customer or the user of the HeartMate II Left Ventricular Assist System with 14 Volt Lithium-Ion batteries should assure that it is used in such an electromagnetic environment.
- Page 500 CW and Ovens 2.4 to 2.5 GHz Avionics Frequency Range Radiated RF Cat. R Radiated 100 MHz RTCA/DO-160G to 8 GHz Section 20 Table D.17 Declaration and Guidance Concerning Electromagnetic Immunity (Continued) HeartMate II Left Ventricular Assist System Instructions for Use...
- Page 501 To assess the electromagnetic environment due to fixed RF transmitters, an electromagnetic site survey should be considered. If the measured field strength in the location in which the HeartMate II Left Ventricular Assist System with 14 Volt Lithium-Ion batteries is used exceeds the applicable RF compliance level above, the HeartMate II Left Ventricular Assist System with 14 Volt Lithium-Ion batteries should be observed to verify normal operation.
- Page 503 SYMBOLS This section describes the symbols that are used on the HeartMate II Left Ventricular Assist System components, accessories, or packaging. HeartMate II Left Ventricular Assist System Instructions for Use...
- Page 505 Authorized representative in the European community Storage Temperature Sterilized by Irradiation Sterilized by Ethylene Oxide Operating Instructions Do not use if package damaged Do not reuse. Single patient use only. Quantity of contents Peel Tab HeartMate II Left Ventricular Assist System Instructions for Use...
-
Page 506: E Symbols
Expiration Date: Use by (Expiration Date) Keep dry See instructions for use Non-ionizing radiation Fragile This end up Alternating current UL product safety mark MR unsafe—do not subject to magnetic resonance imaging HeartMate II Left Ventricular Assist System Instructions for Use... - Page 507 Symbol Description On-product symbols See System Controller User Interface on page 2-16 Specific Mobile Power Unit Symbols Symbol Description On-product symbols See Mobile Power Unit User Interface Components on page 3-34 HeartMate II Left Ventricular Assist System Instructions for Use...
- Page 508 Hazard alarm. Specific System Monitor Symbols Symbol Description Power OFF Power ON Input: System Monitor only. For cable connection from Power Module to port on back of System Monitor. HeartMate II Left Ventricular Assist System Instructions for Use...
- Page 509 As-Needed Safety Checklist- - - - - - - - - - - - - - - - - - - - - - F-11 Clinic Visit Safety Checklist - - - - - - - - - - - - - - - - - - - - - - F-12 HeartMate II Left Ventricular Assist System Instructions for Use...
-
Page 511: Daily Safety Checklist
Inspect the driveline exit site for signs of infection, including redness, tenderness, swelling, discharge, or a foul odor. Use aseptic technique to touch or handle the exit site. HeartMate II Left Ventricular Assist System Instructions for Use... -
Page 512: F Safety Checklists
Inspect the driveline and all cables for signs of damage, such as cracking, fraying, wear, exposed wires, twists, sharp bends, or kinks (see What Not To Do: Driveline and Cables on page 7-34). HeartMate II Left Ventricular Assist System Instructions for Use... -
Page 513: Weekly Safety Checklist
Power Module or Mobile Power Unit to the AC electrical outlet, for damage or wear. Ensure that the cord is not kinked, split, cut, cracked, or frayed. Do not use the cord if it shows signs of damage. Obtain a replacement from Thoratec Corporation, if needed. -
Page 514: Monthly Safety Checklist
Check the expiration date of the 11 Volt Lithium-Ion backup battery by following the steps below: 1. Ensure that you advise all HeartMate II LVAS patients to bring their backup System Controller with them to all clinic visits. 2. Use the System Monitor to check the expiration date of the 11 Volt Lithium-Ion backup battery within the patient’s primary and backup System Controllers. - Page 515 Report the condition to Thoratec Corporation. For Thoratec contact information, see page iii. Cleaning and service should be performed only by Thoratec-trained personnel. Do not attempt to clean or repair equipment on your own.
-
Page 516: Six Month Safety Checklist
Review What Not To Do: Driveline and Cables on page 7-34 or Patient Handbook section 5. • Review using the Shower Bag and showering (see page 6-14 or Patient Handbook section 4). HeartMate II Left Ventricular Assist System Instructions for Use... - Page 517 Thoratec Corporation. For Thoratec contact information, see page iii. Cleaning and service should be performed only by Thoratec-trained personnel. Do not attempt to clean or repair equipment on your own. HeartMate II Left Ventricular Assist System Instructions for Use...
-
Page 518: Yearly Safety Checklist
F Safety Checklists Yearly Safety Checklist Schedule a Power Module inspection and cleaning with Thoratec-trained personnel. The inspection and cleaning includes (but is not limited to) functional testing, cleaning, inspection, and replacement of the Power Module backup battery. IMPORTANT! Ensure that the Power Module backup battery is reconnected after service or shipping (see Installing the Power Module Backup Battery on page 3-7). -
Page 519: As-Needed Safety Checklist
You may use a mild detergent, if necessary. Do not submerge the charger in water or liquid. REPLACE ANY EQUIPMENT OR SYSTEM COMPONENT THAT APPEARS DAMAGED OR WORN. HeartMate II Left Ventricular Assist System Instructions for Use F-11... -
Page 520: Clinic Visit Safety Checklist
Review caring for the driveline exit site including cleansing, dressing, and immobilizing the driveline (see page 6-8 or Patient Handbook section 4). System Controller must be maintained and assessed for readiness (IFU Section 2). F-12 HeartMate II Left Ventricular Assist System Instructions for Use... -
Page 521: Conversion Patients
CONVERSION PATIENTS Summary of Clinical Studies This section describes items to consider when converting patients to the Pocket System Controller. HeartMate II Left Ventricular Assist System Instructions for Use... - Page 523 Among other differences that are noticed by the clinician and patient is the “feel” of the connection of the HeartMate II pump driveline to the Pocket Controller. In addition, there are differences in the presentation of the alarm conditions and actions to take in response to each of these alarms.
- Page 525 SURVEY This section provides an opportunity for you to provide Thoratec Corporation with valuable information that will help to improve this manual. HeartMate II Left Ventricular Assist System Instructions for Use...
- Page 527 The printed materials and media that Thoratec provides are available in the languages I need. __ Yes __ No I use the HeartMate II Patient Information Kit (pre-decision booklet) as an effective resource for my prospective VAD patients and their cardiologists. __ Yes __ No Topics covered in the HeartMate II Left Ventricular Assist System Patient Handbook meet the information needs of my patients.
-
Page 528: H Survey
To share your feedback about this manual, mail or fax a copy of your completed sur- vey to: Marketing Communications Manager Thoratec Corporation 6035 Stoneridge Drive Pleasanton, CA 94588 Fax: 925-847-8574 HeartMate II Left Ventricular Assist System Instructions for Use... -
Page 529: Glossary
GLOSSARY This section provides a glossary of terms for the HeartMate II Left Ventricular Assist System. Abbreviations - - - - - - - - - - - - - - - - - - - - - - - - - - Glossary-3... - Page 531 Left Ventricular Assist System Low Molecular Weight Ml/hr Milliliter per hour Magnetic Resonance Imaging Operating Room Pulsatility Index Partial Thromboplastin time Once daily Revolutions Per Minute Three times daily Volt HeartMate II Left Ventricular Assist System Instructions for Use Glossary-3...
- Page 532 Battery Charger: A device that charges, calibrates, and tests the HeartMate 14 Volt Lithium-Ion batteries that are used to power the HeartMate II Left Ventricular Assist System. Battery Power Gauge: A set of lighted bars that indicate how much battery power is available.
- Page 533 Direct Current: Abbreviated DC. The type of electricity that comes from a battery. The HeartMate II system uses DC power from two 14 Volt Lithium-Ion batteries. Display Button: A button on the System Controller user interface. Press this button ( to bring up data on the user interface’s display screen (such as current function and alarm...
- Page 534 ) on the System Controller. It lights when HeartMate II pump blood flow is critically low. Low Speed Limit: The lowest speed at which the HeartMate II pump can operate while maintaining patient stability. LPM: Short for liters per minute (lpm). Blood flow through the pump is measured in lpm.
- Page 535 System Controller. Percutaneous Lead (also frequently called the “driveline”): The cable passing through the patient’s skin that is permanently attached to the HeartMate II pump. It connects the implanted pump to the System Controller. It contains wires that carry power to the pump, and that control and monitor pump operation.
- Page 536 Alarms cannot be silenced while in power saver mode. See Estimating Remaining Time for In-Use Batteries on page 3-54. Power Sources: Three power sources can power the HeartMate II Left Ventricular Assist System: 1) a pair of wearable, rechargeable 14 Volt Lithium-Ion batteries worn in battery clips, 2) the Power Module that plugs into an AC electrical outlet, or 3) the Mobile Power Unit that plugs into an AC electrical outlet.
- Page 537 However, the white cable contains a data link that sends information to the Power Module. Tethered Operation: Refers to using the HeartMate II Left Ventricular Assist System while connected to an electrical outlet via the Power Module or Mobile Power Unit.
- Page 538 HeartMate 14 Volt Lithium-Ion batteries that are providing power during battery-powered operation. Yellow Wrench Alarm: A yellow-colored symbol ( ) on the System Controller user interface that illuminates during alarm conditions that are important, but not immediately life-threatening. Glossary-10 HeartMate II Left Ventricular Assist System Instructions for Use...
-
Page 539: Index
4-18, 4-29 System Controller Neck Strap 6-30 power cable disconnected 7-17 Travel Bag 6-60 Power Module 7-25 wear and carry 6-27 pump off 7-12 Admin screen on System Monitor 4-42 HeartMate II Left Ventricular Assist System Instructions for Use Index-1... - Page 540 System Controller 2-53 power cord for international travel 3-68 storing 6-59 setting up 3-67 battery clips Consolidated 6-38 cleaning Protection 6-59 inserting 14 Volt Lithium-Ion battery in 3-58, Index-2 HeartMate II Left Ventricular Assist System Instructions for Use...
- Page 541 1-16 chest compressions, external dipyridamole 6-10 cleaning discharge readiness 6-67 batteries and battery clips disconnecting Power Module backup battery Battery Charger 3-23 driveline display button on System Controller 2-16, 2-19 HeartMate II Left Ventricular Assist System Instructions for Use Index-3...
- Page 542 6-10 Holster, Battery 6-46 hospital-supplied equipment for implant humidity, acceptable range fixed speed, determining optimal 4-23 for operation flow parameter for pump 1-18 for storage and transport fungal infection Index-4 HeartMate II Left Ventricular Assist System Instructions for Use...
- Page 543 5-44 low battery alarms, recognizing 2-32 device tracking 5-48 low battery hazard alarm 7-16 installing System Controller backup battery low battery screen 7-16, 7-18 5-45 low flow alarm 7-12, 7-15 HeartMate II Left Ventricular Assist System Instructions for Use Index-5...
- Page 544 Sealed Outflow Bend Relief Collar 5-42 5-28 self test product list performing on Power Module 3-19 Protection Bag for backup System Controller performing on System Controller 2-28 6-59 Index-6 HeartMate II Left Ventricular Assist System Instructions for Use...
- Page 545 3-15 4-14 connectors pump flow 2-16 4-11 display button pump power 2-19 4-14 driveline pump speed 4-13 connecting reviewing events 2-23 4-41 disconnecting screens 2-25 environmental requirements Admin 4-42 HeartMate II Left Ventricular Assist System Instructions for Use Index-7...
- Page 546 6-27 Battery Holster 6-46 Belt Attachment 6-34 cleaning Consolidated Bag 6-38 Holster Vest 6-52 Protection Bag 6-59 Shower Bag 6-14 System Controller Neck Strap 6-30 Travel Bag 6-60 weekly checklist Index-8 HeartMate II Left Ventricular Assist System Instructions for Use...
- Page 548 Thoratec Corporation continually strives to provide the highest quality products for mechanical circulatory support. Specifications may change without notice. Therefore, please refer to the HeartMate II Instructions for Use shipped with the HeartMate II for the most current information regarding indications, contraindications, and cautions.
Need help?
Do you have a question about the HEARTMATE II and is the answer not in the manual?
Questions and answers