Table of Contents
Advertisement
Advertisement
Chapters
Table of Contents

Related Manuals for Festo DGC G Series


Summary of Contents for Festo DGC G Series
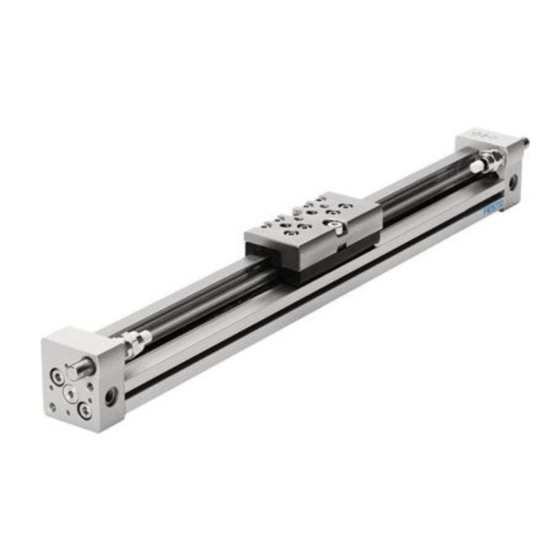
- Page 1 Linear drive DGC-…-G Repair instructions (en) 7DGC-Ga_en...
- Page 2 Imprint Version: 7DGC-Ga_de (09.2009) Copyright: ©Festo AG & Co. KG Postfach D-73726 Esslingen Editorial department: SC-S Phone: +49 / 711 / 347-0 Email: service_international@festo.com Internet: http://www.festo.com The reproduction, distribution and utilisation of this document as well as the communication of its contents to others without expressed authori- sation is prohibited.
- Page 3 These repair instructions have been prepared with care. Festo AG & Co. KG does not, however, accept liability for any errors in these repair instructions or their consequences. Likewise, no liability is accepted for direct or consequential damage resulting from incorrect use of the products.
-
Page 4: Table Of Contents
4.3.3 Replacing the slide elements in the slide 4.3.4 Replacing the buffer strips 4.3.5 Replacing the sealing rings for the supply ports in the end caps Maintenance Greasing the linear drive Tools Required tools by size Liability/Conditions of use 4 / 48 Festo 07DGC-Ga_en... -
Page 5: Important Information
It can be found on the parts catalogue on the Festo web- Before carrying out a repair, the Festo website (www.Festo.com). site (www.Festo.com). -
Page 6: General Safety Instructions
Repairs must only be carried out in conjunction with these repair instructions as well as the respective device-specific operating instructions. Note Instead of carrying out the repair yourself, your local Festo sales office offers the option of having the repair carried out by Festo. Environment Components and equipment replaced as part of a repair must be disposed of in accordance with the locally valid envir- onmental protection regulations. -
Page 7: Types And Part Numbers
The complete overview of features, accessories, Type Part number type codes, technical data and dimensions for the DGC-… DGC-8-…-G 530906 linear drives can be found in the product catalogue or on DGC-12-…-G 530907 the Festo website (www.Festo.com). DGC-18-…-G 532446 DGC-25-…-G 532447 DGC-32-…-G 532448 DGC-40-…-G 532449 DGC-50-…-G... -
Page 8: Component Overview
Component overview DGC-8/12-…-G This diagram is intended only to provide an overview of the individual components. To order spare and wearing parts, please use the online spare parts catalogue on the Festo website (spareparts.Festo.com). 8 / 48 Festo 07DGC-Ga_en... - Page 9 Tightening torque 0.3 Nm, use LOCTITE 243 internal Torx T6 Slide Socket head screw DIN 912- DIN 912- Tightening torque 1.4 Nm, use LOCTITE 243 M3×8-8.8 M4×8-8.8 Sealed with thread locker 397332 Sealing band End cap, right Festo 07DGC-Ga_en 9 / 48...
-
Page 10: Dgc-18/25
DGC-18-...-G DGC-25-...-G 24 25 This diagram is intended only to provide an overview of the individual components. To order spare and wearing parts, please use the online spare parts catalogue on the Festo website (spareparts.Festo.com). 10 / 48 Festo 07DGC-Ga_en... -
Page 11: Dgc-18/25
DIN 433, 5.3 Slide-piston connection Slide Cushioning seal 8×11.6 P80 9.5×15 P80 Piston Magnet Band reverser Coupling Piston module Buffer, right Buffer, right, sub-assembly End cap, right Sealing ring Plug screw Tightening torque 11 Nm Festo 07DGC-Ga_en 11 / 48... -
Page 12: Dgc-32/40
DGC-32-...-G DGC-40-...-G 24 25 This diagram is intended only to provide an overview of the individual components. To order spare and wearing parts, please use the online spare parts catalogue on the Festo website (spareparts.Festo.com). 12 / 48 Festo 07DGC-Ga_en... - Page 13 12×18 P80 16×24 P80 Piston Magnet Band reverser Coupling Piston module Buffer, right Buffer, right, sub-assembly End cap, right Sealing ring OL-1/4 OL-1/2 Plug screw Tightening torque 11 Nm Tightening torque 50 Nm Compression spring – Festo 07DGC-Ga_en 13 / 48...
-
Page 14: Dgc-50/63
DGC-50/63-…-G This diagram is intended only to provide an overview of the individual components. To order spare and wearing parts, please use the online spare parts catalogue on the Festo website (spareparts.Festo.com). 14 / 48 Festo 07DGC-Ga_en... - Page 15 End cap, right, sub-assembly Sealing ring OL-1/2 OL-M22 Plug screw Tightening torque 16 Nm Tightening torque 18 Nm Socket head screw DIN 912- DIN 912- Tightening torque 20 Nm ± 20%, use LOCTITE 243 M8×16-10.9 M8×25-10.9 Festo 07DGC-Ga_en 15 / 48...
-
Page 16: Repair Steps
The following chapters describe how to dismantle the different sizes of the linear drives: • Linear drives DGC-8/12-…-G (see chapter 4.1). • Linear drives DGC-18/25/32/40-…-G (see chapter 4.2). • Linear drives DGC-50/63-…-G (see chapter 4.3). 16 / 48 Festo 07DGC-Ga_en... -
Page 17: Linear Drives Dgc-8/12
The slide can only be pushed off the cylinder barrel in conjunction with the piston. Note The black wiper seal on the slide is not fastened and may be lost when pull- ing out the slide. Festo 07DGC-Ga_en 17 / 48... -
Page 18: Assembling The Linear Drive
When assembling a linear drive wearing parts, such as the sealing band, seals, buffers, clips and the complete piston, can be replaced. The wearing parts are ordered on the online spare parts catalogue (spareparts.Festo.com) quoting the appropriate part number (dependent on the size of the linear drive). - Page 19 Fill the grease pockets in the slide elements with grease. Apply a thin layer of guide grease over the full surface of the contact area. See “Assembly aids” in the online spare parts catalogue on the Festo website (www.Festo.com). • Grease the sealing band, the piston and the inside of the cylinder barrel.
- Page 20 (see table). Type Torque DGC-8-…-G 3.0 Nm ± 20% DGC-12-…-G 3.0 Nm ± 20% Note After the linear drive has been assembled, it needs to be commissioned as described in chapter 7 of the operating instructions. 20 / 48 Festo 07DGC-Ga_en...
-
Page 21: Replacing The Slide Elements In The Slide
Observe the greasing instructions in the table in chapter 4.1.2. • Insert the slide elements in the slide (2). Note After replacing the slide elements, the sliding play has to be set as described in chapter 4.1.4. Festo 07DGC-Ga_en 21 / 48... -
Page 22: Setting The Sliding Play On The Slide
Push a feeler gauge (0.02 mm) between the upper slide element and the guide rail. • Apply Loctite 243 to both threaded pins to set the sliding play and screw them in so that the slide rests on the guide rail backlash-free. 22 / 48 Festo 07DGC-Ga_en... -
Page 23: Replacing The Coupling On The Slide
Note The socket head screw for fastening the coupling is filled with thread locker. To open the screw the thread locker has to be removed using suitable tools. • Remove the socket head screw completely. Festo 07DGC-Ga_en 23 / 48... -
Page 24: Replacing The Cushioning Components
Unscrew the cushioning components from the end caps. • Insert the new cushioning components by repeating the steps in reverse order and tighten them using the appropriate torque (see table). Type Torque DGC-8-…-G 2.0 Nm ±20% DGC-12-…-G 2.0 Nm ±20% 24 / 48 Festo 07DGC-Ga_en... -
Page 25: Linear Drives Dgc-18/25/32/40
• Remove the clamping mechanism for the cover band from both ends of the drive and remove the clamping mechanism from the sealing band between the cover band and sealing band. Festo 07DGC-Ga_en 25 / 48... - Page 26 • Remove the slide-piston connection. • Push the slide off the cylinder barrel. • Push the piston out of the cylinder barrel. Documents Chapter 4.2.3 describes how to dismantle and repair the piston module. 26 / 48 Festo 07DGC-Ga_en...
-
Page 27: Assembling The Linear Drive
When assembling a linear drive, wearing parts, such as the sealing band, cover band, seals and the complete piston, can be replaced. The wearing parts are ordered on the online spare parts catalogue (spareparts.Festo.com) quoting the appropriate part number (dependent on the size of the linear drive). - Page 28 – The plain-bearing guide in these sizes is designed for unlubricated operation. guide See “Assembly aids” in the online spare parts catalogue on the Festo website (www.Festo.com). • Grease the cylinder barrel and the sealing band and cover band. Observe the greasing instructions in the table at the start of this chapter.
- Page 29 0.4 Nm ±10% DGC-32-…-G 0.4 Nm ±10% DGC-40-…-G 1.0 Nm ±10% • Move the piston to the other end of the cylinder barrel once in order to secure the sealing band back in the slot. Festo 07DGC-Ga_en 29 / 48...
- Page 30 Apply Loctite 243 to the socket head screw and tighten it using the appro- priate torque (see table). Type Torque DGC-18-…-G 0.2 Nm ±10% DGC-25-…-G 0.4 Nm ±10% DGC-32-…-G 0.4 Nm ±10% DGC-40-…-G 1.0 Nm ±10% • Grease the sealing rings and insert them into the end caps. 30 / 48 Festo 07DGC-Ga_en...
-
Page 31: Dismantling And Repairing The Piston Module
The piston must be replaced completely in case of wear. The spare part comprises the inner and outer sealing rings and the magnets. • Bend the band reverser slightly apart and pull it off the coupling. • Check all parts for wear and replace them as necessary. Festo 07DGC-Ga_en 31 / 48... -
Page 32: Replacing The Buffer Strips
Insert the new sealing rings in the supply ports by repeating the steps in reverse order and tighten the plug screws using the appropriate torque (see table). Type Torque DGC-25-…-G 11 Nm ±10% DGC-32-…-G 11 Nm ±10% DGC-40-…-G 50 Nm ±10% 32 / 48 Festo 07DGC-Ga_en... -
Page 33: Linear Drives Dgc-50/63
Unscrew and remove the flat head screw from the band clamping mechanism on both buffers. • Remove the clamping mechanism for the cover band from both ends of the drive and remove the clamping mechanism from the sealing band between the cover band and sealing band. Festo 07DGC-Ga_en 33 / 48... - Page 34 • Unfasten both the socket head screws on the front of the slide-piston connection and remove them. • Remove the socket head screw on the right-hand side of the slide-piston connection. 34 / 48 Festo 07DGC-Ga_en...
- Page 35 Pull the cover band out of the cylinder barrel. • Push the sealing band inwards and out of the guide slot (1) with a blunt object and pull it out of the cylinder barrel (2). Festo 07DGC-Ga_en 35 / 48...
-
Page 36: Assembling The Linear Drive
When assembling a linear drive, wearing parts, such as the sealing band, cover band, seals and the complete piston, can be replaced. The wearing parts are ordered from the online spare parts catalogue (spareparts.Festo.com) quoting the appropriate part number (dependent on the size of the linear drive). - Page 37 The magnet is moulded-in and is thus not visible. Therefore its position can be determined using a counter magnet (e.g. compass). • Push the sealing band under the band reverser with a screwdriver. • Insert the piston fully into the cylinder barrel. Festo 07DGC-Ga_en 37 / 48...
- Page 38 Newly inserted sealing bands and cover bands are generally too long and protrude beyond the buffer. Shorten the bands as necessary so that they do not protrude beyond the contact surface of the buffer (see band fastening on the other side of the cylinder barrel). 38 / 48 Festo 07DGC-Ga_en...
- Page 39 • Apply Loctite 243 to the socket head screws for the slide-piston connection and tighten them slightly so that the slide-piston connection is positioned at 1-2 mm from the slide. Festo 07DGC-Ga_en 39 / 48...
- Page 40 Grease the sealing ring and insert it into the respective fixture in the end cap. • Attach the respective end caps to the cylinder barrel on both sides and align each rear and lower edge flush with the cylinder barrel. 40 / 48 Festo 07DGC-Ga_en...
-
Page 41: Replacing The Slide Elements In The Slide
Replacing the slide elements in the slide • Remove the slide as described in chapter 4.3.1. • Lever the slide elements inwards and out of the slide with a suitable tool. • Insert the new slide elements in the slide. Festo 07DGC-Ga_en 41 / 48... -
Page 42: Replacing The Buffer Strips
Insert the new sealing rings in the supply ports by repeating the steps in reverse order and tighten the plug screws using the appropriate torque (see table). Type Torque DGC-50-…-G 16 Nm DGC-63-…-G 18 Nm 42 / 48 Festo 07DGC-Ga_en... -
Page 43: Maintenance
This chapter contains key technical information about how to carry out maintenance work on the linear drive. A detailed description of the steps for care and maintenance can be found in the operating instructions. Further information on the assembly aids and lubricants can be found on the Festo website (www.Festo.com). Greasing the linear drive The linear drive has to be greased when repair work is carried out and at set intervals. -
Page 44: Tools
For cutting the sealing band and the cover band to sors or metal shears to length length Liability/Conditions of use The General Terms and Conditions of Festo AG & Co. KG apply, which can be viewed on the Festo website (www.Festo.com). 44 / 48 Festo 07DGC-Ga_en... - Page 45 Festo shall have the corresponding have the same version status as the last and 2 completely to a third party. The third rights of use. Festo permits the user to use printed edition. party must be made explicitly aware of these the electronic documentation under the fol- conditions of use.
- Page 49 Linear drive DGC-…-GF Repair instructions (en) 7DGC-GFa_en...
- Page 50 Imprint Version: 7DGC-GFa_en (09.2009) Copyright: ©Festo AG & Co. KG Postfach D-73726 Esslingen Editorial department: SC-S Phone: +49 / 711 / 347-0 Email: service_international@festo.com Internet: http://www.festo.com The reproduction, distribution and utilisation of this document as well as the communication of its contents to others without expressed authori- sation is prohibited.
- Page 51 These repair instructions have been prepared with care. Festo AG & Co. KG does not, however, accept liability for any errors in these repair instructions or their consequences. Likewise, no liability is accepted for direct or consequential damage resulting from incorrect use of the products.
- Page 52 4.2.4 Setting the sliding play on the slide 4.2.5 Replacing the cushioning components 4.2.6 Replacing the sealing rings for the supply ports in the end caps Maintenance Greasing the linear drive Tools Required tools by size Liability/Conditions of use 4 / 44 Festo 7DGC-GFa_en...
-
Page 53: Important Information
They can be found in the online repair must be considered. ance, etc. It can be found on the spare parts catalogue on the Festo Before carrying out a repair, the Festo website (www.Festo.com). website (www.Festo.com). -
Page 54: General Safety Instructions
Repairs must only be carried out in conjunction with these repair instructions as well as the respective device-specific operating instructions. Note Instead of carrying out the repair yourself, your local Festo sales office offers the option of having the repair carried out by Festo. Environment Components and equipment replaced as part of a repair must be disposed of in accordance with the locally valid environmental protection regulations. -
Page 55: Types And Part Numbers
The complete overview of features, accessories, Type Part number type codes, technical data and dimensions for the DGC-… DGC-18-…-GF 532479 linear drives can be found in the product catalogue or on DGC-25-…-GF 532483 the Festo website (www.Festo.com). DGC-32-…-GF 532487 DGC-40-…-GF 532491 DGC-50-…-GF 532495 DGC-63-…-GF 532499 Mounting directions This graphic provides you with an overview of the mounting directions on the linear drive using the DGC-25-…-GF as an... -
Page 56: Component Overview
SPC 46 17 39 DGC-25-...-GF This diagram is intended only to provide an overview of the individual components. To order spare and wearing parts, please use the online spare parts catalogue on the Festo website (spareparts.Festo.com). 8 / 44 Festo 7DGC-GFa_en... - Page 57 Tightening torque 4.5 Nm ± 10%, M4×35-10.9 M5×40-10.9 use LOCTITE 243 use LOCTITE 243 Stop Stop Connection Cover Buffer/piston seal 8×11.6 P80 9.5×15 P80 Magnet Piston Band reverser Piston module Buffer, right Buffer, right, sub-assembly Blanking plug End cap, right Festo 7DGC-GFa_en 9 / 44...
- Page 58 DGC-32-...-GF DGC-40-...-GF 17 39 This diagram is intended only to provide an overview of the individual components. To order spare and wearing parts, please use the online spare parts catalogue on the Festo website (spareparts.Festo.com). 10 / 44 Festo 7DGC-GFa_en...
- Page 59 DIN 912-M5×40-10.9 Tightening torque 4.5 Nm ± 10%, use LOCTITE 243 Stop Connection Cover Buffer/piston seal 12×18 P80 16×24 P80 Magnet Piston Band reverser Piston module Buffer, right Buffer, right, sub-assembly Blanking plug End cap, right Festo 7DGC-GFa_en 11 / 44...
-
Page 60: Dgc-50/63
DGC-50/63-…-GF This diagram is intended only to provide an overview of the individual components. To order spare and wearing parts, please use the online spare parts catalogue on the Festo website (spareparts.Festo.com). 12 / 44 Festo 7DGC-GFa_en... - Page 61 Socket head screw DIN 6912- DIN 912- Tightening torque 2.0 Nm ± 20%, use LOCTITE 243 M4×12-8.8 M4×10-8.8 Piston module Compression spring VL-5/2-4.0 VL-5/2-4.0 Buffer, right Buffer, right, sub-assembly End cap, right End cap, right, sub-assembly Festo 7DGC-GFa_en 13 / 44...
-
Page 62: Repair Steps
The following chapters describe how to dismantle the different sizes of the linear drives: • Linear drives DGC-18/25/32/40-…-GF (see chapter 4.1). • Linear drives DGC-50/63-…-GF (see chapter 4.2). 14 / 44 Festo 7DGC-GFa_en... -
Page 63: Linear Drives Dgc-18/25/32/40
• Remove the clamping mechanism for the cover band from both ends of the drive and remove the clamping mechanism from the sealing band between the cover band and sealing band. Festo 7DGC-GFa_en 15 / 44... - Page 64 • Lift the slide-piston connection upwards and out. DGC-32-…-GF and DGC-40-…-GF (not shown in the illustration): • Remove both socket head screws completely. • Lift both the modules of the slide-piston connection upwards and out. 16 / 44 Festo 7DGC-GFa_en...
- Page 65 Pull the cover band out of the cylinder barrel. • Push the sealing band inwards and out of the guide slot (1) with a blunt object and pull it out of the cylinder barrel (2). Festo 7DGC-GFa_en 17 / 44...
-
Page 66: Assembling The Linear Drive
When assembling a linear drive, wearing parts, such as the sealing band, cover band, seals and the complete piston, can be replaced. The wearing parts are ordered from the online spare parts catalogue (spareparts.Festo.com) quoting the appropriate part number (dependent on the size of the linear drive). - Page 67 When inserting the piston, make sure that the magnetic side of the piston is opposite the cut-outs on the groove for the proximity switches. • Push the sealing band under the band reverser with a screwdriver. • Insert the piston fully into the cylinder barrel. Festo 7DGC-GFa_en 19 / 44...
- Page 68 0.4 Nm ±10% DGC-32-…-GF 0.4 Nm ±10% DGC-40-…-GF 1.0 Nm ±10% • Move the piston to the other end of the cylinder barrel once in order to secure the sealing band back in the slot. 20 / 44 Festo 7DGC-GFa_en...
- Page 69 Apply Loctite 243 to the socket head screw and tighten it using the appro- priate torque (see table). Type Torque DGC-18-…-GF 0.2 Nm ±10% DGC-25-…-GF 0.4 Nm ±10% DGC-32-…-GF 0.4 Nm ±10% DGC-40-…-GF 1.0 Nm ±10% Festo 7DGC-GFa_en 21 / 44...
- Page 70 • Put on the second washer. Apply Loctite 243 to the thread, screw on the nut and tighten it using the appropriate torque (see table). Type Torque DGC-18-…-GF 1.2 Nm ±10% DGC-25-…-GF 4.5 Nm ±10% 22 / 44 Festo 7DGC-GFa_en...
- Page 71 Torque DGC-18-…-GF 7 Nm DGC-25-…-GF 12 Nm DGC-32-…-GF 30 Nm DGC-40-…-GF 30 Nm Note After the linear drive has been assembled, it needs to be commissioned as described in chapter 7 of the operating instructions. Festo 7DGC-GFa_en 23 / 44...
-
Page 72: Replacing The Slide Elements In The Slide
Insert the pressure piece and the new slide elements in the slide and push the slide onto the guide rail. Note After replacing the slide elements, the sliding play has to be set as described in chapter 4.1.4. 24 / 44 Festo 7DGC-GFa_en... -
Page 73: Setting The Sliding Play On The Slide
Secure the regulating screw setting by inserting and tightening the socket head screws using the appropriate torque (see table). Type Torque DGC-18-…-GF 0.7 Nm DGC-25-…-GF 2.0 Nm DGC-32-…-GF 2.0 Nm DGC-40-…-GF 3.0 Nm • Fit the remaining parts as described in chapter 4.1.2. Festo 7DGC-GFa_en 25 / 44... -
Page 74: Dismantling And Repairing The Piston Module
• Grease the sealing rings and the band reverser. Observe the greasing instructions in the table in chapter 4.1.2. • Assemble the linear drive as described in chapter 4.1.2. 26 / 44 Festo 7DGC-GFa_en... -
Page 75: Replacing The Cushioning Components
Insert the new sealing rings in the supply ports by repeating the steps in reverse order and tighten the plug screws using the appropriate torque (see table). Type Torque DGC-25-…-GF 11 Nm ±10% DGC-32-…-GF 11 Nm ±10% DGC-40-…-GF 50 Nm ±10% Festo 7DGC-GFa_en 27 / 44... -
Page 76: Linear Drives Dgc-50/63
Allen key, size 3. • Remove the clamping mechanism for the cover band from both ends of the drive and remove the clamping mechanism from the sealing band between the cover band and sealing band. 28 / 44 Festo 7DGC-GFa_en... - Page 77 Unfasten the threaded pins on the left-hand side of the slide-piston connection. • Unfasten and remove the socket head screw on the right-hand side the slide-piston connection. • Unfasten both the socket head screws on the front of the slide-piston connection and remove them. Festo 7DGC-GFa_en 29 / 44...
- Page 78 Pull the cover band out of the cylinder barrel. • Push the sealing band inwards and out of the guide slot (1) with a blunt object and pull it out of the cylinder barrel (2). 30 / 44 Festo 7DGC-GFa_en...
-
Page 79: Assembling The Linear Drive
When assembling a linear drive, wearing parts, such as the sealing band, cover band, seals and the complete piston, can be replaced. The wearing parts are ordered from the online spare parts catalogue (spareparts.Festo.com) quoting the appropriate part number (dependent on the size of the linear drive). - Page 80 The magnet is moulded-in and is thus not visible. Therefore its position can be determined using a counter magnet (e.g. compass). • Push the sealing band under the band reverser with a screwdriver. • Insert the piston fully into the cylinder barrel. 32 / 44 Festo 7DGC-GFa_en...
- Page 81 Use a spring scale to check the displacement force of the slide (refer to the table in chapter 4.2.4 for the values) and if necessary, adjust the setting for the sliding play as described in chapter 4.2.4. Festo 7DGC-GFa_en 33 / 44...
- Page 82 Place the slide-piston connection on the coupling. • Apply Loctite 243 to the socket head screws for the slide-piston connection and tighten them slightly so that the slide-piston connection is positioned at 1-2 mm from the slide. 34 / 44 Festo 7DGC-GFa_en...
- Page 83 20 Nm ±20% DGC-63-…-GF 20 Nm ±20% • Tighten the threaded pins on the left-hand end of the slide-piston connec- tion using the appropriate torque (see table). Type Torque DGC-50-…-GF 5 Nm ±20% DGC-63-…-GF 5 Nm ±20% Festo 7DGC-GFa_en 35 / 44...
-
Page 84: Replacing The Slide Elements In The Slide
If the slide elements in the slide are faulty or worn, they will have to be replaced. • Remove the slide as described in chapter 4.2.1. • Remove the slide elements from the slide. • Unfasten the socket head screws on the top of the slide and remove them. 36 / 44 Festo 7DGC-GFa_en... - Page 85 Insert the pressure piece and the new slide elements in the slide and push the slide onto the guide rail. Note After replacing the slide elements, the sliding play has to be set as described in chapter 4.2.4. Festo 7DGC-GFa_en 37 / 44...
-
Page 86: Setting The Sliding Play On The Slide
Secure the regulating screw setting by inserting and tightening the socket head screws using the appropriate torque (see table). Type Torque DGC-50-…-GF 6.0 Nm ±10% DGC-63-…-GF 6.0 Nm ±10% • Fit the slide-piston connection as described in chapter 4.2.2. 38 / 44 Festo 7DGC-GFa_en... -
Page 87: Replacing The Cushioning Components
Insert the new sealing rings in the supply ports by repeating the steps in reverse order and tighten the plug screws using the appropriate torque (see table). Type Torque DGC-50-…-GF 16 Nm ± 10% DGC-63-…-GF 18 Nm ± 10% Festo 7DGC-GFa_en 39 / 44... -
Page 88: Maintenance
This chapter contains key technical information about how to carry out maintenance work on the linear drive. A detailed description of the steps for care and maintenance can be found in the operating instructions. Further information on the assembly aids and lubricants can be found on the Festo website (www.Festo.com). Greasing the linear drive The linear drive has to be greased when repair work is carried out and at set intervals. -
Page 89: Tools
For cutting the sealing band and the cover band to length metal shears Liability/Conditions of use The General Terms and Conditions of Festo AG & Co. KG apply, which can be viewed on the Festo website (www.Festo.com). Festo 7DGC-GFa_en 41 / 44... - Page 90 Festo shall have the corresponding have the same version status as the last and 2 completely to a third party. The third rights of use. Festo permits the user to use printed edition. party must be made explicitly aware of these the electronic documentation under the fol- conditions of use.
- Page 93 Linear drive DGC-…-KF Repair instructions (en) 7DGC-KFa_en...
- Page 94 Imprint Version: 7DGC-KFa_de (09.2009) Copyright: ©Festo AG & Co. KG Postfach 73726 Esslingen, Germany Editorial staff: SC-S Tel.: +49/711/347-0 Email: service_international@festo.com Internet: http://www.festo.com The reproduction, distribution and utilisation of this document as well as the communication of its contents to others without explicit authorisation is prohibited.
- Page 95 These repair instructions have been prepared with care. Festo AG & Co. KG does not, however, accept liability for any errors in these repair instructions or their consequences. Likewise, no liability is accepted for direct or consequential damage resulting from improper use of the products.
- Page 96 4.3.3 Replacing the cushioning components 4.3.4 Replacing the sealing rings for the supply ports in the end caps Maintenance Recirculating ball bearing guide Maintenance of the band system Tools Required tools by size Liability/Conditions of use 4 / 44 Festo 7DGC-KFa_en...
-
Page 97: Important Information
They can be found in the online unit, which can only be replaced as a whole. nance, etc. It can be found on the spare parts catalogue on the Festo Festo website (www.Festo.com). website (www.Festo.com). However, in case of larger defects, the •... -
Page 98: General Safety Instructions
Repairs must only be carried out in conjunction with these repair instructions as well as the respective device-specific operating instructions. Note Instead of carrying out the repair yourself, your local Festo sales office offers the option of having the repair carried out by Festo. Environment Components and equipment replaced as part of a repair must be disposed of in accordance with the locally valid environmental protection regulations. -
Page 99: Types And Part Numbers
The complete overview of features, accessories, type Type Part number codes, technical data and dimensions for the DGC-… DGC-8-…-KF 530906 linear drives can be found in the product catalogue or on DGC-12-…-KF 530907 the Festo website (www.Festo.com). DGC-18-…-KF 532446 DGC-25-…-KF 532447 DGC-32-…-KF 532448 DGC-40-…-KF 532449 DGC-50-…-KF... -
Page 100: Component Overview
Component overview DGC-8/12-…-KF This diagram is intended only to provide an overview of the individual components. To order spare and wearing parts, please use the online spare parts catalogue on the Festo website (spareparts.Festo.com). 8 / 44 Festo 7DGC-KFa_en... - Page 101 Tightening torque 1.1 Nm, M2×4-10.9 M3×5-10.9 use LOCTITE 243 use LOCTITE 243 Socket head screw DIN 912- DIN 912- Tightening torque 1.4 Nm, use LOCTITE 243 M38-8.8 M4×8-8.8 Sealed with thread locker 397332 Sealing band End cap, right Festo 7DGC-KFa_en 9 / 44...
- Page 102 DGC-18-...-KF DGC-25-...-KF 17 30 This diagram is intended only to provide an overview of the individual components. To order spare and wearing parts, please use the online spare parts catalogue on the Festo website (spareparts.Festo.com). 10 / 44 Festo 7DGC-KFa_en...
- Page 103 Socket head screw DIN 912 DIN 912 M4×8-8.8 M5×12-10.9 Socket head screw DIN 912 DIN 912 M4×35-10.9 M5×40-10.9 Slide-piston connection Cover Buffer/piston seal Magnet Piston Band reverser Piston module Buffer, right Buffer, right, sub-assembly End cap, right Festo 7DGC-KFa_en 11 / 44...
- Page 104 DGC-32-...-KF DGC-40-...-KF 17 30 This diagram is intended only to provide an overview of the individual components. To order spare and wearing parts, please use the online spare parts catalogue on the Festo website (spareparts.Festo.com). 12 / 44 Festo 7DGC-KFa_en...
- Page 105 Socket head screw DIN 6912 DIN 912 M5×12-8.8 M5×16-10.9 Socket head screw DIN 912 M5×40-10.9 Slide-piston connection Spring Cover Buffer/piston seal Magnet Piston Band reverser Piston module Buffer, right Buffer, right, sub-assembly End cap, right Festo 7DGC-KFa_en 13 / 44...
-
Page 106: Dgc-50/63
DGC-50/63-…-KF 1 Nm This diagram is intended only to provide an overview of the individual components. To order spare and wearing parts, please use the online spare parts catalogue on the Festo website (spareparts.Festo.com). 14 / 44 Festo 7DGC-KFa_en... - Page 107 Socket head screw DIN 6912- DIN 912- Tightening torque 2.0 Nm ± 20%, use LOCTITE 243 M4×12-8.8 M4×10-8.8 Piston module Compression spring VL-5/2-4.0 Buffer, right Buffer, right, sub-assembly End cap, right End cap, right, sub-assembly Festo 7DGC-KFa_en 15 / 44...
-
Page 108: Repair Steps
The following chapters describe how to dismantle the different sizes of the linear drives: • Linear drives DGC-8/12-…-KF (see chapter 4.1). • Linear drives DGC-18/25/32/40-…-KF ( see chapter 4.2). • Linear drives DGC-50/63-…-KF (see chapter 4.3). 16 / 44 Festo 7DGC-KFa_en... -
Page 109: Linear Drives Dgc-8/12
The socket head screw for fastening the coupling is filled with locking agent. To open the screw the locking agent has to be removed using appropriate tools. • Unscrew and remove the socket head screw. Festo 7DGC-KFa_en 17 / 44... - Page 110 Pull the sealing band out of the cylinder barrel on one side. Note It may not be possible to pull out the sealing band on long drives. In this case, push it into the cylinder barrel with a blunt object and then remove it. 18 / 44 Festo 7DGC-KFa_en...
-
Page 111: Assembling The Linear Drive
When assembling a linear drive wearing parts, such as the sealing band, seals, buffers, covers, clips and the complete piston, can be replaced. The wearing parts are ordered from the online spare parts catalogue (spareparts.Festo.com) quoting the appropriate part number (dependent on the size of the linear drive). - Page 112 Align the rear and bottom edge of both end caps flush with the cylinder barrel. • Tighten the self-tapping screws on both ends using the appropriate torque (see table). Type Torque DGC-8-…-KF 3.0 Nm ± 20% DGC-12-…-KF 3.0 Nm ± 20% 20 / 44 Festo 7DGC-KFa_en...
- Page 113 1.4 Nm • Clip the wiper seal into the slide from the side. Note After the linear drive has been assembled, it needs to be commissioned as described in chapter 7 of the operating instructions. Festo 7DGC-KFa_en 21 / 44...
-
Page 114: Replacing The Cushioning Components
Unfasten and remove the three self-tapping screws on both end caps. Note The basic principle of self-tapping screws means they have a high level of holding force in the thread and require greater force when unfastening them. 22 / 44 Festo 7DGC-KFa_en... - Page 115 DGC-18-…-KF and DGC-25-…-KF: • Unscrew and remove the nut from the screw. Remove the socket head screw and both washers. DGC-32-…-KF and DGC-40-…-KF (not shown in the illustration): • Unscrew and remove both socket head screws. Festo 7DGC-KFa_en 23 / 44...
- Page 116 Pull the cover band out of the cylinder barrel. • Push the sealing band inwards and out of the guide slot (1) with a blunt object and pull it out of the cylinder barrel (2). 24 / 44 Festo 7DGC-KFa_en...
-
Page 117: Assembling The Linear Drives
When assembling a linear drive, wearing parts, such as the sealing band, cover band, seals and the complete piston, can be replaced. The wearing parts are ordered from the online spare parts catalogue (spareparts.Festo.com) quoting the appropriate part number (dependent on the size of the linear drive). - Page 118 When inserting the piston, make sure that the magnetic side of the piston is opposite the cut-outs on the groove for the proximity switches. • Push the sealing band under the band reverser with a screwdriver. • Insert the piston fully into the cylinder barrel. 26 / 44 Festo 7DGC-KFa_en...
- Page 119 0.4 Nm ±10% DGC-32-…-KF 0.4 Nm ±10% DGC-40-…-KF 1.0 Nm ±10% • Move the piston to the other end of the cylinder barrel once in order to secure the sealing band back in the slot. Festo 7DGC-KFa_en 27 / 44...
- Page 120 Align the slide centrally with the piston. • Insert the parts of the slide-piston connection between the slide and the piston from above. Note The parts of the slide-piston connection are paired with the slide. Observe the instructions in chapter 4.2.1. 28 / 44 Festo 7DGC-KFa_en...
- Page 121 4.5 Nm ±10% DGC-40-…-KF 4.5 Nm ±10% • Place the cover on the slide-piston connection and press it lightly so that it latches into place. • Grease the sealing rings and insert them into the end caps. Festo 7DGC-KFa_en 29 / 44...
- Page 122 Torque DGC-18-…-KF 7 Nm DGC-25-…-KF 12 Nm DGC-32-…-KF 30 Nm DGC-40-…-KF 30 Nm Note After the linear drive has been assembled, it needs to be commissioned as described in chapter 7 of the operating instructions. 30 / 44 Festo 7DGC-KFa_en...
-
Page 123: Dismantling And Repairing The Piston Module
• Grease the sealing rings and the band reverser. Observe the greasing instructions int the table in chapter 4.2.2. • Assemble the linear drive as described in chapter 4.2.2. Festo 7DGC-KFa_en 31 / 44... -
Page 124: Replacing The Cushioning Components
Insert the new sealing rings in the supply ports by repeating the steps in reverse order and tighten the plug screws using the appropriate torque (see table). Type Torque DGC-25-…-KF 11 Nm ±10% DGC-32-…-KF 11 Nm ±10% DGC-40-…-KF 16 Nm ±10% 32 / 44 Festo 7DGC-KFa_en... -
Page 125: Linear Drives Dgc-50/63
Allen key, size 3. • Remove the clamping mechanism for the cover band from both ends of the drive and remove the clamping mechanism from the sealing band between the cover band and sealing band. Festo 7DGC-KFa_en 33 / 44... - Page 126 Unfasten the threaded pins on the left-hand side of the slide-piston connection. • Unfasten and remove the socket head screw on the right-hand side of the slide-piston connection. • Unfasten both the socket head screws on the front of the slide-piston con- nection and remove them. 34 / 44 Festo 7DGC-KFa_en...
- Page 127 Pull the cover band out of the cylinder barrel. • Push the sealing band inwards and out of the guide slot (1) with a blunt object and pull it out of the cylinder barrel (2). Festo 7DGC-KFa_en 35 / 44...
-
Page 128: Assembling The Linear Drive
When assembling a linear drive, wearing parts, such as the sealing band, cover band, seals and the complete piston, can be replaced. The wearing parts are ordered from the online spare parts catalogue (spareparts.Festo.com) quoting the appropriate part number (dependent on the size of the linear drive). - Page 129 The magnet is moulded-in and is thus not visible. Therefore its position can be determined using a counter magnet (e.g. compass). • Push the sealing band under the band reverser with a screwdriver. • Insert the piston fully into the cylinder barrel. Festo 7DGC-KFa_en 37 / 44...
- Page 130 Newly inserted sealing bands and cover bands are generally too long and protrude beyond the buffer. Shorten the bands as necessary so that they do not protrude beyond the contact surface of the buffer (see band fastening on the other side of the base profile). 38 / 44 Festo 7DGC-KFa_en...
- Page 131 The parallel offset between the upper edge of the slide-piston connection and the outer edge of the slide max. 0,5 mm must not exceed 0.5 mm. Festo 7DGC-KFa_en 39 / 44...
- Page 132 • Apply Loctite 243 to the socket head screws and tighten them using the appropriate torque (see table). Type Torque DGC-50-…-KF 25 Nm ±20% DGC-63-…-KF 30 Nm ±20% 40 / 44 Festo 7DGC-KFa_en...
-
Page 133: Replacing The Cushioning Components
Insert the new sealing rings in the supply ports by repeating the steps in reverse order and tighten the plug screws using the appropriate torque (see table). Type Torque DGC-50-…-KF 16 Nm ± 10% DGC-63-…-KF 18 Nm ± 10% Festo 7DGC-KFa_en 41 / 44... -
Page 134: Maintenance
For cutting the sealing band and the cover band to or metal shears to length length Liability/Conditions of use The General Terms and Conditions of Festo AG & Co. KG apply, which can be viewed on the Festo website(www.Festo.com). 42 / 44 Festo 7DGC-KFa_en... - Page 135 Festo shall have the corresponding have the same version status as the last and 2 completely to a third party. The third rights of use. Festo permits the user to use printed edition. party must be made explicitly aware of these the electronic documentation under the fol- conditions of use.
Need help?
Do you have a question about the DGC G Series and is the answer not in the manual?
Questions and answers