Table of Contents
Advertisement
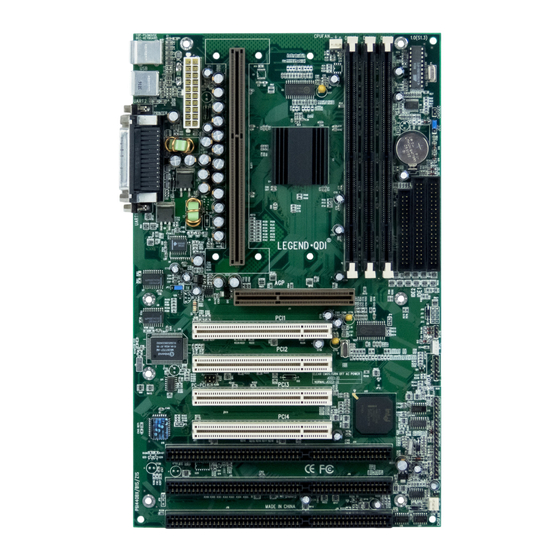
P6I440BX/B1S
SETUP DELLA SCHEDA SPEEDEASY
Procedura di installazione:
®
TM
1. Inserite il microprocessore Pentium®II/ Intel
Celeron
come da istruzioni.
2. Modificate la configurazione del computer e ripristinate il sistema.
3. Premete il tasto <Del> e accendete il computer per entrare nel setup BIOS.
4. Entrate nel menu "SpeedEasy CPU* SETUP" per regolare la velocit... del
1
microprocessore.
Nota: se non regolate la velocità del microprocessore, il sistema funzionerà
con le regolazioni standard (Microprocessore da 200MHz con velocità di
"host bus" da 100MHz e microprocessore da 133MHz con velocità di "host
bus" da 66MHz).
5. Salvate e uscite dal Setup BIOS, e fate ripartire il computer.
*CPU= microprocessore
Manual for P6I440BX/B1S
9
Advertisement
Table of Contents

Subscribe to Our Youtube Channel
Related Manuals for QDI P6I440BX/B1S


Summary of Contents for QDI P6I440BX/B1S
- Page 1 (Microprocessore da 200MHz con velocità di “host bus” da 100MHz e microprocessore da 133MHz con velocità di “host bus” da 66MHz). 5. Salvate e uscite dal Setup BIOS, e fate ripartire il computer. *CPU= microprocessore Manual for P6I440BX/B1S...
- Page 2 (dell’accoppiamento). Potete selezionare manualmente la velocità del microprocessore sulla schermata “SpeedEasy CPU SETUP”. Avvertenza: non dovete regolare la frequenza del microprocessore pi alta di quella predisposa, altrimenti la casa produttrice non si farà carico di eventuali danni al micorprocessore. Manual for P6I440BX/B1S...
- Page 3 Í Ë ³ ö BIOS£ ¬ Ï µ Í ³ ¾ Í ¿ É Ò Ô ° ´ Ä ã É è ¶ ¨ µ Ä Ë Ù ¶ È Ô Ë Ð Ð Á Ë ¡ £ Manual for P6I440BX/B1S...
- Page 4 Ç ë Î ð ½ « Ö Ð Ñ ë ´ ¦ À í Æ ÷ µ Ä Æ µ Â Ê µ ÷ ½ Ú Ö Á ¸ ß ì ¶ Æ ä Õ ý ³ £ ¹ ¤ × ÷ Æ µ Â Ê £ ¬ · ñ Ô ò ± ¾ ¹ « Ë ¾ ½ « ² » » á ¸ º Ô ð Ó É ´ Ë ¶ ø ² ú É ú µ Ä È Î º Î Ë ð » Ù ¡ £ Manual for P6I440BX/B1S...
- Page 5 Í Ë ³ ö BIOS£ ¬ Ï µ Í ³ ¾ Í ¿ É Ò Ô ° ´ Ä ã É è ¶ ¨ µ Ä Ë Ù ¶ È Ô Ë Ð Ð Á Ë ¡ £ Manual for P6I440BX/B1S...
-
Page 6: Speedeasy Cpu Setup
· ñ Ô ò ± ¾ ¹ « Ë ¾ ½ « ² » » á ¸ º Ô ð Ó É ´ Ë ¶ ø ² ú É ú µ Ä È Î º Î Ë ð » Ù ¡ £ Manual for P6I440BX/B1S... -
Page 7: Key Features
Introduction Introduction Overview The P6I440BX/B1S green motherboard utilizes the Intel® 440BX AGPset and provides a highly integrated solution for fully compatible, high performance PC/ATX platform. It provides 66MHz and 100MHz system bus support for all Intel Pentium® II and Celeron processors. - Page 8 On-board MAXIM1617 monitors the CPU temperature. (manufacturing option) ® Provides management application such as ManageEasy and LDCM(LANDesk Client Manager) (manufacturing option). Supports keyboard password power-on function. Supports SecurityEasy function (manufacturing option) System status resumes after AC power failure. Manual for P6I440BX/B1S...
- Page 9 Supports IDE CD-ROM or SCSI boot up. Green function Supports ACPI (Advanced Configuration and Power Interface) and ODPM (OS Directed Power Management). Supports three green modes: Doze, Standby and Suspend. Expansion slots 3 ISA slots and 4 PCI slots. 1 AGP Slot Manual for P6I440BX/B1S...
- Page 10 -- This page is intentionally left blank -- Manual for P6I440BX/B1S...
-
Page 11: External Connectors
You can enable/disable them and choose the IRQ or I/O address in “Integrated Peripherals” from AWARD BIOS SETUP. Parallel Port UART1 UART2 Manual for P6I440BX/B1S... -
Page 12: Atx Power Supply Connector & Power Switch (Power)
When the system is in soft power-down status, the LED glows dimly. When the system is powered up, the LED is on. Key-Lock Connector (KEY_L) The connector can be connected to the keyboard lock switch on the case for locking the keyboard. Manual for P6I440BX/B1S... -
Page 13: Hardware Green Connector (Sleep)
Infrared Header (IrDA) This connector supports wireless transmitting and receiving. If using this function, set ‘Serial Port 2 Mode’ to IrDA or ASKIR and configure the settings from the ‘INTEGRATED PERIPHERALS’ section of the BIOS. IRRX IRTX Manual for P6I440BX/B1S... -
Page 14: Fan Connector (Cpufan, Chsfan)
“Resume by Ring” to Enabled in the “POWER MANAGEMENT SETUP” section of the BIOS. Save & exit, then boot the operating system once to make sure this function takes effect. Signal for waking up (active low) +5V standby Manual for P6I440BX/B1S... -
Page 15: Chassis Security Switch (Chssec)
PCI 1 First PCI slot. PCI 2 Second PCI slot. PCI 3 Third PCI slot. PCI 4 Fourth PCI slot. IDE 1 Primary IDE port. IDE 2 Secondary IDE port. FLOPPY Floppy Drive Port. Accelerated Graphics Port Manual for P6I440BX/B1S... -
Page 16: Jumper Settings
The only way to power up the system is to enter the correct password. If you forget the password, clear CMOS and set it again. Refer to BIOS descrip- tion on page 44 for detailed information. Manual for P6I440BX/B1S... -
Page 17: Memory Configuration
DRAMs installed. Possible SDRAM DIMM memory sizes are 8MB, 16MB, 32MB, 64MB, 128MB in each DIMM socket. Possible EDO DIMM memory sizes are 8MB, 16MB, 32MB, 64MB, 128MB, 256MB in each DIMM socket. Manual for P6I440BX/B1S... - Page 18 -- This page is intentionally left blank -- Manual for P6I440BX/B1S...
-
Page 19: System Password
Note 4: If there is no SLEEP button on your case, your system still can enter lock status through our lock application. Refer to Appendix A (item 4) for details. Note 5: See also chapter 4 ‘BIOS Description’. Manual for P6I440BX/B1S... - Page 20 -- This page is intentionally left blank -- Manual for P6I440BX/B1S...
-
Page 21: Bios Description
1. Create a bootable system floppy diskette, by typing Format A:/s from the DOS prompt under DOS6.xx or Windows 9x environment. 2. Copy FLASH.EXE from the directory \Utility on the QDI Motherboard Utility CD onto your new bootable diskette. 3. Download the updated BIOS file from the Website (http://www.qdigrp.com). Please be sure to download the suitable BIOS file for your motherboard. - Page 22 Be sure your new BIOS is compatible with your MB. If not, the system will be damaged. /g: Retrieves BIOS file from BIOS ROM. Examples: A:\FLASH.EXE BIOSfile.bin A:\FLASH.EXE BIOSfile.bin /cdpc/n A:\FLASH.EXE BIOSfile.bin /g Note: FLASH utility runs incorrectly at Windows DOS prompt. Manual for P6I440BX/B1S...
-
Page 23: Load Setup Defaults
The basic CMOS settings included in ‘Standard CMOS Setup’ are Date, Time, Hard Disk Use the arrow keys to highlight Drive Types, Floppy Disk Drive Types, and VGA etc. the item, then use the <PgUp> or <PgDn> keys to select the value you want in each item. Manual for P6I440BX/B1S...
Need help?
Do you have a question about the P6I440BX/B1S and is the answer not in the manual?
Questions and answers