Table of Contents
Advertisement
DIGITAL COLOR PRINTER
MODEL
CP-W5000DW
OPERATION MANUAL
THIS OPERATION MANUAL IS IMPORTANT
TO YOU.
PLEASE READ IT BEFORE USING YOUR
DIGITAL COLOR PRINTER.
Hereby, Mitsubishi Electric Corporation, declares that this digital color printer is in
compliance with the essential requirements and other relevant provisions of Directive
1999/5/EC.
Advertisement
Table of Contents

Related Manuals for Mitsubishi Electric CP-W5000DW


Summary of Contents for Mitsubishi Electric CP-W5000DW
- Page 1 THIS OPERATION MANUAL IS IMPORTANT TO YOU. PLEASE READ IT BEFORE USING YOUR DIGITAL COLOR PRINTER. Hereby, Mitsubishi Electric Corporation, declares that this digital color printer is in compliance with the essential requirements and other relevant provisions of Directive 1999/5/EC.
- Page 2 INFORMATION This Class A digital apparatus complies with Canadian ICES-003. WARNING: TO PREVENT FIRE OR SHOCK HAZARD, DO NOT EXPOSE THIS APPLIANCE TO RAIN OR MOISTURE. WARNING: Use the included AC power cord so as not to interfere with radio and television reception. If you use other cables, it may cause interference with radio and television reception.
- Page 3 This symbol mark is according to the directive 2002/96/EC Article 10 Information for users and Annex IV, and/or to the directive 2006/66/EC Article 20 Information for end-users and Annex II. Your MITSUBISHI ELECTRIC product is designed and manufactured with high quality materials and components which can be recycled and/or reused.
-
Page 4: Table Of Contents
CONTENTS CONTENTS ........................1 SAFETY PRECAUTIONS ....................2 PROTECTIVE MEASURES ................2 INSTALLATION LOCATIONS ................3 FOR LONG OPERATING LIFE................3 OTHER CAUTIONS ....................3 SPECIAL FEATURES ....................4 UNPACKING ........................5 FEATURES AND FUNCTIONS ..................6 FRONT, TOP, AND SIDE PANELS ..............6 REAR PANEL .....................8 BEFORE OPERATION ....................9 PRINTER SETUP PROCEDURE ...............9 INK RIBBON INSTALLATION ................10 PRINT PAPER INSTALLATION ................12... -
Page 5: Safety Precautions
SAFETY PRECAUTIONS In the interest of safety, please observe the following precautions: POWER REQUIREMENT This Digital Color Printer is designed to operate on 100 - 240 V AC 50/60 Hz. Never connect to any outlet or power supply having a different voltage or frequency. In addition, be sure to supply power to the printer from a receptacle with a ground fault circuit interrupter. -
Page 6: Installation Locations
SAFETY PRECAUTIONS INSTALLATION LOCATIONS MAINTAIN GOOD VENTILATION PROTECT AGAINST DEW FORMATION Ventilation slots and holes are provided on the rear and both In extremely cold regions, if the printer is moved quickly sides of this printer. Place the printer on a hard and level from an extremely cold place to warmer one, dew is likely to surface and keep a space between the printer and the walls be formed. -
Page 7: Special Features
HIGH QUALITY AND HIGH DENSITY PRINTING CP-W5000DW is a dye sublimation thermal transfer color printer, which produces superior high quality and high density images. It also produces a continuous tone at 256 gradient for each of Y, M, and C. -
Page 8: Unpacking
UNPACKING Take the printer out of the box by the following procedures. Make sure to check the accessories. Open the box and take out the accessories. Accessories Remove the top cushion. Hold and release the joint parts (6 pieces) at the bottom of the box to remove the upper box. -
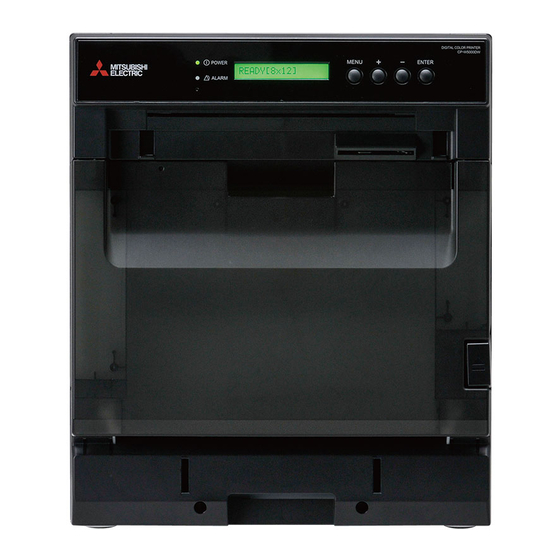
Page 9: Features And Functions
FEATURES AND FUNCTIONS FRONT, TOP, AND SIDE PANELS * Names within brackets are displayed on the LCD. OPERATOR CONTROL PANEL EXIT PAPER TRAY INSERTION SLOTS PRINT OUTPUT SLOT Slots to hold the exit paper tray. The printed paper comes out here. TOP COVER [T.DOOR] WASTE OUTPUT SLOT Open this cover when cleaning the thermal head or the... - Page 10 FEATURES AND FUNCTIONS HOW TO MOUNT AND REMOVE THE FRONT COVER BIN Tilt the front cover bin toward you by the handle. Then lift To mount the front cover bin, insert the projections at the bottom and remove the front cover bin. of both sides of the bin along the guides at the bottom of both sides of the slide door and then close the front cover bin.
-
Page 11: Rear Panel
FEATURES AND FUNCTIONS REAR PANEL POWER SWITCH USB TERMINAL Use to switch the power ON and OFF. Use to connect the USB cable. See page POWER SOCKET (AC LINE) HANDLES FOR TRANSPORTING Use to connect the provided power cord. Insert the When carrying the printer, hold these handles and cord firmly. -
Page 12: Before Operation
BEFORE OPERATION PRINTER SETUP PROCEDURE Before printing, follow the printer setup listed below. Install the ink ribbon to this printer. (See page 10.) Install the print paper to this printer. (See page 12.) Install the printer driver on the personal computer. (See page 15.) -
Page 13: Ink Ribbon Installation
BEFORE OPERATION INK RIBBON INSTALLATION Before installing the ink ribbon cassette into this printer, load the ink ribbon in the ink ribbon cassette. NOTE • Place the ink ribbon cassette on a flat surface, when loading the ink ribbon. • Select a place that is free of dust when loading the ink ribbon. - Page 14 BEFORE OPERATION Place the ink ribbon cassette containing the ink ribbon in Guides Handle the position as shown in the illustration. To insert the ink ribbon cassette, align the protrusions on both sides of the cassette with the right and left guides inside the slide door and slide it in a slanting direction.
-
Page 15: Print Paper Installation
BEFORE OPERATION PRINT PAPER INSTALLATION NOTE • Do not push down on the slide door. If you push down on the slide door when they are open, this printer may fall and it can cause damage or injury. Attach the supplied paper flanges to both sides of the print paper. - Page 16 BEFORE OPERATION Remove the sticker and insert the print paper between the rollers to feed it as shown in the figure. Insert the print paper until the blue indicator at the front bottom of the slide door illuminates. Remove the sticker before inserting the print paper between the rollers. Make sure to insert the paper straight.
-
Page 17: Handling Of Paper / Ink Ribbon
BEFORE OPERATION HANDLING OF PAPER / INK RIBBON BEFORE PRINTING • Fingerprints or dust on the paper printing surface may produce poor print quality and cause paper jams. • When the print paper or ink ribbon is abruptly transferred from a cool place to a hot place, vapor or dew is generated on the surface, which causes paper jams or degraded print quality. -
Page 18: Printer Driver Installation
BEFORE OPERATION PRINTER DRIVER INSTALLATION Before connecting the printer and the personal computer, install the printer driver. The printer driver is required to print the data from the personal computer connected with this printer. The printer driver for Windows is supplied with this printer. ®... -
Page 19: Usage
USAGE BUTTON OPERATION AND LCD INDICATION Use the operator control panel buttons and LCD to review and change printer settings. * Use the button shown in bold type. MENU ENTER READY[8x12] PRINTER INFO> PRINTED: ****** MENU MENU PAPER LEFT: ***% MENU INK LEFT: ***% MENU... -
Page 20: Descriptions Of Messages Shown On The Lcd
USAGE DESCRIPTIONS OF MESSAGES SHOWN ON THE LCD LCD Indication Description READY[8x12] The printer is on and ready to make prints. [8x12] represents the size of ribbon that is loaded. ****** represents the total number of prints made since the printer was manufactured. This counter PRINTED: ****** cannot be reset. -
Page 21: Error Messages And Countermeasures
ERROR MESSAGES AND COUNTERMEASURES INDICATIONS ON THE FRONT PANEL AND LCD AND COUNTERMEASURES If, for some reason, printing is not possible or an error occurs during printing, the indicators on the front panel illuminate and a message is displayed on the LCD. In this case, follow the procedure described below. : Steady on : Off : Blinking... - Page 22 ERROR MESSAGES AND COUNTERMEASURES : Steady on : Off : Blinking ALARM POWER Description or cause Countermeasures Page The printer has a specific Turn off the printer, wait for 10 seconds or PREHEAT problem that may require longer, and turn it on. If the error persists, service.
-
Page 23: Overcoming Paper Jams
ERROR MESSAGES AND COUNTERMEASURES OVERCOMING PAPER JAMS Take an appropriate measure according to the indication on the LCD on the front of the printer. XXXX: Error number *******: Error indication LCD indication Countermeasures 1. Remove the exit paper tray. (See page 2. - Page 24 ERROR MESSAGES AND COUNTERMEASURES XXXX: Error number *******: Error indication LCD indication Countermeasures 1. Turn the paper flange according to the arrow to take up the paper. • Pull out the paper completely from the printer. XXXX-******* Rewind Paper 1. Install the print paper. (See page 12.) •...
-
Page 25: Repairing A Torn Ink Ribbon
ERROR MESSAGES AND COUNTERMEASURES REPAIRING A TORN INK RIBBON Position the ink ribbon cassette with the torn ink ribbon on a flat, clean surface. Place a piece of transparent adhesive cellophane tape on the center of the ink ribbon. Direction to turn the shaft Cellophane tape Wind the shaft of the ink ribbon in the direction of the arrow so that the cellophane tape is not... -
Page 26: Before Calling For Service
ERROR MESSAGES AND COUNTERMEASURES BEFORE CALLING FOR SERVICE For the following symptoms, check the printer again before calling for service. Symptom Check Remedy The power is not Is the power cord plug disconnected from the • Connect the power cord plug to the outlet firmly. turned on. -
Page 27: Cleaning
CLEANING Cleaning as indicated below will help maintain stable printer operation and extend the printer’s life. Wearing gloves at cleaning is recommended to prevent injury. Make sure to turn off the power before cleaning. AIR-FILTER CLEANING Clean the air-filters and the ventilation inlets as follows. Loosen the thumb screws for the filter covers on the rear panel and remove the filter covers. -
Page 28: Platen Roller Cleaning
CLEANING PLATEN ROLLER CLEANING Preparations Dial Platen roller Alcohol (ethyl alcohol, etc.) Soft and clean cloth Clean the black part of the roller. Wipe the black part carefully with cloth dampened with a small amount of alcohol. Wipe the whole roller while rotating it by turning the dial. - Page 29 CLEANING Remove the cover for the cleaning rollers. The cleaning rollers are two black rollers inside. Cover for the cleaning rollers Cleaning rollers Clean both cleaning rollers. Gently wipe them with a cloth dampened with alcohol. Wipe the whole rollers by turning them. Wait for the alcohol to dry and then reinstall the cover for the cleaning rollers, print paper, and front cover bin.
-
Page 30: Specifications
SPECIFICATIONS Class Digital Color Printer Model CP-W5000DW Printing method Sublimation Dye Thermal Transfer line print 3-color faces progressive printing (yellow, magenta, and cyan) and surface lamination Print’s resolution 300 x 300 dpi (dpi: dots per inch) Dot resolution 8 x 12”... - Page 31 FAX +34 93 589 4388 Please contact the nearest Mitsubishi sales branch to get DOC (Declaration of Conformity) of the EC Directive 1999/5/EC. Manufactured by Mitsubishi Electric (Malaysia) Sdn. Bhd. PLO 32, Kawasan Perindustrian Senai II, 81400 Senai, Johor Darul Takzim, Malaysia WE919C194B1...
Need help?
Do you have a question about the CP-W5000DW and is the answer not in the manual?
Questions and answers