Table of Contents
Advertisement
Quick Links
Advertisement
Table of Contents

Related Manuals for AG Neovo X-22E


Summary of Contents for AG Neovo X-22E
- Page 1 X-22E & X-24E LED-Backlit Display User Manual...
-
Page 2: Table Of Contents
TABLE OF CONTENTS Safety Information WEEE ............................... 4 Precautions Notice ............................... 5 Cautions When Setting Up ........................5 Cautions When Using ..........................6 Cleaning and Maintenance ........................6 Notice for the LCD Display ........................7 Chapter 1: Product Description 1.1 Package Contents ..........................8 1.2 Wall Mounting Installation Preparation .................... - Page 3 Chapter 6: Appendix 6.1 Warning Messages ..........................41 6.2 Troubleshooting ..........................42 6.3 Transporting the LCD Display ......................44 Chapter 7: Specifications 7.1 Display Specifications ........................45 7.2 Display Dimensions ..........................46 7.2.1 X-22E Dimensions........................46 7.2.2 X-24E Dimensions........................46...
-
Page 4: Safety Information
SAFETY INFORMATION W E E E Information for users applicable in European Union countries. e sy ol on t e p o ct o its pac a in si nifies t at t is p o ct as to e disposed separately from ordinary household wastes at its end of life. -
Page 5: Precautions
PRECAUTIONS Precautions CAUTION RISK OF ELECTRIC SHOCK DO NOT OPEN Symb ols used in this manual This icon indicates the ex i stence of a potential haz a rd that could result in personal injury or damage to the product. This icon indicates important operating and servicing information. -
Page 6: Cautions When Using
PRECAUTIONS Cautions W hen Using Use only the power cord supplied with the LCD display. The power outlet should be installed near the LCD W arning: display and be easily accessible. Unplug the power cord If an ex t ension cord is used with the LCD display, from the power outlet and ensure that the total current consumption plugged e e to... -
Page 7: Notice For The Lcd Display
PRECAUTIONS N otice for the LCD Display In order to maintain the stable luminous performance, it is recommended to use low brightness setting. Due to the lifespan of the lamp, it is normal that the brightness q uality of the LCD display may decrease with time. -
Page 8: Chapter 1: Product Description
CHAPTER 1: PRODUCT DESCRIPTION Chapter 1: Product Description 1. 1 Package Contents When unpacking, check if the following items are included in the package. If any of them is missing or damaged, contact your dealer. LCD Display N ote: User Manual Pow er adapter Must use only the supplied power adapter:... -
Page 9: Wall Mounting Installation Preparation
75mm other horiz o ntal surface overhead are strongly advised to contact AG Neovo for consultations and solutions to help ensure a most pleas a le an lfillin isplay 1. 2. 2 R emov ing the B ase Stand ex p erience. -
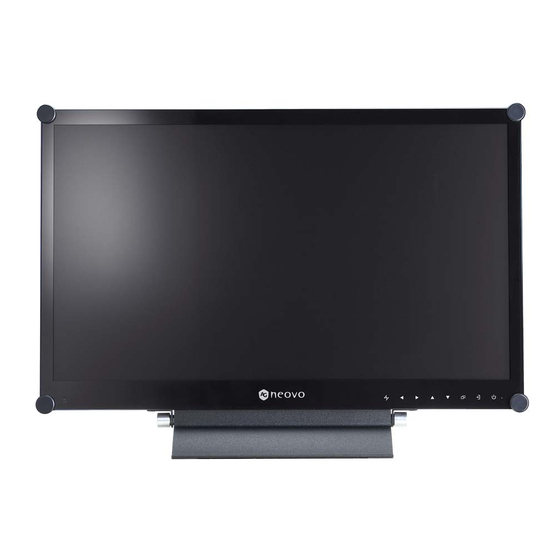
Page 10: Lcd Display Overview
PRODUCT DESCRIPTION 1. 3 LCD Display Ov erv iew 1. 3. 1 F ront V iew and K eypad B uttons Display screen DOW N Hot Key: Aspect Ratio The LCD display screen is protected by NeoV Optical Glass. • When PIP is on, press to SWAP the PIP main and sub picture. -
Page 11: Rear View
PRODUCT DESCRIPTION 1. 3. 2 R ear V iew DC IN HDMI DisplayPort AUDIO IN DC pow er input DisplayPort connector Use to connect the power cord. Use to connect a PC using a DisplayPort cable for digital input signal. DV I connector V G A connector Use to connect a PC using a DVI cable... -
Page 12: Chapter 2: Making Connections
CHAPTER 2: MAKING CONNECTIONS Chapter 2: Making Connections 2. 1 Connecting the Pow er Connect the power cord to the power adapter. Connect the power adapter to the DC power input at the rear of the LCD display. Connect the power cord plug to a power outlet or a power supply. DC IN Caution: Make sure that the LCD display is... -
Page 13: Connecting Input Source Signals
MAKING CONNECTIONS 2. 2 Connecting Input Source Signals 2. 2. 1 Connecting a Computer Using V G A Cab les Connect one end of a D-sub cable to the VGA connector of the LCD display and the other end to the D-sub connector of the computer. -
Page 14: Using Displayport Cables
MAKING CONNECTIONS Using DisplayPort Cab les Connect one end of a DisplayPort cable to the DisplayPort connector of the LCD display and the other end to the DisplayPort connector of the computer. DisplayPort Connecting an Audio Dev ice Connect one end of an audio cable to the audio port at the rear of the LCD display and the other end to the audio out port of the computer. -
Page 15: Connecting A Video Device
MAKING CONNECTIONS 2. 2. 2 Connecting a V ideo Dev ice Using H DMI Cab les Connect one end of an HDMI cable to the HDMI connector of the LCD display and the other end to the HDMI connector of your device. HDMI... -
Page 16: Chapter 3: Using The Lcd Display 3.1 Turning On The Power
CHAPTER 3: USING THE LCD DISPLAY Chapter 3: Using the LCD Display 3. 1 T urning on the Pow er N ote: The LCD display still consumes POW E R button power as long as the power LE D indicator cord is connected to the power outlet. -
Page 17: Adjusting The Volume
USING THE LCD DISPLAY 3. 3 Adjusting the V olume V OLUME buttons Touch the button to call out the volume bar. Touch the button to increase volume or the button to decrease volume. To mute the audio, set the volume to 0. 3. -
Page 18: Using Picture-In-Picture (Pip)
USING THE LCD DISPLAY 3. 5 Using Picture- in- Picture ( PIP) The Picture-in-Picture (PIP) feature allows viewing of more than one input source signal on the LCD display. 3. 5. 1 PIP Options Touch the button repeatedly to enable and scroll among the PIP options. Options are as follows: •... -
Page 19: Pip Swap
USING THE LCD DISPLAY 3. 5. 2 PIP Sw ap The main and the sub source signals set in PIP Setting can be easily swapped using the keypad. N ote: Sub source PIP Swap can only be ex ecuted Main source if PIP is enabled, see page 33. -
Page 20: Chapter 4: On Screen Display Menu
CHAPTER 4: ON SCREEN DISPLAY MENU Chapter 4: On Screen Display Menu 4. 1 Using the OSD Menu Operation Display the main menu screen. Touch 1 9 2 0 x 1 0 8 0 6 0 H z B R I G H T N E S S B R I G H T N E S S C O N T R A S T C O L O U R... - Page 21 ON SCREEN DISPLAY MENU Operation Select the submenu item. Touch the button. 0 x 1 0 8 0 6 0 H z B R I G H T N E S S R I G H T N E S S C O N T R A S T O L O U R T E M P .
-
Page 22: Osd Menu Tree
ON SCREEN DISPLAY MENU 4. 2 OSD Menu T ree 1 9 2 0 x 1 0 8 0 6 0 H z B R I G H T N E S S B R I G H T N E S S C O N T R A S T C O L O U R T E M P . - Page 23 ON SCREEN DISPLAY MENU Main Menu Sub menu R emarks 4. S • See page 31. • • • OVERSCAN • See page 32. • • SUB SOURCE • • • SWAP • ENABLE See page 34. • • MODE SD S •...
- Page 24 ON SCREEN DISPLAY MENU Main Menu Sub menu R emarks Select t e SD lan NL / 簡中 / 繁中 Displays settin s in o ation s c as np t esol tion o i ontal ency e tical ency i in o e an Version.
-
Page 25: Chapter 5: Adjusting The Lcd Display
CHAPTER 5: ADJUSTING THE LCD DISPLAY Chapter 5: Adjusting the LCD Display 5. 1 B R IG H T N E SS 1 9 2 0 x 1 0 8 0 6 0 H z 1. Touch to call out the OSD window. B R I G H T N E S S B R I G H T N E S S 2. - Page 26 ADJUSTING THE LCD DISPLAY Original Setting H igh Setting Setting BRIGHTNESS CONTRAST BLACK LEVEL...
-
Page 27: Colour Temp
ADJUSTING THE LCD DISPLAY 5. 2 COLOUR T E MP. 1 9 2 0 x 1 0 8 0 6 0 H z 1. Touch to call out the OSD window. N E U T R A L W A R M B R I G H T N E S S 2. -
Page 28: Image Setting
ADJUSTING THE LCD DISPLAY 5. 3 IMAG E SE T T IN G 1. Touch to call out the OSD window. 1 9 2 0 x 1 0 8 0 6 0 H z S H A R P N E S S B R I G H T N E S S 2. - Page 29 ADJUSTING THE LCD DISPLAY Item F unction Operation R ange Adjusts black and white levels for video. FULL Touch the button to LIMIT select the setting. N ote: This menu option is only available if the input source is HDMI. Signal source from PC - PC signal at a full range (Grayscale 0-255) state: COLOUR RANGE Monitor OSD colour range: Full...
- Page 30 ADJUSTING THE LCD DISPLAY Item F unction Operation R ange H. POSITION Moves the screen image to the left (Horiz ontal Position) or right. V. POSITION Moves the screen image up or down. (Vertical Position) Adjusts the phase timing to Touch the button to synchronise with the video signal.
-
Page 31: Aspect Ratio
ADJUSTING THE LCD DISPLAY 5. 4 ASPE CT R AT IO 1 9 2 0 x 1 0 8 0 6 0 H z 1. Touch to call out the OSD window. A S P E C T R A T I O F U L L B R I G H T N E S S 2. -
Page 32: Pip Setting
ADJUSTING THE LCD DISPLAY 5. 5 PIP SE T T IN G 1 9 2 0 x 1 0 8 0 6 0 H z 1. Touch to call out the OSD window. P I P O F F B R I G H T N E S S 2. - Page 33 ADJUSTING THE LCD DISPLAY N ote: Any input signal may be set as the main or the sub source signal. However, some input signals are not supported to be paired together as the main and the sub source signals. Refer to the following table for compatibility options. T ab le 5.
-
Page 34: Anti-Burn-In
ADJUSTING THE LCD DISPLAY 5. 6 AN T I- B UR N - IN 1 9 2 0 x 1 0 8 0 6 0 H z 1. Touch to call out the OSD window. E N A B L E O F F B R I G H T N E S S 2. -
Page 35: Osd Setting
ADJUSTING THE LCD DISPLAY 5. 7 OSD SE T T IN G 1 9 2 0 x 1 0 8 0 6 0 H z 1. Touch to call out the OSD window. T R A N S P A R E N C Y B R I G H T N E S S 2. -
Page 36: Audio Setting
ADJUSTING THE LCD DISPLAY 5. 8 AUDIO SE T T IN G 1 9 2 0 x 1 0 8 0 6 0 H z 1. Touch to call out the OSD window. V O L U M E B R I G H T N E S S 2. -
Page 37: System
ADJUSTING THE LCD DISPLAY 5. 9 SY ST E M 1 9 2 0 x 1 0 8 0 6 0 H z 1. Touch to call out the OSD window. P O W E R S A V I N G O F F B R I G H T N E S S 2. - Page 38 N ote: This menu option is only available if the input source is HDMI. Enables or disables the logo feature. If the setting is set to ON , the AG Neovo LOGO lo o is ie y isplaye a te t e isplay is powered on.
-
Page 39: Eco Smart
ADJUSTING THE LCD DISPLAY 5. 10 E CO SMAR T With the built-in EcoSmart sensor, users can enable the Eco Smart feature to automatically adjust the LCD screen brightness according to the ambient light. This feature comforts the eyes and helps optimise energy e ficiency. -
Page 40: Input Select
ADJUSTING THE LCD DISPLAY 5. 11 IN PUT SE LE CT 1 9 2 0 x 1 0 8 0 6 0 H z 1. Touch to call out the OSD window. V G A D V I B R I G H T N E S S 2. -
Page 41: Chapter 6: Appendix 6.1 Warning Messages
CHAPTER 6: APPENDIX Chapter 6: Appendix 6. 1 W arning Messages W arning Messages Cause Solution The resolution or the refresh rate of • Change the resolution or the the graphics card of the computer refresh rate of the graphics I N P U T S I G N A L O U T O F R A N G E is set too high. -
Page 42: Troubleshooting
APPENDIX 6. 2 T roub leshooting Prob lem Possib le Cause and Solution No picture. • Check if the LCD display is turned ON. • Check if the power cord is properly connected to the LCD display. • LED indicator is OFF. •... - Page 43 APPENDIX Prob lem Possib le Cause and Solution Mist formed inside the • This happens due to humid weather conditions. This is a normal glass surface. occurrence. The mist will disappear after a few days or as soon as the weather stabiliz e s.
-
Page 44: Transporting The Lcd Display
APPENDIX 6. 3 T ransporting the LCD Display To transport the LCD display for repair or shipment, place the display in its original packaging carton. Put all the accessories in the b ox ( if necessary) . Place the tw o foam cushions on each side of the LCD display for protection. -
Page 45: Chapter 7: Specifications
Chapter 7: Specifications CHAPTER 7: SPECIFICATIONS isp a Specifications X - 22E X - 24E Panel Panel Type LED-Backlit TFT LCD (TN Technology) LED-Backlit TFT LCD (TN Technology) Panel Siz e 21.5” 23.5” Max . Resolution FHD 1920 x 1080 FHD 1920 x 1080 Pix e l Pitch 0.248 mm... -
Page 46: Display Dimensions
32.6 227.4 227.4 538.55 522.3(opening dimension) 16.3 16.3 (M4xL10) x8 137.4 137.4 277.4 277.4 227.4 eo o Company Address: 5F-1, No. 3-1, Park Street, Nangang District, Taipei, 11503, Taiwan. X24E00/X22EA0_ UM_ V013 Copyright © 2019 AG Neovo. All rights reserved.
Need help?
Do you have a question about the X-22E and is the answer not in the manual?
Questions and answers