Stihl RE 90 Instruction Manual
Hide thumbs
Also See for RE 90:
- Instruction manual (492 pages) ,
- Instruction manual (176 pages) ,
- Instruction manual (448 pages)
Table of Contents
Advertisement
Available languages
Available languages
STIHL RE 90
WARNING
Read Instruction Manual thoroughly before use and
follow all safety precautions – improper use can cause
serious or fatal injury.
ADVERTENCIA
Antes de usar la máquina lea y siga todas las precauciones
de seguridad dadas en el manual de instrucciones – el uso
incorrecto puede causar lesiones graves o mortales.
{
Instruction Manual
Manual de instrucciones
Advertisement
Chapters
Table of Contents

Related Manuals for Stihl RE 90


Summary of Contents for Stihl RE 90
- Page 1 STIHL RE 90 Instruction Manual Manual de instrucciones WARNING ADVERTENCIA Read Instruction Manual thoroughly before use and Antes de usar la máquina lea y siga todas las precauciones follow all safety precautions – improper use can cause de seguridad dadas en el manual de instrucciones – el uso serious or fatal injury.
- Page 2 Instruction Manual 1 - 37 Manual de instrucciones 38 - 75...
-
Page 3: Table Of Contents
19.1 STIHL RE 90 ........ -
Page 4: Introduction
Because the pressure washer is electrically 24.1 STIHL Incorporated ....... . 37... -
Page 5: Symbols In Text
English 2 Guide to Using this Manual DANGER Indicates a hazardous situation that, if not avoided, will result in death or serious injury. WARNING Indicates a hazardous situation that, if not avoided, could result in death or serious injury. NOTICE Indicates a risk of property damage, including damage to the machine or its individual components. -
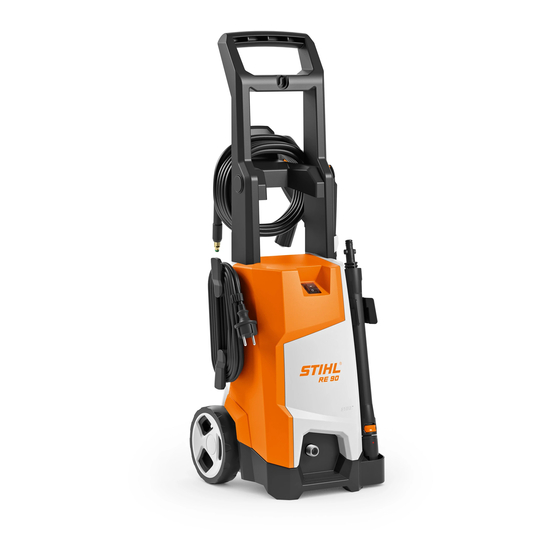
Page 6: Main Parts
English 3 Main Parts 1 Pushbar 3 Main Parts For pushing the pressure washer. 2 Holder for Spray Gun For storing the spray gun. Pressure Washer 3 Holder for Spray Attachment For storing the entire spray attachment consisting of spray gun and spray lance. 4 Carrying Handle For lifting and transporting the pressure washer. -
Page 7: Spray Attachment
English 4 Safety Symbols on the Product 16 Connector for Water Inlet 7 High-Pressure Hose For connecting the water hose to the high-pressure Transports the water from the high-pressure pump to the pump. spray gun. 8 Coupling # Rating Plate For connecting the high-pressure hose to the high- Contains electrical information and the product's serial pressure pump. -
Page 8: Important Safety Instructions
English 5 IMPORTANT SAFETY INSTRUCTIONS Read and follow all safety precautions in the To reduce the risk of damage to the pressure instruction manual. Improper use can lead to washer, do not allow the pressure washer to be serious or fatal personal injury or property used or stored in freezing temperatures. - Page 9 – use only high pressure hoses and accessories rated for these WARNING amounts or above. Use only genuine STIHL replacement parts. ■ This pressure washer is provided with a "ground fault circuit interrupter (GFCI)" built into the plug or the power- –...
-
Page 10: Intended Use
English 5 IMPORTANT SAFETY INSTRUCTIONS Intended Use animals. Keep clear of nozzle while machine is operating. Make sure spray jet does not damage WARNING object being cleaned. ■ This pressure washer is designed for cleaning jobs around – To reduce risk of fire and explosion, never spray the home and garden, cleaning garden furniture, flammable liquids. -
Page 11: Personal Protective Equipment
■ Good footing is very important. To help maintain a secure dangerous. Only attachments supplied by STIHL or footing and reduce the risk of injury while working: expressly approved by STIHL for use with this specific – Wear sturdy boots with non-slip, rubber model are recommended. -
Page 12: Power Supply Cord
– Make sure the power supply cord is positioned and property damage: secured or marked so that it will not be stepped on, – Take the pressure washer to your authorized STIHL tripped over, come in contact with sharp objects, servicing dealer to be checked before further moving parts, or otherwise be subjected to damage operation. -
Page 13: Connecting The Water Supply
STIHL servicing dealer. Do not use the pressure To prevent contamination of potable water: washer until the problem has been corrected. - Page 14 English 5 IMPORTANT SAFETY INSTRUCTIONS ■ To help reduce the risk of serious personal injury or death 5.8.2 Holding and Controlling the Pressure Washer from unintentional starting: – Never carry the pressure washer with your finger on the spray gun trigger. –...
- Page 15 English 5 IMPORTANT SAFETY INSTRUCTIONS – Always keep the power supply cord behind the 5.8.3 Working Conditions operator and away from the water jet. Don't let the WARNING power supply cord become entangled with obstacles or objects. ■ Operate your pressure washer only under good visibility ■...
- Page 16 English 5 IMPORTANT SAFETY INSTRUCTIONS ■ Spraying certain materials with the water jet may produce ■ Breathing asbestos dust is dangerous and can cause dust or a mist containing particulate matter capable of severe or fatal injury, respiratory illness or cancer, causing respiratory disease, cancer, birth defects and including mesothelioma.
- Page 17 English 5 IMPORTANT SAFETY INSTRUCTIONS unsuitable detergents or cleaning agents can cause – Keep hands, feet or any other part of personal injury and damage the pressure washer and/or your body away from the water jet at all the surface being cleaned. times.
-
Page 18: Maintenance, Repair And Storage
6 Maintenance, Repair and Storage ■ Use of parts that are not authorized or approved by STIHL may cause serious or fatal injury or property damage. – STIHL recommends that only identical authorized... -
Page 19: Before Starting Work
English 7 Before Starting Work NOTICE 8 Assembling the Pressure Washer – Do not allow the unit to be used or stored in freezing temperatures. Assembling Parts and Accessories – If the pressure washer must be transported or stored in freezing WARNING conditions, the pump must be filled with To reduce the risk of severe injury from high-pressure spray,... -
Page 20: Connecting And Removing The High-Pressure
English 8 Assembling the Pressure Washer Handle and Cleaning Needle Nozzles ► Insert the fan-jet nozzle (1) and rotary-jet nozzle (2). ► Slide the handle (1) onto the frame (2) and tighten the screws (3). Detergent Spray Set ► Insert the cleaning needle (4) into the handle. Holder for Spray Gun ►... -
Page 21: Connecting And Removing The Spray Gun And Lance
English 8 Assembling the Pressure Washer To connect the high-pressure hose: ► Switch off the pressure washer, @ 11.2. ► Disconnect the pressure washer from the power supply. ► Shut off the water supply. ► Remove all sand and debris from the connections and couplings. -
Page 22: Inserting And Removing The Spray Nozzle
English 8 Assembling the Pressure Washer ► If the high-pressure hose is difficult to push into the spray gun, apply a food-safe fitting grease to the sealing surface on the high pressure hose. ► Press the spray lance (1) against the spray gun (2) and turn until it stops. -
Page 23: Connecting The Water Supply
English 9 Connecting the Water Supply 8.4.2 Removing the Spray Nozzle WARNING If the high-pressure nozzle is not secure, it can fly out of the WARNING spray lance during operation and cause injury. Confirm that To reduce the risk of severe injury from unintended the nozzle is fixed securely in the quick-connect coupling. -
Page 24: Ground Fault Circuit Interruptor (Gfci)
English 10 Ground Fault Circuit Interruptor (GFCI) Connecting the Water Hose NOTICE The water hose must meet the following dimensions: Running the pressure washer without water will cause the – Diameter: 0.5 in. (13 mm) pump to overheat, which may result in permanent damage. Always connect and turn on the water supply to the pump –... -
Page 25: Resetting The Ground Fault Circuit Interruptor
► If the LED does not turn ON after depressing the RESET button, the GFCI is not working. Disconnect the pressure washer from the power supply and have it inspected by an authorized STIHL servicing dealer before further use. 11 Switching the Pressure Washer On and Off 11.1 Switching On... -
Page 26: Switching Off
English 12 During Operation ► Always hold and operate the pressure washer with one ► Set the switch to the 0 position. hand firmly on the spray gun and your other hand firmly on the spray lance. Always hold the pressure washer with two 12 During Operation hands in this manner. -
Page 27: Adding Detergents
► Always read and follow instructions provided by the manufacturer of the detergent before starting work. ► Release the spray gun trigger (2). ► STIHL recommends soaking surfaces with water before The high-pressure pump switches off automatically when applying detergent. -
Page 28: Cleaning
English 12 During Operation After applying detergent: ► If you want to remove dirt from painted, wooden or other potentially sensitive surfaces, increase the distance ► Switch off the pressure washer, @ 11.2. between the nozzle and the surface. ► Relieve system pressure. To adjust the fan jet nozzle: ►... -
Page 29: After Finishing Work
English 13 After Finishing Work ► Wind up the high-pressure hose (1) and stow it on the ► Move the spray attachment evenly along the surface to be cleaned. bracket (2). ► Move forward slowly in a controlled manner. ► Roll up the power supply cord (3) and hang it onto the brackets (4). -
Page 30: Protecting The Pressure Washer In Winter
► Press and release spray gun trigger several times. Freezing temperatures can damage components of the ► Switch off the pressure washer and disconnect it from the pressure washer. STIHL recommends storing the pressure power supply. washer indoors in a dry room where it is protected from ►... -
Page 31: Transporting
@ 13.2. NOTICE Freezing temperatures can damage components of the pressure washer. STIHL recommends storing the pressure washer indoors in a dry room where it is protected from freezing temperatures. Relieve all system pressure and make sure all water is eliminated from the pump system and hoses before storing. -
Page 32: Cleaning The Nozzle And Spray Lance
English 16 Cleaning 16.2 Cleaning the Nozzle and Spray Lance 16.3 Cleaning the Water Intake Screen A clogged high pressure nozzle can cause excessive To clean the water intake screen: pressure to build in the pump. Clean the high-pressure nozzle if it becomes clogged. To clean the nozzle and spray lance: ►... -
Page 33: Inspection And Maintenance
English 17 Inspection and Maintenance 17 Inspection and Maintenance 17.1 Inspection and Maintenance Chart The following maintenance intervals are examples and apply for normal operating conditions. Actual use and your experience will determine the frequency of required inspection and maintenance. Complete Machine Visual inspection Clean... -
Page 34: Inspecting And Maintaining The Pressure Washer
► Inspecting hoses, couplings, connectors and gaskets periodically and having a worn component replaced. ► Having worn, missing or damaged safety labels replaced by an authorized STIHL servicing dealer. The pump is pre-filled with pump oil and does not require replacement or maintenance. -
Page 35: Troubleshooting Guide
► If the pressure washer still does not start, disconnect the pressure washer from the power supply and have it inspected by an authorized STIHL servicing dealer before further use. The electric motor is too warm. ► Allow the pressure washer to cool at ambient temperatures for approximately 5 minutes. - Page 36 ► Clean the nozzle, @ 16.2. The water intake screen is blocked. ► Clean water intake screen, @ 16.3. The high-pressure pump, high-pressure ► Ask a STIHL servicing dealer to inspect the hose or spray attachment is leaking or pressure washer. faulty.
-
Page 37: Specifications
– Minimum pressure: 14.5 PSI (0.1 MPa / 1 bar) appearance of your machine differs from those described in this manual, please contact your STIHL dealer or the STIHL – Maximum pressure: 145 PSI (1 MPa / 10 bar) distributor for your area for assistance. -
Page 38: Replacement Parts And Equipment
23.1 Registered Trademarks STIHL recommends the use of genuine STIHL replacement ® ® STIHL FARM BOSS parts. Genuine STIHL parts can be identified by the STIHL ® iCademy part number, the logo and, in some cases, by the ® STIHL parts symbol . - Page 39 STIHL Territory™ STIHL Injection This listing of trademarks is subject to change. Any unauthorized use of these trademarks without the express written consent of ANDREAS STIHL AG & Co. KG, Waiblingen is strictly prohibited. 24 Addresses 24.1 STIHL Incorporated STIHL Incorporated 536 Viking Drive P.O.
- Page 40 español / EE.UU Contenido 9.1 Conexión de la hidrolavadora al suministro de Introducción ........39 agua .
-
Page 41: Introducción
19.1 STIHL RE 90........ -
Page 42: Símbolos En El Texto
español / EE.UU 2 Acerca de este manual de instrucciones PELIGRO Identifica una situación de peligro que, de no evitarse, causará lesiones graves o mortales. ADVERTENCIA Identifica una situación de peligro que, de no evitarse, podría causar lesiones graves o mortales. INDICACIÓN Indica el riesgo de daños a la propiedad, incluidos la máquina o sus componentes. -
Page 43: Componentes Importantes
español / EE.UU 3 Componentes importantes 1 Barra de empuje 3 Componentes importantes Para empujar la hidrolavadora. 2 Portador de la pistola rociadora Para guardar la pistola rociadora. Hidrolavadora 3 Portador del accesorio de pulverización Permite guardar todo el accesorio de pulverización, compuesto por la pistola y la lanza. -
Page 44: Accesorio Pulverizador
español / EE.UU 4 Símbolos de seguridad en el producto 15 Compartimiento de almacenamiento 6 Acoplamiento de la manguera de presión alta Para guardar las boquillas de presión alta. Para conectar la manguera de presión alta a la pistola rociadora. 16 Conector de entrada de agua 7 Manguera de presión alta Conecta la manguera de agua a la bomba de presión... -
Page 45: Instrucciones Importantes De
español / EE.UU 5 INSTRUCCIONES IMPORTANTES DE SEGURIDAD Para reducir el riesgo de lesiones, respete las Para reducir el riesgo de un incendio o explosión medidas de seguridad especificadas. que pudiera provocar lesiones personales graves o daños a la propiedad, nunca rocíe líquidos inflamables o combustibles, @ 5.8.4 Para reducir el riesgo de dañar la hidrolavadora, Lea y aténgase a todas las precauciones de... - Page 46 español / EE.UU 5 INSTRUCCIONES IMPORTANTES DE SEGURIDAD 7) No se extienda excesivamente ni se pare sobre un apoyo PROTECCIÓN DEL INTERRUPTOR DE PÉRDIDAS A inestable. Mantenga los pies bien apoyados y TIERRA equilibrados en todo momento. ADVERTENCIA 8) Siga las instrucciones de mantenimiento dadas en el manual.
-
Page 47: Uso Previsto
– No manipule el enchufe con manos mojadas. nominal para tolerar estos valores o más. Use – Aislante doble — Al darle mantenimiento a la únicamente repuestos STIHL genuinos. máquina, utilice únicamente repuestos idénticos. – La pistola rociadora produce un culatazo –... -
Page 48: Operador
■ Según los conocimientos actuales de STIHL, el motor eléctrico de esta hidrolavadora no debería interferir con ■ Para reducir el riesgo de descarga eléctrica: un marcapasos. -
Page 49: Hidrolavadora
■ Las piezas de repuesto auténticas de STIHL están de armar, inspeccionar, limpiar, o darle diseñadas específicamente para su hidrolavadora y mantenimiento o servicio a la hidrolavadora. -
Page 50: Conexión Del Suministro De Agua
5 INSTRUCCIONES IMPORTANTES DE SEGURIDAD Conexión del suministro de agua – Si se daña el cable de suministro eléctrico, solicite a un concesionario de servicio STIHL autorizado que ADVERTENCIA lo sustituya antes de usarlo. Un cordón eléctrico dañado debe sustituirse con un repuesto STIHL ■... -
Page 51: Uso De La Hidrolavadora
– Si la hidrolavadora o cualquier pieza de la unidad están dañada o no funciona correctamente, llévela a un concesionario de servicio STIHL autorizado. No use la hidrolavadora hasta que el problema se haya solucionado. - Page 52 español / EE.UU 5 INSTRUCCIONES IMPORTANTES DE SEGURIDAD 5.8.2 Sujeción y control de la hidrolavadora – Coloque el accesorio pulverizador en una posición tal que todas las partes del cuerpo estén lejos del chorro de agua. – Ubique el cordón eléctrico de modo que no se dañe mientras trabaja con la hidrolavadora.
- Page 53 español / EE.UU 5 INSTRUCCIONES IMPORTANTES DE SEGURIDAD – No trate de llegar más lejos de lo debido. Mantenga ■ Las chispas que se generan del funcionamiento de la los pies bien apoyados y equilibrados en todo hidrolavadora pueden encender gases, líquidos, vapores, momento.
- Page 54 español / EE.UU 5 INSTRUCCIONES IMPORTANTES DE SEGURIDAD de polvo u otros contaminantes del aire, especialmente – Nunca pulverice líquidos inflamables o los de partículas pequeñas, puede causar enfermedades combustibles. respiratorias o de otro tipo. – No permita que la bomba aspire fluidos –...
-
Page 55: Mantenimiento, Reparación Y Almacenamiento
– Nunca dirija el chorro hacia aparatos y mantenimiento dadas en las secciones equipos eléctricos, tomacorrientes ni correspondientes de este manual de instrucciones. cordones eléctricos. – STIHL recomienda que un concesionario de servicio STIHL autorizado efectúe todos los trabajos de reparación. 0458-814-8621-A... -
Page 56: Antes De Empezar A Trabajar
■ El uso de componentes no autorizados o no aprobados agriete por la dilatación del agua, por STIHL puede causar lesiones graves o mortales y @ 13.2. daños a la propiedad. – STIHL recomienda que solo se usen piezas de ¡GUARDE ESTAS... -
Page 57: Armado De La Hidrolavadora
español / EE.UU 8 Armado de la hidrolavadora ► Conecte la pistola rociadora y la lanza, @ 8.3.1. Manija y aguja limpiadora ► Inserte la boquilla, @ 8.4.1. ► Si lo desea, añada detergente, @ 12.2. ► Conecte el suministro de agua, @ 9. ►... -
Page 58: Conexión Y Desconexión De La Manguera De Alta
español / EE.UU 8 Armado de la hidrolavadora Boquillas Para conectar la manguera de presión alta: ► Apague la hidrolavadora, @ 11.2. ► Desconecte la hidrolavadora de la fuente de alimentación. ► Cierre el suministro de agua. ► Quite toda la arena y suciedad de las conexiones y acoplamientos. -
Page 59: Conexión Y Desconexión De La Pistola Rociadora Y
español / EE.UU 8 Armado de la hidrolavadora ► Bloquee el gatillo de la pistola rociadora. ► Empuje la manguera de presión alta (1) en la pistola rociadora (2). ► Si resulta difícil empujar la manguera de presión alta contra la pistola rociadora, aplíquele una grasa apta para uso con alimentos a la superficie de sellado de la manguera. -
Page 60: Inserción Y Retiro De La Boquilla
español / EE.UU 8 Armado de la hidrolavadora ADVERTENCIA De lo contrario, podría salir despedida de la lanza rociadora durante el funcionamiento y causar lesiones. Verifique que la boquilla esté firmemente sujetada en el acoplamiento de conexión rápida. La hidrolavadora se ofrece con dos boquillas de alta presión que se pueden conectar a la lanza rociadora. -
Page 61: Conexión Del Suministro De Agua
español / EE.UU 9 Conexión del suministro de agua 8.4.2 Retiro de la boquilla Conexión de la manguera de agua La manguera de agua deberá tener las dimensiones ADVERTENCIA siguientes: Para reducir el riesgo de lesiones graves causadas por la –... -
Page 62: Interruptor De Pérdidas A Tierra (Gfci)
español / EE.UU 10 Interruptor de pérdidas a tierra (GFCI) ► Inserte la boquilla, @ 8.4.1. 10 Interruptor de pérdidas a tierra (GFCI) INDICACIÓN Si se pone en marcha la hidrolavadora sin agua, la bomba 10.1 Prueba del interruptor de pérdidas a tierra se sobrecalentará, lo cual podría causarle daños permanentes. -
Page 63: Reposición Del Interruptor De Pérdidas A Tierra
► Si el LED no se ilumina luego de oprimir el botón de REPOSICIÓN, el GFCI no está funcionando. Desconecte la hidrolavadora de la fuente de alimentación y solicite a un concesionario autorizado de STIHL que la inspeccione antes de volverla a usar. ► Coloque el interruptor en la posición |. -
Page 64: Apagado
español / EE.UU 12 Durante el funcionamiento a los 0,15 ohmios. Las fluctuaciones de voltaje pueden Activación del gatillo de la pistola rociadora afectar de modo negativo a otros aparatos eléctricos que Para oprimir el gatillo de la pistola rociadora: estén conectados. -
Page 65: Adición De Detergentes
► Rocíe la superficie hasta que quede limpia y se hayan ► STIHL recomienda empapar las superficies con agua quitado todos los residuos de detergente. antes de aplicarles detergente. ► Cuando se enjuaga el detergente, empiece por la parte ►... - Page 66 español / EE.UU 12 Durante el funcionamiento Asegúrese de que no haya ninguna otra persona en la zona de trabajo, @ 5.8.4. Trabaje con cuidado y mantenga un control adecuado de la hidrolavadora, @ 5.8.2. ADVERTENCIA Para reducir el riesgo de que se le inyecte fluido bajo la piel y/o lesiones graves, mantenga las manos, los pies y los demás miembros de su cuerpo alejados del chorro de agua y nunca dirija el chorro de presión alta hacia su persona u...
-
Page 67: Después De Completar El Trabajo
español / EE.UU 13 Después de completar el trabajo ► Inserte el juego de pulverización de detergente (6). 13 Después de completar el trabajo ► Inserte la boquilla (7). 13.1 Preparación para el transporte o el almacenamiento Para preparar la hidrolavadora para el transporte o el almacenamiento: ►... - Page 68 Las temperaturas heladas pueden dañar los componentes ambiente. de la hidrolavadora. STIHL recomienda guardar la ► Oprima y suelte el gatillo de la pistola rociadora varias hidrolavadora bajo techo en un lugar seco, protegida de las veces.
-
Page 69: Transporte
@ 13.2. INDICACIÓN Las temperaturas heladas pueden dañar los componentes de la hidrolavadora. STIHL recomienda guardar la hidrolavadora bajo techo en un lugar seco, protegida de las temperaturas heladas. Alivie toda la presión del sistema y compruebe que se haya eliminado toda el agua del sistema de la bomba y de las mangueras antes de guardarla. -
Page 70: Limpieza De La Boquilla Y De La Lanza Rociadora
español / EE.UU 16 Limpieza 16.2 Limpieza de la boquilla y de la lanza rociadora 16.3 Limpieza de la malla de admisión de agua Una boquilla de presión alta obstruida puede causar una Para limpiar la malla de admisión de agua: acumulación excesiva de presión en la bomba. -
Page 71: Inspección Y Mantenimiento
español / EE.UU 17 Inspección y mantenimiento 17 Inspección y mantenimiento 17.1 Tabla de inspección y mantenimiento Los siguientes intervalos de mantenimiento se brindan a modo de ejemplo y corresponden a condiciones normales de trabajo. El uso y la experiencia determinarán la frecuencia de inspección y mantenimiento requerida. -
Page 72: Inspección Y Mantenimiento De La Hidrolavadora
► Si las etiquetas de seguridad están dañadas o faltan, solicite etiquetas de repuesto a un concesionario de servicio STIHL autorizado. La bomba viene llena con aceite adecuado, el cual no requiere cambio ni mantenimiento. Si usted está reclamando cobertura de garantía para algún componente que no ha sido reparado o mantenido debidamente, es posible que se deniegue la garantía. -
Page 73: Guía De Solución De Problemas
► Si la hidrolavadora aún no arranca, desconéctela de la fuente de alimentación y solicite a un concesionario autorizado de STIHL que la inspeccione antes de volverla a usar. El motor eléctrico está muy caliente. ► Permita que la hidrolavadora se enfríe a temperatura ambiente por aproximadamente 5 minutos. - Page 74 La malla de admisión de agua está ► Limpie la malla de admisión de agua, @ 16.3. obstruida. La bomba de alta presión, la manguera o ► Solicite al concesionario de STIHL que revise la el accesorio pulverizador presenta fugas hidrolavadora. o averías.
-
Page 75: Especificaciones
– Fuerza máxima de contragolpe 12,9 N 19.3 Mejoramientos técnicos Suministro de agua STIHL tiene la filosofía de mejorar continuamente todos sus productos. Como resultado de ello, periódicamente se – Diámetro de manguera de agua: 19 mm (3/4 pulg) introducen cambios de diseño y mejoras. Por lo tanto, es –... - Page 76 ® STIHL FARM BOSS de STIHL. Es posible identificar las piezas originales de ® iCademy STIHL por el número de pieza STIHL, el logotipo de ® MAGNUM y, en ciertos casos, el símbolo ® La combinación de colores MasterWrench Service de piezas STIHL.
- Page 77 Injection Esta lista de marcas comerciales está sujeta a cambios. Queda terminantemente prohibido todo uso de estas marcas comerciales sin el consentimiento expreso por escrito de ANDREAS STIHL AG & Co. KG, Waiblingen. 24 Direcciones 24.1 STIHL Incorporated STIHL Incorporated 536 Viking Drive P.O.
- Page 78 español / EE.UU 24 Direcciones 0458-814-8621-A...
- Page 80 State of California to cause químicos considerados por el Estado de cancer, birth defects or other reproductive California como causantes de cáncer, harm. defectos de nacimiento u otra toxicidad reproductora. 0458-814-8621-A englisch / spanisch USA www.stihl.com *04588148621A* 0458-814-8621-A...
Need help?
Do you have a question about the RE 90 and is the answer not in the manual?
Questions and answers