Table of Contents
Advertisement
Advertisement
Table of Contents

Subscribe to Our Youtube Channel
Related Manuals for Arjo System 2000 Series


Summary of Contents for Arjo System 2000 Series
- Page 1 INSTRUCTIONS FOR USE System 2000 04.AR.12_15EN • 07/2019...
- Page 2 Mandatory to read the Instructions for Use Design Policy and Copyright ® and ™ are trademarks belonging to the Arjo group of companies. © Arjo 2019 As our policy is one of continuous improvement, we reserve the right to modify designs without prior notice.The content of this publication may not be copied either whole or in...
-
Page 3: Table Of Contents
Contents Foreword ...................4 Intended Use ................5 Safety Instructions ..............6 Preparations ................7 System 2000 Bathtubs ..............8 Parts Designation ..............10 Control Panels .................12 Buttons and Displays ...............14 Product Description/Functions ..........16 Drain Control Knob ..............16 Autofill ..................16 Shower Handle ..............17 Shower/Disinfection System (UK market only) ....17 P220 Temperature Display ..........18 P300 Display ................18 Scalding Protection ..............18... -
Page 4: Foreword
Foreword Complementary Information Thank you for purchasing Arjo Equipment The Arjo System 2000® bath is part of a worldwide family of quality products designed especially for efficient patient hygiene and good ergonomics for the caregiver. Please read this Instructions for Use... -
Page 5: Intended Use
Assembly and Installation Instructions in this Instructions for Use (IFU). If there is anything you do not completely understand, ask your Arjo representative. Indication for Use Instructions for Use IFU Expected Service Life Care and Preventive Maintenance on page 52... -
Page 6: Safety Instructions
Safety Instructions WARNING To avoid injury to both the patient and the caregiver, never modify the equipment or use incompatible parts. WARNING To avoid explosion or fire, never use the equipment in oxygen rich environment, in presence of heat source or flammable anaesthetic gases. -
Page 7: Preparations
10 NOTE Sound & Vision If you have any questions, please contact your local Arjo representative for support and service. The contact information is listed on the last page of this IFU. Cleaning and Disinfection Instructions on page 40... -
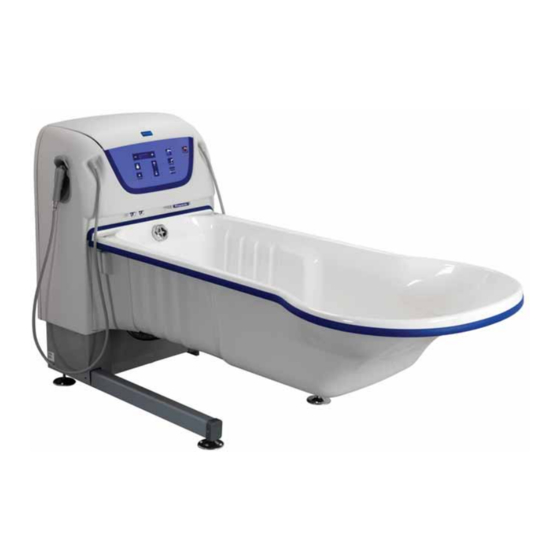
Page 8: System 2000 Bathtubs
System 2000 Bathtubs Rhapsody® Primo® Primo® Ferro Harmonie™... - Page 9 Intentionally left blank...
-
Page 10: Parts Designation
Parts Designation Hydrosound® system (optional) Hydrosound Sound & Vision® system (optional) Sound & Vision ArjoSound Type B, Applied part. Degree of Protection - Electrical shock ArjoSound Disinfection unit (optional) Not WRAS approved ArjoSound Hydromassage™ system (optional) Hydromassage... - Page 11 UNDER THE CONTROL PANEL LID...
-
Page 12: Control Panels
Control Panels P220 Control Panel ArjoSound Hydromassage/Hydrosound... - Page 13 2 3 4 P300 Control Panel Change Default Setting (P300 only) on page 27 ArjoSound Hydromassage/Hydrosound...
-
Page 14: Buttons And Displays
Buttons and Displays Autofill Button P220 P300 Shower Button Raise Bathtub Button Lower Bathtub Button Temperature Display - Bathtub water (P220) P220 75.0°F Display (P300) 37.0°C 75.0°F Hydrosound... - Page 15 P300 StandbyMode Shampoo/Body Wash Button Bath Oil/ArjoSound™ Water Conditioner Button ArjoSound ArjoSound Hydrosound ArjoSound Hydromassage™/Hydrosound® System Button (optional) Hydromassage Hydrosound Hydromassage/Hydrosound P220 P300 Hydromassage/Hydrosound P220. hydrosound hydromassage Hydromassage/Hydrosound Disinfection Button (optional) P300...
-
Page 16: Product Description/Functions
Product Description/Functions Drain Control Knob Fig. 1 Autofill Fig. 2 NOTE If the Autofill button is pressed after the preset water level is reached, bathtub filling continues. P220, Fig. 3 P300 High Level P300 only Normal Normal level Level (preset, 30 s over the top sensor) Level... -
Page 17: Shower Handle
Low level (preset, minus 20 s below the top sensor) High level (preset, 60 s over the top sensor) Change Default Setting (P300 only) on page 27. Shower Handle Fig. 1 Lock Button Trigger Shower/Disinfection System (UK market only) -
Page 18: P220 Temperature Display
P220 Temperature Display (See Fig. 1) Fig. 1 P220 World Temperature display 37.0°C P300 Display (See Fig. 2) P220 75.0°F Fig. 2 P300 Scalding Protection World WARNING 37.0°C To prevent scalding if the scalding protection is 37.0°C activated, remove the patient from the bath 37.0°C immediately in a safe manner. -
Page 19: Shampoo/Body Wash (Optional)
Reset scalding protection (P300 only) (4 steps) Fig. 1 Fig. 2 Shampoo/Body Wash (optional) P300 Change Default Setting (P300 only) on page 27. Bath Oil/ArjoSound™ Water Conditioner (optional) Fig. 3 ArjoSound ArjoSound Hydrosound ArjoSound Hydrosound ArjoSound Fig. 4 P300 Change Default Setting (P300 only) on page 27. -
Page 20: Raise And Lower Bathtub
Emergency Lowering (optional, not for UK market) Fig. 2 NOTE If a buzzing sound is heard, the battery is low. Please contact your local Arjo service technician. Disinfection Unit (optional) Fig. 3 Continue with the steps on the next page. -
Page 21: Pillow
Cleaning and Disinfection Instructions on page 40. Fig. 1 P300 Replace Disinfectant Bottle (System 2000 bath with disinfection option only) on page 42 P300 Hydromassage Fig. 2 P220 Rhapsody® Pillow Primo® Harmonie™ Primo® Ferro Foot Support Toiletry Tray (optional) Fig. 3 Hot Water Flush (Kit) -
Page 22: Hydromassage System
Hydromassage System WARNING To avoid hair entrapments under water, always install the Hydromassage system suction cover before use. CAUTION Turn the hydromassage water intensity knob clockwise at highest intensity in order to prevent water leakage on the floor. The leakage occurs from the built-up water pressure in the Hydromassage Fig. - Page 23 Continue Hydromassage with Treatment Fig. 4 Hose (optional) Hydromassage Hydromassage Fig. 5 Hydromassage Air Inlet Fig. 6 MAX. MIN. MIN. Hydromassage Hydromassage MAX. Fig. 7...
-
Page 24: Hydrosound System
Hydrosound System Hydrosound Hydrosound WARNING To avoid injury, never use the Hydrosound system function when pregnant. WARNING To avoid damage to hearing, make sure to keep the patients head above water when using the Hydrosound system. Use Hydrosound® System (10 steps) Fig. - Page 25 ArjoSound ArjoSound Fig. 2 WARNING To avoid burns, avoid continuous contact with the Hydrosound system transducer plate while in operation. (See Fig. 2) Hydrosound Hydrosound Hydrosound Hydrosound Fig. 3 Hydrosound P220, P300 Hydrosound Fig. 4 Hydrosound Hydrosound Fig. 5 P300 P220 P300 Hydrosound...
-
Page 26: Sound & Vision System
Sound & Vision System Sound & Vision System Hand Control Sound & Vision Sound & Vision Hydromassage Hydrosound WARNING To avoid electric shock, only use the USB memory stick in the connector on the bath. Use Sound & Vision System (4 steps) Sound &... -
Page 27: Change Default Setting (P300 Only)
Change Default Setting (P300 only) (4 steps) Control Panels on page 12 Alternative Function Default Settings Settings Interval (Preset) Button values (Display Code) ° ° Filling ° ° Showering ° ° ° Disinfect ArjoSound Bath Oil ArjoSound ArjoSound water conditioner ArjoSound Shampoo Hydrosound... -
Page 28: Bathe Patient Using A Lift Hygiene Chair
Bathe Patient using a Lift Hygiene Chair Preparations for Bath (5 steps) Alenti, Calypso and Combilift Fig. 1 System 2000 Alenti, Calypso and Combilift IFU before use. P300 Product Description/Functions on page 16 WARNING To prevent scalding, always check the water temperature with your naked hand before directing the water on the patient. - Page 29 Transfer and Bathe Patient (13 steps) Fig. 1 WARNING To avoid entrapment, make sure to keep the patients hair, arms and feet close to the body and use designated grab supports during any movement. Fig. 2 WARNING To avoid entrapment or pinching of genitals, make sure there is enough clearance during movement over the tub edge, toilet, bedpan or other furniture.
- Page 30 Fig. 4 Fig. 5 WARNING To avoid entrapment or pinching of genitals, make sure there is enough clearance during movement over the tub edge, toilet, bedpan or other furniture. Hydromassage Hydrosound Sound & Vision...
- Page 31 Shower Patient (14 steps) WARNING To prevent scalding, always check the water temperature with your naked hand before directing the water on the patient. Do not use gloves as it may insulate to the extent that the water temperature can be misjudged. Point the flow of the water away from the patient.
- Page 32 Fig. 1 Fig. 2...
- Page 33 End the Bath (9 steps) Fig. 1 WARNING To avoid entrapment or pinching of genitals, make sure there is enough clearance during movement over the tub edge, toilet, bedpan or other furniture. Fig. 2 Disinfect After Each Patient Fig. 3 (1 step) Cleaning and Disinfection Instructions on page 40...
-
Page 34: Bathe Patient Using A Lift Bath Trolley
Bathe Patient using a Lift Bath Trolley Miranti Bolero System 2000 Preparations for Bath (7 steps) Fig. 1 CAUTION To prevent equipment damage when using a lift bath trolley, the foot support and pillow must be removed. P300 Product Description/Functions on page 16 WARNING To prevent scalding, always check the water temperature with your naked hand before... - Page 35 Transfer and Bathe Fig. 1 (13 steps) Miranti Fig. 2 Manual Drive Power Drive Fig. 3 CAUTION To prevent damage to the equipment, make sure the “Duck Foot” bath legs go underneath the lift bath trolley chassis. Continue with the steps on the next page.
- Page 36 Fig. 4 Fig. 5 Hydromassage Hydrosound Sound & Vision...
- Page 37 Use the Shower (13 steps) WARNING To prevent scalding, always check the water temperature with your naked hand before directing the water on the patient. Do not use gloves as it may insulate to the extent that the water temperature can be misjudged. Point the flow of the water away from the patient.
- Page 38 Fig. 2 End the Bath Fig. 3 (6 steps) Fig. 4 Power Drive Fig. 5 Manual Drive...
- Page 39 Disinfect After Each Patient Fig. 1 (1 step) Cleaning and Disinfection Instructions on page 40 Miranti Miranti...
-
Page 40: Cleaning And Disinfection Instructions
If contact occurs rinse with plenty of water. If eyes or skin becomes irritated, contact a physician. Always read the material safety data sheet of the disinfectant. CAUTION To avoid damage on the equipment only use Arjo branded disinfectants. - Page 41 Microbiological Formation Prevention Installation precautions In order to limit the growth of bacterial flora, it is necessary to take action at four levels: • Avoid stagnating water and make sure proper water circulation; • Take precautions against the formation of scale and corrosion based on the water quality;...
- Page 42 WARNING To prevent cross-contamination, always follow the disinfection instructions in this Instructions for Use. Fig. 2 Fig. 3 ° Arjo Guard (60) Arjo Clean™ (60) Cen-Kleen IV ™(40) Arjo Disinfectant Cleanser IV (35) Arjo General Purpose Disinfectant (35) Fig. 4...
- Page 43 Clean and Disinfect with Disinfection Spray Handle (Still Bath and Hydrosound System) (38 steps) Fig. 1 Remove visual residue (Step 1-6 of 38) Clean (Step 7-23 of 38) Fig. 2 Replace Disinfectant Bottle (System 2000 bath with disinfection option only) on page 42. Continue with the steps on the next page.
- Page 44 Fig. 3 Fig. 4 CAUTION Never use green or brown Scotch-Brite nor steel wool on the bath as it may scratch the surface. ° Fig. 5 Continue with the steps on the next page.
- Page 45 Disinfect (Step 24-38 of 38) Fig. 6 P300 P220 P220 US NOTE Let the pillow dry with the suction cups upwards.
- Page 46 Clean and Disinfect with a Spray Bottle Fig. 1 (29 steps) Remove visual residue (Step 1-5 of 29) Clean (Step 6-16 of 29) Fig. 2 Fig. 3 Continue with the steps on the next page.
- Page 47 Fig. 4 CAUTION Never use green or brown Scotch-Brite nor steel wool on the bath as it may scratch the surface. ° Continue with the steps on the next page.
- Page 48 Disinfect (Step 17-29 of 29) Fig. 5 Fig. 6...
- Page 49 Clean and Disinfect Hydromassage™ System Fig. 1 with Automatic Disinfection (10 steps) Hydromassage Hydromassage Fig. 2 Surface Overflow Clean and Disinfect with Disinfection Outlet Spray Handle (Still Bath and Hydrosound System) on page 43. Hydromassage System Outlet Suction Inlet...
- Page 50 Disinfect Hydromassage™ System without Fig. 1 Automatic Disinfection (18 steps) Fig. 2 Hydromassage Fig. 3 Hydromassage Suction Hydromassage Inlet System Outlet Fig. 4 Hydromassage Fig. 5 Surface Overflow Continue with the steps on the next page. Outlet Hydromassage System Outlet Suction Inlet...
- Page 51 Hydromassage Fig. 1 Increase Intensity Hydromassage Hydromassage Clean and Disinfect with Disinfection Spray Handle (Still Bath and Hydrosound System) on page 43. Remove Lime Deposits, Mini Corrosion and Discolouration (Primo® Ferro, Stainless Steel bath only) (4 steps)
-
Page 52: Care And Preventive Maintenance
Care and Preventive Maintenance System 2000 WARNING To avoid malfunction resulting in injury, make sure to conduct regular inspections and follow the recommended maintenance schedule. In some cases due to heavy use of the product and exposure to aggressive environment more frequent inspections should be carried out. Local regulations and standards may be more stringent than the recommended maintenance schedule. - Page 53 Caregiver Obligations Fig. 1 System 2000 Between Patients System 2000 Cleaning and Disinfection Instructions on page 40 Every week Fig. 2 ArjoSound Fig. 3 Continue with the steps on the next page.
- Page 54 Fig. 4 Hydromassage Hydrosound Hydrosound System on page 24 Sound & Vision Sound & Vision System on page 26 Every month Fig. 1 WARNING Pressurised system and risk of scalding. Make sure that the valve (A) is closed before removing the cap, this is especially important for the hot water valve.
- Page 55 Yearly Checks by Qualified Personnel Only System 2000 Maintenance and Repair Manual WARNING To avoid injury and/or unsafe product, the maintenance activities must be carried out at the correct frequency by qualified personnel using correct tools, parts and knowledge of procedures. Qualified personnel must have documented training in maintenance of this device.
-
Page 56: Troubleshooting
Troubleshooting NOTE Before starting the troubleshooting check: Power supply, Water supply and the LEDs on control panel. If the problem can not be solved with the problem solving actions below, please contact an Arjo authorized technician. PROBLEM ACTION Care and Preventive Maintenance on page 52. -
Page 57: Error Codes (P300 Only)
Error Codes (P300 only) Display Messages Display message Cause Remarks Hydrosound Hydrosound Hydrosound Hydrosound Hydromassage Replace Disinfectant Disinfection ON/OFF Bottle (System 2000 bath with disinfection option only) on page 42... -
Page 58: Technical Specifications
Technical Specifications System 2000 Site Requirements NOTE All drainage, water and electrical installation work should be carried out by qualified personnel, in accordance with local and national regulations. Electric supply, Europe and North America Voltage 230/240 V (Europe) 120 V (North America) 100 V (Japan) 220 V (Korea) 230 V (Saudi Arabia) - Page 59 Mains disconnection device Permanently installed in wall. Visible and accessible at all times Mains transient voltage 4 kV* Creepage distance 3 mm* Air clearance 1.8 mm* Direction of movement Up and down, right and left, clockwise and counterclockwise * If local regulations are higher, then they have to be met. Water supply Cold/Warm Water 3/4”...
- Page 60 Environmental Microbiological demands Fulfil WHOs demands on drinking water and the Drinking Water Directive (DWD) in EU. Specifications below have a different value from microbiological demands above. Ph Range Ph 7.5 - Ph 9 Conductivity (minimum) More than 2.7 mS/m Chloride (maximum) Less than 250 mg/l Hardness...
- Page 61 Range 10-50 °C (50-122 °F) Accuracy +/-1 °C (1.8 °F) Resolution 0.1 °C (0.18 °F) P220 0.5 °C (0.9 °F) P300 Allowed Combinations Arjo Product Lift Bathtub length Alenti All models System 20, 23 and 25 Miranti All models System 23 and 25...
- Page 62 Sound Levels Sound level at raising/lowering, no load 69 dBA Sound level at raising/lowering, full load 68 dBA Sound level at hydromassage/air spa 76 dBA Sound level at bathtub filling 80 dBA Sound level at shower start 55 dBA Water volumes for bathtubs (interval depending on bathtub model and bathtub size) Filling time at 3.0 bar (43.5 PSI) dynamic pressure, 80 °C 3 - 7.5 minutes (176 °F) HW...
-
Page 63: List Of Standards And Certificates
List of Standards and Certificates STANDARD/ DESCRIPTION CERTIFICATE Medical Electrical Equipment - Part 1: General Requirements for Basic EN/IEC 60601-1:2005 AMD1:2012 Safety and Essential Performance Medical Electrical Equipment - Part 1: General Requirements for Basic ANSI/AAMI ES60601-1 (2005) AMD 1 (2012) Safety and Essential Performance Medical Electrical Equipment - Part 1: General Requirements for Basic CAN/CSA-C22.2 No. -
Page 64: Labels
Labels Symbol explanation Label explanation Label for equipotential connection point (bonding lug) Assembly and Installations Instructions Hydromassage Hydrosound Emergency Lowering (optional, not for UK market) on page 20... - Page 65 Approval label explanation Electrical Appliance and Material Safety Law (DENAN). • Approval Label Attention Label (under the (Under the control panel lid) (Japan) control panel lid) Attention Label CONNECT INCOMING ELECTRICAL SERVICE SEE INSTALLATION MANUAL FOR INSTRUCTIONS 8418372 Field Wiring Box Applied Part Label Data Label Europe...
-
Page 66: Electromagnetic Compatibility
Electromagnetic Compatibility System 2000 System 2000 WARNING Stacking or placing other electrical equipment next to this device is not recommended, it can interfere with the equipment’s operation and safety. Portable and mobile radio-frequency (RF) communications equipment can interfere with this equipment operation and safety. WARNING The equipment may cause radio interference or may disrupt the operation of nearby equipment. - Page 67 Guidance and manufacturer’s declaration - electromagnetic immunity Electromagnetic environment Immunity test IEC 60601 test level Compliance guidance System 2000...
- Page 68 Guidance and manufacturer’s declaration - electromagnetic immunity Immunity IEC 60601 Electromagnetic environment Compliance test test level guidance System 2000 System 2000 System 2000 Recommended separation distance between portable and mobile RF communications equipment and the System 2000 bath System 2000 System 2000 System 2000 System 2000...
-
Page 69: Parts And Accessories
Foot Support Toiletry tray 8154647-04 -Primo® Ferro Foot Support For disinfectant SRB4000 SRB5000 contact the Arjo local Arjo Oil™ (Bath Oil) Arjo Care™ (Shampoo, representative 2 X 2 Litre bottles Body Wash) 4 X 2 Litre bottles No picture available... - Page 70 Intentionally left blank...
- Page 71 AUSTRALIA FRANCE POLSKA Arjo Australia Pty Ltd Arjo SAS Arjo Polska Sp. z o.o. 78, Forsyth Street 2 Avenue Alcide de Gasperi ul. Ks Piotra Wawrzyniaka 2 O’Connor CS 70133 PL-62-052 KOMORNIKI (Pozna ) AU-6163 Western Australia FR-59436 RONCQ CEDEX...
- Page 72 At Arjo, we are committed to improving the everyday lives of people affected by reduced mobility and age-related health challenges. With products and solutions that ensure ergonomic patient handling, personal hygiene, disinfection, diagnostics, and the effective prevention of pressure ulcers and venous thromboembolism, we help professionals across care environments to continually raise...
Need help?
Do you have a question about the System 2000 Series and is the answer not in the manual?
Questions and answers
If I have to run the disinfecting process a second time it is overflowing all over the floor. Running disinfecting process twice within a few minutes.