Table of Contents
Advertisement
Quick Links
Advertisement
Table of Contents

Related Manuals for Arjo Classic Line 2


Summary of Contents for Arjo Classic Line 2
- Page 1 INSTRUCTIONS FOR USE Classic Line 2 04.ACL.00_1EN • 08/2020...
- Page 2 © Arjo 2020. As our policy is one of continuous improvement, we reserve the right to modify designs without prior notice. The content of this publication may not be copied either whole or in part without the consent of Arjo.
-
Page 3: Table Of Contents
Raise or lower the Classic Line 2 bathtub ....... . . - Page 4 Alarm and sounds ..............51 .
-
Page 5: Foreword
Service and support A service routine must be performed on Classic Line 2 bathtub to make sure the safety and operating procedures of your product. See section “Care and preventive maintenance” on page 46. - Page 6 Intentionally left blank...
-
Page 7: Intended Use
Intended use Classic Line 2 bathtub is intended for bathing and showering residents in hospitals and long-term care facilities under the supervision of trained skilled nursing staff in accordance with instructions outlined in the Instructions for Use (IFU). Classic Line 2 bathtub must be disinfected according to the instructions established in this IFU. -
Page 8: Safety Instructions
Safety instructions WARNING WARNING To avoid falling, make sure that the patient is To prevent cross-contamination, always positioned in accordance with this IFU. follow the disinfection instructions in this IFU. WARNING WARNING equipment in oxygen rich environment, To avoid the equipment from tipping and the patient from falling, do not use the equipment anaesthetic gases. - Page 9 WARNING To avoid electric shock, make sure that the equipment is connected to: • Continuously powered supply mains with protective earth. • Separate fuse and ground fault circuit interrupter (GFCI) • A mains disconnection device All installations must be in accordance with local codes and regulations.
-
Page 10: Preparations
Site preparations (8 steps) 1. Make sure that the Classic Line 2 bathtub has been installed according to the Assembly and Installation Instructions. 2. Check that all parts of the product are supplied. Compare to section Parts designation on page 12. - Page 11 3. If any part is missing or damaged – do NOT use the product. WARNING To prevent cross-contamination always follow the disinfection instructions in this IFU. Before every use, make sure Classic Line 2 bathtub is cleaned and disinfected according to section Cleaning and disinfection on page 34. NOTE If you have any questions, please contact your local Arjo representative for support and service.
-
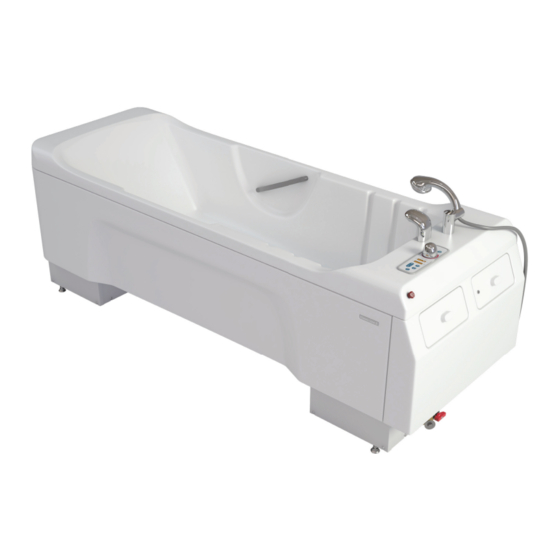
Page 12: Parts Designation
Parts designation Bathtub 1. Control panel 4. Footrest 2. Filling spout 5. Air Spa system nozzles (optional) 3. Shower handle with holder 6. Grab handles 15 16 17 18 7. Footrest grooves 12. Emergency stop button Integrated disinfection unit (optional) 9. - Page 13 Control panel 1. Mains power LED indicator 2. Battery LED indicator (Battery optional) 3. Functions lock ON/OFF 4. Water temperature setting knob 5. Temperature display –bathtub water 6. Scalding temperature LED indicator 8. Shower ON/OFF 10. Lower bathtub 11. Raise bathtub 12.
-
Page 14: Product Description
No LED, Battery needs replacement or is disconnected. No operation is possible. Battery optional. If the battery fails to work during a power failure (no Mains LED indication), contact your Arjo technician. The battery must be checked regularly by authorised personnel, see section Care and preventive maintenance on page 46. -
Page 15: Raise Or Lower The Classic Line 2 Bathtub
To raise Classic Line 2 bathtub press and hold the Raise bathtub button, up arrow. Figure 3 To lower the Classic Line 2 bathtub press and hold the Lower bathtub button, down arrow. -
Page 16: Shower On/Off
Figure 7 Scalding protection See Figure 7. Classic Line 2 bathtub is equipped with an electronic scalding protection, that automatically shuts off the water if a dangerous temperature level is detected, above or equal to 45 °C. The water shuts off earlier if there is a higher incoming water temperature. -
Page 17: Air Spa System (Optional)
The massage effect is obtained by injecting air through air jets into the Classic Line 2 bathtub water. Figure 9 The Air Spa system has two intensity settings. NOTE The recommended maximum treatment with the Air Spa system is 15 minutes. -
Page 18: Disinfection Button (Optional)
Disinfection button (optional) See Figure 10. Press the Disinfection ON/OFF button for 5 seconds to activate the disinfection unit. The LED indicator (A) turns on when the disinfection Figure 10 function is activated. When the disinfectant liquid level is low the LED 5 seconds. -
Page 19: Disinfection Spray Handle
Press the trigger on the handle to spray. • Figure 13 function that prevents stagnating water in the water system. use of Classic Line 2 bathtub and then every 24 hours if Classic Line 2 bathtub is not used. NOTE Make sure the drain is open. NOTE... -
Page 20: Drain Plug Control Knob
Drain plug control knob See Figure 14. To open and close the drainage plug (A), turn the drain plug control knob (B) in the Classic Line 2 bathtub. Open – clockwise Close – counterclockwise The drain control knob is also equipped with a built-in Emergency stop function See Figure 15. -
Page 21: Footrest
Classic Line 2 bathtub. Press and hold the Lower bathtub button (A) on the Control panel until the Classic Line 2 bathtub is in its lowest position. Figure 18... -
Page 22: Allowed Combinations
Allowed combinations Classic Line 2 bathtub integrates with the following products. No other combinations are allowed. PRODUCT CATEGORY PRODUCT NAME Alenti™ Bath lift chair Calypso™ Miranti™ Bath lift trolley Bolero™ Maxi Sky 2™ with loop spreader bar 700-19471 Ceiling lift Maxi Sky 2™... -
Page 23: Preparations Before Bathing Patient
Preparations before bathing patient Preparations for bath (8 steps) 1. Before using Classic Line 2 bathtub, make sure that you have read the Safety instructions on page 8 and Preparations on page 10 2. Lower Classic Line 2 bathtub to its lowest position. -
Page 24: Bathe Patient Using A Bath Lift Chair
Transfer and bathe patient (14 steps) Alenti and Calypso are the recommended Arjo bath lift chairs that can be used with Classic Line 2 bathtub to transfer patients. See Alenti or Calypso IFU before use. 1. Before using Classic Line 2 bathtub, perform the preparations described in section Preparations for bath on page 23. - Page 25 Move the bath lift chair towards Classic Line 2 bathtub and help the patient to move his or her legs over Classic Line 2 bathtub rim while rotating the chair in place.
- Page 26 Raise Classic Line 2 bathtub, but make sure that there is enough room for body parts between the bottom of Classic Line 2 bathtub and the seat.
- Page 27 3. Make sure that the patient keeps holding on to the driving handle. 4. To separate the bath lift chair from the bottom of Classic Line 2 bathtub, lower Classic Line 2 bathtub to its lowest position or raise the bath lift chair. See Figure 31.
- Page 28 2. Put one or two towels on the patient, or a bathrobe if possible, to keep him or her warm. 3. Lower Classic Line 2 bathtub to its lowest Figure 35 position.
- Page 29 See Figure 37. 9. When transferring the patient straight from Classic Line 2 bathtub to bed, put a towel on the bed under the bath lift chair seat to avoid making the bed wet. Dry the patient thoroughly when lying down in bed.
-
Page 30: Bathe Patient Using A Bath Lift Trolley
Transfer and bathe patient (14 steps) Miranti and Bolero are the recommended Arjo bath lift trolleys that can be used with Classic Line 2 bathtub. See Miranti or Bolero IFU before use. 1. Before using Classic Line 2 bathtub perform the preparations described in section Preparations for bath on page 23. - Page 31 9. Adjust the bath lift trolley to an ergonomic working height. See Figure 42. 10. Raise Classic Line 2 bathtub so that the bath lift trolley is touching the bottom of Classic Line 2 bathtub. See Figure 43. 11. Lower the back rest to a comfortable position for the patient.
- Page 32 5. Lift off the shower handle, hold it over Classic Line 2 bathtub. 6. Direct the shower handle away from the patient. 7. Turn on the shower. 37.0°C WARNING Figure 45 To prevent scalding, always check the water temperature with your bare hand before directing the water onto the patient.
- Page 33 4. Manually pull the bath lift trolley out across the side of Classic Line 2 bathtub. See Figure 49. 5. When transferring the patient straight from Classic Line 2 bathtub to bed, put towel on the Figure 48 bed under the bath lift trolley to avoid making the bed wet.
-
Page 34: Cleaning And Disinfection
Thorough disinfection routines are necessary to stop the bacterial growth on the equipment. This is particularly vital in cases where Classic Line 2 bathtub is in a shared facility. Effective disinfection as outlined below reduces the risk of cross-contamination between patients. - Page 35 Mix hot and cold water as close as possible to the point of use. • • after the bath of each patient. • For scheduled maintenance see Care and preventive maintenance on page 46. Do not forget to contact Arjo for the annual Preventive Maintenance visit. CLEANING AND DISINFECTION CLEANING AND DISINFECTION...
-
Page 36: Replace Disinfectant Bottle (Bathtubs With Disinfection Unit)
Replace disinfectant bottle (bathtubs with disinfection unit) (15 steps) 1. Put on protective gloves and protective glasses. See Figure 51. Figure 51 2. Unlock and remove cover B. See Figure 52. 3. Disconnect the disinfection bottle suction cap from the disinfectant bottle. See Figure 53. 4. - Page 37 13. If necessary, adjust the bottle suction cap to get Figure 55 the right mix ratio. See Figure 57. 14. Put the disinfection spray handle back into the compartment. 15. Put the covers back after use. Arjo Clean (50) Figure 56 Figure 57 CLEANING AND DISINFECTION...
-
Page 38: Clean And Disinfect With A Spray Bottle
Clean and disinfect with a spray bottle (29 steps) Remove visual residue (step 1 to 6 of 29) 1. Raise the Classic Line 2 bathtub to a convenient working position. 2. Make sure all functions are turned off. 3. Open the Drainage plug to drain any remaining water. - Page 39 Disinfect (step 18 to 29 of 29) 18. Spray disinfectant into the drain. 19. Close the Drainage plug. 20. Spray disinfectant on all internal Classic Line 2 bathtub surfaces, and the footrest at the bottom Figure 63 of Classic Line 2 bathtub. Turn over the footrest and spray on the other side.
- Page 40 Figure 64 the disinfectant. See Figure 64. 26. Wet a clean cloth with water and remove all outside Classic Line 2 bathtub, such as handle and knobs. Rinse the cloth occasionally in running water when removing disinfectant. 27. Place the shower handle in the holder.
-
Page 41: Clean And Disinfect With Disinfection Unit
(39 steps) Remove Visual Residue (step 1 to 6 of 39) 1. Raise Classic Line 2 bathtub to a convenient working position. 2. Make sure all functions are turned off. 3. Open the drainage plug to empty any remaining water. - Page 42 14. Close the Drainage plug. Line 2 bathtub surfaces, and at the footrest at the bottom of Classic Line 2 bathtub. Turn over the footrest and spray on the other side. Pay attention Figure 70...
- Page 43 Never use an abrasive pad or steel wool on the bathtub as it may scratch the surface. Scrub the surfaces of Classic Line 2 bathtub, and the footrest with a soft bristle brush or cloth (to Figure 73 thoroughly, especially on the grab handles.
- Page 44 Disinfect (step 25 to 39 of 39) 25. Press the Disinfection ON/OFF button for 5 seconds. For bathtubs with Air Spa system: Approximate time for the automatic disinfection is 3 to 4 minutes. 10 seconds after the start, the disinfection spray handle is activate for 2 minutes before it shuts off.
- Page 45 36. Wet a clean cloth with water and remove all outside Classic Line 2 bathtub, such as handle and knobs. Rinse the cloth intermittently in running water when removing disinfectant. 37. Place the shower handle in the holder. See Figure 76.
-
Page 46: Care And Preventive Maintenance
Care and preventive maintenance Classic Line 2 bathtub is subject to wear and tear, and the following actions must be performed when WARNING To avoid malfunction resulting in injury, make sure to conduct regular inspections and follow the recommended maintenance schedule. In some cases due to heavy use of the product and exposure to aggressive environment more frequent inspections should be carried out. - Page 47 Caregiver obligations shall be carried out by knowledge following the instructions in this IFU. Clean and disinfect Before every use, make sure Classic Line 2 bathtub is cleaned and disinfected according to section Figure 77 Cleaning and disinfection on page 34.
- Page 48 Perform functionality test 1. Test the control panel, disinfection and air spa functions (if applicable). 2. With water turned on, check the shower hose, the handle and the holder for damage. 3. Check the functions of all controls and instruments; in particular, check the proper operation of the scalding protection and the temperature setting.
- Page 49 All caregiver obligations are to be checked service. For details, see separate service instructions. Classic Line 2 bathtub must be serviced once a year in accordance with the Maintenance and Repair Manual. Contact your local Arjo service representative to sign up for a service agreement.
-
Page 50: Troubleshooting
NOTE Before starting the troubleshooting check: power supply, water supply and the LED indicators on the control panel. If the problem can not be solved with the problem solving actions below, please contact an Arjo authorised technician. PROBLEM DESCRIPTION ACTION Nothing happens when pushing a Check that the emergency stop is not pushed down. -
Page 51: Alarm And Sounds
Alarm and sounds ALARM AND SOUNDS DESCRIPTION The disinfectant liquid is low. panel and a buzzer sounds for a few seconds, when pushing the button. Battery level indicator is yellow on the control panel. Low battery The water temperature is 45 °C or above. protection shuts off the water. - Page 52 GENERAL Maximum patient weight 182 kg (400 lb) Max total load (patient + water) 415 kg (915 lb) Bathtub width 780 mm (31 in) Bathtub length 2185 mm (86 in) Bathtub weight (excluding package) 141 kg (310.9 lb) Package weight 40 kg (88.2 lb) 1030 ±...
- Page 53 WATER Thermometer display range 10 to 50 °C Accuracy of thermometer +/- 1 °C 7 min 40 sec 18 min 30 sec 4 min 40 sec 11 min 6 min – 8 min WATER SUPPLY Water supply Position Floor/Wall Physical chemical demands pH range pH 7.5 to pH 9 Conductivity (Min.)
- Page 54 FLOOR Floor load 446 kg/m Floor pressure 2,15 N/mm Floor slip resistance according to DIN 51097 Group B (>18 deg) 1.15° LIFTING SPEED AND TIME Lifting speed bathtub – No load 11 mm/s Lifting speed bathtub – Max load 7.5 mm/s Lowering speed bathtub –...
- Page 55 OPERATING CONDITIONS Air Humidity 30 to 95% Usage Temperature Range (Ambient) +5 °C (41 °F) to +35 °C (95 °F) Atmospheric Pressure 800 hPa to 1060 hPa TRANSPORT AND STORAGE CONDITIONS Air Humidity 10% to 80% at 20 °C (68 °F) Temperature (Ambient) -20 °C (-4 °F) to +70 °C (158 °F) Atmospheric Pressure...
-
Page 56: Labels
Labels Read the IFU icon behind cover A Label placement LABEL EXPLANATION Type B, Applied part: protection against electrical shock in accordance with IEC 60601. Attention Label Important user information for correct use. Approval Label States approvals for the current product. Battery Label States safety and environmental information for the battery. - Page 57 European Directive 2012/19/EU (WEEE) Maximum weight of the patient. Maximum weight of patient + water Time span of Classic Line 2 bathtub lift and Air Spa system turned ON and OFF MEDICAL — GENERAL MEDICAL EQUIPMENT AS TO...
- Page 58 STANDARD / CERTIFICATE DESCRIPTION IEC 60601-1 3.1 edition Medical Electrical Equipment – Part 1 : General requirements for basic safety and essential performance. IEC 60601-1-2:2014 (4th EMC Edition) Medical electrical equipment – Part 1-2: General requirements for basic safety and essential performance – Collateral Standard: Electromagnetic disturbances EN ISO 10993-1:2018 Biological evaluation of medical devices - Part 1...
-
Page 59: Electromagnetic Compatibility
Electromagnetic compatibility customer or the user of Classic Line 2 bathtub should assure that it is used in such an environment. The product has been tested for compliance with current regulatory standards regarding its capacity to block EMI (electromagnetic interference) from external sources. - Page 60 GUIDANCE AND MANUFACTURER’S DECLARATION – ELECTROMAGNETIC IMMUNITY Electromagnetic environment Immunity test IEC60601 test level Compliance level – guidance Electrostatic ±2 kV, ±4 kV, ±8 kV, ± 6kV contact Floors should be wood, concrete discharge (ESD) ±15 kV air ±8 kV air covered with synthetic material EN 61000-4-2 ±8 kV contact...
- Page 61 GUIDANCE AND MANUFACTURER’S DECLARATION – ELECTROMAGNETIC IMMUNITY Electromagnetic environment Immunity test IEC60601 test level Compliance level – guidance Voltage dips, 0% UT; 0.5 cycle 0% UT; 0.5 cycle short interruptions At 0°, 45°, 90°, 135°, 180°, At 0°, 45°, 90°, 135°, 180°, and voltage 225°, 270°...
-
Page 62: Parts And Accessories
Parts and accessories Footrest Battery kit 18100-003 AH1036022 For disinfectant contact your local Arjo representative PARTS AND ACCESSORIES... - Page 63 AUSTRALIA FRANCE POLSKA Arjo Australia Arjo SAS Arjo Polska Sp. z o.o. Building B, Level 3 2 Avenue Alcide de Gasperi ul. Ks Piotra Wawrzyniaka 2 11 Talavera Road CS 70133 PL-62-052 KOMORNIKI (Pozna ) Macquarie Park, NSW, 2113, FR-59436 RONCQ CEDEX...
- Page 64 At Arjo, we are committed to improving the everyday lives of people affected by reduced mobility and age-related health challenges. With products and solutions that ensure ergonomic patient handling, personal hygiene, disinfection, diagnostics, and the effective prevention of pressure ulcers and venous thromboembolism, we help professionals across care environments to continually raise...
Need help?
Do you have a question about the Classic Line 2 and is the answer not in the manual?
Questions and answers