Table of Contents
Advertisement
Quick Links
Advertisement
Table of Contents

Related Manuals for Westcott FJ400


Summary of Contents for Westcott FJ400
- Page 1 QUICK START GUIDE Visit fjwestcott.com/4700 to download the latest firmware...
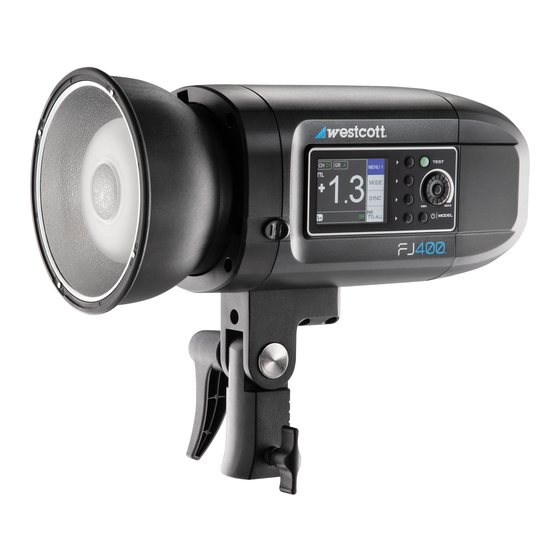
- Page 2 Included Components & Overview FJ400 Strobe, FJ400 AC/DC Lithium Polymer Battery, AC Power Adapter & Cord, Frosted Diffusion Dome, Magnetic Reflector (Bowens, 5.5"), Magnetic CC Gel Set, Magnetic Diffusion, USB-C to USB-A Cable, Rapid Box Switch Insert (Bowens) Battery Release...
- Page 3 LCD Display & Menus Wireless Wireless Canon RT ID Channels Groups (A-J) (00-99) (00-15) Continuous Shooting Enabled* Active Menu Flash Mode Manual (M), TTL Mode Selection Power Output Value Strobe Master Sync Function Lock Delay Flash / Manual to TTL TTL Camera Selection Freeze Function TTL-All...
- Page 4 FJ400 strobe temperatures will increase. Please use caution while using to avoid serious burns or injuries. • Use only with the Westcott FJ400 AC/DC Lithium Polymer Battery and/or AC Power Adapter and Cord. • Do not touch glass diffusion dome, flash tube, LED modeling lamp, or metal reflector after immediate use to avoid potential injury.
- Page 5 Getting Started Charging the FJ400 AC/DC Lithium Polymer Battery The battery can be charged separate of the FJ400 or while attached to the FJ400. In both instances, connect the power cord to the AC Adapter, connect the AC Adapter’s barrel plug to the battery AC receptacle, and connect the power cord into a power outlet.
- Page 6 2. Loosen the tension knob located lower on the tilter bracket. 3. Insert the light stand spigot into the FJ400’s 5/8"-16 mm tilter bracket receptacle. 4. Tighten the tension knob to secure the strobe to the light stand.
- Page 7 8. Locate the firmware file on your computer and drag the file to the FJ400 (external device). 9. Once the file has been completely copied to the FJ400, eject the FJ400 from the computer. 10. Remove the USB-C cable from the FJ400 and reattach the battery.
- Page 8 (“Warranty Period”). If a defect arises and a valid claim is received within the Warranty Period, at its option and to the extent permitted by law, Westcott will either (1) repair the defect at no charge, using new or refurbished replacement parts, or (2) exchange the product with a product that is new or which has been manufactured from new or serviceable used parts and is at least functionally equivalent to the original product.
Need help?
Do you have a question about the FJ400 and is the answer not in the manual?
Questions and answers