Table of Contents
Advertisement
Quick Links
Advertisement
Table of Contents

Related Manuals for PVI VeCOAX ULTRA-HDMI-QAM-IP


Summary of Contents for PVI VeCOAX ULTRA-HDMI-QAM-IP
- Page 1 VeCOAX ULTRA-HDMI-QAM-IP User Manual...
-
Page 2: Table Of Contents
Directory CHAPTER 1 INTRODUCTION ...................... 1 1.1 P ......................... 1 RODUCT VERVIEW 1.2 K .......................... 1 EATURES 1.3 S ......................... 2 PECIFICATIONS 1.4 P ........................4 RINCIPLE HART CHAPTER 2 INSTALLATION GUIDE ................... 6 2.1 G ......................6 ENERAL RECAUTIONS 2.2 P ........................ -
Page 3: Chapter 1 Introduction
Chapter 1 Introduction 1.1 Product Overview VECOAX ULTRA HD encoder modulator is a professional high integration device which includes encoding, multiplexing, scrambling and modulation. It supports up to 12 HDMI and 12 CC inputs, one ATSC tuner input and 256 IP input through Data1 (GE) port. -
Page 4: Specifications
1.3 Specifications Up To 12 HDMI inputs Up To 12 CC(closed caption) input, BNC interface Input 1 ATSC Tuner for re-mux, F type interface ( other standards upon request ) 256 IP input over UDP and RTP, DATA1, RJ45 1920*1080_60p, 1920*1080_50p,1920*1080_60i, Input 1920*1080_50i, 1280*720_60p, 1280*720_50P, 720*480_60i, 720*576_50i... - Page 5 carriers QAM Channel: 16 non-adjacent output (maximum bandwidth 192MHz) Standard: EN300 429/ITU-T J.83A/B MER: ≥40db RF frequency: 50~960MHz, 1KHz step RF output level: -20~+10dbm (87~107 dbµV), 0.1db step DVB-C Symbol Rate: 5.0Msps~7.0Msps, 1ksps stepping Constellation: 16/32/64/128/256QAM J.83A J.83B Constellation 16/32/64/128/256QAM 64/256 QAM Bandwidth Modulation...
-
Page 6: Principle Chart
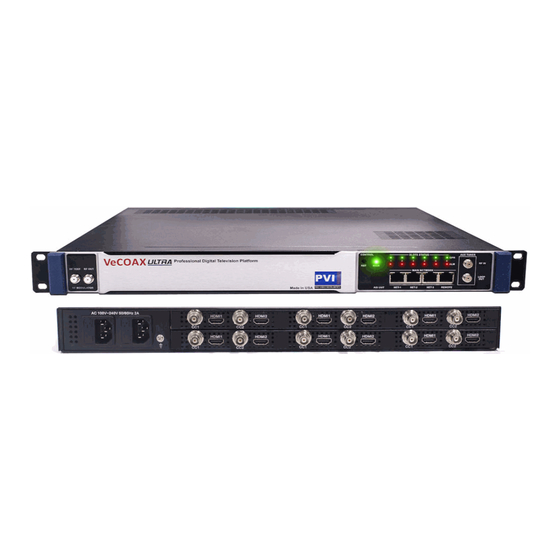
1.4 Principle Chart HDMI #1 Carrier 1 Encoding MUX 1# SCR1# DVB-C 1# IP 1 HDMI #12 Encoding IP1-256 Carrier 16 MUX 16# SCR16# DVB-C 16# ATSC Tuner IP 16 QAM Principle Chart Page 4 / 24 Copyright 2017 ProVideoInstruments USA – All Rights Are Reserved... - Page 7 1.5 Appearance and Description Front and Rear Panel Illustration RF test and RF out port Power supply and Grounding Pole Up to 12 HDMI and 12 CC input port Reset Key Indicators DATA Port (DATA1 and DATA2 for IP stream input/output, DATA 3 for upgrading modules) NMS port for web-based management RF in and Loop out port...
-
Page 8: Chapter 2 Installation Guide
Chapter 2 Installation Guide This section is to explain the cautions the users must know in some case that possible injure may bring to users when it’s used or installed. For this reason, please read all details here and make in mind before installing or using the product. -
Page 9: Environment Requirement
2.4 Environment Requirement Item Requirement When user installs machine frame array in one machine Machine Hall hall, the distance between 2 rows of machine frames Space should be 1.2~1.5m and the distance against wall should be no less than 0.8m. Electric Isolation, Dust Free Machine Hall... -
Page 10: Chapter 3 Web Nms Operation
✓ Users should make sure the 2 ends of grounding wire well electric conducted and be antirust. ✓ It is prohibited to use any other device as part of grounding electric circuit ✓ The area of the conduction between grounding wire and device’s frame should be no less than 25 mm Chapter 3 WEB NMS Operation 3.1 Encoder login... -
Page 11: Encoder Modulator Operation
3.2 Encoder Modulator Operation Status When we login into encoder module, it displays the status interface as Figure-2. System information User can click any item here to enter the corresponding interface to check information or set the parameters. Figure-2 Page 9 / 24 Copyright 2017 ProVideoInstruments USA –... - Page 12 Parameters → Module 1-6 ➢ Encoder 1 VECOAX ULTRA supports up to 6 modules, and each module has 2 HDMI inputs. From the menu on left side of the webpage, clicking “Module1-6→Encoder 1”, it displays the information of 1st encoding channel( Figure-3) where users can configure the video and audio encoding parameters.
- Page 13 ➢ System From the menu on top side of the webpage, clicking “System”, it displays the interface where users can module and TS out information, and save or restore configuration as Figure-4. Figure-4 Page 11 / 24 Copyright 2017 ProVideoInstruments USA – All Rights Are Reserved...
- Page 14 Parameters → Tuner: From the menu on left side of the webpage, clicking “Tuner”, it displays the interface where users can configure the Tuner input parameters as Figure-5. Figure-5 Parameters → TS Config: From the menu on left side of the webpage, clicking “TS Config”, it displays the interface where users can configure the TS output parameters.
- Page 15 Figure-6 ➢ TS Config→Stream select: From the menu on up side of the webpage, clicking “Stream select”, it displays the interface where users can select program(s) to multiplex out and modify program info. (Figure-7) Input Area Output Area Operation Area Figure-7 Configure ‘Input Area’...
- Page 16 : To delete the input channel : To delete all inputs channel : To check input IP lock or not, green means current IP locked : To check current TS overflow or not, red color means current TS overflow, need reduce program : To filter/not filter the source CA information : To enable/disable the PID remapping To refresh the input program information...
- Page 17 ➢ TS Config→General: From the TS Config menu on up side of the webpage, clicking “General”, it displays the interface where users can set stream output information, NIT insert/VCT insert, PCR correction. (Figure-9) Figure-9 ➢ TS Config→PID Bypass: From the TS Config menu on up side of the webpage, clicking “PID Bypass”, it displays the interface as Figure-10 where user can add PIDs to be passed, click the “+”...
- Page 18 Figure-10 Parameters → Modulator: From the menu on left side of the webpage, clicking “Modulator”, it will display the Modulator Configuration screen as Figure-11. Here user can set modulating parameters. Quickly Config Channel Config Figure-11 Page 16 / 24 Copyright 2017 ProVideoInstruments USA – All Rights Are Reserved...
- Page 19 Parameters → IP Stream: VECOAX ULTRA supports TS to output in IP (16 MPTS) format through the DATA1 and DATA2 port. Click ‘IP Stream’, it will display the interface where to set IP out parameters (Figure-12). Quickly Config Channel Config Figure-12 Page 17 / 24 Copyright 2017 ProVideoInstruments USA –...
- Page 20 System → Network: Click ‘Network’, it will display the interface as Figure-13 where to set network parameters. Figure-13 System → password From the menu on left side of the webpage, clicking “Password”, it will display the screen as Figure-14 where to set the login account and password for the web NMS.
- Page 21 System → Configuration: From the menu on left side of the webpage, clicking “Configuration”, it will display the screen as Figure-15 where to save/ restore/factory setting/ backup/ load your configurations. Figure-15 System → Firmware: From the menu on left side of the webpage, clicking “Firmware”, it will display the screen as Figure-16 where to update firmware for the modulator.
- Page 22 System→ Date/Time: From the menu on left side of the webpage, clicking “Date/Time”, it will display the screen as Figure-17 where to set date and time for the device. Figure-17 System→ Log: From the menu on left side of the webpage, clicking “Log”, it will display the log interface as Figure-18 where to check or export the Kernel/System log.
-
Page 23: Chapter 4 Troubleshooting
Chapter 4 Troubleshooting Please visit www.pvisupport.com or call 407 720 6101 ext #2 The Free Tech Support Service is active Mon-Fri – 10Am – 4PM Est on regular business days Prevention Measures ➢ Installing the device at the place in which environment temperature between 0 to 45 °C ➢... -
Page 24: Chapter 5 Packing List
Chapter 5 Packing List VECOAX ULTRA 1 pcs HDMI cables ( same number as the installed channels ) Power Cord 2pcs if the system has redundant power Page 22 / 24 Copyright 2017 ProVideoInstruments USA – All Rights Are Reserved...
Need help?
Do you have a question about the VeCOAX ULTRA-HDMI-QAM-IP and is the answer not in the manual?
Questions and answers