Table of Contents
Advertisement
Quick Links
Sun StorageTek™ SL24 Tape
Autoloader
Getting started
© Copyright 2008 Sun Microsystems, Inc., 4150 Network Circle,
Santa Clara, California 95054, U.S.A. All rights reserved. Sun
StorageTek™ SL24 Tape Autoloader and Sun StorageTek™ SL48
Tape Library are trademarks of Sun Microsystems, Inc. Other
trademarks may be mentioned herein which belong to other
companies.
Fourth edition: October 2008
The information in this document is subject to change without
notice.
Printed in the US
www.sun.com
AH945-96057
IMPORTANT:
Shipping Lock: The shipping lock must be removed for the
robotics to work properly. A robot move error is displayed if the
shipping lock is not removed. See Step 1, Removing and storing
the shipping lock.
WARNING!
The Sun StorageTek™ SL24 Tape Autoloader weighs 15.6 kg (34.3
lb) without media and 20.4 kg (44.9 lb) with media (24 cartridges).
When moving the Autoloader, to reduce the risk of personal injury
or damage to the device:
•
Observe local health and safety requirements and guidelines
for manual material handling.
•
Remove all tapes to reduce the overall weight of the device.
•
Obtain adequate assistance to lift and stabilize the device during
installation or removal.
WARNING!
When placing the Autoloader into a rack, to reduce the risk of
personal injury or damage to equipment:
•
Extend the rack's leveling jacks to the floor.
•
Ensure that the full weight of the rack rests on the leveling jacks.
•
Install stabilizing feet on the rack.
•
Extend only one rack component at a time. Racks may become
unstable if more than one component is extended.
Page 1
Advertisement
Table of Contents

Related Manuals for Sun Microsystems Sun StorageTek SL24


Summary of Contents for Sun Microsystems Sun StorageTek SL24
- Page 1 Extend only one rack component at a time. Racks may become unstable if more than one component is extended. © Copyright 2008 Sun Microsystems, Inc., 4150 Network Circle, Santa Clara, California 95054, U.S.A. All rights reserved. Sun StorageTek™ SL24 Tape Autoloader and Sun StorageTek™ SL48 Tape Library are trademarks of Sun Microsystems, Inc.
-
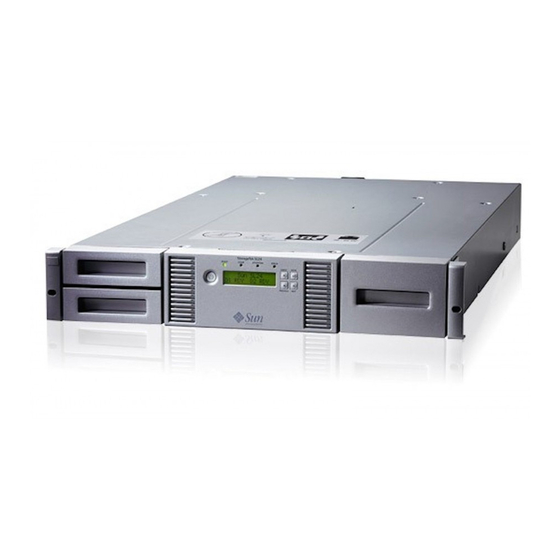
Page 2: Front Panel Overview
Front panel overview Back panel overview: SAS 11672 2. Fan 1. SAS connector 11341 3. Power connector 4. Tape drive 1. Power button 2. Mailslot 5. Ethernet port 6. Serial port (Factory use only) 3. LEDs 4. LCD screen 7. USB port 8. -
Page 3: Using The Operator Control Panel (Ocp)
Using the operator control panel (OCP) Using the remote management interface (RMI) The OCP has a power button, four LEDs, four control keys, and a 2‐line by 16‐character LCD screen. With the OCP, you can With the RMI, you can monitor, configure, and operate most monitor, configure, and operate most Autoloader functions from the Autoloader functions from a web browser. -
Page 4: Unpacking The Autoloader
Unpacking the Autoloader 1 Removing and storing the shipping lock Remove the packaging, accessories, and Autoloader from the box one layer at a time. Place the Autoloader on a level work surface. Carefully remove the foam padding and then the bag from the Autoloader. - Page 5 2 Determining your rack type Customizing the rails for M6 threaded‐hole racks 11420 You will need a #2 Phillips screwdriver, a small flat screwdriver, the two rack rails, and the hardware packets for your rack. Racks having vertical mounting rails with 10–32 threaded holes in the 11422 rack column (Sun StorEdge Expansion Cabinet).
-
Page 6: Securing The Rails To The Rack
3 Securing the rails to the rack Optional: Adding a tape drive 1 08 0 7 With a tape drive upgrade kit, the Autoloader can hold up to two half‐height LTO tape drives. Remove the drive bay cover with a Phillips screwdriver. Slide the 11423 tape drive into the bay until it is firmly seated. -
Page 7: Planning The Parallel Scsi Configuration
5b Planning the parallel SCSI 6 Changing the SCSI ID configuration On a parallel SCSI Autoloader, if you need to change the SCSI ID for one or both of the tape drives, do so before connecting the Autoloader to the host computer. Attach the power cord to the Autoloader. -
Page 8: Powering On The Autoloader
8b Connecting the Autoloader: parallel 9 Powering on the Autoloader SCSI 11366 To use the web‐based management interface, plug one end of the Ethernet cable into the Ethernet port on the back of the Autoloader. 11415 Plug the other end of the cable into an Ethernet LAN port. Plug the power cable into the Autoloader and the power outlet. -
Page 9: Setting The Date And Time
Information/Status > Network Information menu item. Sun recommends leaving the Fibre Channel ports at the default See the Sun StorageTek SL24 Tape Autoloader and SL48 Tape Library settings of Port Speed: Automatic and Port Type: Auto Detect. User and Service Guide included in the product documentation for With these settings, the tape drive will choose the appropriate ™... -
Page 10: Labeling Tape Cartridges
14 Labeling tape cartridges 15 Loading cartridges Use the front panel Operations > Unlock Left Magazine option to release the left magazine. Pull the magazine straight out of the front of the Autoloader. You might be requested to provide the administrator password to access the magazines. -
Page 11: Ordering Media
16 Verifying the installation Ordering media Verify that the Autoloader has the current firmware revision. To find the firmware revision on the front panel: From the Home screen, press Next until the display shows Status/Information. Press Enter. Press Next until the display shows Autoloader Information. Press Enter. - Page 12 Operator control panel menu HOME Unlock Mailslot Status/Information Configuration Operations Support Set Logical Libraries Inventory Unlock Left Magazine Power On/Off Drives Change Admin Autoloader Information Unlock Right Magazine Run Demo Password Set Reserved Drive 1 Information Clean Drive Run Slot T o Slot Test Slot Count Drive 2 Information...
Need help?
Do you have a question about the Sun StorageTek SL24 and is the answer not in the manual?
Questions and answers