Table of Contents
Advertisement
Quick Links
Advertisement
Table of Contents

Related Manuals for Cuisinart GRSM2U


Summary of Contents for Cuisinart GRSM2U
- Page 1 2 IN 1 GRILL & SANDWICH MAKER GRSM2U CPT445U...
- Page 2 Do not use if damaged, or if the appliance has been dropped. Do not use this appliance if the lead is damaged. In the event of damage, or if the appliance develops a fault, contact the Cuisinart Customer Care Line (refer to “UK After Sales Service section“ for further information).
- Page 3 Congratulations on your purchase of the Cuisinart 2 In 1 Grill and Sandwich Maker. For over 30 years Cuisinart’s aim has been to produce the very finest kitchen equipment. All Cuisinart products are engineered for exceptionally long life, and designed to be easy to use as well as to give excellent performance day after day.
-
Page 4: Table Of Contents
Contents Product Description ................5 Safety Cautions & Wiring Instructions ..........6 Selecting The Plates ................9 Fitting and Removing the Plates ............. 10 Fitting and Removing the Integrated Drip Tray ......11 Using the 2 in 1 Grill & Sandwich Maker ........12 Cooking with the Grill Plates ............ -
Page 5: Product Description
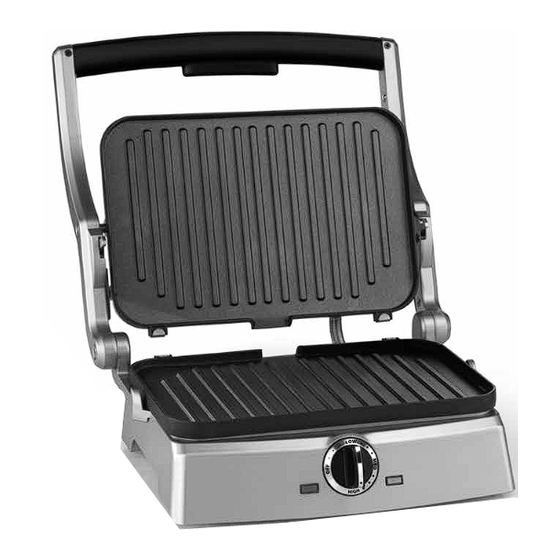
Product Description Handle Handle Release Button Upper Plate Release Button Grill Plates Lower Plate Release Button Temperature Control Dial Indicator Lights Housing Base Sandwich Plates Includes scraping tool (image not shown) -
Page 6: Safety Cautions & Wiring Instructions
Do not use if damaged, or if the appliance has been dropped. In the event of damage, or if the appliance develops a fault, contact the Cuisinart Customer Care Line (refer to ‘UK After Sales Service’ section for further information). - Page 7 For indoor, domestic use only. This appliance should be used only for preparation of food as described within the instructions for use that accompany it. Please retain these instructions for further use. Always ensure that your hands are dry before removing the plug from the mains socket.
- Page 8 UK Wiring Instructions The wires in the mains lead are coloured in accordance with the following code: BLUE = NEUTRAL BROWN = LIVE YELLOW & GREEN = EARTH As the colours of the wire in the mains lead of this appliance may not correspond with the colour marking identifying the terminals on your plug, proceed as follows: The wire which is coloured BLUE must be connected to the terminal which...
-
Page 9: Selecting The Plates
Whether you are cooking a complete meal or a light snack, the Cuisinart 2 in 1 Grill & Sandwich Maker is the perfect machine. With two sets of interchangeable plates, a floating hinge that adjusts to any thickness of food and a choice of variable temperature settings, you can achieve perfect cooking results every time. -
Page 10: Fitting And Removing The Plates
Fitting & Removing The Plates Fitting the Plates Ensure the product is switched off and is fully cooled down. Select either the grill or sandwich plates. Position the unit so that the controls are facing towards you. Press the handle release button and lift the handle to fully open the product. -
Page 11: Fitting And Removing The Integrated Drip Tray
Fitting and Removing the Integrated Drip Tray The 2 In 1 Grill & Sandwich Maker has a clever fat drainage system. Fat is drained via a small recess at the rear of the plates, allowing fat and grease to drip down into the integrated tray. To insert the drip tray, insert it into the slot on the right side of the lower housing. -
Page 12: Using The 2 In 1 Grill & Sandwich Maker
Using the 2 in 1 Grill & Sandwich Maker Once you have fitted the plates and integrated drip tray you are ready to start using the 2 in 1 Grill & Sandwich Maker. Preheating the Appliance For optimum results, always preheat the unit completely before using. Plug the unit into a suitable mains socket. -
Page 13: Cooking With The Grill Plates
Cooking with the Grill Plates Preheat the appliance, until the green indicator illuminates. Place the food on the bottom plate and lower the lid. The floating hinge design means that the space between the upper and lower plate adjusts to the thickness of your food (see fig. 4). N.B. -
Page 14: Cooking With The Sandwich Plates
Cooking with the Sandwich Plates Preheat the appliance, until the green indicator illuminates. Place the food on the lower sandwich plate and close the handle. You will hear a click when it locks securely. N.B. It is important to lock the plates in sandwich mode to ensure your sandwich seals properly. -
Page 15: Cleaning & Maintenance
Cleaning & Maintenance Before first use and after every use, clean each part thoroughly. Once you have finished cooking, turn the dial control to the ‘OFF’ position and unplug the power cord from the mains and allow the appliance to cool for at least 30 minutes before handling. -
Page 16: Uk Guarantee
UK Guarantee This Cuisinart 2 in 1 Grill and Sandwich Maker has a 5 year guarantee for domestic use. The guarantee covers defects under normal use from date of purchase and ceases to be valid in the event of alteration or repair by unauthorised persons. -
Page 17: Uk After Sales Service
For further advice on using the appliance or should you need to re- turn your product, please contact the Conair Customer Care Line on 03702 406 902 (09:00 to 17:00 Monday to Friday) or email your enquiry to support@cuisinart.co.uk The return address is: Customer Care Centre... - Page 20 IB-15/388A...
Need help?
Do you have a question about the GRSM2U and is the answer not in the manual?
Questions and answers