Fronius Symo Hybrid Installation Instructions Manual
With external battery
Hide thumbs
Also See for Symo Hybrid:
- Installation instructions manual (56 pages) ,
- Installation instruction (52 pages) ,
- Monitoring manual (20 pages)
Table of Contents
Advertisement
Available languages
Available languages
Quick Links
/ Perfect Charging / Perfect Welding /
FIND YOUR
FIND YOUR
OPERATING MANUALS
OPERATING MANUALS
Fronius Symo Hybrid
mit Fremdbatterie
Fronius Symo Hybrid
with external battery
42,0410,2418
Solar Energy
013-04072018
Installationsanleitung
Anlagenüberwachung
Installations instructions
System monitoring
Advertisement
Chapters
Table of Contents

Related Manuals for Fronius Symo Hybrid


Summary of Contents for Fronius Symo Hybrid
- Page 1 / Perfect Charging / Perfect Welding / Solar Energy FIND YOUR FIND YOUR OPERATING MANUALS OPERATING MANUALS Installationsanleitung Fronius Symo Hybrid mit Fremdbatterie Anlagenüberwachung Installations instructions Fronius Symo Hybrid with external battery System monitoring 42,0410,2418 013-04072018...
-
Page 3: Table Of Contents
Komponenten............................Fronius Checkbox 500V........................Fremdbatterie............................Technische Daten Fronius Checkbox 500V..................Status LED Fronius Checkbox 500V ....................Fronius Symo Hybrid mit der Fremdbatterie installieren ................Inbetriebnahme ............................. Maximale Abstände zwischen den Komponenten ................Modbus-Verkabelung und Abschlusswiderstände ................Fronius Checkbox installieren ........................ -
Page 5: Anschluss Fremdbatterie Fronius Symo Hybrid
Fehlerfall Überspannungen auftreten können, die zu unsicheren Zuständen führen kön- nen. Für die Batterie und den Fronius Symo Hybrid gibt es eigene Installationsanleitungen. In diesem Dokument wird nur auf die Besonderheiten beim Anschluss an der Fronius Check- box 500V eingegangen. Die restlichen Installationsschritte finden Sie in den Installations- anleitungen bei den Geräten. -
Page 6: Technische Daten Fronius Checkbox 500V
Technische Daten Umgebungsbedingungen Fronius Check- Schutzart IP65 box 500V Zulässige Umgebungstemperatur -25 °C - +60 °C Maximale Meereshöhe 2000 m Zulässige Luftfeuchtigkeit 0 - 100% (nicht kondensierend) Elektrische Spezifikationen Maximale Eingangsspannung Wechselrichterseite Udc max in_INV 1000 V Batterieseite Udc max out_BAT... -
Page 7: Fronius Symo Hybrid Mit Der Fremdbatterie Installieren
Installation Wechselrichter - Fronius Hybrid Serie Installation Fronius Smart Meter Installation Fronius Checkbox und Fremdbatterie (nähere Informationen zur Installation der Fronius Checkbox finden Sie im Kapitel Fro- nius Checkbox installieren auf Seite 9) Inbetriebnahme-Assistent (Wizard am Wechselrichter) ausführen und abschließen Kommunikation zwischen Batterie und Wechselrichter konfigurieren Funktionstest durchführen... - Page 8 OPTION 2 OUTPUT Fronius RS 485 Smart Battery D+ / D- Meter 33 34 35 Data (Recommended cable: Li2YCY(TP) or CAT6a) NO OPTION NO OPTION Fronius Smart Battery Meter *) Abschlusswiderstand R 120 Ohm liegt beim Fronius Smart Meter bei...
-
Page 9: Fronius Checkbox Installieren
Hybrid-Systems darf nur durch geschultes Personal und nur im Rahmen der technischen Bestimmungen erfolgen. Vor der Installation und Inbetriebnahme die Installationsanleitung und Bedienungsanleitung des Fronius Symo Hybrids und der Batterie lesen. WARNUNG! Ein elektrischer Schlag kann tödlich sein. Gefahr durch DC-Span- nung vom Wechselrichter und von der Batterie. -
Page 10: Fronius Checkbox 500V Montieren Und Anschließen
Klemmstellen mit jeweils einem Ferritring bestückt werden, um elektromagnetische Stö- bauen rungen zu vermeiden. Ein Ferritring ist im Lieferumfang des Fronius Symo Hybrids enthalten, der zweite im Lie- ferumfang der Fronius Checkbox (Würth Ferritring - Artikelnummer: 74271132S). Datenleitung vor der Klemmstelle im Wechselrichter mit einem Ferritring bestücken Datenleitung vor der Klemmstelle der Batterie abisolieren und zweimal durch den Fer- ritring führen... -
Page 11: Fronius Anlagenüberwachung Installieren Und Konfigurieren
Software-Version Für die Unterstützung der Fremdbatterie ist eine Software-Version von min. 1.9.x-x erfor- der Fronius Anla- derlich. Eine Anleitung zum Updaten ist unter www.fronius.com zu finden. Für die Dauer genüberwachung des Update-Vorgangs muss eine Online-Verbindung bestehen. Die aktuelle Version der Anlagenüberwachung ist über das Infosymbol ersichtlich:... - Page 12 D i s p l a y S e t t i n g Der Wechselrichter baut den WLAN Access Point auf. Der WLAN Access Point bleibt 1 Stunde geöffnet. Installation mittels Solar.web App Installation mittels Web-Browser Fronius Solar.web App herunterladen Endgerät mit dem WLAN Access Point verbinden SSID = FRONIUS_239.xxxxx (4-8 stellig) nach einem Netz mit dem Na- men „FRONIUS_239.xxxxx“...
-
Page 13: Informationen Zur Durchführung Des Techniker Assistenten
Smart Meter zu aktivieren. Eine nicht aktivierte Batterie kann zur Tiefentladung führen und dadurch die Batterie dauerhaft beschädigen. Den Solar Web Assistenten ausführen und den Anweisungen folgen Die Fronius Solar Web Startseite wird angezeigt. oder Die Web-Seite der Fronius Anlagenüberwachung wird angezeigt. - Page 14 2. Service Passwort Service Passwort eintragen und merken! 3. IO-Zuordnung Einstellungen für die IO-Schnittstelle eintragen (siehe auch IO-Zuordnung erstellen auf Seite 17) 4. Anlagenübersicht Einstellungen der gesamten PV Anlage eintragen (siehe auch Einstellungen in der Anla- genübersicht auf Seite 17)
-
Page 15: Software Update Der Fremdbatterie Durchführen
5. Dynamische Leistung Einstellungen für die dynamische Leistungsreduzierung eintragen Software Update VORSICHT! Gefahr von Beschädigungen an der Batterie! Wird der Software Up- der Fremdbatterie date-Prozess der Batterie unterbrochen, kann es zu Beschädigungen an der Bat- durchführen terie kommen. Um dies zu vermeiden, während des Updates: den Wechselricher nicht ausschalten die Batterie nicht ausschalten es wird empfohlen, dass die Batterie einen Ladezustand (SoC) von über 50%... - Page 16 Das Update wird gestartet und läuft durch. Dies kann bis zu einer Stunde dauern. Auf das Ende des Updates warten. Es erscheint eine Meldung, dass das Update erfolgreich war. Meldung mit Klick auf ‚OK‘ bestätigen.
-
Page 17: Einstellungen In Der Fronius Anlagenüberwachung
Unter Einstellungen - Anlagenübersicht im Bereich Batterie „RESU7H / RESU10H“ der Anlagenüber- auswählen sicht Im Bereich Zähler „aktiviert“ auswählen und unter Einstellungen muss die Zählerposi- tion je nach Installation (Verbrauchszweig oder Einspeisepunkt) ausgewählt werden Wenn die Checkbox korrekt installiert wurde, das Häkchen bei „Fronius Checkbox 500V installiert“ setzen... -
Page 18: Fehlerbehebung
Fehlerbehebung Fehlersuche Batterie bleibt dauerhaft im Energiesparmodus (Fehlermeldung 65000) Verhalten Die Batterie geht in den Energiesparmodus und kann vom Wechselrichter nicht mehr aktiviert werden Behebung Prüfen ob der DC-Hauptschalter der Batterie eingeschaltet ist Behebung Prüfen ob der DC-Hauptschalter des Wechselrichters eingeschaltet ist Behebung Verkabelung zwischen Wechselrichter, Checkbox und Batterie prüfen Behebung... - Page 19 Contents Connecting the external battery to the Fronius Symo Hybrid ..............Components............................Fronius Checkbox 500V........................External battery............................. Fronius Checkbox 500V technical data ....................Fronius Checkbox 500V status LED ..................... Installing the Fronius Symo Hybrid with the external battery ..............Commissioning ............................
-
Page 21: Connecting The External Battery To The Fronius Symo Hybrid
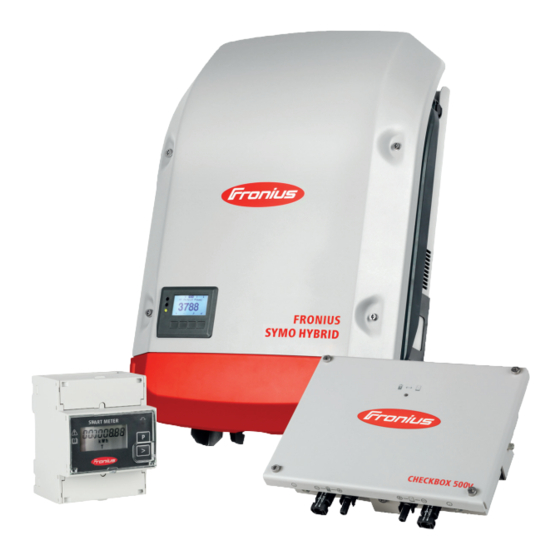
Grid Fronius Check- The Fronius Checkbox 500V connects the Fronius Symo Hybrid to a external battery. The box 500V inverter and battery must never be directly connected to each other, as an error could lead to surges that place the system in an unsafe state. -
Page 22: Fronius Checkbox 500V Technical Data
Fronius Check- Environmental conditions box 500V techni- Degree of protection IP65 cal data Permissible ambient temperature -25 °C - +60 °C Maximum altitude 2000 m Permitted humidity 0 - 100% (non-condensing) Electrical specifications Maximum input voltage Inverter side Udc max in_INV... -
Page 23: Installing The Fronius Symo Hybrid With The External Battery
Install the inverter (Fronius Hybrid series) Install the Fronius Smart Meter Install the Fronius Checkbox and external battery (for more information on installing the Fronius Checkbox, see section Installing the Fronius Checkbox on page 25) Launch and complete the Setup wizard (wizard on the inverter) - Page 24 Fronius RS 485 Smart Battery D+ / D- Meter 33 34 35 Data (Recommended cable: Li2YCY(TP) or CAT6a) NO OPTION NO OPTION Fronius Smart Battery Meter *) The R 120 Ohm terminating resistor is supplied with the Fronius Smart Meter...
-
Page 25: Installing The Fronius Checkbox
Commissioning of the hybrid system may only be car- ried out by trained personnel in accordance with the technical regulations. Read the Installation Instructions and the Operating Instructions of the Fronius Symo Hybrid and the battery before carrying out any installation or commissioning work. -
Page 26: Mounting And Connecting Up The Fronius Checkbox 500V
One ferrite ring is supplied with the Fronius Symo Hybrid and one is supplied with the Fro- nius Checkbox (Würth ferrite ring - item number: 74271132S). Fit a ferrite core to the data line ahead of the terminal connection in the inverter... -
Page 27: Installing And Configuring Fronius System Monitoring
In order for the external battery to be supported, a software version of at least 1.9.x-x is of the Fronius required. Instructions for updating can be found at www.fronius.com. There must be an on- system monitor- line connection for the duration of the update process. The current version of the system... - Page 28 The inverter establishes the WLAN Access Point. The WLAN Access Point remains open for 1 hour. Installation using the Solar.web App Installation using a web browser Download the Fronius Solar.web App Connect the end device to the WLAN access point. SSID = FRONIUS_239.xxxxx (4 - 8...
-
Page 29: Information To Help You Work Through The Technician Wizard
Smart Meter. Not activating the battery can lead to deep discharge and this can cause long-term damage to the battery. Run the solar web wizard and follow the instructions The Fronius Solar.web homepage the Fronius system monitoring web page is displayed. Information to The technician wizard consists of 5 steps: help you work through the tech- 1. -
Page 30: Performing A Software Update On The External Battery
3. IO mapping Settings for the IO interface are entered (also see Creating IO mapping on page 33) 4. System overview Settings for the entire PV system are entered (also see System monitoring settings on page 33) 5. Dynamic power Enter the settings for the dynamic power reduction Performing a soft- CAUTION! Risk of damage to the battery! Interruptions to the battery software... - Page 31 CAUTION! Risk of damage to the battery! If, despite safety precautions, the up- dating process is still interrupted, follow the steps for turning off the battery as out- lined by the manufacturer of the external battery in the correct order. Then immediately inform your contact at the manufacturer of the external battery to avoid long-term damage.
-
Page 33: Fronius System Monitoring Settings
Select "activated" in the Meter field. The meter position must be selected under Set- tings depending on the installation (consumption branch or feed-in point) If the Checkbox has been installed correctly, check the box next to "Fronius Checkbox 500V installed"... -
Page 34: Troubleshooting
Troubleshooting Troubleshooting Battery is permanently in energy saving mode (error message 65000) Behaviour The battery goes into energy saving mode and can no longer be activated by the inverter Remedy Check if the DC main switch on the battery has been switched on Remedy Check if the DC main switch on the inverter has been switched on Remedy... - Page 36 Fronius International GmbH Fronius USA LLC Solar Electronics Division 4600 Wels, Froniusplatz 1, Austria 6797 Fronius Drive, Portage, IN 46368 E-Mail: pv-sales@fronius.com E-Mail: pv-us@fronius.com http://www.fronius.com http://www.fronius-usa.com Under http://www.fronius.com/addresses you will find all addresses of our sales branches and partner firms!
Need help?
Do you have a question about the Symo Hybrid and is the answer not in the manual?
Questions and answers