Table of Contents
Advertisement
GUILD
500W 85mm Circular Saw
Instruction Manual
Important
- Please read these instructions fully before operating or maintaining your Guild circular saw
These instructions contain important information that will help you get the best from your Guild
circular saw, ensuring it remains safe to operate.
If you need help or have damaged or missing parts, call the Customer Helpline on 0333 3201989
After Sales Support
UK/Ireland 0333 3201989
Help@guildpowertools.co.uk
PSC85GH
Advertisement
Table of Contents

Related Manuals for Guild PSC85GH


Summary of Contents for Guild PSC85GH
- Page 1 Important - Please read these instructions fully before operating or maintaining your Guild circular saw These instructions contain important information that will help you get the best from your Guild circular saw, ensuring it remains safe to operate. If you need help or have damaged or missing parts, call the Customer Helpline on 0333 3201989...
-
Page 2: Table Of Contents
Contents Safety Information ����������������������������������������������������������������������������������������������������3 In The Box �����������������������������������������������������������������������������������������������������������������9 Accessories ��������������������������������������������������������������������������������������������������������������9 Operating Instructions �������������������������������������������������������������������������������������������� 10 Working Hints For Your Circular Saw ��������������������������������������������������������������������� 15 Maintenance ����������������������������������������������������������������������������������������������������������� 15 Technical Data �������������������������������������������������������������������������������������������������������� 16 Environmental Protection ��������������������������������������������������������������������������������������� 17 Guarantee ��������������������������������������������������������������������������������������������������������������� 18 Customer Helpline 0333 3201989... -
Page 3: Safety Information
Safety Information Important - Please read these instructions fully before starting assembly Warning Symbols The following warning symbols appear throughout this assembly manual and indicate the appropriate safety measures you should take when assembling and operating the circular saw. To reduce the risk of injury, Please read the instruction manual Warning Wear eye protection Wear ear protection... - Page 4 Safety Information Important - Please read these instructions fully before starting assembly General Power Tool Safety Warnings WARNING! Read all safety warnings and all instructions� Failure to follow the warnings and instructions may result in electric shock, fire and/or serious injury. Save all warnings and instructions for future reference�...
- Page 5 Safety Information Important - Please read these instructions fully before starting assembly General Power Tool Safety Warnings d) Remove any adjusting key or wrench before turning the power tool on� A wrench or a key left attached to a rotating part of the power tool may result in personal injury. e) Do not overreach�...
- Page 6 Safety Information Important - Please read these instructions fully before starting assembly Safety Warnings for all saws DANGER: Keep hands away from cutting area and the blade� Keep your second hand on auxiliary handle, or motor housing� If both hands are holding the saw, they cannot be cut by the blade.
- Page 7 Safety Information Important - Please read these instructions fully before starting assembly Further safety instructions for all saws c) When restarting a saw in the workpiece, centre the saw blade in the kerf and check that saw teeth are not engaged into the material� If saw blade is binding, it may walk up or kickback from the workpiece as the saw is restarted.
- Page 8 Safety Information Important - Please read these instructions fully before starting assembly Safety instructions for Plunge type saw all angles and depths of cut. b) Check the operation and condition of the guard return spring� If the guard and the spring are not operating properly, they must be serviced before use�...
-
Page 9: In The Box
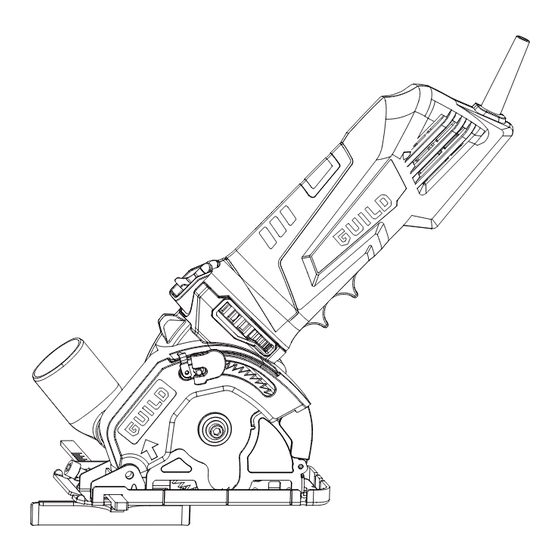
In The Box Parts Soft Grip Handle Depth Adjustment Lever Lock Off Button On/Off Switch Fixed Upper Guard Hex Key Dust Extraction Outlet Inner Flange (See Fig. A) Vacuum Adapter Saw blade (See Fig. A) Parallel Guide Clamping Fixture Blade bolt (See Fig. A) Parallel Guide Outer Flange (See Fig. -
Page 10: Accessories
Accessories TCT 24T Blade HSS 44T Blade Parallel Guide Dust Extraction Outlet Hex Key Operating Instructions NOTE: Before using the tool, read the instruction book carefully. Intended use: The tool is intended for ripping and cross-cutting wood and other materials in straight cutting lines, while resting firmly on the work piece. - Page 11 Operating Instructions 2� SAFETY ON/OFF SWITCH (SEE FIG� B1) To switch the machine on, pull the on/off switch (11) back. Release the on/off switch (11) to switch off. NOTE: When the machine is not in use, the lock off button(2) rests against the blade guard in order to block the plunge function and prevent the blade from being exposed unnecessarily.
- Page 12 Operating Instructions 5� CUTTING DEPTH ADJUSTING (SEE FIG� D1, D2) NOTE: The correct choice of cutting depth can improve ease of cutting and cut quality. Always use the minimum cut depth required for your particular cut, which should just cut through the material plus a small allowance e.g. 3 mm. Excessive cutting depth increases splintering in wood, and causes severe chatter in sheet aluminum (which can quickly blunt the blade).
- Page 13 Operating Instructions overcutting required. 1) Determine the desired depth according to the thickness of the material plus a blade allowance of 3 mm. 2) Unlock the depth of cut adjustment and lock lever . (SEE FIG. D1) 3) Slide the depth of cut indicator to the desired depth of cut. Push the depth of cut adjustment and lock lever down .
- Page 14 Operating Instructions 7� POCKET CUTTING (SEE FIG� F1, F2) Only professionals can do pocket cutting! Clearly mark the area to be cut. Note: DO NOT REMOVE the saw and blade from the workpiece while the blade is moving. It may damage the cut (kerf), cause kickback and loss of control, and result in injury. 8�...
-
Page 15: Working Hints For Your Circular Saw
Working Hints For Your Circular Saw If your power tool becomes too hot, please run your circular saw no load for 2-3 minutes to cool the motor. Avoid prolonged usage at very low speeds. Protect saw blades against impact and shock. Cutting with extreme force can significantly reduces the performance capability of the tool and reduces the service life of the saw blade. -
Page 16: Technical Data
Technical Data Technical Data Table Voltage 230-240V ~ 50Hz Rated power 500W No load speed 4500/min Blade size TCT blade Ø85mmx1.2mmxØ15mmx24T HSS blade Ø85mmx1.2mmxØ15mmx44T Max cutting depth 25mm Recommended maximum material thickness Wood 25mm Aluminum PVC pipe (diameter) 13mm Protection class Machine weight 1.9kg Spindle thread size... -
Page 17: Environmental Protection
Technical Data Vibration Information How the tool is used and the materials being cut or drilled. The tool being in good condition and well maintained. The use of the correct accessory for the tool and ensuring it is sharp and in good condition. The tightness of the grip on the handles and if any anti vibration and noise accessories are used. -
Page 18: Guarantee
Guarantee This product is selected for DOMESTIC USE ONLY and not for business use. This product is guaranteed against manufacturing defects for a period of 24 months. This does not cover the product where the fault is due to misuse, abuse, use in contravention of the instructions, or where the product has been the subject of unauthorised modifications or alterations, or has been the subject of commercial use.
Need help?
Do you have a question about the PSC85GH and is the answer not in the manual?
Questions and answers