Table of Contents
Advertisement
Quick Links
Advertisement
Table of Contents

Subscribe to Our Youtube Channel
Related Manuals for Perkin-Elmer TITAN MPS


Summary of Contents for Perkin-Elmer TITAN MPS
- Page 1 ATOMIC SPECTROSCOPY ITAN Customer Users Guide...
- Page 3 Titan MPS Users Guide...
- Page 4 Registered names, trademarks, etc. used in this document, even when not specifically marked as such, are protected by law. PerkinElmer is a registered trademark of PerkinElmer, Inc. Titan MPS, WinLab32 for AA, and AAnalyst, are trademarks of affiliates of PerkinElmer, Inc. Windows is a trademark and Microsoft is a registered trademark of Microsoft Corporation.
-
Page 5: Table Of Contents
Table of Contents Introduction ..................xiii Safety and Regulatory Information........... xiii Safety Practices Overview ....................1 Qualified Users ..................2 Proper Use .....................2 General Safety Information ..............4 Safety and Emissions ................7 Precautions ....................9 Environmental Conditions ..............11 Electrical Safety ..................12 Fuses ....................13 EMC Compliance ................14 United States (FCC) ................14 Warning Labels on the Instrument ............15 WEEE Instructions for PerkinElmer Products ........20... - Page 6 Data Review File Management and Export ........84 Reviewing Digestions on the Titan MPS ..........85 Flow Charts ..................91 Start Digestion ..................93 Sample Details ..................94 Digestion Results ................95 Change / Rename Datafile ..............96 Create Method ..................97 Edit Method ..................98 Data Management ................99 File Management / Data Export ............100...
-
Page 7: Introduction
Introduction xiii Introduction Please read this users guide carefully before operating the Titan MPS microwave sample preparation system. Failure to follow these instructions could result in damage to the instrument as well as personal injury. Safety warnings are printed in boldface throughout this guide and are illustrated the in section Safety Warnings and Icons on page xiii. - Page 8 A warning indicates an operation that could cause personal injury if precautions are not followed. Warning This symbol alerts you to the risk of electric shock that could result in personal injury to yourself or other persons. Details about these circumstances are in a box like this one. This symbol alerts you to the risk of hot surfaces that could cause personal to yourself or other persons.
- Page 9 Important safety information is provided in this chapter. 2 Preparing Your Laboratory The preparation of your laboratory needed for the Titan MPS. 3 System Description This chapter contains information on the components of the instrument, how it works and instrument specifications.
- Page 10 Using the Index Use the index to look up information on the different hardware components. For example, if you need to find information on cleaning the glass ring, look up "glass ring" in the index. Also, use the index to look up information on the following topics: •...
-
Page 11: Safety Practices
Overview This chapter describes the general safety practices and precautions that must be observed when operating the Titan MPS This advice is intended to supplement, not supersede, the normal safety codes in the user's country. It is also a supplement to the PerkinElmer standard Safety and Health Policy. -
Page 12: Qualified Users
The instrument emits microwave radiation! Never operate the microwave oven if the drop lid or the related lock Warning mechanism have been damaged. Contact Perkin Elmer Inc. to obtain the required service (Refer to the Repairs/Customer Service on page 107 for contacts). - Page 13 The use of organic solvents is strictly prohibited since the Titan MPS is not designed to prevent the spontaneous combustion of any solvent vapors that may escape into the oven chamber.
-
Page 14: General Safety Information
Safety Practices a reliance on the Titan MPS's microwave power regulation, damage of this kind is excluded from the warranty! Qualified handling, proper transport, storage, set-up, and use, as well as conscientious maintenance are all prerequisites for the trouble-free and safe operation of the Titan MPS microwave digestion system. - Page 15 Examples of such substances include: explosives (TNT, etc.), perchlorates, ether, pyrophoric substances, etc. Pressure vessels! Use only digestion vessels and spare parts authorized by Perkin Elmer for use with the Titan MPS.(Refer to the Repairs/Customer Service on page Warning 107 section for contact addresses).
- Page 16 Note operating conditions and to prevent negative influences on your analysis results (e.g. memory effects etc.). Perkin Elmer includes its digestion vessels in the one year warranty coverage. Nevertheless all of the vessels are subject to a certain aging process, which also depends on the type and frequency of the application.
-
Page 17: Safety And Emissions
Safety and Emissions The instrument operates with 230 volts and generates microwave radiation! The Titan MPS must always be carefully connected to a grounded Warning conductor. Provided the wall outlet used is equipped with a ground connection, the supplied power cord will ensure proper connection. If it... - Page 18 Rupture Discs Rupture discs as overpressure protection! Use only original Perkin Elmer rupture discs and pressure seals. These can be obtained from Perkin Elmer Inc. (Refer to the Repairs/Customer Warning Service on page 107 section for contact addresses). Never use more than...
-
Page 19: Precautions
Precautions All pressure vessels are equipped with a sealed connection to a gas collection system which, in turn, must be connected to an exhaust system via PFA tubing. The PFA tubing is connected to the screw-on connection located in the center of the top of the microwave. - Page 20 Safety Practices The laboratory manager is responsible for warning users of this instrument concerning biohazardous materials that are processed in this instrument and about waste that results from the operation of this Warning instrument. Warning: Explosive Atmosphere This instrument is not designed for operation in an explosive atmosphere. Warning The following precautions must be observed when using this instrument: •...
-
Page 21: Environmental Conditions
Environmental Conditions • Do not store, handle, or consume food in the work area. • When you remove the instrument from storage and before you put it into operation, allow it to stand for at least a day under the approved operating conditions. -
Page 22: Electrical Safety
Safety Practices Electrical Safety Warning: Unauthorized Adjustments and Servicing Only a PerkinElmer service engineer or similarly trained and authorized person should be permitted to service the instrument. Warning Do not attempt to make adjustments, replacements, repairs, or modifications to this instrument except as described in the documentation supplied with the instrument. -
Page 23: Fuses
Fuses • the electromagnetic disturbance generated does not exceed the level above which radio and telecommunications equipment or other equipment cannot operate as intended; • it has a level of immunity to the electromagnetic disturbance to be expected in its intended use which allows it to operate without unacceptable degradation of its intended use. -
Page 24: Emc Compliance
Safety Practices EMC Compliance Europe This device has been designed and tested in accordance with the following IEC publications: IEC 61010-1: Safety requirements for electrical equipment for measurement, control, and laboratory use. IEC 60335-2-90: Particular requirements for commercial microwave ovens. All information concerning EMC standards is in the Declaration of Conformity, and these standards may change as the European Union adds new requirements. -
Page 25: Warning Labels On The Instrument
Warning Labels on the Instrument Changes or modifications not expressly approved by PerkinElmer could Note cause the instrument to violate FCC (U.S. Federal Communications Commission) emission regulations, and because of this violation could void the user's authority to operate this instrument. Warning Labels on the Instrument Any of the following symbols can be used on the instrument: This symbol indicates the risk of electric shock. - Page 26 Safety Practices This symbol indicates the risk of laser radiation. This symbol indicates the off position of the main power switch or circuit breaker. This symbol indicates the on position of the main power switch or circuit breaker. With the switch in this position, the instrument is connected to the line power supply but is not necessarily switched on and operational.
- Page 27 Warning Labels on the Instrument Warning Label On The Inside Lid of the Instrument Figure 1-1. Warning label on the Inside of the lid Item Description Vessel under pressure-open carefully after cooling...
- Page 28 Safety Practices Warning Labels on the Rear of the Instrument Figure 1-2. Warning labels on the rear of the instrument Item Description High Voltage-Ground circuit continuity is vital for the safe operation of this equipment. Never operate the equipment with the grounding conductor disconnected. If equipment grounding is accomplished by the use of an IEC 60309 power plug furnished by the factory, the plug is not to be removed during or after installation.
- Page 29 Warning Labels on the Instrument Warning Labels at the Right Side of the Instrument Figure 1-3. Warning labels on the right side of the instrument Item Description Prohibited for persons with heart pacemakers Danger-Before opening disconnect mains Use only cable with protective earth High Voltage-Before opening disconnect mains Use only cable with protective earth...
-
Page 30: Weee Instructions For Perkinelmer Products
Safety Practices Decontamination Customers wishing to return instrumentation and/or associated materials to PerkinElmer for repair, maintenance, warranty or trade-in purposes are advised that all returned goods must be certified as clean and free from contamination. The customer's responsible body is required to follow the “Equipment Decontamination Procedure”... - Page 31 WEEE Instructions for PerkinElmer Products A label with a crossed-out wheeled bin symbol and a rectangular bar indicates that the product is covered by the Waste Electrical and Electronic Equipment (WEEE) Directive and is not to be disposed of as unsorted municipal waste. Any products marked with this symbol must be collected separately, according to the regulatory guidelines in your area.
-
Page 32: Warranty/Limitation Of Warranty
Since such scorching can only be avoided by proper sample and reagent selection by the operator and not by a reliance on the Titan MPS's microwave power regulation, damage of this kind is excluded from the warranty! Care must also be taken when handling ceramic inserts as their reliability can be seriously impaired by even minor damage to their surfaces. -
Page 33: Preparing Your Laboratory
The laboratory must fulfill these requirements, described in this chapter, before you can operate the microwave correctly. Environmental Requirements The location where the Titan MPS is to be installed must fulfill the criteria listed below: • Indoors. -
Page 34: Exhaust Line Venting Requirements
Make sure that all ventilation procedures conform to applicable laws. Lab Space Requirements PerkinElmer offers a bench specifically designed for the Titan MPS and its Note accessories. This bench (Part No. N0777900) is very useful in labs which are tight on bench space or which require frequent repositioning of the instrument. - Page 35 Lab Space Requirements Corrosion of the unit due to placement in a chemical hood or other corrosive environment is not covered under warranty. Warning Dimensions and Weight For information on the instrument’s dimensions and weight see Specifications section in Chapter 3, System Descriptions. Specifications For information on the instrument’s power supply see Specifications section in Chapter 3, System Descriptions.
-
Page 36: Microwave Radiation 2
Preparing Your Laboratory Microwave Radiation The unit employs high voltage and generates microwave radiation! The Titan MPS must always be carefully connected to a grounded conductor. Provided the wall outlet used is equipped with a ground Warning connection, the supplied power cord will ensure proper connection. If it... -
Page 37: System Description
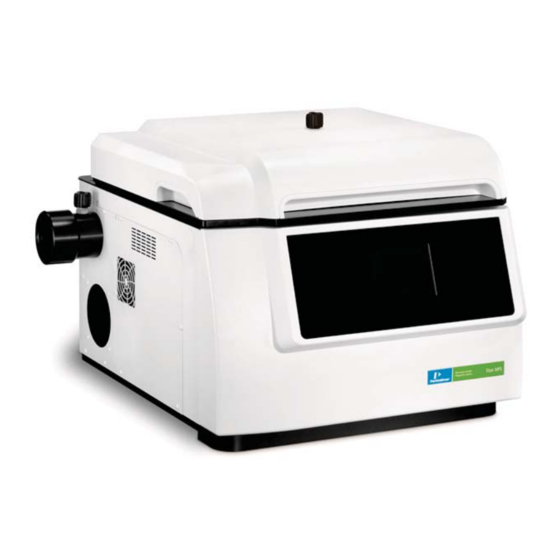
Titan Microwave Prep System Basic Unit The Titan MPS is designed for pressure digestion at temperatures up to 230 °C (446 °F) in continuous use (short term 260 °C (500 °F) and, depending on the type of vessels employed, pressures up to a max. of 100 bar (1450 psi). - Page 38 Figure 3-1. View of Titan MPS The Titan MPS includes DTC™, a temperature measurement system that allows the temperature of the sample in each vessel to be quickly determined and regulated. DTC™ directly measures the infrared radiation emitted by the sample while filtering out the infrared radiation emitted by the body of the vessel.
- Page 39 Titan Microwave Prep System Instrument Connections The the following figures illustrate, the various connections on the Titan MPS. Figure 3-2. Instrument Connections Item Description Item Description Drop lid with vent connection Ethernet Built-in control unit Mains power USB connection Power switch/fuse...
- Page 40 System Description Electrical Connections The mains power switch is located on the right-hand side of the unit. The switch functions also as a thermal fuse (not self resetting) Figure 3-3. Electrical Connections Item Description Ethernet Mains power connection Main power switch/fuse...
- Page 41 Titan Microwave Prep System Ventilation System The microwave unit is equipped with a complex ventilation system, oven cavity ventilation is completely separated from the electronic and magnetron ventilation. For laboratories that cannot meet the nominal exhaust requirements of the Titan MPS, an optional external exhaust fan is available to ventilate the oven cavity and the Gas Containment Manifold.
- Page 42 System Description Controller An integrated control unit with 5.7 inch color touch screen and graphics display is used to control the microwave oven. The English, German, French, Italian and Spanish language software is pre installed at the factory. Figure 3-5. Controller Main Window...
- Page 43 Titan Microwave Prep System Keys and Functions The version number of the control software is displayed in the header of the Home screen and the footer shows the version number of the firmware of the Titan MPS and the instrument status. Function...
-
Page 44: Pressure Vessels And Turntables
System Description Pressure Monitoring Each Titan MPS is equipped with the DPC™ Direct Pressure Control, a pressure monitoring system designed to measure and report the sample pressure in a single reference vessel. The pressure in the reference vessel is determined by using polarized light to measure any change in the photo elastic behavior of a glass ring in the vessel lid. - Page 45 Pressure Vessels and Turntables Figure 3-6. Complete 16 position standard pressure assembly with DPC cap • 15 standard pressure vessels made of TFM™ • 1 standard pressure vessel with DPC™ pressure cap • 16 position Turntable • 16 position Gas Containment Manifold...
- Page 46 System Description PerkinElmer High Pressure 100mL Vessels PerkinElmer High Pressure 100mL vessels are made of a TFM™ pressure vessel body with TFM™ cap. In addition, this vessel consists of a ceramic pressure jacket and a TFM™ insert • 7 high pressure vessels made of TFM™ with ceramic insert and TFM™ liner •...
-
Page 47: Specifications
Specifications Specifications Technical specifications for the Titan MPS Microwave Oven Specification Power supply Power supply 230 V AC Frequency 50/60 Hz Current 12 A Power consumption 2700 W Fuses Main switch with built in breaker Magnetron frequency 2450 MHz Magnetron power (continuous) - Page 48 System Description Control Unit Control Unit Specification Touch screen 5.7" color Program memory 100 programs, 25 preprogrammed Data file memory approximately 1000 data files Display 320 x 240 pixel Interface Ethernet, USB Pressure Vessels Pressure Vessels PKI-75 PKI-100 Volume 75 ml 100 ml Operating Pressure 40 bar (580psi)
-
Page 49: Installation
Unpacking Inspecting the Shipment Upon receipt of the Titan MPS, the exterior of all the shipping cartons should be inspected. All cartons should arrive unopened and undamaged. If the examination reveals that damage has occurred in shipment, notify the carrier and PerkinElmer immediately. - Page 50 Titan MPS out of the carton. Warning 1. Place the carton on the floor in front of the bench on to which the Titan MPS will be placed. 2. Cut the bands that hold the carton together, lift off the top of the shipping carton.
-
Page 51: Power Cord Options
Power Cord Options Power Cord Options The Titan MPS offers a number of power cord options. The cord is 2.5 meters long and black. Plug Type (C-19 Connection on Titan MPS) Part Number Country Plug N3135000 Europe N3135001 Switzerland N3135002... - Page 52 Installation Part Number Country Plug N3135003 India, South Africa N3135004 United Kingdom (requires receptacle 09290305 not included) N3135005 Australia N3135006 Israel...
- Page 53 Power Cord Options Part Number Country Plug N3135007 China N3135008 Brazil N3135009 Denmark (requires receptacle 09290305 not included) N3135010 North America (included)
- Page 54 Installation Accessories Part Number Description Accessory N3135011 Receptacle (For use with the Buck and Boost Transformer in Japan) N3135012 In-Line Connector (For use with the Buck and Boost Transformer in Japan) N3135013 *Buck and Boost Transformer (0.5 KVA) Japan and U.S./Canada 100 VAC 50/60 Hz (Japan) 208 VAC 60 Hz (US/Canada) 09290305...
- Page 55 Power Cord Options *Buck and Boost Transformer (0.5 KVA) Japan and U.S./Canada Connections...
-
Page 56: Installation
Installation Installation The unit employs high voltage and generates microwave radiation! The Titan MPS must always be carefully connected to a grounded conductor. Provided the wall outlet used is equipped with a ground Warning connection, the supplied power cord will ensure proper connection. If it... - Page 57 Installation Hot acid vapors may be released. The supplied vent tubes must therefore always be properly connected and attached to an exhaust system. Warning Make sure the PFA tube is securely attached so that it cannot pop off its connection fitting in case of a percussive pressure burst as occurs when a rupture disc activates.
- Page 58 Power the system on and wait for it to initialize. When presented with the login screen, select Admin and enter the factory default code of 0000 and press OK. This will then take you to the home screen of the Titan MPS controller.
- Page 59 Figure 4-4. The Titan MPS home screen With the top of the Titan MPS now open, remove and packing material from within the oven cavity and any that remains around the body of the Titan MPS. The turntable and vessels can now be unpacked from their box. Remove the vessels...
- Page 60 The turntable should not wobble, shift side-to-side or touch the sides of the oven cavity. Figure 4-5. The Titan MPS oven cavity with support ring and keyed drive...
- Page 61 Installation On the controller, press Setup to enter the setup menu. In this menu the local time, login pass codes and the language of the interface can be set. The global maximum operating parameters for digestion programs can be set here as well, but it is recommended to leave these at the factory settings unless directed otherwise by a service technician.
- Page 62 Press the Set Time button at the bottom of the screen. Enter the local date and time and the press save to store the information. Press back to return to the home screen. The Titan MPS is now ready to use. Figure 4-7.
-
Page 63: Operation
The Titan MPS is also equipped with DPC™ reference vessel pressure sensing. The Titan MPS monitors the sample pressure in the reference vessel and when this pressure reaches the maximum set in the digestion method, the Titan MPS will... - Page 64 Operation continuously adjust the microwave power to ensure that the pressure remains below the set limit. The digestion of organic compounds can result in exothermic reactions which can result in rapid heating of the sample and reagents within the vessel. These reactions typically occur around 130-150°C (265-300°F).
- Page 65 Warning Use only digestion vessels and spare parts authorized by Perkin Elmer for Caution use with the Titan MPS. These can be obtained from Perkin Elmer. (Refer to the Repairs/Customer Service on page 107 for contact addresses).
- Page 66 All such vessels should be immediately returned to Perkin Elmer for inspection. Never attempt to use excessive force to open the vessels. Never use tools which do not come with the Titan MPS to open the vessels! Pressure vessels!
-
Page 67: System Login
System Login The Titan MPS has three login authority levels allowing controlled access to various capabilities of the built-in controller. These login levels are identified as User, Administrator (abbreviated as Admin) and Service. The Service login is restricted to authorized PerkinElmer Service Engineers. - Page 68 Operation Function User Admin Access to Setup button Method Section: Select method from Favorites list Replace method on Favorites list Edit method on Favorites list Create a method Data Section: Select a Datafile Review previous digestions Export / Delete Datafiles Digestion Start: Edit Digestion Comment Edit Sample Details...
-
Page 69: Performing A Digestion
After turning the unit on and logging in, you will see the Home screen of the Titan MPS controller. Figure 5-2. The Titan MPS Home Screen Performing a sample digestion consists of a few basic steps. 1. Select the digestion method. - Page 70 Operation Select The Digestion Method 1. To select a method and return to the Home screen, highlight the chosen method and then press the Select button. Figure 5-3. The method Favorites screen. Method 1 has been pressed and is now highlighted and ready for selection. 2.
- Page 71 TFM™ seal using the included forming tool and then place the seal with the rupture disc onto the vessel body. At this point, the cap can be placed on the vessel and the vessel with sample is now ready to be placed in the Titan MPS. Figure 5-4.
- Page 72 Operation The caps of the vessels do not need force to be tightened. Lightly Note tightening by hand is all that is required for reliable performance. When loading the turntable, the digestion vessels should be placed as symmetrically as possible. Use the guide displayed on the Digestion Review screen of the Titan controller to help with vessel placement.
- Page 73 Performing a Digestion Figure 5-6. A blind stopper attached to the Gas Containment Manifold at an empty turntable position Close the oven lid. The locks should make a click sound and the Start button on the Titan controller should turn from red to green, indicating that the door is fully closed and the system is ready.
- Page 74 Operation Figure 5-7. The digestion comment screen with Sample Details button 2. On the digestion comment screen select the text field and enter information or comments about the digestion. 3. Pressing the Sample Details button will open the Sample Details screen. This will allow data entry for each individual sample.
- Page 75 Performing a Digestion Figure 5-8. The Sample Details screen, allowing information to be entered for each sample 4. For 16-vessel configurations, press Next when on the Sample Details 1-8 screen to enter details for sample 9-16. When all the sample details have been entered and Next selected the Digestion Comments screen will appear.
- Page 76 Operation Figure 5-9. The Digestion Review screen 7. Review the method and place the samples in the oven 8. On the Digestion Review screen review all the digestion method parameters to ensure that everything is correct. You can rename the datafile or choose a different datafile by pressing the gray button that shows the current datafile name.
- Page 77 Begin the Digestion 1. Once the digestion method has been reviewed press Start! to begin the digestion. The Titan MPS will execute the temperature program of the method while monitoring and controlling the sample digestion using DTC™ and DPC™ sensing.
- Page 78 Figure 5-11. The realtime digestion information display While performing the digestion, the Titan MPS displays the information gathered from the DTC™ and DPC™ sensors. This information is displayed in real time (see cool down). If needed, the digestion can be immediately stopped by pressing the red Stop button.
-
Page 79: Pressure Calibration
Figure 5-12. The Digestion Finished screen 2. When the digestion has completed, the Titan MPS will display the Digestion Finished screen. On this screen, the digestion comment can be edited to include new information by pressing the text field. The digestion data can be reviewed in greater detail by pressing the Review Digestion button (see Data Review File Management and Export on page 84). - Page 80 Operation Figure 5-13. The Select Method screen with Pressure Adjust method at the bottom Highlighting the Pressure Adjust button brings up a second button where the vessel type must be highlighted by pressing on the appropriate vessel type. Press the green Select button to use the highlighted method and vessel and return to the Home screen.
- Page 81 Pressure Calibration Figure 5-14. The Pressure Adjust button highlighted and the vessel type selection popup On the Home screen the Method button will now display the active method as STD75: p-sensor calibration or HP100: p-sensor calibration. Press the Start button, enter a digestion comment if desired on the Digestion Comment screen and press the Next button.
- Page 82 Operation Figure 5-15. The Pressure Adjust, Select Cap screen with instructions and the ten storage locations Highlight the desired storage location and enter the cap name or serial number. When this is complete, press Select. This will bring up a second Pressure Adjust screen with additional instructions.
-
Page 83: Method Creation And Editing Favorites
The ten methods displayed on the favorites list provide an easy way to select the most common methods used during the workday. The list comes pre-populated when the Titan MPS is delivered. To change the methods on the favorites list, the you should first highlight the method you would like to replace by pressing on the appropriate button. - Page 84 Operation Figure 5-17. The Replace Favorite screen Editing a Method Only methods that appear on the Favorites list can be edited. Follow the instructions on Editing the Favorites List on page 73 to find and place the appropriate method onto the Favorites list. Editing and saving a method from the Favorites list replaces and overwrites the method on the Favorites list and in the system memory.
- Page 85 Method Creation and Editing Favorites Figure 5-18. The edit Method screen displaying the method name, the tempera- ture program table and on the right side the vessel type selection. 2. At the top of the Edit Method screen is the method name. To change the method name press the current method name to bring up the keyboard.
- Page 86 Titan MPS to moderate this effect. Time The time (in minutes) the Longer times allow the reagents system should remain at to completely digest the sample.
-
Page 87: Creating A Method
Creating a Method 4. To change any of the cells within the temperature program table pressing the cell and the keyboard will appear allowing entry of new values. Limits are in place depending on the vessel chosen in the column on the right side of the screen (see below). - Page 88 Operation Methods that are overwritten are permanently changed. When making new Caution methods it is necessary to first place a blank user method onto the Favorites list and then edit the user method. This preserves the original list of methods in the system memory. The digestion ends when no more time remains.
-
Page 89: Selecting And Renaming Datafiles
Selecting and Renaming Datafiles Selecting Datafiles Data files can be selected at two separate locations within the menu system of the Titan MPS. 1. From the home screen press the Data button. This will bring up the Select / Review datafile screen. - Page 90 Operation Figure 5-21. The Digestion Review screen showing the Datafile button 1. Pressing the gray datafile button opens the Datafile Select / Rename screen. 2. On the Datafile Select / Rename screen select a different datafile by pressing the name of the datafile to highlight it and then pressing Select. 3.
- Page 91 Selecting and Renaming Datafiles Figure 5-22. The Datafile Select / Review screen Renaming Datafiles Renaming of datafiles can only be performed on the Datafile Select / Rename screen which is accessed via the Digestion Review screen. 1. On the Datafile Select / Rename screen highlight the datafile that is to be renamed.
-
Page 92: The Real Time Data Display
The temperature control of the system is based on the highest measured sample temperature at each data update (revolution), and the Titan MPS will modulate the power in response to this. Figure 5-23. - Page 93 The Real Time Data Display To return to the default display that shows the max temperature per revolution press max. Note that vessel number one has two bars; the second bar represents the pressure measurement of the DPC sensor. At the very bottom of the Realtime Display screen are numeric displays for monitoring the various parameters listed.
-
Page 94: Data Review File Management And Export
A binary file of the digestion data is created that cannot be modified and is used by the Titan MPS to display the digestion results; and a text file which is a duplicate of the data and is available for export to a PC via USB stick or Ethernet connection. -
Page 95: Reviewing Digestions On The Titan Mps
Reviewing Digestions on the Titan MPS Reviewing Digestions on the Titan MPS At the completion of a digestion, you are presented with the Digestion Finished screen. On this screen is a button labeled Review Digestion. This allows the for review the data for the just-completed digestion. - Page 96 Operation Figure 5-25. The Data Review main screen As with the Realtime Display, each individual vessel can be selected and the temperature and pressure graphs will update with data for the selected vessel. In addition, in the lower left of the Data Review screen is a time display and two buttons which can be used to advance or retreat the time.
- Page 97 Reviewing Digestions on the Titan MPS Figure 5-26. Method Summary screen At the top of the method summary screen is the location where the data is stored and any digestion comment entered. 1. Select the Next button to advance through the Sample Details screens.
- Page 98 Operation Figure 5-27. Sample Details review 1-8 Figure 5-28. Sample Details review 9-16...
- Page 99 Reviewing Digestions on the Titan MPS File Management and Data Export File Management is reached with the Data button from the Titan MPS Home screen. 1. Pressing the Data button opens the Select / Review Datafile screen. Figure 5-29. The Select / Review Datafile screen. The File Manager button is in the upper right 2.
- Page 100 Operation Figure 5-30. The File Management screen. Accessible only by Administrator log- Pressing the Export Data button will take the administrator to the Export Data screen. See the following screen. Figure 5-31. The Export Data screen. Accessible only by Administrator login...
-
Page 101: Flow Charts
Press the Copy all to USB button and wait for the system to complete the file copy. Press the Remove USB button and then remove the USB stick from the Titan MPS. Flow Charts The following flowcharts can be used as quick references on the operation of the... - Page 102 Operation Select Method/Choose Favorites Selecting a method from the Favorites List for digestion, or making alterations to the Favorites List.
-
Page 103: Start Digestion
Start Digestion Start Digestion Once a method has been chosen, the steps needed to enter information, complete a digestion, and review the results. Begin by accurately weighing samples into vessels and adding reagents... -
Page 104: Sample Details
Operation Sample Details Entering individual sample information. -
Page 105: Digestion Results
Digestion Results Digestion Results Reviewing the data from completed digestions... -
Page 106: Change / Rename Datafile
Operation Change / Rename Datafile Locating and/or renaming the datafile used to save digestion data. -
Page 107: Create Method
Create Method Create Method The process of generating a new method. * Once saved, the method is permanently changed! -
Page 108: Edit Method
Operation Edit Method The process of editing a current method. * Once saved, the method is permanently changed! -
Page 109: Data Management
Data Management Data Management Options available via the "Data" button on the Home screen. -
Page 110: File Management / Data Export
Operation File Management / Data Export Exporting or deleting the data files of previous digestions. * This action is irreversible and all files will be permanently deleted! -
Page 111: Maintenance
Cleaning Acid burn hazard! Use only digestion vessels and spare parts authorized by PerkinElmer Inc. for use with the Titan MPS. (Refer to the Repairs/Customer Service on Warning page 107 for contact addresses). Always wear safety glasses/goggles and protective gloves when... - Page 112 Maintenance Oven Chamber The oven should be wiped out with a moist cloth at regular intervals as well as whenever a rupture disc vents. All relevant safety measures should be observed for the acids used. Careful attention should be used when dealing with hydrofluoric acid.
- Page 113 Cleaning Complete Digestion After a complete digestion it is sufficient to clean it several times with demineralised water. (e. g. 3x 20 ml) Nevertheless it is advisable to perform a blank digestion prior to a new series of digestions. (such as for example if the purity grade changes from % to ppm, ppb, sub ppb).
- Page 114 Maintenance Figure 6-1. Exploded Diagram for Cap Item Description Item Description Polarization foil Glass ring Glass prism Cap insert Thumbscrew O-ring Connecting fitting Assembling tool...
- Page 115 Cleaning To disassemble the DPC cap for both the Standard 75mL digestion vessel and the High Pressure 100 mL digestion vessel, the procedure is the same. Begin by loosening the set screw for the glass prism. This set screw is located directly above the Gas Containment Manifold port on the cap.
-
Page 116: Turntable System
5. Reinstall the turntable and Gas Containment Manifold. Switching Turntable Configurations The Titan MPS allows quick and easy switching between the 8 position and 16 position configurations. To do this, simply remove all the vessels, lift off, the Gas Containment Manifold and lift out the turntable. Place the new turntable in place in the oven cavity, ensuring it is centered correctly and is engaged with the keyed drive at its base. -
Page 117: Fuse Replacement
Fuse Replacement The main power switch of the Titan MPS also functions as an automatic breaker which is manually resettable. To reset the breaker, turn the power switch to "off", wait a few seconds and then turn the switch back on. -
Page 118: Maintenance Tips
PerkinElmer before it is delivered. However all magnetrons are subject to an aging process and it may become necessary to check the output power. This is definitely advisable if the rate at which the Titan MPS heats samples becomes noticeably slower. - Page 119 Output Power Measurement To measure the output power, 500 ml of tap water is heated at full microwave power for 42 seconds and then the rise in temperature measured. The output power can be calculated from this. To perform the power test, start the power test program from the operator library and follow the instructions in the program.
- Page 120 Maintenance...
- Page 121 Output Power Measurement The output power should be at least 1300 watts. If values of less than 1300 watts are determined, the contact PerkinElmer Service (Repairs/Customer Service on page 107).
- Page 122 Maintenance...
-
Page 123: Troubleshooting
Troubleshooting Overview This section describes the error messages for the system and their meaning. Where possible, corrective actions are suggested. Servicing of the instrument by someone other than a PerkinElmer trained and authorized person will render the warranty null and void. -
Page 124: Microwave Oven
Troubleshooting Microwave Oven Problem Possible Cause(s) Corrective Action Lid cannot be opened. Lid cannot be opened. Check the power cord. Power cord is loose or the Switch on the power switch. power switch is not switched For safety, the lid cannot be opened while the microwave Program in progress. - Page 125 Microwave Oven Problem Possible Cause(s) Corrective Action Electrical breaker on the Magnetron defective. Contact your PerkinElmer power switch triggers fre- Short circuit in the device. Service Representative. quently. RCCB switch of the supply Magnetron defective. Contact your PerkinElmer line triggers often. Short circuit in the device.
-
Page 126: Control Unit
Troubleshooting Control Unit Problem Possible Cause(s) Corrective Action Pressure reading is inaccu- Note: Below 5 bar, some fluc- Inspect and clean the DPC rate or fluctuates signifi- tuation is normal. glass parts and polarization cantly. film. (See Chapter 6, Mainte- DPC cap is contaminated. -
Page 127: Pressure Digestion Vessel
Pressure Digestion Vessel Pressure Digestion Vessel Problem Possible Cause(s) Corrective Action Vessels leak. TFM seal is not sealing effec- Expand the lip of the TFM tively on the digestion vessel. seal using the TFM seal tools Expand the lip of the TFM If the TFM seal is damaged, seal using the TFM seal tools replace the seal see Chapter 6... - Page 128 Troubleshooting If you are located outside of the U.S., call your local PerkinElmer sales or service office. Please provide your unit's serial number with all repair questions or repair orders. The serial number is located on the nameplate.
-
Page 129: Appendix
Appendix References Rupture Disc Inspection and Replacement A bulge in the center of the rupture disc after use is normal and will not affect its function, for a bulge larger than 2mm it is recommend to replace the rupture disc. TFM™... - Page 130 Appendix Weighing Cup To simplify the weighing process and prevent loss of samples the samples can be weighed directly into the weighing cups made from TFM. These are placed in the digestion vessel with the sample and remain there during digestion. Since the TFM™...
-
Page 131: Conversion Table
Conversion Table Conversion Table Temperature °C = (°F - 32°) / 1.8 °F = 1.8 * °C +32° Length 1 cm = 0.3937 inch 1 inch = 2.540 cm Volume 1 ml = 0.06102 inch = 2.642*10 gallon 1 inch = 16.387 ml = 43.29*10 gallon 1 gallon = 3785 ml = 231 inch... - Page 132 Appendix Login Login 1. Select the login access desired.
- Page 133 Index of Controller Screens Login Passcode 1. Enter the login passcode.
- Page 134 Data: Takes the user to the Select/Review Datafile screen. Start: Takes the user to the Digestion Comment screen. Setup: Access the Admin setup menu. Service: For authorized PerkinElmer Service Engineers only. Login: Return to the login screen. OPEN: open the Titan MPS lid.
- Page 135 Index of Controller Screens Method 1. Select Method. 2. Highlight a method favorite by pressing on it. Select: Selects the highlighted method favorite and returns to the Home screen. Replace: Opens the methods library. Selecting a library method replaces the favorite method.
- Page 136 Appendix Replace Favorite (Method Library) 1. Highlight a method by pressing on it. Select: Replace the favorite with the highlighted method and return to the Favorites screen. Cancel: Discard any selections and return to the Favorites screen.
- Page 137 Index of Controller Screens Edit Method 1. Select any field for entry by pressing on it. Save: Save changes to the current method and return to the Favorites screen. Saving any edits permanently replaces the edited method! Caution Cancel: Discard any changes and return to the Favorites screen.
- Page 138 Appendix Data Select/Review Datafile 1. Highlight a datafile by pressing on it. The Max Index # represents the number of individual digestions within the datafile. Select: Selects the highlighted datafile and returns to the Home screen. View Digestion: Reviews the digestion data from the highlighted datafile and file index #.
- Page 139 Index of Controller Screens File Management 1. Highlight a datafile by pressing on it. View Digestion: Reviews the digestion data from the highlighted datafile. Back: Discard selections and return to the Select/Review Datafile screen. Delete All: Deletes all datafiles (confirmation required). Export Data: Accesses the USB data export screen.
- Page 140 Appendix Export Data (USB) Erase USB: Erases the connected USB stick. Copy all to USB: Copies datafiles to the USB stick. Back: Returns to the File management screen.
- Page 141 Index of Controller Screens Start Digestion Comment 1. Press the comment field to enter information. Sample Details: Go to the Sample Details screen to enter sample specific information. Next: Go to the Digestion Review screen. Back: Return to the Home screen.
- Page 142 Appendix Sample Details 1-8 1. Highlight a field to enter information for that sample. Next: Go to the next Sample Details page (if using 16 vessel configuration). Back: Return to the Digestion Comment screen.
- Page 143 Index of Controller Screens Sample Details 9-16 1. Highlight a field to enter information for that sample. Done: Return to the Digestion Comment screen. Back: Return to the Sample Details 1-8 screen.
- Page 144 Appendix Digestion Review/Edit The center area displays the current method program. If logged in as Admin, this program can be altered at this stage for a one-time digestion (method development). The method is not permanently changed, but the datafile will record the altered method for future review.
- Page 145 Index of Controller Screens Datafile Select/Rename 1. Highlight a datafile by pressing on it. The file index # displays the number of digestions saved within the datafile. Reset: Reset the digestion index of the selected datafile and overwrite previous data (Admin only). Reset: Reset the digestion index of the all datafiles and overwrite previous data (Admin only).
- Page 146 Appendix Select DPC Cap This screen shows the currently stored pressure calibrations. Select the appropriate calibration/cap to continue the digestion. Back: Use this button to return to the Review Digestion screen. Start!: This button will start the digestion if a pressure calibration is selected.
- Page 147 Index of Controller Screens Realtime Display The top of the Realtime Display shows a graph of the highest individual sample temperature per sample cycle. The second row shows a graph of the pressure in the reference vessel. The bottom chart displays a bar chart of each individual vessels current temperature.
- Page 148 Appendix Digestion Complete 1. Press the Digestion Comment field to edit the current comment. Review Digestion: Review the current digestion data. Finish: Return to the Home screen.
- Page 149 Index of Controller Screens Digestion Graph Back: Returns to the Digestion Complete screen. Next: Go to the Review Method screen.
- Page 150 Appendix Review Method Back: Return to the Digestion Graph screen. Next: Go to the Review Sample Details 1-8 screen.
- Page 151 Index of Controller Screens Review Sample Details 1-8 Back: Return to the Review Method screen. Next: Go to the Review Sample Details 9-16 screen.
- Page 152 Appendix Review Sample Details 9-16 Back: Return to the Review Sample Details 1-8 screen. Exit: Return to the Home screen.
- Page 153 Index of Controller Screens Setup Setup 1-10 1. Select the operating language by pressing the appropriate button. Set time: set the system time. Back: return to the Home screen. Next: Go to Setup 11-20.
- Page 154 Appendix Setting Description T max. set (°C) Global temp program max T min. set (°C) Global temp program min P max set (bar) Global pressure max P min set (bar) Global pressure min Power max set (%) Global max microwave power (%) Power min set (%) Global min microwave power (%) Standard favorite...
- Page 155 Index of Controller Screens Setup 11-20 Back: Return to Setup 1-10. Next: Go to Setup 21-30. Setting Description Admin login code Set the passcode for admin login (default "0") User login code Set the passcode for user login (default "0") File overflow warning Number of total digestions stored before the system gives a capacity warning.
- Page 156 Appendix...
- Page 157 Index selecting 79 Decontamination 20 Accessories 44 Digestion 53, 131 complete 138 graph 139 Basic Unit information 63 system description 27 method 60 Blank Digestion 103 starting 67 vessels 60 Digestion Comment 131 Cleaning Digestion Complete 138 instrument 20 Digestion Edit 134 maintenance 101 Digestion Procedure 59 methods 102...
- Page 158 system description 32 Favorites List Method editing 73 creating 77 File Management 89, 129 editing 74 First Time Setup 48 Method Library 126 Flow Charts 91 Method Preparation 53 Change / Rename Datafile 96 Method Screen 125 Create Method 97 Microwave Device Data Management 99 Troubleshooting 114...
- Page 159 Recycling the Instrument Box 40 system description 34 Renaming Datafiles 81 Replace Favorite 126 Review Datafile 128 Unpacking 39 Review Method 140 Review Sample Details 1-8 141 Review Sample Details 9-16 142 Ventilation System Rupture Disc system description 31 inspection 119 Vessels replacement 119 maintenance 102...
- Page 161 PerkinElmer, Inc. 710 Bridgeport Avenue Shelton, CT 06484-4794, U.S.A. Internet: http://www.perkinelmer.com email: info@perkinelmer.com PerkinElmer is a registered trademark of PerkinElmer, Inc.
Need help?
Do you have a question about the TITAN MPS and is the answer not in the manual?
Questions and answers
can I get a quote for Titan MPS SN:313X8030601