Oki Pro1040 Setup Manual
Hide thumbs
Also See for Pro1040:
- User manual (210 pages) ,
- Maintenance manual (118 pages) ,
- User manual (76 pages)
Table of Contents
Advertisement
Quick Links
Advertisement
Table of Contents

Related Manuals for Oki Pro1040


Summary of Contents for Oki Pro1040
- Page 1 Pro1040/Pro1050 Setup Guide...
-
Page 2: Manual Configuration
This manual describes details about product functions and operations. z Maintenance Guide This manual describes how to replace consumables, and how to clean and maintain the product. The latest versions of the manuals can be downloaded at the Oki Data website. https://www.oki.com/printing/ Technical DTM Print Support... -
Page 3: About The Included Software Dvd-Rom
About the Included Software DVD-ROM Placing the Software DVD-ROM that comes with the printer into the computer's DVD-ROM drive causes the menu screen shown below to appear on the display. Memo z The examples here show Windows screens. Select to add printer drivers and select the driver you want. -
Page 4: Reading The Manual
Reading the Manual Symbols Note z These are cautions and restrictions for the correct operation of the device. Make sure to read to avoid misoperation. Memo z These are references and information that are useful when using the device. We recommend reading them. Reference z These are the reference pages. -
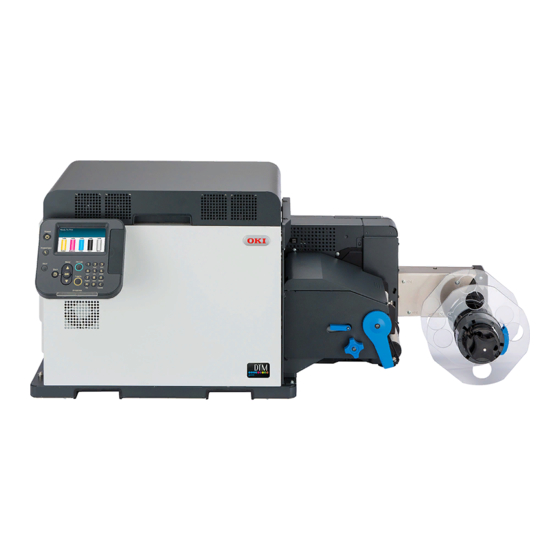
Page 5: Illustrations
Illustrations Unless otherwise specified, the printer illustrations used herein show the printer with the unwinder mounted. Illustrations may differ from the actual product. Screens The images of the control panel and PC used herein are examples. The images may differ from actual products and screens. -
Page 6: For Your Safety
For Your Safety Read the provided manuals for your safety before using the product. Cautions Related to Safety WARNING Mishandling due to ignoring this display may cause death or serious injury. CAUTION Mishandling due to ignoring this display may cause personal injury. General Cautions WARNING Do not touch the safety... -
Page 7: Precautions About The Installation Environment And Location To Install The Machine
Precautions about the Installation Environment and Location to Install the Machine [Precautions related to installation] CAUTION WARNING z Do not install the equipment on a thick-piled carpet or rug. z Do not install the equipment in a location that is z Do not install the equipment in a location that is poorly ventilated or stuffy. - Page 8 [External Dimensions] 477 mm 1040 mm 441 mm - 8 -...
- Page 9 [Installation Space] z Select an installation location that is level and can support the weight of the machine (weight of equipment is about 43 kg for the printer and about 19 kg for the unwinder). * Including the print cartridge and other consumables. z Install the machine near a power socket.
-
Page 10: About The Product Warranty
All rights are reserved by Oki Data Corporation. You must not copy, transfer, translate, etc. the content herein without authorization. You must obtain written permission from Oki Data Corporation before doing any of the above. -
Page 11: Emergency First Aid
4-11-22 Shibaura, Minato-ku, Tokyo 108-8551, Japan For all sales, support and general enquiries contact your local distributor. Importer to the EU/Authorized Representative OKI Europe Limited (trading as OKI Printing Solutions) Blays House Wick Road Egham Surrey, TW20 0HJ United Kingdom For all sales, support and general enquiries contact your local distributor. -
Page 12: Pro1040/Pro1050 Features
Pro1040/Pro1050 Features A powerful collection of color Roll paper printing calibration functions The printer's control panel has Printing on die-cut labels and black functions for correcting color marked roll paper is supported. alignment and density, in order to Roll paper can also be cut for single adjust color balance. - Page 13 The control panel shows the Power consumption is reduced printer status, and displays error while the printer is not in use messages and help information. (Power Save Mode). The control panel standby screen can When the printer is not used for a be used to show the “Supplies Life”...
-
Page 14: Table Of Contents
Emergency First Aid ................11 Manufacturer ..................11 Importer to the EU/Authorized Representative .......... 11 Environmental Information ..............11 Pro1040/Pro1050 Features ..............12 Parts Nomenclature and Functions .......... 16 Printer ........................16 Front/Left Side ........................16 Printer Interior ........................18 Interfaces ........................ - Page 15 Connecting to a PC ..............32 Flow for Installing the Driver on a Computer ............... 32 Operating Environment .................... 33 Connecting Cables ....................34 LAN Cable Connection ......................34 USB Cable Connection ....................... 35 Installing the Printer Driver ..................36 Network Connection ......................
-
Page 16: Parts Nomenclature And Functions
Parts Nomenclature and Functions Printer Front/Left Side ① ② ③ ④ ⑤ ① Top Cover ④ Fuser and Exit Unit Open when replacing the print cartridge, belt unit, Remove when replacing the fuser and exit unit or 2nd transfer roller, or waste toner box, or when when clearing a paper jam. - Page 17 Parts Nomenclature and Functions ① ② ③ ① Fuser and Exit Unit Handle ③ Release Lever Pull upwards when removing the fuser and exit unit. Press downwards when opening the exit feed cover. ② Exit Feed Cover Open when clearing a paper jam. - 17 -...
-
Page 18: Printer Interior
Parts Nomenclature and Functions Printer Interior ① ② ⑤ ③ ⑤ ④ ① Print Cartridge ④ Belt Unit Develop the image with toner drawn by the LED Transfers toner to the paper. head, and transfer the toner image onto the belt The belt unit is a consumable item. - Page 19 Parts Nomenclature and Functions ① ③ ② ① Waste Toner Box ③ Paper Guide Stores waste toner. Remove when a paper jam occurs in the paper A message appears on the control panel when the transport path or when cleaning the paper transfer box is full of waste toner.
-
Page 20: Interfaces
Parts Nomenclature and Functions Interfaces ① ② ① LAN (Network) Interface Connector ② USB 2.0 Interface Connector For connection of a LAN cable. Use this connector For connection of a USB 2.0 cable. Use this connector when connecting the printer on a network. when using a USB cable to connect the printer directly to a computer. -
Page 21: Unwinder
Parts Nomenclature and Functions Unwinder ① ② ③ ⑦ ⑥ ⑤ ④ ① Unwinder Cover ⑤ Roll Paper Holder Knob Open this when setting paper or clearing paper jams. Use when securing the core of a roll paper that has been placed on the roll paper holder. - Page 22 Parts Nomenclature and Functions ④ ③ ① ② ① Roll Paper Guide Adjustment Knob ③ F0 Roller Unit Rotate the knob to adjust the roll paper guide to the The F0 roller unit is a roller for feeding roll paper. width of the paper to be printed.
-
Page 23: Control Panel
Parts Nomenclature and Functions Control Panel The control panel can be used to check the current status of the printer and to access various functions available with the printer. With this printer, print cartridges etc. can be replaced while monitoring the LCD on the control panel. If a paper jam or some other problem occurs on the printer, corrective action can be taken while monitoring messages that appear on the LCD. -
Page 24: Using The Control Panel
Parts Nomenclature and Functions Using the Control Panel This section describes the main operations that can be performed using the control panel, and provides information about interpreting LCD contents. The currently selected item is highlighted. The standby screen shows either of two displays: “Supplies Life display”... - Page 25 Parts Nomenclature and Functions „ Standby Screen Press the scroll button ▼ several times to select [Panel Setup], and then press The standby screen shows either of two displays: the <OK> button. “Supplies Life display” or “Unwinder Config display”. Use the procedure below to switch between the two standby screen displays.
- Page 26 Parts Nomenclature and Functions „ Error Screen „ Help Screen When a problem occurs on the printer, the Press the <HELP> button to display the Help ATTENTION lamp lights or flashes, and a Screen. If the <HELP> button is lit, pressing message appears on the LCD.
-
Page 27: Using The Numeric Keypad
Parts Nomenclature and Functions Using the Numeric Keypad „ Function Number Input Screen While "Ready to print" is displayed on the The numeric keypad is used when inputting standby screen, pressing the <Fn> key and then numeric values or alphabetic characters. inputting a number displays the corresponding menu. -
Page 28: Function Number List
Parts Nomenclature and Functions Function Number List Function Function Number Menu Item Number Paper Size X Dimension Y Dimension Media Type Media Weight Print Information (Configuration) Print Information (Usage Report) Print Information (Error Log) Power Save Time Auto Power Off Time Error Report Print Position Adjust Media Transfer Setting Black... -
Page 29: Turning On And Off The Power Supply
Turning on and off the Power Supply Turning on and off the Power Supply Precautions about the z Do not connect other electronic products to the same power socket as the machine. Electric Power The machine may malfunction due to the electronic noise particularly if you connect an air conditioner, copier, shredder, or WARNING... -
Page 30: Connecting A Power Cord
Power cord Plug the power plug into the power socket. Memo z When the machine starts, the OKI logo screen appears on the LCD on the control panel. After a short time, the idle display appears and printing is possible. -
Page 31: Turning Off The Power
Turning on and off the Power Supply Turning off the Power Press and hold the <POWER> button for approximately 1 second. “Shutting down. Please wait. Printer will turn off automatically.” appears on the control panel and the LED lamp on the <POWER>... -
Page 32: Connecting To A Pc
Connecting to a PC Connecting to a PC This section describes how to connect the printer to a computer and how to install the printer driver from the included software DVD-ROM. You need to have a computer with a DVD drive connected for installation. -
Page 33: Operating Environment
Connecting to a PC Operating Environment This printer supports the operating systems (OS) listed below. z Windows 10/Windows 10 (64-bit version) z Windows 8.1/Windows 8.1 (64-bit version) z Windows 8/Windows 8 (64-bit version) z Windows Server 2016 z Windows Server 2012 R2 z Windows Server 2012 z Windows 7/Windows 7 (64-bit version) z Windows Server 2008 R2... -
Page 34: Connecting Cables
Connecting to a PC Connecting Cables „ Things to Prepare This printer can connect to a computer or a network. It comes with a LAN (network) interface LAN cable connector and a USB interface connector as standard. A LAN cable can be used to connect Note to a network, while a USB cable can be used to connect to a computer. -
Page 35: Usb Cable Connection
Connecting to a PC USB Cable Connection „ To Connect a USB Cable Taking care to orient the connector Use this connector when connecting the printer correctly, connect the square end of the to a computer with a USB cable. USB cable to the printer ( ①... -
Page 36: Installing The Printer Driver
Connecting to a PC Installing the Printer „ Setting the Printer’s IP Address on the Control Panel Driver Memo Network Connection z When configuring a small-scale network to connect the printer to a single computer, set an IP address as shown below (RFC1918 compliant). - Page 37 Connecting to a PC Use the numeric keypad to input the To set the IP address manually, press administrator password. the scroll button ▼ to select [Manual], and then press the <OK> button. The factory default password is 999999. → Go to step 8. Press the <OK>...
- Page 38 Connecting to a PC Press the scroll buttons ▲ and ▼ or Press the scroll button ▼ to select the numeric keypad to input the first [Gateway Address], and then press the three digits of the IP address, and <OK> button. then press the <OK>...
- Page 39 Connecting to a PC „ Configuring the IP Address and Other Click the icon showing the name of the Network adapter. Settings on the Computer Memo z If your computer already has an IP address and other settings configured, or if an IP address is obtained automatically, advance to "To Install the Printer Driver"...
- Page 40 Connecting to a PC Input the IP address, subnet mask, „ To Install the Printer Driver default gateway, and DNS server, and Check that the printer is connected to then click [OK]. the computer, and then turn on the power. Reference "LAN Cable Connection"...
- Page 41 Connecting to a PC Select [Network], and then click [Next]. The network administrator password and the language of the control panel can be changed as necessary on this screen. If changes are unnecessary or completed, click [Next]. The driver searches for printers. After supported printers are detected, select this printer from the list, and then click [Next].
-
Page 42: Connecting With Usb
Connecting to a PC Connecting with USB Click [View devices and printers]. Note z Confirm that the printer is turned off. z PC administrator privileges are required for the setup. z Unless otherwise specified, operations here are shown using Windows 10. Depending on the OS, the screens and operation procedures may differ. - Page 43 Connecting to a PC Read the "Software License Agreement", After installation is complete, click and then click [Accept]. [Complete]. Select [USB connection], and then click The network administrator password [Next]. and the language of the control panel can be changed as necessary on this screen.
- Page 44 Connecting to a PC Click [Start] and select [Control Panel] Remove the "Software DVD-ROM" from in [Windows System]. the computer. Note z After installing the printer driver, if you click [Print Test Page] in the screen below, the layout of the image skews in the printed results when you print a test page, which is caused by the type of OS you are using.
-
Page 45: Dealing With Setup Problems
Connecting to a PC Dealing with Setup Problems If you run into problems while setting up a network connection or USB connection, refer to the attached "Maintenance Guide". This section describes possible problems that may occur while operating the printer, and recommended steps to resolve them. - Page 46 Oki Data Corporation 4-11-22 Shibaura, Minato-ku,Tokyo 108-8551, Japan March 2019 46938702EE Rev2 https://www.oki.com/printing/...
Need help?
Do you have a question about the Pro1040 and is the answer not in the manual?
Questions and answers