SPX Pearpoint Flexiprobe P340 Operation Manual
Pear point’s advanced digital video inspection system
Hide thumbs
Also See for Pearpoint Flexiprobe P340:
- Service manual (60 pages) ,
- User manual (12 pages)
Table of Contents
Advertisement
Quick Links
Advertisement
Table of Contents

Related Manuals for SPX Pearpoint Flexiprobe P340


Summary of Contents for SPX Pearpoint Flexiprobe P340
- Page 1 Print Specification Sheet 90/P340-OPMAN-ENG_05 WEB & CD ONLY www.radiodetection.com © 2014 Radiodetection Limited. Western Drive, Bristol, BS14 0AF Unauthorised disclosure or copying of this document or any part thereof is prohibited COMPANY CONFIDENTIAL Tel: 0117 976 7776 Fax: 0117 976 7775...
- Page 2 o P e r at i o n m a n Ua l P340 flexiprobe ™ P e a r P o i n t ’ s a d va n c e d d i g i ta l v i d e o i n s P e ct i o n sys t e m 9 0 / P 3 4 0 - o P m a n - e n g / 0 5 i s s U e 5 0 1 / 2 0 1 4...
- Page 3 Preface Before you begin Please read this operation manual before attempting to use the P340 flexiprobe system. Note that this manual and all its contents are subject to change. Pearpoint products are under continuous development. Pearpoint reserves the right to modify any product, including this manual, without notice and some product changes may have taken place after publication of this user manual.
- Page 4 Installation, operation and safety precautions WARNING: The P340 flexiprobe, including its component parts are heavy. If available, use the wheels to assist transport. Observe heavy-lifting safety practices when lifting any component of this system. Refer to the specifications in Appendix 11.5 for a description of the system’s dimensions and weights. WARNING: If system connects to mains operated equipment then the external equipment must be earthed in accordance with the manufacturer’s instructions.
- Page 5 WARNING: This coiled rod retains a large amount of energy when coiled and can cause injury if not correctly handled. Only competent personnel should handle this product. Radiodetection and Pearpoint recommend that a risk assessment is undertaken before the rod is handled, the bindings are cut or when using, loading, unloading, uncoiling or coiling rod.
- Page 6 Maintenance Clean and sanitize the P340 flexiprobe system at regular intervals and after conducting an inspection. Consider the work environment and clean / sterilize appropriately before shipment, following any applicable laws and guidelines. Always keep all connectors covered with their protective caps when the equipment is not in use to prolong the life of your product.
- Page 7 Disposal Do not dispose of this product in municipal waste facilities. Please check local regulations for disposal of electronic products, batteries and type of waste / whether any hazards are contained. Pearpoint complies with the requirements of 2002/96/EC Waste Electrical and Electronic Equipment. Compliance EU Compliance This equipment complies with the following EU Directives:...
- Page 8 Copyright statement © 2014 Radiodetection Ltd. All rights reserved. Radiodetection is a subsidiary of SPX Corporation. SPX, the green “> ” and “X” are trademarks of SPX Corporation Inc. Radiodetection, Pearpoint, flexiprobe, flexitrax, GatorCam and flexicoiler are considered trademarks of Radiodetection Ltd..
- Page 9 Training Radiodetection provides training services for most Pearpoint products. Our qualified instructors will train equipment operators or other personnel at your preferred location or at Radiodetection facilities. Training in best practices can lead to improved efficiency, avoid workplace accidents, how to diagnose and repair simple issues, as well as facilitating longer product lifetimes.
- Page 10 P340 flexiprobe Operation Manual viii...
-
Page 11: Table Of Contents
5.6.1 General Navigation and text entry Contents 5.6.2 Entering text with the keyboard 5.6.3 Entering text with the keypad Preface 5.7 Setup menu 5.8 Setting up your controller Section 1: Introduction 5.8.1 Basic Settings 1.1 About this manual 5.8.2 Recording options 1.2 Overview 5.8.3 Video Quality 1.3 Safety notices... - Page 12 9.10 HTML Report 11.1 Shortcuts Section 10: Digital Video 11.2 Clamp assembly 11.3 Care and maintenance 10.1 Video Specification 11.4 AVC Video license 10.2 Video Quality settings 11.5 Specifications 10.3 Video playback 10.4 Distributing your recordings 10.5 Converting digital videos 10.6 Advanced video editing Section 11: Appendix P340 flexiprobe Operation Manual...
-
Page 13: Section 1: Introduction
Section 1: Introduction 1.1 About this manual This manual provides comprehensive operating instructions for the P340 flexiprobe pipeline video inspection system. Before attempting to operate the P340 flexiprobe system, it is very important that you read this manual, noting all safety warnings and procedures in the Preface, Section 1.3 and throughout the rest of the manual. -
Page 14: Safety Notices
P340 flexiprobe features • One-Touch recording using industry standard H.264 video and AAC audio format. • Internal and external rechargeable battery options • Record up to 50 minutes of high-quality video per gigabyte of memory. For more information about video recording settings and quality, please refer to Section 5.8. NOTE: Recording length for a given file size is not fixed and depends on a large number of factors including, among other things, the live picture being recorded. -
Page 15: Section 2: System Overview
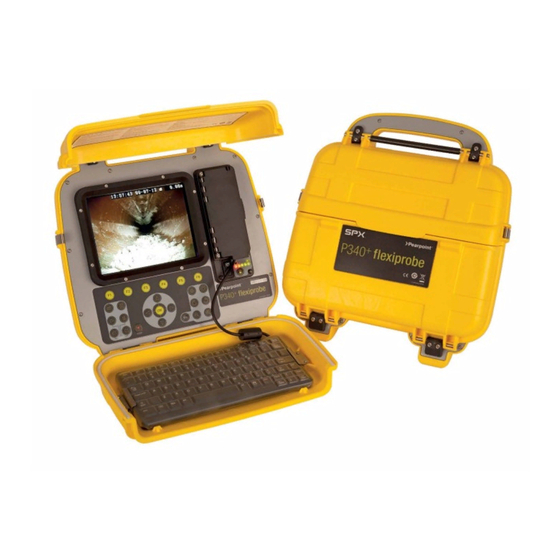
Section 2: System Overview The P340 flexiprobe pushrod inspection system comprises of a controller, pushrod reel, camera and accessories. This subsection provides a detailed, illustrated overview of these components. 2.1 Controller The P340 command module unit acts as the controller and digital video recorder and playback device. Video is displayed on an 8"... - Page 16 18. Battery Check button (P340+ only): Activates the battery status indicator (item 17). Figure 2.1: Controller Module Figure 2.2 Controller Rear View Figure 2.3 Controller I/O socket P340 flexiprobe Operation Manual 4...
- Page 17 Keypad See Figure 2.4 19. Function keys: Use to select menu items or activate short cuts. 20. Camera key: Press to take screen captures. 21. Text key: Press to access the Onscreen-Text and Report menu. 22. Play: Enters the card browser menu. Starts or continues video playback of selected file. 23.
-
Page 18: Pushrod Reels And Cameras
2.2 Pushrod reels and cameras See Figures 2.5 to 2.8. Figure 2.5: P343 Pushrod Reel 1. Pushrod Reel: Holds the pushrod on a revolving reel. The pushrod can be up to 500ft (150m) in length (depending on reel type). 2. Pushrod Guide: Guides the rod on and off the reel. - Page 19 position of the sonde to be pinpointed using a RD7000+DL receiver (optional purchase). 10. Universal brushes and skids: Protect the camera during use and centers the camera in the pipe. See Section 4.3 for instructions on how to install skids and brushes. 11.
-
Page 20: Section 3: Quick Start Guide
Section 3: Quick start guide This Section provides the user with quick start instructions for operating the P340 controllers. Note this Section is intended as a reference for experienced users; first-time users should read this manual in its entirety before proceeding. 3.1 Quick start procedure •... -
Page 21: Section 4: System Assembly
Section 4: System Assembly This Section describes the procedures used to setup the P340 flexiprobe for the first time. The system can be configured in a large number of ways, depending on the components you have chosen for your survey. Unless indicated otherwise, most of the procedures do not need to be repeated unless the P340 controller is reset to factory settings. -
Page 22: Keyboard
If both a CF card and a USB flash drive are present, the controller will use the USB flash drive for recording. For more information about USB flash drives refer to Section 7.1. 4.1.5 Keyboard Connect the supplied keyboard via the PS/2 connector in the I/O panel (Item 15 in Figure 2.3). NOTE: Only the supplied keyboard is compatible with the controller. -
Page 23: Focusing The Cameras
4.3.2 Focusing the cameras The camera focus is adjustable and should be set to match the internal diameter of the pipe under inspection. With reference to Tables 4.1 and 4.2, place the camera at the required distance from a target object to get optimal image quality. -
Page 24: Skids And Brushes
4.3.5 Skids and brushes Each system comes with a universal brush and skid set that allows you to adapt your camera and pushrod for deployment in pipes from 2” (50mm) to 6” (150mm). The universal brush and skid set works with 1” (25mm) and 2”... -
Page 25: W-Skids
Install one 1.4” (35mm) skid adaptor on the rear end of the flexisonde. Install one 2.8” (70mm) skid on the 1.4” (35mm) skid adaptor; ensure that the rear skid is positioned so that the camera is level when placed on a flat surface ... -
Page 26: P340+ Internal Rechargeable Battery
4.4 P340+ Internal Rechargeable Battery A fully charged P340+ internal battery pack will power the system for up to 5 hours depending on usage and system configuration. To charge the internal battery, connect the battery charger lead to the power lead (Figure 4.2a). The first time you charge this battery, you should allow at least 6 hours to fully charge it. -
Page 27: External Rechargeable Battery Packs
CAUTION: We recommend the use of an alternative power source when batteries are low, due to the risk of losing survey information. A low battery may also cause the power to cycle repeatedly. Figure 4.3 Connecting the mains power lead to the automotive charger with the use of the cable adaptor. For more information about recharging batteries refer to the instructions that come with your charger. -
Page 28: External Video Equipment
The P340 flexiprobe external battery pack contains lead-acid batteries. Contact your local Pearpoint representative for instruction on correct removal and handling of the batteries. Follow local regulations for correct disposal of the battery box. Batteries may be subject to shipping regulations, consult your courier if unsure. -
Page 29: Section 5: Controller And System Set-Up
Section 5: Controller and system set-up This Section introduces the P340 controller and system set-up. 5.1 Overview The P340 controller acts as the main control unit and digital video processor for the flexiprobe system. It is compatible with the full range of P340 flexiprobe pushrod reels and cameras. It is also compatible with the full range of P330+ and P340 flexiprobe pushrod reels and cameras. -
Page 30: Getting Help
A list of shortcuts is included in Appendix 11.1. 5.4 Welcome screen The welcome screen is the first screen to appear after the SPX logo and the optional splash screen. It provides important information about the status and settings of your system and should not be ignored. The welcome screen is illustrated in Figure 5.1. -
Page 31: On-Screen Information
5.5 On-Screen Information The P340 On-Screen Information provides real-time system and telemetry information overlaid on the video. The On-Screen Information also displays the top-level system menu when it is active. On-Screen Information content will change depending on the menu and mode you are in, as well as your personal settings. -
Page 32: System Menu
5.6 System Menu The P340 controller features an intuitive hierarchical list-based menu system that can be accessed by pressing MENU when this is visible on the menu bar at the bottom of the screen. Figure 5.3: Main menu From the main Menu screen (Figure 5.3) you will be able to access 3 main submenus: Jobs: enter this menu to start, edit or review a job. -
Page 33: Entering Text With The Keyboard
5.6.2 Entering text with the keyboard The keyboard is fully featured; you can enter any available character and use navigation keys such as Home, End and the arrow keys to position the cursor. Press the Text button on the controller to enter this area. -
Page 34: Setting Up Your Controller
Maintenance: allows you to perform maintenance task such as updating the P340 software, format memory cards, restore factory defaults, review the Controller log and change the job templates used to enter observations and generate a report on a PC using FlexiSight manager. 5.8 Setting up your controller Enter the Setup menu, followed by Controller to configure the main controller settings: you can choose between Basic settings and Recording... -
Page 35: Recording Options
o Camera selects the P340 camera as the default video source. o External selects the external video source. You can connect an external video source to the controller using standard composite RCA. The controller’s video input jack is located inside the I/O interface panel (Item 8 in Figure 2.3) and is highlighted with a yellow ring around the jack. - Page 36 Scheme In this menu you can set your video and photo file names structure scheme: the file is named in accordance to your choice with a numeric counter added at the end. Date or current job information, such as client name, site address and survey start and finish references can be chosen.
-
Page 37: Video Quality
NOTE: Video titles are limited to 13 entries (rows) per title. As all forms (company, survey, site and observations) are customizable and may exceed this limit, only the first 13 non-empty entries will be displayed. 5.8.3 Video Quality Enter this menu, see Figure 5.9, to review or modify the video recording quality. Figure 5.9: Setup video recording quality The P340 controller can record video using several predefined quality profiles. -
Page 38: Setting Up Your Reel
Quality: You can choose between 4 different profiles: High, Medium, Low and Custom. Frame size: selects the dimensions (in pixels) of the recorded video. The options are: o Full: PAL (720x576 pixels) or NTSC (720x480 pixels) depending on your camera. -
Page 39: On-Screen Information Settings
5.10 On-Screen Information Settings From the Setup screen enter the On-Screen Information menu, see Figure 5.10, to personalize the On- Screen Information fields by changing the screen layout, varying the text background transparency and text color and hiding the date or time. There are 5 options: ... - Page 40 Figure 5.11: Normal Layout Figure 5.12: TV Layout Normal Layout This is the standard layout optimized to make use of the entire screen (See Figure 5.11). On-Screen information fields are positioned at the very edges of the display. Overlaid text pages will also have characters which may be positioned at the edges of the display.
-
Page 41: Company Details
5.11 Company details The P340 controller allows you to customize your system by storing your company details and logo on the controller. These details are used to personalize reports and the video title screen. NOTE: Video titles are optional. For more information please refer to Section 5.8. -
Page 42: Maintenance (Including Software Updates)
5.11.2 How to setup your company logo To enter your company logo, copy a JPEG version of your company logo (32KB maximum) into the root of your memory storage device and insert it in the controller. NOTE: The root directory refers to the top-level directory or folder of your memory storage device. 1. - Page 43 CAUTION Formatting the Compact Flash card or USB Flash drive will erase all existing data permanently; this includes jobs details, observations, reports, photos and videos. Formatting cannot be undone - proceed with caution! Custom Job Template: Enter this menu to load a new template for your job details and/or modify the built-in defect codes.
- Page 44 How to update your controller software Pearpoint may issue P340 system software updates to enhance system performance. To find out if Pearpoint has released a new software update, please visit www.radiodetection.com or contact your local Pearpoint representative. It is highly recommended that you periodically check for new software releases and update your controller when software is made available.
- Page 45 How to modify your Job Templates The P340 controller uses Job templates to organize the inspection’s recordings and observation into JOBS (See Section 9.5) and to assist in the creation of reports. You can customize your Job templates by using FlexiSight Manager. 1.
-
Page 46: Section 6: System Operation
Section 6: System operation This Section introduces the user to basic operation of the P340 flexiprobe system. Note in particular the reel calibration procedure, which must be completed every time the system is used. Failure to calibrate the pushrod counter may lead to inaccurate distance readings. 6.1 Before you begin Assess your deployment and safety requirements before you begin. -
Page 47: Deploying The Camera
We recommend the use of a sonde and RD7000+DL to locate points of interest with more confidence. 6.3 Deploying the camera To deploy the camera, first release the brake gently and rotate the reel. When a sufficient amount of pushrod is free, insert the camera into the pipe. Push the pushrod into the pipe by hand and rotate the reel if you need more length. -
Page 48: Still Pictures
5. If required, connect the optional headset to record audio commentary over the video. 6. To pause a recording, press . Press ● or key to resume your recording. 7. To end the recording, press ■ on the keypad. NOTE: Recordings are automatically limited to a maximum of approximately 2 hours. Recordings exceeding 2 hours are split into multiple files. -
Page 49: Digital Image Controls
6.6 Digital image controls The P340 controller offers sophisticated digital imaging control to allow you to manipulate the video displayed on the screen when playing back a recording or displaying a video from an external video source. You can use the pan function to digitally pan a zoomed-in picture on screen. 1. -
Page 50: Section 7: Memory Storage And File Management
Section 7: Memory Storage and File management The P340 controller supports Compact Flash cards and USB flash drives as memory storage devices. All your videos, images, text entries and report files are all stored in either of these 2 memory devices. Record up to 50 minutes of high-quality video per Gigabyte of memory. -
Page 51: File Browser
Pearpoint recommends using only USB flash drives produced by known flash memory manufacturers. Please contact your local Pearpoint representative for the latest list of recommended USB flash drives. Or rd_support@spx.com 7.2 File browser The P340 flexiprobe system features a file manager, see Figure 7.2, that allows you to browse, review and manage your files and folders contained in your storage devices. - Page 52 folder – B:/JOBS indicates that you are in the USB flash drive’s JOBS folder. 4. To move from the Compact Flash card to USB flash drive or vice versa just select the drive bar and press OK or Enter. 5. To enter a folder, select it and press OK or Enter. 6.
- Page 53 Deleting files and folders You can delete any file or folder on the storage device. Figure 7.3 shows the delete functions in the file browser. 1. Select the file or folder you wish to delete. 2. Mark the file or folder by pressing the ► arrow.
-
Page 54: Viewing Jpeg Pictures
File Size. Read-only attribute. Hidden attribute. Date and time of creation. 3. Press OK to exit. 7.3 Viewing JPEG pictures The file browser allows viewing of JPEG image files created by the P340 controller. When a picture is displayed on-screen a camera symbol will appear in the DVR Section of the On-Screen information. -
Page 55: Playing Videos
3. Press OK to confirm your choice and start the slideshow. 4. Press ■ to stop the slideshow. 7.4 Playing videos You can play a recorded video and view it on the P340 flexiprobe display or on any external monitor connected to the video output jacks on the controller. -
Page 56: Pc Usb Connections
7.5 PC USB connections The P340 controller supports USB 2.0 connections to a Microsoft Windows PC to allow high-speed files transfer from the Compact Flash Card. NOTE: The controller is compatible with high-speed, powered USB ports. We do not recommend connection to external USB hubs or older 1.1 USB ports. - Page 57 Disconnecting CAUTION: Eject the command module from the PC BEFORE you disconnect the USB cable. Failure to do so may corrupt your card and all data. Windows computer To disconnect the controller from the computer you must use the Windows USB hub manager, see Figure 7.6 before removing the cable.
-
Page 58: Section 8: Adding Text - Text Pages
Section 8: Adding text - Text pages This Section introduces the P340 controller text page overlay features. 8.1 Video Text Pages During an inspection, the user can choose to overlay a text page such as Figure 8.1 on videos or pictures to document the findings for audit or review. - Page 59 TRANS: Select the desired text background transparency from invisible to solid. Overlaying a text page You can browse, edit and overlay text pages at any time when in the main menu or during a recording by using the keyboard’s Pg Up and Pg Dn keys: NOTE: If you are recording a video, this will automatically pause and resume when you have made your selection.
- Page 60 Use the keyboard or keypad to add or edit the text. Editing text with the keyboard The keyboard is fully featured; you can enter any available character and use navigation keys such as Home, End and the arrow keys to position the cursor. 1.
-
Page 61: Section 9: Jobs, Observations And Reporting
Section 9: Jobs, observations and reporting This Section describes how the P340 controller organizes your work and how to use the integrated report writer to add detailed observations to your survey. Observations can be used to create an HTML report that can be left with your customer or later viewed. NOTE: The P340 flexiprobe controller cannot display a HTML report in its final format. -
Page 62: Introducing Jobs
9.1 Introducing JOBS The P340 controller automatically organizes inspection data into JOBS folders making it very easy to review and store videos, photos and observation. By entering the client’s name, its address and a start and finish reference for your survey, all your jobs will be uniquely and logically stored in your memory storage device. -
Page 63: One-Click Recording And Quick Job Start
NOTE: Only the first 17 characters of the client name or site address or the first 8 characters of the start and finish references will be included in the File name to ensure the full file name remains visible at all times. -
Page 64: Job Browser
9.3 Job Browser From the main menu press JOB to access the Job Browser menu, see Figure 9.4. This menu screen is organized into three areas. Job details: This shows the client, site and survey details of the job selected in the jobs list. ... - Page 65 NOTE: The available commands in the menu bar will change depending if you are reviewing Job’s details or if you are in the file browser area. There are 6 commands available: 1. START: Activates the current job and exits to the main screen with live video. If pressed when defining a new job it also saves the details entered so far.
-
Page 66: Job Details (Creating A New Job)
To de-activate a Job, press STOP. 9.5 Job details (Creating a new Job) Details about your inspections are required to be able to organize your work into JOBS and to be able to produce reports. There are 3 forms you will have to fill to create a new job: 1. - Page 67 Client fields 1. Name: Client’s company name or personal name if the client is an individual (30 characters maximum). 2. Client reference: Client’s reference (30 characters maximum). 3. Address: Client’s address if different from the site address (30 characters maximum). 4.
- Page 68 Default Survey form The survey page allows you to enter information about the survey you conduct. By default the start and finish fields are S and F. Date and Time fields are automatically filled Survey information appears on the Report Details page. Survey fields 1.
-
Page 69: Inspection Details
9.6 Inspection Details In order to compile an inspection report the P340 controller requires a number of critical pieces of information about the inspection you are conducting. Most of the information required is collected from the details you have created when defining the current job. - Page 70 Creating an observation To enter the observation form, when a job is active, press OK or Enter. Observations are numbered sequentially. The observation number is displayed in brackets in the title bar. NOTE: If recording, the controller will automatically pause when entering the observation form and resume when you exit.
- Page 71 5. Cont. Defect: Identify a defect which extends or repeats beyond the first meter from the camera position. 6. Code: Defect Code. 7. Joint: Identify if the observation relates to a pipe joint. 8. Material: Pipe’s material; by default you can choose between WRCs MSSC 3 pipe materials identification.
-
Page 72: Other Comments (Freetext)
Observation popup When entering observations, you can set up the controller to display, if recording, the observation you have just entered automatically in the middle of the screen for duration of 4 seconds when resuming your survey. To enable this setting, go to MENU > SETUP > CONTROLLER > RECORDING > VIDEO TITLES and set the Observation field to “on”. - Page 73 press REPRT. HTML reports can be given directly to the customer: from the JOBS folder simply copy the “Report” folder to a destination of your choice. Folder structure The report is generated as a series of HTML documents. These are organized into a series of sub-folders. The principle is similar to that of an internet website.
- Page 74 Browsing and printing Figure 9.6: Viewing reports in a web browser 1. Connect the memory storage device to your PC. If your memory device is a Compact Flash you can use the built-in PC USB connection. See Section 7.5 for more details on how to connect your controller to a PC 2.
-
Page 75: Section 10: Digital Video
Section 10: Digital Video The P340 flexiprobe controllers incorporate an advanced digital video recorder. This Section provides an overview of the video files produced by the flexiprobe system and how to play them on PC or MAC computers. Also included is a detailed Section on converting video files to other popular formats for playback and distribution. - Page 76 VLC media player(from the Videolan project) or Quicktime (from Apple) support files created with the flexirpobe. Both VLC and Quicktime do not require additional CODECs and are available free for Microsoft Windows XP, Windows Vista, Windows 7, Mac OS X and most Linux distributions (VLC only). VLC media player, see Figure 10.1, is available on line from the VideoLan project website: http://www.videolan.org/vlc/ Quicktime media player is available on line from the Apple website.
-
Page 77: Distributing Your Recordings
10.4 Distributing your recordings When it comes to distributing your recordings the first thing to consider is your customer’s requirements. Generally speaking there are two possibilities: they may require a DVD or a digital video file. DVDs are one of the most popular ways to distribute videos. Most households have Domestic DVD players and most modern PCs are equipped with a DVD player. - Page 78 Setting the P340 flexiprobe controllers for PC or TV screen: To produce a DVD or digital video file recording to be played on a TV screen set your On Screen Information layout to TV. To produce a DVD or digital video file recording to be played on a PC screen set you OSD layout to Normal.
- Page 79 3. Switch on the controller and locate the file you wish to convert using the file browser. 4. Do not play the file at this stage. 5. Insert a blank DVD into the DVD recorder and begin recording. 6. Play the file on the controller. NOTE: if your recordings were not set to TV mode, use the digital zoom function on the controller to match the P340 flexiprobe video picture size to the one captured by your DVD recorder and displayed by your TV.
- Page 80 DivX and Xvid AVI files A popular file format supported by many newer DVD players and many portable digital players is DivX. You can re-encode our files in AVI DivX by using a suitable video converter. DivX CODECs for Windows and Mac are available to download freely for personal use. Xvid is an open source implementation of the DivX CODEC.
-
Page 81: Converting Digital Videos
Using data CDs, DVDs and flash memory devices You can copy any digital video file on to a standard, blank data DVD or CD using any burning program that is compatible with your computer. NOTE: If using an Apple Mac, be sure that you encode your DVD using the Joliet file system for maximum compatibility with Windows-based computers. - Page 82 2GB of available hard disk space. CD or DVD burner (for producing DVDs, VCDs or distributing video files on optical media). Video conversion software. Conversion software Ultimate Video Converter The Ultimate Video Converter is a 3 party commercial utility that can convert video files using internal CODECs.
-
Page 83: Advanced Video Editing
DivX / Xvid. QuickTime. Flash Video. 10.6 Advanced video editing FlexiSight Manager FlexiSight Manager is a Pearpoint PC application that can perform basic editing on P340 flexiprobe video files. This program is compatible with Windows XP and Vista. It may require administrator access rights on Windows 7 and 8 and possibly addition .NET installations. - Page 84 To make an analog conversion you need video recording equipment which has analog video inputs and the ability to record to DV. To make a digital conversion you need to copy your video files to the computer and use conversion software to create a DV version of your video file.
-
Page 85: Section 11: Appendix
Section 11: Appendix 11.1 Shortcuts This appendix includes a list of keypad and keyboard shortcuts featured on the controller. Familiarizing yourself with the shortcuts will allow you to work more efficiently. You can access a list of available shortcuts by simultaneously pressing Fn + F2 on the keypad or SHIFT + F2 on the keyboard. -
Page 86: Clamp Assembly
11.2 Clamp assembly Use the optional flexiprobe clamp to attach the controller onto the pushrod reel. This is not required on P343 reels. The flexiprobe clamp is supplied in its assembled state. Figure 11.4 illustrates the clamp in exploded form in place above the reel. -
Page 87: Care And Maintenance
11.3 Care and maintenance WARNING! Clean and sanitize the P340 flexiprobe system with a suitable disinfectant at regular intervals to help prevent the risk of biological contaminations from foul water sources. Use appropriate gloves when cleaning the system. Ensure that power sources (mains or battery) are removed before any component is disconnected (or re-connected!). -
Page 88: Avc Video License
Camera Clean with water and disinfectant. Clean the lens with a lint-free cloth. Pushrod Use a cloth moistened with disinfectant. Storing the system The P340 flexiprobe is a precision system. Always store the system, including all components and accessories, in a clean and dry environment. -
Page 89: Specifications
11.5 Specifications Table 11.6: Controller specifications P340 Flexiprobe Power requirements P340(+) controller input 12-24VDC, 40W External power supply (PSU) input 100-240VAC, 50-60Hz, 1.2A P340+ automotive battery charger input 10-30VDC, 4.0A P340+ mains battery charger 110/240V options Battery capacity (P340+) 14.8V, 6.6Ah (98Wh) Battery run-time (P340+) Up to 1 day typical usage, 7 hrs view-only / 4 hrs recording 8”... - Page 90 Table 11.7: Reels and Rod specifications P341 Plumbers P341 P342 P343 Dimensions 22.4" x 16.9" x 10.6" / 22.4" x 16.9" x 33.5" x 29.5" x 32.0" x 46.0" x 18.7" 570 x 430 x 269mm 10.6" / 16.5" / 570 x 430 x 850 x 750 x 813 x 1168 x...
- Page 91 To see the full range of products and services provided by Radiodetection visit: www.radiodetection.com © 2014 Radiodetection Ltd. All rights reserved. Radiodetection is a subsidiary of SPX Corporation. Radiodetection, Pearpoint, flexitrax, flexiprobe and RD7000 are trademarks of Radiodetection Ltd. Due to a policy of continued development, we reserve the right to alter or amend any published specification without notice.
- Page 92 Radiodetection is a leading global developer and supplier of test equipment used by utility companies to help install, protect and maintain their infrastructure networks. Radiodetection is a unit of SPX (NYSE: SPW), a global Fortune 500 multi-industry manufacturing company. With headquarters in Charlotte, N.C., SPX has 15,000 employees in more than 35 countries worldwide.
Need help?
Do you have a question about the Pearpoint Flexiprobe P340 and is the answer not in the manual?
Questions and answers