SPX Pearpoint P340 flexiprobe system User Manual
Hide thumbs
Also See for Pearpoint P340 flexiprobe system:
- Operation manual (92 pages) ,
- Service manual (60 pages)
Table of Contents

Related Manuals for SPX Pearpoint P340 flexiprobe system


Summary of Contents for SPX Pearpoint P340 flexiprobe system
- Page 1 U S E r G U I d E B E d I E N U N G S a N l E I T U N G G U í a d E l U S Ua r I o G U I d E d ’...
- Page 2 © 2013 Radiodetection Ltd. All rights reserved. Radiodetection is a subsidiary of SPX Corporation. SPX, the green “>” and “X” are trademarks of SPX Corporation, Inc. Radiodetection, Pearpoint and flexiprobe are trademarks of Radiodetection Ltd. Due to a policy of continued development, we reserve the right to alter or amend any published specification without notice.
- Page 3 ENGLISH DEUTSCH ESpañoL FRaNÇaIS NEDERLaNDS...
-
Page 4: Safety Warnings
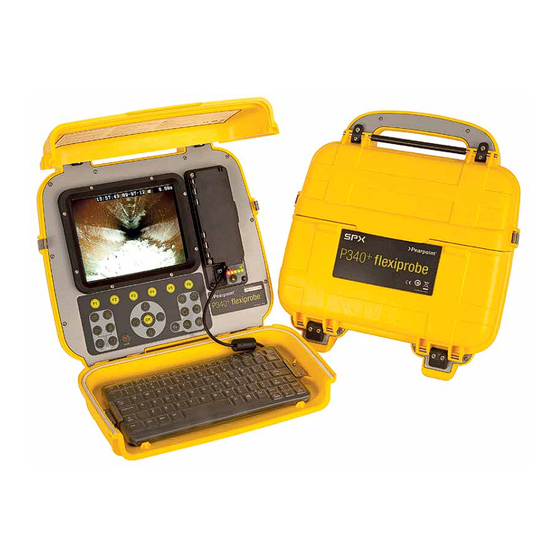
SaFETy waRNINGS The system is not earthed. If mains operated equipment is connected to the system then the external equipment must be earthed in accordance with the manufacturer’s instructions. Failure to comply with this may cause the unit to become live and be a lethal hazard. DO NOT USE the P340 flexiprobe system in potentially explosive environments. - Page 5 p340 Controller 1 On/Off Switch. 2 Keypad and function keys: Allows the operator to select functions and edit text entries. 3 Keyboard: Provides enhanced text entry capabilities and short-cuts to access system functions. 4 Display: LCD screen shows image and various on-screen information such as deployed rod length, operator generated titles, time and date.
-
Page 7: Environmental Specifications
Camera/pushrod reel 1 Pushrod Reel: Holds the pushrod on a revolving reel. The pushrod is up to 150m (500ft) in length. 2 Rod Guide: Guides the rod on and off the reel. 3 Stowage Hooks: To store the link cable on the reel. 4 Cable Socket: Connector for the link cable. -
Page 8: Quick Start Procedure
Quick start procedure • Install the controller on top of the reel if desired (optional on the P341 models). • With no power on, attach the camera and accessories to the pushrod. • Connect the link cable to the connectors on the rear of the controller and on the pushrod reel. - Page 9 Setup Reel Connect the link cable to the reel socket and to the controller socket and ensure that the connectors have been tightened. Power lead Release the side catches and open the two halves of the cover. Open the connection panel cover: 1 If required, connect the keyboard to the keyboard socket.
- Page 10 Once the system is correctly assembled and connected to a power source, you may need to configure the controller’s software. Switch the On/Off switch to On. After 5 seconds the SPX splash screen will be displayed for 5 seconds. This will be followed by the welcome screen: •...
-
Page 11: Video Recording
Jobs By entering information about your current session Client, Site and Survey the P340 Controller will organize all your recordings (videos or photos) and observations in Jobs structures. This information will also be used to generate the final detailed report (if required) by using FlexiSight manager. Consult the operational manual for more details. -
Page 12: Still Pictures
Still pictures Press the key at anytime to take still pictures. Enter job details if required: • Review Client Name, Site Address and Survey Start and Finish Survey references by pressing the keys. Press OK to Edit and then press OK again to accept the changes. •...
Need help?
Do you have a question about the Pearpoint P340 flexiprobe system and is the answer not in the manual?
Questions and answers