Advertisement
Quick Links
•
NOTE: Do NOT discard the box as it will be used during calibration of
Please read thoroughly before starting installation and check that kit contents are complete.
Troubleshooting recommendations can be found on last page.
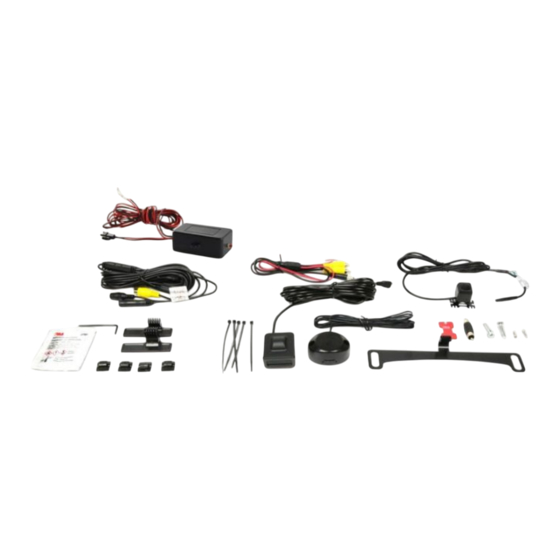
Items Included in the Kit:
4 mounting feet
3M surface prep-pad
Allen wrench
Front sensor
Speaker with volume control
Park View Pro module
Camera with mounting foot
Chassis harness for camera
Video/power harness
3M camera mount adhesive pad
Safety Precautions:
Work in well ventilated area that is clear of obstructions.
●
Secure vehicle with tire chucks in both front and rear of tires.
●
Turn vehicle accessories OFF and ensure ignition key is in OFF position.
●
Wear safety goggles and snug fitting clothes.
●
Use tools only for their intended purpose and which are in good repair.
●
Only perform this task if confidence, skill, and physical ability permit.
●
NOTE: We strive to provide accurate and up-to-date installation instructions. For the latest full color
instructions, as well as an installation video, please visit www.brandmotion.com
5000-CA6 rev2 Instructions 3-1-19
Park View Pro with Front Camera
(Kit # 5000-CA6)
system at final steps.
Tools & Supplies Needed:
Wire strippers
Wire cutters
Electrical tape
Zip ties
Plastic panel removal tools
Digital Volt Meter / BCM safe test light
Screwdriver
Socket set
Wrench
Page 1 of 5
INSTALLATION INSTRUCTIONS
Advertisement

Related Manuals for BrandMotion Curb Alert Park View Pro 5000-CA6


Summary of Contents for BrandMotion Curb Alert Park View Pro 5000-CA6
- Page 1 Only perform this task if confidence, skill, and physical ability permit. ● NOTE: We strive to provide accurate and up-to-date installation instructions. For the latest full color instructions, as well as an installation video, please visit www.brandmotion.com 5000-CA6 rev2 Instructions 3-1-19 Page 1 of 5...
- Page 2 INSTALLATION INSTRUCTIONS cloth and the 3M prep-pad or alcohol. 1. Find an appropriate place to mount all components C. Connect the 2 W HITE w ires at the plug on A. The Proximity sensor MUST be mounted as the camera harness together.(If you do close as possible to the center of the front of not want park lines to show from the...
- Page 3 INSTALLATION INSTRUCTIONS appropriate length). repeat step F). Connect the RED wire of the power harness G - Raise box straight up and as soon as the and camera harness to an Ignition sensor no longer detects the box the solid controlled power source (it is recommended tone will stop ...
- Page 4 INSTALLATION INSTRUCTIONS hear a series of beeps to notify that the device is up and running B. Simply drive up to the curb at a slow speed (the device is intended for curbs that are vertical to the parking space, curbs that are at an angle will not be detected properly), and once the curb is within programmed distance the device will beep to notify you...
-
Page 5: Troubleshooting & Faqs
INSTALLATION INSTRUCTIONS Troubleshooting/FAQ’s - My curb alert is no longer giving me audible alerts. Try holding the red calibration button down for 35-40 seconds. This will not give you any audible alert but it will hard reset the system. Afterward, start recalibration at step 1 on the top of page 3.
Need help?
Do you have a question about the Curb Alert Park View Pro 5000-CA6 and is the answer not in the manual?
Questions and answers