Advertisement
Advertisement

Subscribe to Our Youtube Channel
Related Manuals for Benchmark Scientific Incu-Shaker CO2 Mini


Summary of Contents for Benchmark Scientific Incu-Shaker CO2 Mini
- Page 1 OPERATING MANUAL...
-
Page 2: Table Of Contents
Table of Contents CONTENTS PAGE SAFETY AND GENERAL PRECAUTION FEATURES AND SPECIFICATIONS CONTROL PANEL INSTALLATION CO2 INCUBATOR OPERATION 8-11 ORBITAL SHAKER OPERATION 11-13... -
Page 3: Safety And General Precaution
1. General Information and Precautions Safety Symbols: 1.1. Precautions related to the power cable Always allow at least 3cm between the power cable and the back wall to prevent the back wall from causing pressure on the power cable. Always use the electrical plug that was supplied with this instrument. Never touch the power cord with wet hands. - Page 4 ALWAYS ensure that the instrument is connected to an outlet with specifciations that match those of the serial number label. (Over-voltage or under-voltage can damage the product and result in poor performance.) When installing the instrument, always allow a distance of at least 30cm from the back wall. Install the unit in the way that the power plug is easily accessible and can be easily pulled in case of danger.
-
Page 5: Features And Specifications
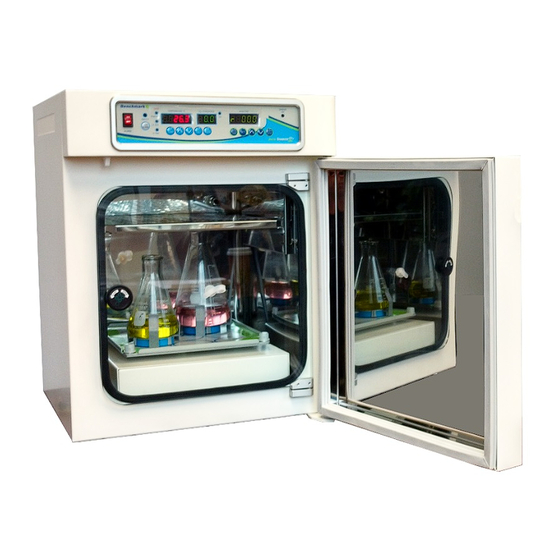
2. FEATURES AND SPECIFICATIONS: 2.1 Features 1. Excellent temperature uniformity of Temperature and CO with a built in shaker 2. 6 Side direct heat for temperature uniformity and fast recovery 3. IR CO₂ Sensor detects precise density of CO₂ 4. Outer heated door prevents condensation on glass viewing door. 5. -
Page 6: Control Panel
3.Control Panel SAFETY activation indicator: If the over-temperature safety is activated, this LED will be ON Temperature display LED window CO₂ Gas % display window Supply Status Pilot Lamp : Pilot lamp ON means inflow of gas RPM display : RPM value display Shaker Status Pilot Lamp : When Shaker is running, this lamp is flashing. -
Page 7: Installation
4. Installation Before beginning the installation, always: Inspect the packaging for damage. When the instrument is received, please inspect the item carefully to check for any potential transit damage. In the event of damage, always report the damage to the shipping carrier and your local representative immediately. -
Page 8: Co2 Incubator Operation
5. CO₂ Incubator Operation 5.1 Power switch Turn on the power switch. The digital LED will display current temperature and CO₂% in the chamber. 5.2 Setting temperature Press the "TEMP SET" key, then, the LED screen will flash and display current programmed temperature. Set up the desired temperature by pressing UP (▲) or DOWN (▼). - Page 9 CO2 gas supply control To apply a new value a. Press and hold “CAL/SET” for 10 seconds. Then, LED will be flickering as below. Channel 1 is for adjusting the calibration of the main chamber temperature. Press UP (▲) by the difference measured from the set value and the value measured by precision thermometer or thermocouple.
- Page 10 Channel 4 is for adjusting the CO2 density. Press UP (▲) by the difference measured from the set value and the value measured by precision analyzer. Press DOWN (▼)by the difference measured from the set value and the value measured by precision analyzer. Ex.) If the measured CO2 value is 5% and Display shows 4%, then press up to set to 1%.
-
Page 11: Orbital Shaker Operation
Three minutes after the temperature and the CO2 density have reached the desired setting, all alarm systems are activated. (If the temperature or CO2 does not reach the set point, the alarm system will not be activated.) If the user would like to disable these alarms, the alarm can be set to the “OFF”... - Page 12 6.3 Platform Installation The Orbi-Shaker includes a flat non-slip platform for low speed operation with many common vessels, including trays flasks and dishes. For installation of an optional platform, such as the optional MAGic Clamp platform, please follow the instructions below: Unscrew the four metal thumb screws from the corners of the internal (included) platform and remove the green rubber mat.
- Page 13 Before disconnecting, ensure that incubator is powered off. Service and Contact Service on the instrument should only be performed by qualified service personnel. To request service or technical support, please contact Benchmark Scientific or your local Benchmark Scientific representative.
Need help?
Do you have a question about the Incu-Shaker CO2 Mini and is the answer not in the manual?
Questions and answers