Advertisement
Quick Links
Quick-Start Guide
6-Slot SD™ Card Reader/Writer - Thunderbolt™ 3 - SD 4.0, UHS-II
6SD4FCRTB3C
FR: Guide de l'utilisateur - fr.startech.com
DE: Bedienungsanleitung - de.startech.com
ES: Guía del usuario - es.startech.com
NL: Gebruiksaanwijzing - nl.startech.com
PT: Guia do usuário - pt.startech.com
IT: Guida per l'uso - it.startech.com
JP: 取扱説明書 - jp.startech.com
Package Contents
• SD Card Reader/Writer x 1
• Quick-Start Guide x 1
Requirements
Host Computer
• Thunderbolt 3 Port x 1
SD Card
• (Optional) SD Card x 6
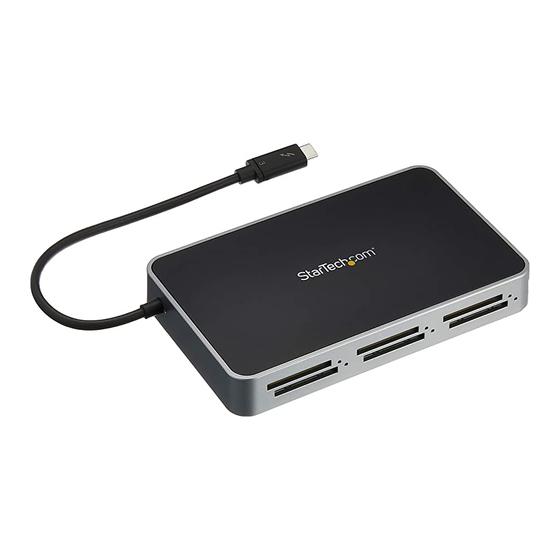
Product Diagram
Actual product may vary from photos.
Thunderbolt 3
Connector
Connecting the SD Card Reader/Writer
1. Connect the Thunderbolt 3 Connector to a Thunderbolt 3 Port on
the Host Computer.
Note: Driver installation is not required.
Note: Use the Thunderbolt 3 Port on your Host Computer with
the highest power output for the best performance. Consult the
manufacturer of your Host Computer for details regarding the
power specifications of your Thunderbolt 3 Ports.
For the latest information, technical specifications, and support for
this product, please visit www.startech.com/6SD4FCRTB3C.
SD Card Slot
Inserting an SD Card
1. Insert an SD Card, label side up, into one of the SD Card Slots on
the front of the SD Card Reader/Writer.
2. Once inserted, push the SD Card into the SD Card Slot until it
clicks into place.
Note: The Host Computer's Operating System (OS) will
automatically detect the SD Card and install the required driver
software.
3. Repeat Steps 1 and 2 for the installation of up to five additional
SD Cards.
4. Access the data stored on the SD Card inserted in step 1.
Note: The SD Cards may require formatting before they appear up
on your Host Computer.
Removing an SD Card
Warning: Removal of an SD Card before it is safe could result in the
loss or corruption of data on the SD Card.
Windows
1. Click on the Up arrow on the right side of the Taskbar.
2. The System Tray will pop up, revealing a set of icons.
3. Click on the Safely Remove Hardware icon.
4. The Safely Remove Hardware screen will appear.
5. Select the SD Card you wish to remove.
6. A message will appear telling you when it is safe to remove the
Card from the SD Card Reader/Writer.
macOS
1. Close any open screens associated with the SD Card Reader/
Writer.
2. On the Desktop, click and drag the USB storage icon to the
Trash Can icon. The Trash Can icon will turn into an Eject icon
indicating that it is safe to remove the SD Card from the SD Card
Reader/Writer.
Keyboard Shortcut (Optional)
1. Select the USB Storage icon.
2. Press Command + E to safely eject the SD Card. The SD Card can
now be safely removed from the SD Card Reader/Writer.
Physically Removing the SD Card
1. Push the SD Card into the SD Card Reader/Writer until the SD
Card clicks. The SD Card will be ejected from the SD Card Slot.
2. Pull the SD Card out of the SD Card Slot.
Manual Revision: 09/13/2018
Advertisement

Summary of Contents for StarTech.com Thunderbolt 3
-
Page 1: Package Contents
SD Card from the SD Card Connecting the SD Card Reader/Writer Reader/Writer. Keyboard Shortcut (Optional) 1. Connect the Thunderbolt 3 Connector to a Thunderbolt 3 Port on the Host Computer. 1. Select the USB Storage icon. Note: Driver installation is not required. -
Page 2: Led Indicators
• Installation och/eller montering får endast göras av behöriga yrkespersoner och enligt In no event shall the liability of StarTech.com Ltd. and StarTech.com USA LLP (or their officers, gällande lokala förordningar för säkerhet och byggnormer. directors, employees or agents) for any damages (whether direct or indirect, special, punitive, •...


Need help?
Do you have a question about the Thunderbolt 3 and is the answer not in the manual?
Questions and answers