Electro-Voice R300 User Manual
Hide thumbs
Also See for R300:
- User manual (36 pages) ,
- Quick start manual (2 pages) ,
- User manual (32 pages)
Table of Contents
Advertisement
Quick Links
Advertisement
Table of Contents

Subscribe to Our Youtube Channel
Related Manuals for Electro-Voice R300


Summary of Contents for Electro-Voice R300
- Page 1 R300 UHF WIRELESS USER GUIDE Preliminary Draft 01 Page 1 of 14 5/6/2010...
-
Page 2: Table Of Contents
TABLE OF CONTENTS Quick System Setup............. 3 Detailed System Setup & Operation 1. Receiver..............4 2. Handheld Transmitter..........7 3. Bodypack Transmitter..........8 Guidelines For Best Performance........9 Troubleshooting Guide..........10 Technical Specifications..........11 Certifications............... 12 Service and Warranty..........12 Components and Accessories........13 Appendix A Compatible Channel Groups....14 Preliminary Draft 01 Page 2 of 14 5/6/2010... - Page 3 You may have to adjust the gain (via the control next to the connector on the receiver back panel) to provide the best input volume for your mixer/amp. “Quick Set-up” is now complete. Please enjoy your R300 system. Preliminary Draft 01...
-
Page 4: Quick System Setup
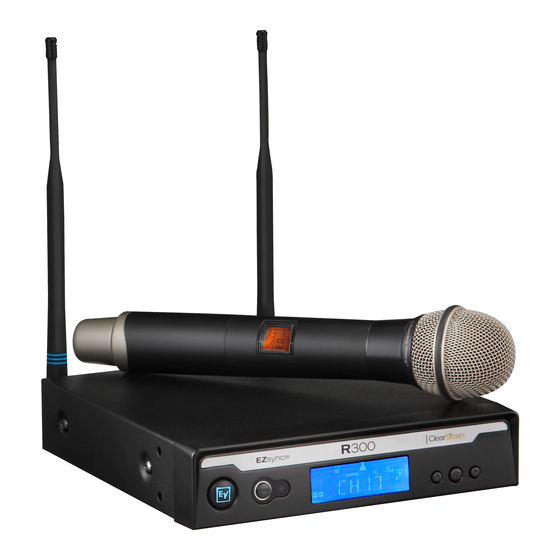
2) Detailed Component Descriptions 2.1) R300 Receiver RECEIVER CONTROLS, CONNECTORS 1. Power ON/OFF 2. SYNC Data Transfer Button 3. Infrared EZsync Window 4. Graphical Display Channel or Frequency Display b. Diversity Indicator c. RF Strength Meter d. Audio Level Meter e. -
Page 5: Detailed System Setup & Operation 1. Receiver
When the scan is complete, the display will show the clearest available channel. Use the SYNC button to transfer the new channel as in step 3. During set up make sure the mixer or amplifier input used for the R300 is muted or turned down to a minimum level. - Page 6 DISPLAY The main display can be adjusted to display the Channel number or the Frequency. Note: At any time the item not selected for the main display can be shown for 5 seconds by pushing the SET button once a. Press and hold the SET button until DISPLY shows in the display. b.
- Page 7 Press ◄ or ► to change channels Press and hold ► for 3 seconds starts ClearScan, CLEARSCAN scrolls across the display. Press SET once to display FREQUENCY or CHANNEL, whichever is not showing Press and hold SET for 3 seconds to access settings menu. Preliminary Draft 01 Page 7 of 14 5/6/2010...
-
Page 8: Handheld Transmitter
2.2) Handheld Transmitter HT-300 CONTROLS, CONNECTORS AND INDICATORS 1) Microphone Element 2) Backlit LCD Display a. Channel Frequency c. Battery Level d. Mute Indicator EZSync Infrared Port 4) Battery Cover – Screw type. Battery Compartment – Two AA Batteries 6) On/Off/Mute button 2.2) Handheld Transmitter Setup &... -
Page 9: Bodypack Transmitter
2.3) Bodypack Transmitter BP-300 CONTROLS, CONNECTORS AND INDICATORS 1) Antenna – Flexible ¼ wave antenna 2) Power On/Off/Mute Button 3) TA4 Microphone Connector 4) On/Mute LED – Green when transmitter is on, Red when muted 5) LCD Display a. Channel b. -
Page 10: Guidelines For Best Performance
Multiple Systems and R300 The ClearScan function can be used to set up any two R300 systems. Just scan with the first unit, set the transmitter to that clear channel and leave it on. Then scan the second unit for another clear channel. If 3 or more systems are used in the same room, put all of the channels in the same group as indicated by the channel map on page XX. -
Page 11: Troubleshooting Guide
Loud instrument or audio source Change the bodypack gain switch to INS Battery level low in transmitter Insert fresh batteries in transmitter Interference Another R300 system in the Make certain all units are on different channels. If installation is on the same more channels are needed call EV at 800-392-... -
Page 12: Technical Specifications
SPECIFICATIONS R300 Receiver Receiver Type Synthesized PLL Frequency Range (RF) A Band 618 – 634MHz B Band 678 – 694 MHz E Band 850 – 865 MHz Number of Channels Modulation +/- 40 kHz Diversity Antenna < 1.0 µ V for 12 dB SINAD... -
Page 13: Certifications
Conforms to European Union directives, eligible to bear CE marking as per the R&TTE directive. R300 receiver: Certified for use in Canada under RSS 210 Issue 5. HT-C and BP-C transmitters: Certified for use in Canada under RSS 123 Issue 1. -
Page 14: Components And Accessories
Appendix A Compatible Channel Groups Use only channels within the same group when using more than two R300 units in one room. If you need additional help call 1-800-392-3497 (US and Canada only). US Band A 618 - 634 MHz...
Need help?
Do you have a question about the R300 and is the answer not in the manual?
Questions and answers