Table of Contents
Advertisement
Quick Links
Advertisement
Table of Contents

Related Manuals for Prodigit 1000A


Summary of Contents for Prodigit 1000A
- Page 1 1000A Precision Current Shunt Operation Manual P/N: 9001000A01 REV: B...
- Page 2 会也可能不会含有所有所列的部件。This table shows where these substances may be found in the supply chain of Prodigit electronic information products, as of the date of sale of the enclosed product. Note that some of the component types listed above may or may not be a part of the enclosed product. ○:表示该有毒有害物质在该部...
-
Page 3: Table Of Contents
USB connection option ..................8 2-12 LAN Connection Option ..................8 2-13 Range Output ......................8 Chapter 3 Operation ......................10 3-1. 1000A current shunt Size description ..............10 3-2. Front panel description ..................10 3-3. Instructions ......................11 3-4. Protect ......................... 14 Chapter 4 Remote control programming operation .............. -
Page 4: 1000A Precision Current Shunt Operation Manual 1
1Ω, 0.1Ω, 0.01Ω, 0.001Ω to 0.0001Ω. The AC/DC measuring current range from 200mA, 2A, 20A, 200A to 1000A full scale and a built-in 5 1/2 digit precision AC/DC current meter with AUTO-ZERO and AUTO-RANGE function. Each shunt range has its own a select key provides access to the voltage output terminals of each shunt resistor. -
Page 5: Accessories
0.001mA~199.999mA / 200.00mA~400.00mA 0.01+0.005 0.5+0.05 *AC input:Range 0.2A、2A、20A、200A ≧ 5% of Range Range 1000A ≧ 10% of Range * The specifications apply when the 1000A is powered on for at least 30 minutes : General information’s : Temperature range 0 to 50℃; stated accuracy for 1 year at 23℃±2℃. -
Page 6: Options
1000A Precision Current Shunt Operation Manual 3 1-4. Options PRODIGIT PART NO. DESCRIPTIONS Quantity NOTE 64180100 1 meter welding cable 80 SQMM For 200A 709100002 Braided Connector L=1000mm 709200002 Braided Connector L=2000mm For 1000A 709300002 Braided Connector L=3000mm 15060801 Rack mount kit... -
Page 7: Chapter 2 Installation
Chapter 2 Installation 2-1 Check line voltage The 1000A precision current shunt can be operated from a 100/115 or 200/230Vac input as indicated on the label on the rear panel. The input is switchable so please make sure that the switch is set correctly for your nominal mains input before turning on the mains power. -
Page 8: Grounding Requirements
If prior to exchanging the fuse, there is any abnormal noise or odour do not use the unit. Please inform your local sales office to organise repair of the 1000A. To avoid the risk of fire or electronic shock the fuse must only be replaced with same type and rating as the original. -
Page 9: Environmental Requirements
The following procedure should be followed before applying mains power: • Check that the POWER switch is in the off (O) position • Check the rear panel voltage selector of the 1000A is correctly set. • Connect correct AC mains lead to the 1000A •... -
Page 10: Gpib & Rs232 Connection Option
1000A Precision Current Shunt Operation Manual 7 2-8 GPIB & RS232 connection option If your 1000A is fitted with GPIB + RS232 interface card then the rear panel will have the necessary interface sockets as shown in Fig 2-3. This connects the 1000A mainframe to RS232 or GPIB port of your computer. -
Page 11: Usb Connection Option
→ Pass AC/DC Key to save the New address Fig 2-5 1000A REAR PANEL 2-11 USB connection option Fig 2-6 shows the USB connector in the rear panel of 1000A mainframe. Please refer Appendix A. Fig 2-6 1000A USB Connection 2-12 LAN Connection Option Fig 2-7 shows the LAN connector in the rear panel of 1000A mainframe. - Page 12 1000A Precision Current Shunt Operation Manual 9 1000A PC817 Pin1 IF = 5mA Pin2 Pin3 Pin4 Pin5 Pin6 Pin7 Pin8 Pin9 Pin10 Pin11 Pin12 Pin13 Pin14 Fig 2-8 RS-232C RANGE OUTPUT CONNECTION OF REAR PANEL...
-
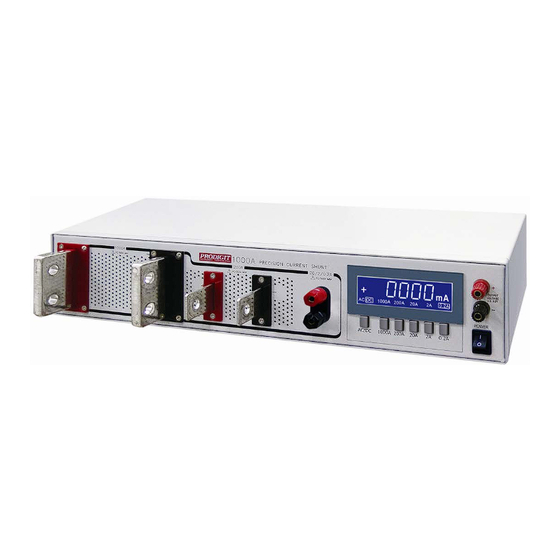
Page 13: Chapter 3 Operation
10 PRODIGIT Chapter 3 Operation This chapter describes the front panel function and operation of each 1000A current shunt, and GPIB/RS232/LAN/USB programming. 3-1. 1000A current shunt Size description Fig 3-1 1000A SIZE description 3-2. Front panel description... -
Page 14: Instructions
It indicates the model number and specifications of 1000A Current shunt. 3.3.2. Range Select There are five operating range, the sequence is 1000A, 200A, 20A, 2A, 0.2A. Pressing the "1000A" key on the 1000A current Shunt, the appropriate LCD will Illuminate according to the operating range is selected. - Page 15 12 PRODIGIT Pressing the "2A" key on the 1000A current Shunt, the appropriate LCD will Illuminate according to the operating range is selected. Pressing the "0.2A" key on the 1000A current Shunt, the appropriate LCD will Illuminate according to the operating range is selected.
- Page 16 1000A Precision Current Shunt Operation Manual 13 (CURRENT INPUT) are connecting the load in series with the panel terminals of the appropriate current shunt. Note the maximum current limit label on the panel. The RANGE selector key-switch is used to select the voltage sense terminals (VOLTAGE OUTPUT) and the 5 1/2 digit precision current meter.
-
Page 17: Protect
14 PRODIGIT 3-4. Protect The protect device (current fuse) protects the 200mA and 2A range from an input current greater than 1A and 5A. To replace the current fuse, perform the following steps: 1. Turn off the power and disconnect all equipment. -
Page 18: Introduction
NOTEBOOK PC with GPIB/RS-232 interface, the NOTEBOOK PC acts as a remote controller of 1000A precision current shunt. The summary of GPIB command 4-2. There’re two syntax commands of 1000A to be selected. One is SIMPLE mode and the other is COMPLEX mode. The summary of RS-232 Interface and command 4-3. -
Page 19: The Description Of Abbreviation
16 PRODIGIT State Commands NOTE RETURN [STATe] RANGe{SP}{0.2A│2A│20A│200A│1000A} (;│NL) 0:0.2A 1:2A [STATe] RANGe{?} (;│NL) 2:20A 3:200A 4:1000A [STATe:] MODE{SP}{DC│AC} (;│NL) [STATe:] MODE{?}(;│NL) ‘0’:DC ‘1’:AC TABLE 4-1 STAGE COMMAND SUMMARY System Commands NOTE RETURN [ SYStem:] REMOTE(;NL) Only RS232cmd [ SYStem:] LOCAL(; NL) Only RS232cmd “PRODIGIT:1000A”... -
Page 20: Remote Control Command Description
0.2A 200A 1000A [STATe ] MODE Syntax [STATe:] MODE{SP}{DC│AC} (;│NL) Purpose: Set the 1000A Current shunt AC or DC mode. Description: This command is set the 1000A Current shunt AC or DC mode. [STATe ] MODE? Syntax [STATe:] MODE?( ;│NL) -
Page 21: Appendix A 1000A Usb Instruction
18 PRODIGIT Purpose: Read the 1000A Current shunt AC or DC mode. Description: This command is read the 1000A Current shunt AC or DC mode. [SYStem:] NAME? Syntax:[SYStem:] NAME? {;NL} Purpose: Read the model number of Load Description: This command is for reading the model number of Load. If no module is Operating, the display will be lit “NULL”, or it will be lit the model number... - Page 22 1000A Precision Current Shunt Operation Manual 19...
- Page 23 20 PRODIGIT 2. After the installation, connect the 1000A and PC with USB. Then select the item USB to Serial Port (COM3), set the BAUD-RATE to 115200bps and the Flow control to Hardware. You should then be able to control the 1000A via USB on COM3.
-
Page 24: Appendix B: 1000A Lan Installation
1000A Precision Current Shunt Operation Manual 21 Appendix B: 1000A LAN Installation 1. Connect AC power and the network (LAN) cable to the 1000A mainframe. Connect the other side of the network cable to the existing network. 2. After inserting the driver CD-ROM, run LAN\ETM.EXE from the CD. The Ethernet Manager screen will be displayed as shown in Fig C1-1. - Page 25 22 PRODIGIT 4. The Controller Setup page should be accessible, once everything is set correctly. This allows greater control over the communications interface. 5. Insert the following into the controller set up screen: IP Address: as recommended according to your network...
Need help?
Do you have a question about the 1000A and is the answer not in the manual?
Questions and answers