Ceragon FibeAir IP-20G Installation Manual
Hide thumbs
Also See for FibeAir IP-20G:
- Technical description (266 pages) ,
- Installation manual (49 pages) ,
- User manual (20 pages)

Related Manuals for Ceragon FibeAir IP-20G


Summary of Contents for Ceragon FibeAir IP-20G
-
Page 1: Installation Guide
FibeAir® IP-20G Installation Guide DOC-00041192 Rev A.01 June 2014 Copyright © 2014 by Ceragon Networks Ltd. All rights reserved. -
Page 2: Information To User
Installation Guide Notice This document contains information that is proprietary to Ceragon Networks Ltd. No part of this publication may be reproduced, modified, or distributed without prior written authorization of Ceragon Networks Ltd. This document is provided as is, without warranty of any kind. -
Page 3: Table Of Contents
FibeAir® IP-20G Installation Guide Table of Contents 1. FibeAir IP-20G Hardware Overview ..............9 Ethernet Traffic Interfaces .................... 10 1.1.1 Ethernet Traffic Interface LEDs ..................10 1.1.2 Ethernet Traffic Interface Pin-Outs ................11 Ethernet Management Interfaces ................. 12 1.2.1 Management Interface Cable Options ................. 12 1.2.2 Management Interface LEDs .................. - Page 4 Logging On ........................33 Configuration ........................ 34 6. Specifications ....................35 Environmental Specifications for IDU ................35 Environmental Specifications for RFU ................. 35 Mechanical Specifications .................... 35 Power Consumption Specifications ................36 Ceragon Proprietary and Confidential Page 4 of 36...
- Page 5 Do not look into coaxial connectors at closer than reading distance (1 foot). Do not look into an open waveguide unless you are absolutely sure that the power is turned off. Ceragon Proprietary and Confidential Page 5 of 36...
- Page 6 Installation Codes: The equipment must be installed according to country national electrical codes. For North America, equipment must be installed in accordance to the US National Electrical Code, Articles 110-16, 110-17 and 110-18, and the Canadian Electrical Code, Section 12. Ceragon Proprietary and Confidential Page 6 of 36...
- Page 7 Diphenyl (Pb) (Hg) (Cd) (Cr VI) (PBB) Ethers (PBDE) PCB/Circuit Comply Comply Comply Comply Comply Comply Modules Mechanical Comply Comply Comply Comply Comply Comply Parts Cables Comply Comply Comply Comply Comply Comply Ceragon Proprietary and Confidential Page 7 of 36...
-
Page 8: About This Guide
Consult the Release Notes for the functionality supported in the specific release you are using. Target Audience This guide is intended for use by personnel of all levels certified by Ceragon personnel such as system engineers, technicians, or supervisors. Related Documents ... -
Page 9: Fibeair Ip-20G Hardware Overview
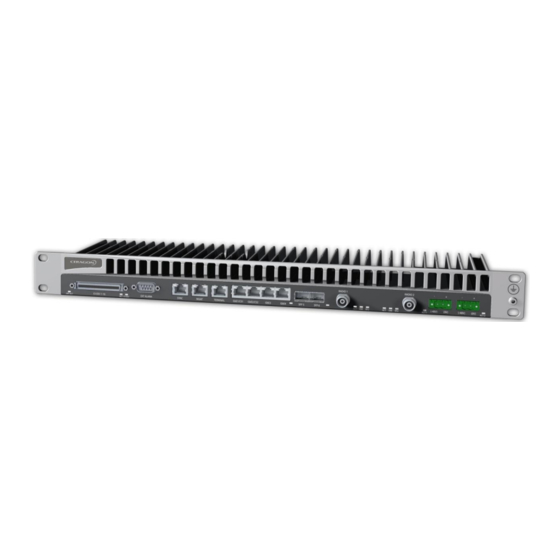
Installation Guide FibeAir IP-20G Hardware Overview FibeAir IP-20G is a compact unit that fits in a single rack unit, with a passive cooling system that eliminates the need for fans. An IP-20G system consists of an IP-20G indoor unit (IDU) and one or two radio frequency units (RFUs). A coaxial cable connects the IDU to each RFU, transmits traffic and management data between the IDU and the RFU, and provides DC -48V power to the RFU. -
Page 10: Ethernet Traffic Interfaces
FibeAir® IP-20G Installation Guide Ethernet Traffic Interfaces The front panel of the FibeAir IP-20G contains four electrical and two optical GE Ethernet traffic interfaces: 2 x GE dual mode electrical or cascading interfaces (RJ-45) – GbE1/CS1, GbE2/CS2 2 x GE electrical interfaces (RJ-45) –GbE3, GbE4 ... -
Page 11: Ethernet Traffic Interface Pin-Outs
BI_DA+ (Bi-directional pair +A) BI_DA- (Bi-directional pair -A) BI_DB+ (Bi-directional pair +B) BI_DC+ (Bi-directional pair +C) BI_DC- (Bi-directional pair -C) BI_DB- (Bi-directional pair +B) BI_DD+ (Bi-directional pair +D) BI_DD- (Bi-directional pair -D) Ceragon Proprietary and Confidential Page 11 of 36... -
Page 12: Ethernet Management Interfaces
Off – The cable is not connected or the signal is lost. Note: The management interfaces cannot be shut down. Green – The interface is enabled and the link is operational. Blinking Green – The interface is transmitting and/or receiving management traffic. Ceragon Proprietary and Confidential Page 12 of 36... -
Page 13: Management Interface Pin-Outs
Port 1 – RX- Port 2 – RX+ Port 2 – RX- TDM Interfaces (E1/DS1 1x16) (Optional) Optionally, FibeAir IP-20G can be ordered with an MDR69 connector in which 16 E1/DS1 interfaces are available (ports 1 through 16). 1.3.1 E1/DS1 Interface LEDs The E1/DS1 interface has the following LEDs ... -
Page 14: E1/Ds1 Interface Pin-Outs
TWISTED PAIR OUT - RING8 OUT - TIP9 Ch9 Tx TWISTED PAIR OUT - RING9 OUT - TIP10 Ch10 Tx TWISTED PAIR OUT - RING10 OUT - TIP11 Ch11 Tx TWISTED PAIR Ceragon Proprietary and Confidential Page 14 of 36... - Page 15 TWISTED PAIR IN - RING8 IN - TIP9 Ch9 Rx TWISTED PAIR IN - RING9 IN - TIP10 Ch10 Rx TWISTED PAIR IN - RING10 IN - TIP11 Ch11 Rx TWISTED PAIR Ceragon Proprietary and Confidential Page 15 of 36...
-
Page 16: Radio Interfaces
SHELL SHIELD Radio Interfaces FibeAir IP-20G includes one or two radio interfaces, depending on the hardware assembly option that was selected. Each radio interface uses a TNC connector type. Each radio interface is connected to an RFU via coaxial cable. - Page 17 Red – A cable is disconnected, or a major or critical RFU alarm is present. Blinking Green – An RF loopback has been activated, and the result is Blinking Red – An RF loopback has been activated, and the result is Failed. Radio Interface LEDs Ceragon Proprietary and Confidential Page 17 of 36...
-
Page 18: Power Interfaces
FibeAir® IP-20G Installation Guide Power Interfaces FibeAir IP-20G receives an external supply of -48V current via one or two power interfaces (the second power interface is optional for power redundancy). The IP-20G monitors the power supply for under-voltage and includes reverse polarity protection, so that if the positive (+) and negative (-) inputs are mixed up, the system remains shutdown. -
Page 19: Synchronization Interface
FibeAir® IP-20G Installation Guide Synchronization Interface FibeAir IP-20G includes an RJ-45 synchronization interface for T3 clock input and T4 clock output. The interface is labeled SYNC. 1.6.1 Synchronization Interface LEDs The synchronization interface contains two LEDs, one on the upper left of the interface and one on the upper right of the interface, as follows: ... -
Page 20: Synchronization Interface Pin-Outs
T4_OUT_P 1PPS_N ToD_P (or PPS_IN_P) ToD_N (or PPS_IN_N) Terminal Interface FibeAir IP-20G includes an RJ-45 terminal interface (RS-232). A local craft terminal can be connected to the terminal interface for local CLI management of the unit. 1.7.1 Terminal Interface Pin-Outs... -
Page 21: External Alarms
External input alarm #1 External input alarm #2 External input alarm #3 External input alarm #4 External input alarm #5 Relay #1, normally closed pin Relay #1, common pin Relay #1, normally open pin Ceragon Proprietary and Confidential Page 21 of 36... -
Page 22: Unit/Act Led
Yellow – Power is on, and there are minor alarms or warnings on the unit. Red – Power is on, and there are major or critical alarms on the unit. Unit/ACT LED Ceragon Proprietary and Confidential Page 22 of 36... -
Page 23: Preparing For Installation
Inspect for any damage on the cases and equipment. Report any damage or discrepancy to a Ceragon representative, by e-mail or fax. Unpacking Equipment at the Site The equipment is packed in sealed plastic bags and moisture absorbing bags are inserted. - Page 24 To avoid malfunctioning or personnel injuries, equipment or accessories/kits/plug-in unit installation, requires qualified and trained personnel. Changes or modifications not expressly approved by Ceragon Networks could void the user's authority to operate the equipment Where special cables, shields, adapters and grounding kits are supplied or described in this manual, these items must be used, to comply with the relevant regulations.
-
Page 25: Installing The Ip-20G Idu
FibeAir® IP-20G Installation Guide Installing the IP-20G IDU This section provides instructions for installing a FibeAir IP-20G IDU. IDU (Full Configuration) Kits required to perform the installation Description Quantity IP-20G chassis 19" rack / sub-rack SM-Card Cover Tools Philips screwdriver ... -
Page 26: Grounding The Ip-20G
1 Connect a grounding wire first to the single-point stud shown in the figure below, and then to the rack, using a single screw and two washers. Note: The grounding wire must be 16 AWG or thicker. Ceragon Proprietary and Confidential Page 26 of 36... -
Page 27: Replacing An Ip-20G Idu Or Sm-Card
In some cases, you may need to replace the SM-Card itself in order to upgrade the unit’s configuration. To remove the SM-Card Cover: 1 Loosen the screws of the SM-Card Cover and remove it from the IDU. Ceragon Proprietary and Confidential Page 27 of 36... - Page 28 SM-Card is installed. 3 Gently place the SM-Card Cover in its place and tighten the screws, using a Phillips screwdriver. Ceragon Proprietary and Confidential Page 28 of 36...
-
Page 29: Connecting The Power Cable
Power supply grounding should be in according with the following figure: Power Supply Grounding FibeAir IP-20G utilizes a single-feed power interface. Optionally, IP-20G can be ordered with a second power interface for power redundancy. A power cable connector is included with the IP-20G unit. - Page 30 5 Secure the wires in the connector with the screws. 6 Plug the connector into the IP-20G power interface and tighten the two screws on the sides of the connector to secure the connector. Connecting the Power Cable Ceragon Proprietary and Confidential Page 30 of 36...
-
Page 31: Power Supply Notes
In a building installation, the circuit breaker shall be readily accessible and incorporated external to the equipment. The maximum rating of the overcurrent protection shall be 10 Amp, while the maximum current rating is 5 Amp. Ceragon Proprietary and Confidential Page 31 of 36... -
Page 32: Performing Initial Configuration
IP-20G unit and lists the configuration steps that should be performed in order to enable basic radio connectivity. For detailed configuration instructions, refer to the FibeAir IP-20G User Guide, DOC-00041190. Establishing a Connection You can connect to the IP-20G unit using a TP cable with a LAN connection or using a Serial RS-232 cable. -
Page 33: Connecting To The Unit With A Lan Connection
5.1.2 Connecting to the Unit with a LAN Connection FibeAir IP-20G contains two FE management interfaces, which connect to a single RJ-45 physical connector on the front panel (MGMT). For details on which type of cable to use to utilize either one or both management interfaces, refer to Management Interface Cable Options on page 12. -
Page 34: Configuration
In addition to setting the IP addresses, the following configuration steps should be performed in order to establish basic connectivity. For a detailed description of these procedures, refer to the FibeAir IP-20G User Guide, DOC-00036540. ... -
Page 35: Specifications
(male) to the RFU. RFU-C Mechanical Specifications Height: 200 mm/7.87” Width: 200 mm/7.87” RFU-C Dimensions Depth: 85 mm/3.35” Weight: 4kg/9 lbs. RFU-C Standard 50 mm-120 mm/2”-4.5” (subject to vendor and antenna Mounting OD Pole size) Ceragon Proprietary and Confidential Page 35 of 36... -
Page 36: Power Consumption Specifications
IDU Eth-only with single RFU 23.5W Addition for second RFU 2.9W Addition for 16 E1s 1+0: 22 6-26 GHz RFU only. 1+1: 39 RFU-C 1+0: 26 28-38 GHz RFU only. 1+1: 43 Ceragon Proprietary and Confidential Page 36 of 36...
Need help?
Do you have a question about the FibeAir IP-20G and is the answer not in the manual?
Questions and answers